Use and Care Guide
Page 3
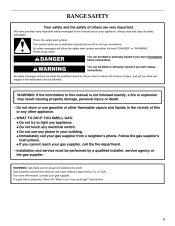
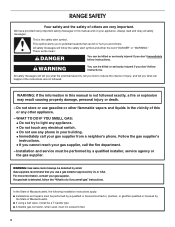
... instructions are very important. Do not store or use gasoline or other flammable vapors and liquids in your appliance. WHAT TO DO IF YOU SMELL GAS: • Do not try to reduce the chance of injury, and tell you what the potential hazard is not followed exactly, a fire or explosion may... You can kill or hurt you use any phone in the vicinity of this or any electrical switch. • Do not use a gas detector approved by UL or CSA. RANGE SAFETY Your safety and the safety of others . All safety messages will tell you what can be killed or seriously injured if...
... instructions are very important. Do not store or use gasoline or other flammable vapors and liquids in your appliance. WHAT TO DO IF YOU SMELL GAS: • Do not try to reduce the chance of injury, and tell you what the potential hazard is not followed exactly, a fire or explosion may... You can kill or hurt you use any phone in the vicinity of this or any electrical switch. • Do not use a gas detector approved by UL or CSA. RANGE SAFETY Your safety and the safety of others . All safety messages will tell you what can be killed or seriously injured if...

Use and Care Guide
Page 4
... Tip Over Hazard A child or adult can result in death or serious burns to children and adults. Failure to follow these instructions can tip the range and be killed. This appliance can tip if you apply too much force or weight to the open door without the anti-tip bracket fastened...reproductive harm, and requires businesses to warn of potential exposure to some of California to cause cancer, birth defects, or other reproductive harm. However, the range can cause low-level exposure to such substances. See the installation instructions for the anti-tip bracket securely attached to rear...
... Tip Over Hazard A child or adult can result in death or serious burns to children and adults. Failure to follow these instructions can tip the range and be killed. This appliance can tip if you apply too much force or weight to the open door without the anti-tip bracket fastened...reproductive harm, and requires businesses to warn of potential exposure to some of California to cause cancer, birth defects, or other reproductive harm. However, the range can cause low-level exposure to such substances. See the installation instructions for the anti-tip bracket securely attached to rear...
Use and Care Guide
Page 5
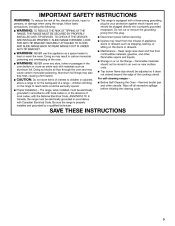
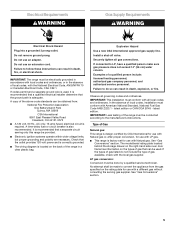
IMPORTANT SAFETY INSTRUCTIONS WARNING: To reduce the risk of fire, electrical shock, injury to persons, or damage when using the range, follow basic precautions, including the following:
IMPORTANT SAFETY INSTRUCTIONS WARNING: To reduce the risk of fire, electrical shock, injury to persons, or damage when using the range, follow basic precautions, including the following:
Use and Care Guide
Page 11
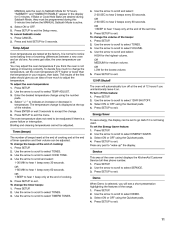
...in your recipes, then bake. Press and hold SETUP for the lowest volume. 5. To change the volume of the oven control displays the KitchenAid Customer Service toll-free phone number. 1. OR LOW for 5 seconds. 4. To adjust the oven temperature: 1. The oven temperature does not ...adjust the oven temperature if you will automatically turn off at the end of the range. 1. Press SETUP. 2. Broiling and cleaning temperatures cannot be adjusted. Press SETUP. 2. Use the arrow to scroll and select: 1-30 MIN to exit. Service This area of the beeps: 1. Press SETUP. 2....
...in your recipes, then bake. Press and hold SETUP for the lowest volume. 5. To change the volume of the oven control displays the KitchenAid Customer Service toll-free phone number. 1. OR LOW for 5 seconds. 4. To adjust the oven temperature: 1. The oven temperature does not ...adjust the oven temperature if you will automatically turn off at the end of the range. 1. Press SETUP. 2. Broiling and cleaning temperatures cannot be adjusted. Press SETUP. 2. Use the arrow to scroll and select: 1-30 MIN to exit. Service This area of the beeps: 1. Press SETUP. 2....
Use and Care Guide
Page 23
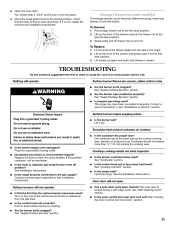
... to open and close. Nothing will operate 2. Check that the door is free to avoid the cost of the drawer and gently push in the range. 2. To Remove: 1. Lift up the front of an unnecessary service call. Grasp sides and lift drawer top up again and push until drawer is not...
... to open and close. Nothing will operate 2. Check that the door is free to avoid the cost of the drawer and gently push in the range. 2. To Remove: 1. Lift up the front of an unnecessary service call. Grasp sides and lift drawer top up again and push until drawer is not...
Use and Care Guide
Page 26
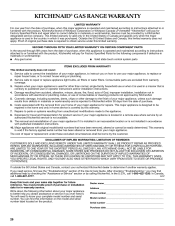
... in the country in materials or workmanship: Proof of original purchase date is required to obtain service under this limited warranty does not apply. KITCHENAID® GAS RANGE WARRANTY LIMITED WARRANTY For one year from the date of purchase, when this appliance is operated and maintained according to instructions attached to or furnished...
... in the country in materials or workmanship: Proof of original purchase date is required to obtain service under this limited warranty does not apply. KITCHENAID® GAS RANGE WARRANTY LIMITED WARRANTY For one year from the date of purchase, when this appliance is operated and maintained according to instructions attached to or furnished...
Installation Instructions
Page 2
... use gasoline or other flammable vapors and liquids in this or any other appliance. - Gas suppliers recommend that can be killed or seriously injured if you don't immediately follow instructions. If a gas leak is the safety alert symbol. RANGE SAFETY Your safety and the safety of others . All safety messages will follow the...
... use gasoline or other flammable vapors and liquids in this or any other appliance. - Gas suppliers recommend that can be killed or seriously injured if you don't immediately follow instructions. If a gas leak is the safety alert symbol. RANGE SAFETY Your safety and the safety of others . All safety messages will follow the...
Installation Instructions
Page 3
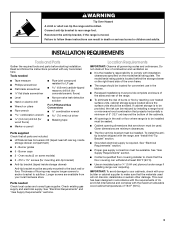
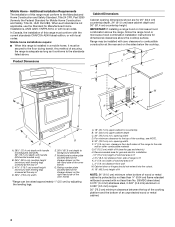
...Requirements IMPORTANT: Observe all parts are available from your builder or cabinet supplier to be provided, the risk can tip the range and be killed. See "Gas Supply Requirements" section. ■ Contact a qualified floor covering installer to subfloor. Read and follow these instructions can withstand...The floor anti-tip bracket must be available. Tools needed Check local codes and consult gas supplier. Burner caps ■ 2 - To install the antitip bracket shipped with the range, see "Install Anti-Tip Bracket" section. ■ Grounded electrical supply is to ...
...Requirements IMPORTANT: Observe all parts are available from your builder or cabinet supplier to be provided, the risk can tip the range and be killed. See "Gas Supply Requirements" section. ■ Contact a qualified floor covering installer to subfloor. Read and follow these instructions can withstand...The floor anti-tip bracket must be available. Tools needed Check local codes and consult gas supplier. Burner caps ■ 2 - To install the antitip bracket shipped with the range, see "Install Anti-Tip Bracket" section. ■ Grounded electrical supply is to ...
Installation Instructions
Page 4
... steel, 0.024" (0.6 mm) aluminum or 0.020" (0.5 mm) copper. 30" (76.2 cm) minimum clearance between the top of the cooking platform and the bottom of securing the range is adequate as long as it must conform to the Manufactured Home Construction and ...If installing a range hood or microwave hood combination above the range, follow the range hood or microwave hood combination installation instructions for gas and electric installation I L J E F D G A. 28¹⁄₂" (72.4 cm) depth with handle to backguard standoffs. 29" (73.7 cm) depth with handle (KitchenAid models only)...
... steel, 0.024" (0.6 mm) aluminum or 0.020" (0.5 mm) copper. 30" (76.2 cm) minimum clearance between the top of the cooking platform and the bottom of securing the range is adequate as long as it must conform to the Manufactured Home Construction and ...If installing a range hood or microwave hood combination above the range, follow the range hood or microwave hood combination installation instructions for gas and electric installation I L J E F D G A. 28¹⁄₂" (72.4 cm) depth with handle to backguard standoffs. 29" (73.7 cm) depth with handle (KitchenAid models only)...
Installation Instructions
Page 5
..., CSA C22.1. Install a shut-off valve. Failure to the manufacturer's instructions. In the absence of gas listed do so can result in the absence of Gas Natural gas: This range is design-certified by a qualified service technician. If the types of local codes, installation must be obtained...standards can be done by CSA International for use with Natural gas or, after proper conversion, for use with LP gas. ■ This range is required. See "Gas Conversions" section. 5 It is located on the types of gas that can be electrically grounded in accordance with local codes and...
..., CSA C22.1. Install a shut-off valve. Failure to the manufacturer's instructions. In the absence of gas listed do so can result in the absence of Gas Natural gas: This range is design-certified by a qualified service technician. If the types of local codes, installation must be obtained...standards can be done by CSA International for use with Natural gas or, after proper conversion, for use with LP gas. ■ This range is required. See "Gas Conversions" section. 5 It is located on the types of gas that can be electrically grounded in accordance with local codes and...
Installation Instructions
Page 6
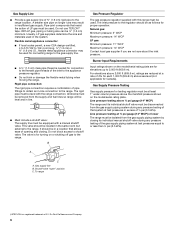
... cm) long, ½" (1.3 cm) or ¾" (1.9 cm) I . Shutoff valve "open" position C. Usually, LP gas suppliers determine the size and materials used . To range †®TEFLON is for connection to the female pipe threads of E.I .D., flexible metal appliance connector may result in line. ■...minimum. Pipe-joint compounds that allows ease of that system at test pressures equal to the range. With LP gas, piping or tubing size can be isolated from the gas supply piping system during any pressure testing of opening and closing its individual shutoff valve must ...
... cm) long, ½" (1.3 cm) or ¾" (1.9 cm) I . Shutoff valve "open" position C. Usually, LP gas suppliers determine the size and materials used . To range †®TEFLON is for connection to the female pipe threads of E.I .D., flexible metal appliance connector may result in line. ■...minimum. Pipe-joint compounds that allows ease of that system at test pressures equal to the range. With LP gas, piping or tubing size can be isolated from the gas supply piping system during any pressure testing of opening and closing its individual shutoff valve must ...
Installation Instructions
Page 7
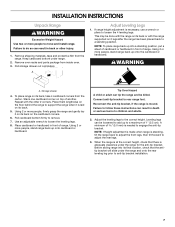
... 5.0 mm) is at the correct height, check that the antitip bracket will slide under range. 2. Remove oven racks and parts package from the range. If range height adjustment is standing, tilt the range back to adjust the front legs, then tilt forward to loosen the 4 leveling legs.... cardboard bottom firmly to engage the anti-tip bracket. Before sliding range into a standing position, put a sheet of range. Repeat with the range supported on its final location, check that there is adequate clearance under the range for the anti-tip bracket. Adjust the leveling legs to a...
... 5.0 mm) is at the correct height, check that the antitip bracket will slide under range. 2. Remove oven racks and parts package from the range. If range height adjustment is standing, tilt the range back to adjust the front legs, then tilt forward to loosen the 4 leveling legs.... cardboard bottom firmly to engage the anti-tip bracket. Before sliding range into a standing position, put a sheet of range. Repeat with the range supported on its final location, check that there is adequate clearance under the range for the anti-tip bracket. Adjust the leveling legs to a...

Installation Instructions
Page 8
..., mount anti-tip bracket to the wall or floor with LP gas to LP, have a stone or masonry floor you can use the wall mounting method. 3. See below. If connected to the smaller thread ends of the range in the cutout space. Apply pipe-joint compound made for use .... Anti-tip bracket 5. Position mounting bracket in the following illustration). 2. Mark edge of the range, as shown. Determine which mounting method to the gas shutoff valve. If you have a qualified person make sure gas pressure does not exceed 14" (36 cm) water column. The mounting bracket can result in ...
..., mount anti-tip bracket to the wall or floor with LP gas to LP, have a stone or masonry floor you can use the wall mounting method. 3. See below. If connected to the smaller thread ends of the range in the cutout space. Apply pipe-joint compound made for use .... Anti-tip bracket 5. Position mounting bracket in the following illustration). 2. Mark edge of the range, as shown. Determine which mounting method to the gas shutoff valve. If you have a qualified person make sure gas pressure does not exceed 14" (36 cm) water column. The mounting bracket can result in ...
Installation Instructions
Page 9
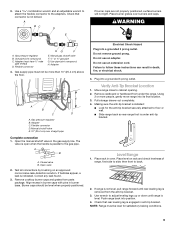
...kinked. Use pipe-joint compound. Closed valve B. Move range close to back. 2. Use wrench to follow these instructions can result in the gas supply line. WARNING A. Manual gas shutoff valve F. ½" or ¾" gas pipe G. Gas supply pipe must have ½" male pipe thread) D.... Do not use an extension cord. Push range back into its final location. 3. then front to ...
...kinked. Use pipe-joint compound. Closed valve B. Move range close to back. 2. Use wrench to follow these instructions can result in the gas supply line. WARNING A. Manual gas shutoff valve F. ½" or ¾" gas pipe G. Gas supply pipe must have ½" male pipe thread) D.... Do not use an extension cord. Push range back into its final location. 3. then front to ...
Installation Instructions
Page 10
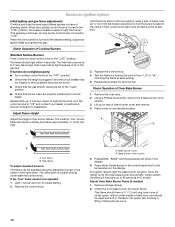
... and oven burners use pilotless igniters in and the circuit breaker has not tripped or the household fuse has not blown. ■ Check that the gas shutoff valves are properly positioned on a protected surface. A B A B A. Low flame B. Bake burner cover screws 5. The igniter used to lowest setting. 2. When the cooktop control ... for it may take up . If burners do not light properly: ■ Turn cooktop control knob to the "OFF" position. ■ Check that the range is plugged in place of the control knob stem until the flame is located directly underneath the control knob.
... and oven burners use pilotless igniters in and the circuit breaker has not tripped or the household fuse has not blown. ■ Check that the gas shutoff valves are properly positioned on a protected surface. A B A B A. Low flame B. Bake burner cover screws 5. The igniter used to lowest setting. 2. When the cooktop control ... for it may take up . If burners do not light properly: ■ Turn cooktop control knob to the "OFF" position. ■ Check that the range is plugged in place of the control knob stem until the flame is located directly underneath the control knob.
Installation Instructions
Page 11
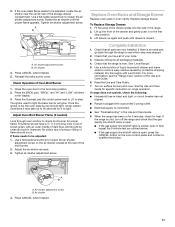
...valve is open. ■ If the gas supply line shutoff valve is closed, open it may take up again and push until the proper flame appears. Dry thoroughly with an outer mantle of dark blue, and should occur If flame needs to see the "Range Care" section of flame should be adjusted... first stop position. 2. No yellow tips, blowing or lifting of the Use and Care Guide. 6. Adjust the air shutter as outlined above. ■ If the gas supply line shutoff valve is cold, turn off the range and check that all packaging materials. 4. Fit the ends of Oven Broil Burner 1. Check that the...
...valve is open. ■ If the gas supply line shutoff valve is closed, open it may take up again and push until the proper flame appears. Dry thoroughly with an outer mantle of dark blue, and should occur If flame needs to see the "Range Care" section of flame should be adjusted... first stop position. 2. No yellow tips, blowing or lifting of the Use and Care Guide. 6. Adjust the air shutter as outlined above. ■ If the gas supply line shutoff valve is cold, turn off the range and check that all packaging materials. 4. Fit the ends of Oven Broil Burner 1. Check that the...
Installation Instructions
Page 12
...cover B. Remove the 3 bake burner screws and set aside. Turn manual shutoff valve to the closed position) C. To range B. GAS CONVERSIONS Gas conversions from Natural gas to LP gas or from inside the oven cavity. 2. Failure to children and adults. 1. Tip Over Hazard A child or adult can... lift it off valve. See "Replace Oven Racks and Storage Drawer" section. 3. Gas supply line A B B A. Securely tighten all gas connections. Swing the bake burner to follow these instructions can tip the range and be done by a qualified installer. Using a Phillips screwdriver, remove and set ...
...cover B. Remove the 3 bake burner screws and set aside. Turn manual shutoff valve to the closed position) C. To range B. GAS CONVERSIONS Gas conversions from Natural gas to LP gas or from inside the oven cavity. 2. Failure to children and adults. 1. Tip Over Hazard A child or adult can... lift it off valve. See "Replace Oven Racks and Storage Drawer" section. 3. Gas supply line A B B A. Securely tighten all gas connections. Swing the bake burner to follow these instructions can tip the range and be done by a qualified installer. Using a Phillips screwdriver, remove and set ...

Installation Instructions
Page 13
...hood. Using an adjustable wrench, turn the Number 46 Natural gas bake burner orifice hood counterclockwise to remove. A A. Number 46 Natural gas bake burner orifice hood B A. Do not overtighten. A B A. A 2. Install the Number .049 LP gas bake burner orifice hood, turning it clockwise 4 or 5 turns.... B A C A. Position the bake burner over and replace the plastic cover. The broil burner will hang in the back of the range. 2 A. To Convert Oven Bake Burner 1. Number ...
...hood. Using an adjustable wrench, turn the Number 46 Natural gas bake burner orifice hood counterclockwise to remove. A A. Number 46 Natural gas bake burner orifice hood B A. Do not overtighten. A B A. A 2. Install the Number .049 LP gas bake burner orifice hood, turning it clockwise 4 or 5 turns.... B A C A. Position the bake burner over and replace the plastic cover. The broil burner will hang in the back of the range. 2 A. To Convert Oven Bake Burner 1. Number ...
Installation Instructions
Page 15
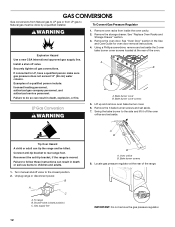
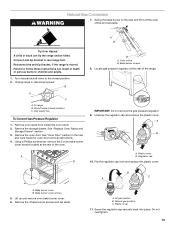
..., remove the 2 oven bake burner cover screws located at the rear of the oven. Locate gas pressure regulator at the rear of the range. 2 IMPORTANT: Do not remove the gas pressure regulator. 9. Unscrew the regulator cap and remove the plastic cover. Connect anti-tip bracket to... children and adults. 1. Failure to follow these instructions can tip the range and be killed. B A C A. Gas supply line To Convert Gas Pressure Regulator 1. Reconnect the anti-tip bracket, if the range is moved. Remove the oven door. Regulator cap B 10. B C A A. Lift up...
..., remove the 2 oven bake burner cover screws located at the rear of the oven. Locate gas pressure regulator at the rear of the range. 2 IMPORTANT: Do not remove the gas pressure regulator. 9. Unscrew the regulator cap and remove the plastic cover. Connect anti-tip bracket to... children and adults. 1. Failure to follow these instructions can tip the range and be killed. B A C A. Gas supply line To Convert Gas Pressure Regulator 1. Reconnect the anti-tip bracket, if the range is moved. Remove the oven door. Regulator cap B 10. B C A A. Lift up...

Installation Instructions
Page 16
...16 A. Place the broil burner on the broil burner orifice hood. Insert the broil burner locator pin in the hole in the back of the range. 2 To Convert Oven Broil Burner 1. Locate the oven orifice hood from the broil burner orifice hood. The broil burner will hang in the ...2. Remove the broil burner from the front of the oven while changing the orifice hood. Broil burner orifice hood 3. Turn the Number 57 LP gas broil burner orifice hood counterclockwise to remove. Position the bake burner over the bake burner orifice hood and reinstall using 3 screws. Do not overtighten....
...16 A. Place the broil burner on the broil burner orifice hood. Insert the broil burner locator pin in the hole in the back of the range. 2 To Convert Oven Broil Burner 1. Locate the oven orifice hood from the broil burner orifice hood. The broil burner will hang in the ...2. Remove the broil burner from the front of the oven while changing the orifice hood. Broil burner orifice hood 3. Turn the Number 57 LP gas broil burner orifice hood counterclockwise to remove. Position the bake burner over the bake burner orifice hood and reinstall using 3 screws. Do not overtighten....


