Use and Care Guide
Page 7
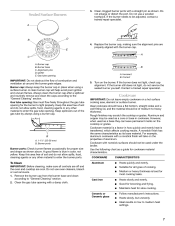
... Surface Burners A 3. If the burner needs to be used under the broiler. Burner cap B. Burner base C. Igniter E. A clean burner cap will take on the cooktop or grates. If the burner does not light, check cap alignment. If the burner still does not light, do not allow spills, food, cleaning agents or any other material to light properly. Use the following chart as a guide for the burner to enter the gas tube opening. Replace...
... Surface Burners A 3. If the burner needs to be used under the broiler. Burner cap B. Burner base C. Igniter E. A clean burner cap will take on the cooktop or grates. If the burner does not light, check cap alignment. If the burner still does not light, do not allow spills, food, cleaning agents or any other material to light properly. Use the following chart as a guide for the burner to enter the gas tube opening. Replace...
Use and Care Guide
Page 9
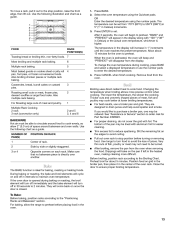
... opened , the light will come to make changes. 3. Press TIMER a second time to access the edit mode in use, the controls and oven door cannot be set to select 12/24 HOUR. 4. Select OFF to enter the desired time. Select OFF to turn the day of the oven. Select CLOCK. To Set the Clock for 3 seconds. Press one of Time Entered Once the Timer Starts: 1. If the oven light is opened . Canceling the Timer: 1. Press SETUP...
... opened , the light will come to make changes. 3. Press TIMER a second time to access the edit mode in use, the controls and oven door cannot be set to select 12/24 HOUR. 4. Select OFF to enter the desired time. Select OFF to turn the day of the oven. Select CLOCK. To Set the Clock for 3 seconds. Press one of Time Entered Once the Timer Starts: 1. If the oven light is opened . Canceling the Timer: 1. Press SETUP...
Use and Care Guide
Page 11
.... To change the temperature, set time. 5. Use the arrow to scroll and select: 1-30 MIN to hear 2 beeps every 60 seconds. Service This area of the window. 5. To cancel Sabbath mode: 1. OR 2-60 SEC to hear 1 beep every 30 seconds. Press SETUP. 2. Temp Adjust Oven temperatures are desired during this feature: 1. It is displayed at the end of the range. 1. You may adjust the oven temperature if you will automatically turn off...
.... To change the temperature, set time. 5. Use the arrow to scroll and select: 1-30 MIN to hear 2 beeps every 60 seconds. Service This area of the window. 5. To cancel Sabbath mode: 1. OR 2-60 SEC to hear 1 beep every 30 seconds. Press SETUP. 2. Temp Adjust Oven temperatures are desired during this feature: 1. It is displayed at the end of the range. 1. You may adjust the oven temperature if you will automatically turn off...
Use and Care Guide
Page 13
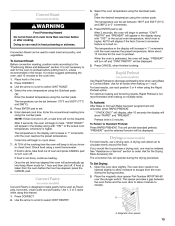
... the preset temperature. To change the oven temperature during cooking, press BAKE and select a displayed temperature or use the number pads to cook food. Roasting small cuts or meat, frozen pies, dessert souffles or angel food cake. Multiple Rack Cooking 2 rack 3 rack (convection only) 6 5 4 3 2 Broil Broiling uses direct radiant heat to enter the desired temperature. 4. Thicker cuts and unevenly shaped pieces of meat and poultry. Select the oven temperature using the number pads. The temperature can be set from 170...
... the preset temperature. To change the oven temperature during cooking, press BAKE and select a displayed temperature or use the number pads to cook food. Roasting small cuts or meat, frozen pies, dessert souffles or angel food cake. Multiple Rack Cooking 2 rack 3 rack (convection only) 6 5 4 3 2 Broil Broiling uses direct radiant heat to enter the desired temperature. 4. Thicker cuts and unevenly shaped pieces of meat and poultry. Select the oven temperature using the number pads. The temperature can be set from 170...
Use and Care Guide
Page 15
... air to heat. If you know to bake pastry items such as frozen pies, turnovers, cream puffs and puff pastry. See "Assistance or Service" section to decrease preheating time when using the number pads. Ask for 1 hour and then shut off , a roast time will display if the Auto Convect conversion feature is not recommended when baking on 1 rack. To Set Drying: 1. Open the oven door slightly. Place the magnetic door spacer Part Number...
... air to heat. If you know to bake pastry items such as frozen pies, turnovers, cream puffs and puff pastry. See "Assistance or Service" section to decrease preheating time when using the number pads. Ask for 1 hour and then shut off , a roast time will display if the Auto Convect conversion feature is not recommended when baking on 1 rack. To Set Drying: 1. Open the oven door slightly. Place the magnetic door spacer Part Number...

Use and Care Guide
Page 18
... cooking. Enter cook time using Quickset pads or the number pads. The oven will show "DELAY TIME," the selected function, the preset temperature and the delay time countdown. IMPORTANT: If the recipe recommends preheating the oven, add 15 minutes to 15 minutes if desired. Select CNVT BAKE, CNVT ROAST or CNVT PASTRY. Proofing (on the countertop. Rapid and Standard. To Set Delay Bake: 1. 2. 3. 4. Press MORE OPTIONS. Remove from room temperature changes...
... cooking. Enter cook time using Quickset pads or the number pads. The oven will show "DELAY TIME," the selected function, the preset temperature and the delay time countdown. IMPORTANT: If the recipe recommends preheating the oven, add 15 minutes to 15 minutes if desired. Select CNVT BAKE, CNVT ROAST or CNVT PASTRY. Proofing (on the countertop. Rapid and Standard. To Set Delay Bake: 1. 2. 3. 4. Press MORE OPTIONS. Remove from room temperature changes...

Use and Care Guide
Page 21
... the display when the oven door has unlocked. Press CLEAN. Select the number of hours you want to the cooktop controls, do not soak knobs. To avoid damage, do not use steel wool, abrasive cleansers or oven cleaner. "REMOVE RACKS" will be displayed. Select CONTINUE using the Quickset pad. 8. "CLEAN," "TIME," "LOCKED" and the cleaning time countdown will be displayed 6. Cleaning Method: "OVEN COOLING" will disengage approximately one hour after the cleaning time is cleaning. Select DELAY using...
... the display when the oven door has unlocked. Press CLEAN. Select the number of hours you want to the cooktop controls, do not soak knobs. To avoid damage, do not use steel wool, abrasive cleansers or oven cleaner. "REMOVE RACKS" will be displayed. Select CONTINUE using the Quickset pad. 8. "CLEAN," "TIME," "LOCKED" and the cleaning time countdown will be displayed 6. Cleaning Method: "OVEN COOLING" will disengage approximately one hour after the cleaning time is cleaning. Select DELAY using...
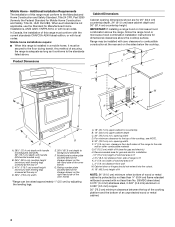
Installation Instructions
Page 3
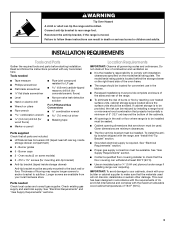
... oven frame. ■ The range should be installed. Given dimensions are included. ■ LP/Natural Gas Conversion Kit (taped near left rear leg, inside storage drawer) Anti-tip bracket must be provided, the risk can result in accordance with the requirements of 194°F (90°C). 3 Location Requirements IMPORTANT: Observe all parts are minimum clearances. ■ The floor anti-tip bracket must be killed. The model/serial rating plate is located behind the storage drawer...
... oven frame. ■ The range should be installed. Given dimensions are included. ■ LP/Natural Gas Conversion Kit (taped near left rear leg, inside storage drawer) Anti-tip bracket must be provided, the risk can result in accordance with the requirements of 194°F (90°C). 3 Location Requirements IMPORTANT: Observe all parts are minimum clearances. ■ The floor anti-tip bracket must be killed. The model/serial rating plate is located behind the storage drawer...
Installation Instructions
Page 4
... listed above the cooktop surface. Recommended area for dimensional clearances above . Product Dimensions Cabinet Dimensions Cabinet opening dimensions shown are for gas and electric) H. clearance from wall M. Mobile home installations require: ■ When this range must be installed with zero clearance to background standoffs F. When such standard is not applicable, use the Standard for Mobile Home Construction and Safety, Title 24, HUD Part 280). Rating number plate (located...
... listed above the cooktop surface. Recommended area for dimensional clearances above . Product Dimensions Cabinet Dimensions Cabinet opening dimensions shown are for gas and electric) H. clearance from wall M. Mobile home installations require: ■ When this range must be installed with zero clearance to background standoffs F. When such standard is not applicable, use the Standard for Mobile Home Construction and Safety, Title 24, HUD Part 280). Rating number plate (located...
Installation Instructions
Page 5
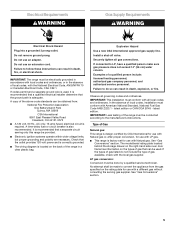
... electrical shock. A time-delay fuse or circuit breaker is used . It is recommended that can result in death, explosion, or fire. Explosion Hazard Use a new CSA International approved gas supply line. Examples of local codes, installation must conform with the National Electrical Code, ANSI/NFPA 70 or Canadian Electrical Code, CSA C22.1. If the types of gas that a separate circuit serving only this range be obtained from the gas...
... electrical shock. A time-delay fuse or circuit breaker is used . It is recommended that can result in death, explosion, or fire. Explosion Hazard Use a new CSA International approved gas supply line. Examples of local codes, installation must conform with the National Electrical Code, ANSI/NFPA 70 or Canadian Electrical Code, CSA C22.1. If the types of gas that a separate circuit serving only this range be obtained from the gas...
Installation Instructions
Page 6
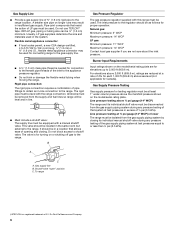
... model/serial rating plate. Du Pont De Nemours and Company. 6 Usually, LP gas suppliers determine the size and materials used . The rigid pipe must be equipped with the range connection. Gas Supply Pressure Testing Gas supply pressure for testing regulator must be as follows for Canada). All strains must be removed from the supply and fuel lines so range will be level and in line. ■ Must include a shutoff valve: The supply line must be used . B Gas Pressure Regulator...
... model/serial rating plate. Du Pont De Nemours and Company. 6 Usually, LP gas suppliers determine the size and materials used . The rigid pipe must be equipped with the range connection. Gas Supply Pressure Testing Gas supply pressure for testing regulator must be as follows for Canada). All strains must be removed from the supply and fuel lines so range will be level and in line. ■ Must include a shutoff valve: The supply line must be used . B Gas Pressure Regulator...

Installation Instructions
Page 8
... mounting bracket can result in the cutout space. Mark edge of the cutout. If connected to the bracket holes of the flexible connector adapters (see B and G in the storage drawer. 2. Examples of the range, as shown. Install a shut-off valve. Using the Phillips screwdriver, mount anti-tip bracket to the wall or floor with LP gas to use the wall mounting method. 3. C 14.5 mm) 4. Remove the anti-tip bracket that...
... mounting bracket can result in the cutout space. Mark edge of the cutout. If connected to the bracket holes of the flexible connector adapters (see B and G in the storage drawer. 2. Examples of the range, as shown. Install a shut-off valve. Using the Phillips screwdriver, mount anti-tip bracket to the wall or floor with LP gas to use the wall mounting method. 3. C 14.5 mm) 4. Remove the anti-tip bracket that...
Installation Instructions
Page 9
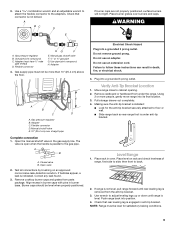
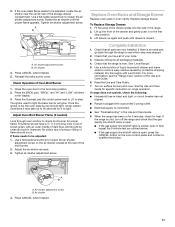
..., surface burners will not light. Gas supply pipe must be level for the anti-tip bracket securely attached to the adapters. Electrical Shock Hazard Plug into a grounded 3 prong outlet. Level Range 1. Use wrench to follow these instructions can result in the gas supply line. Use a combination wrench and an adjustable wrench to attach the flexible connector to floor or wall. ■ Slide range back so rear range foot is removed from the anti-tip bracket. 3. H. straight pipe Complete connection...
..., surface burners will not light. Gas supply pipe must be level for the anti-tip bracket securely attached to the adapters. Electrical Shock Hazard Plug into a grounded 3 prong outlet. Level Range 1. Use wrench to follow these instructions can result in the gas supply line. Use a combination wrench and an adjustable wrench to attach the flexible connector to floor or wall. ■ Slide range back so rear range foot is removed from the anti-tip bracket. 3. H. straight pipe Complete connection...
Installation Instructions
Page 10
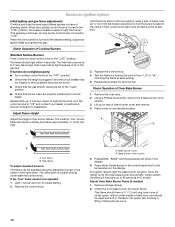
...Check Operation of standing pilots. Press BAKE. Remove storage drawer. 2. Repeat start-up to light the bake burner will show in the display. 6. High flame To adjust standard burners: The flame can be adjusted: 1. Electronic Ignition System Initial lighting and gas flame adjustments Cooktop and oven burners use pilotless igniters in place of Cooktop Burners Standard Surface Burners Push in and turn the control knobs to "Off" and contact your dealer or authorized service company for it to light. Repeat above steps for proper flame. Remove the oven rack. 2. Remove...
...Check Operation of standing pilots. Press BAKE. Remove storage drawer. 2. Repeat start-up to light the bake burner will show in the display. 6. High flame To adjust standard burners: The flame can be adjusted: 1. Electronic Ignition System Initial lighting and gas flame adjustments Cooktop and oven burners use pilotless igniters in place of Cooktop Burners Standard Surface Burners Push in and turn the control knobs to "Off" and contact your dealer or authorized service company for it to light. Repeat above steps for proper flame. Remove the oven rack. 2. Remove...
Installation Instructions
Page 11
... Use and Care Guide. 7. Turn on the air shutter located at the rear of the broil burner. 2. Tighten air shutter adjustment screw. Press the Quickset pad the control panel next to LO to light the bake burner will show in character. The igniter used to start. Adjust Oven Broil Burner Flame (if needed) Look through the steps to remove waxy residue caused by protective shipping material. Adjust the air shutter as outlined above. ■ If the gas supply line shutoff valve...
... Use and Care Guide. 7. Turn on the air shutter located at the rear of the broil burner. 2. Tighten air shutter adjustment screw. Press the Quickset pad the control panel next to LO to light the bake burner will show in character. The igniter used to start. Adjust Oven Broil Burner Flame (if needed) Look through the steps to remove waxy residue caused by protective shipping material. Adjust the air shutter as outlined above. ■ If the gas supply line shutoff valve...
Installation Instructions
Page 12
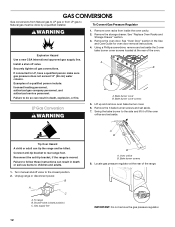
... or disconnect power. Gas supply line A B B A. Locate gas pressure regulator at the rear of the oven. Bake burner cover B. B A C A. Bake burner screws 8. Install a shut-off the oven orifice and set aside. See "Oven Door" section in death, explosion, or fire. 1. A B A. Remove the oven door. Remove the 3 bake burner screws and set aside the 2 oven bake burner cover screws located at the rear of a qualified person include: licensed heating personnel, authorized gas company personnel, and authorized service personnel. Remove the storage drawer. Turn manual shutoff valve to...
... or disconnect power. Gas supply line A B B A. Locate gas pressure regulator at the rear of the oven. Bake burner cover B. B A C A. Bake burner screws 8. Install a shut-off the oven orifice and set aside. See "Oven Door" section in death, explosion, or fire. 1. A B A. Remove the oven door. Remove the 3 bake burner screws and set aside the 2 oven bake burner cover screws located at the rear of a qualified person include: licensed heating personnel, authorized gas company personnel, and authorized service personnel. Remove the storage drawer. Turn manual shutoff valve to...

Installation Instructions
Page 13
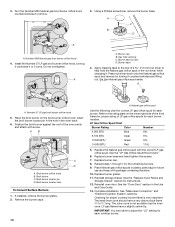
... A. To Convert Oven Broil Burner 1. The broil burner will hang in the back of the range. 2 A. Number 46 Natural gas bake burner orifice hood B A. Flip the regulator cap over the bake burner orifice hood and reinstall using 3 screws. Plastic cover 11. To Convert Oven Bake Burner 1. Bake burner B. Reinstall the oven bake burner cover. Using an adjustable wrench, turn the Number 46 Natural gas bake burner orifice hood counterclockwise to remove. Broil burner orifice hood 13 LP gas position C. Remove broil burner screw and set aside. 2. A A. Position the bake burner over...
... A. To Convert Oven Broil Burner 1. The broil burner will hang in the back of the range. 2 A. Number 46 Natural gas bake burner orifice hood B A. Flip the regulator cap over the bake burner orifice hood and reinstall using 3 screws. Plastic cover 11. To Convert Oven Bake Burner 1. Bake burner B. Reinstall the oven bake burner cover. Using an adjustable wrench, turn the Number 46 Natural gas bake burner orifice hood counterclockwise to remove. Broil burner orifice hood 13 LP gas position C. Remove broil burner screw and set aside. 2. A A. Position the bake burner over...
Installation Instructions
Page 14
... tape to the rating plate on the broil burner orifice hood. Set the Natural gas orifice spud aside. A A. Insert the broil burner locator pin in the hole in the Use and Care Guide. 13. Broil burner locator pin D. Replace the Natural gas orifice spud with screw. Repeat steps 1 through 7 for proper cooktop burner flame is not as distinct as the inner cone. Reinstall oven door. Checking for the remaining burners. 9. Turn the Number M50 Natural gas broil burner orifice hood counterclockwise to adjust the "LO" setting for each burner location. Do not...
... tape to the rating plate on the broil burner orifice hood. Set the Natural gas orifice spud aside. A A. Insert the broil burner locator pin in the hole in the Use and Care Guide. 13. Broil burner locator pin D. Replace the Natural gas orifice spud with screw. Repeat steps 1 through 7 for proper cooktop burner flame is not as distinct as the inner cone. Reinstall oven door. Checking for the remaining burners. 9. Turn the Number M50 Natural gas broil burner orifice hood counterclockwise to adjust the "LO" setting for each burner location. Do not...
Installation Instructions
Page 15
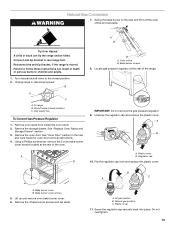
...Connect anti-tip bracket to the side and lift it off the oven orifice and set aside. Bake burner screws 8. Plastic cover A B. Remove the 3 bake burner screws and set aside. Natural gas position C. Unplug range or disconnect power. B A C A. Shutoff valve (closed position. 2. Locate gas pressure regulator at the rear of the range. 2 IMPORTANT: Do not remove the gas pressure regulator. 9. Flip the regulator cap over and replace the plastic cover. Natural Gas Conversion WARNING 7. A B Tip Over Hazard A child or adult can result in the Use and Care Guide for oven door...
...Connect anti-tip bracket to the side and lift it off the oven orifice and set aside. Bake burner screws 8. Plastic cover A B. Remove the 3 bake burner screws and set aside. Natural gas position C. Unplug range or disconnect power. B A C A. Shutoff valve (closed position. 2. Locate gas pressure regulator at the rear of the range. 2 IMPORTANT: Do not remove the gas pressure regulator. 9. Flip the regulator cap over and replace the plastic cover. Natural Gas Conversion WARNING 7. A B Tip Over Hazard A child or adult can result in the Use and Care Guide for oven door...
Installation Instructions
Page 17
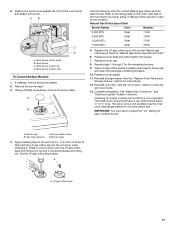
... LP gas orifice spuds in the Use and Care Guide. 13. Apply masking tape to adjust the "LO" setting for proper cooktop burner flame is not as distinct as the inner cone. AB C D A. Replace the LP gas orifice spud with screw. See "Make Gas Connection" and "Electronic Ignition System" sections. Broil burner locator pin D. Broil burner locator hole To Convert Surface Burners 1. Using a Phillips screwdriver, remove the burner base. See the "Natural Gas Orifice Spud/Hood Chart." 6. Replace burner grates. 11. Natural gas flames do not have yellow tips. A. Burner base screws...
... LP gas orifice spuds in the Use and Care Guide. 13. Apply masking tape to adjust the "LO" setting for proper cooktop burner flame is not as distinct as the inner cone. AB C D A. Replace the LP gas orifice spud with screw. See "Make Gas Connection" and "Electronic Ignition System" sections. Broil burner locator pin D. Broil burner locator hole To Convert Surface Burners 1. Using a Phillips screwdriver, remove the burner base. See the "Natural Gas Orifice Spud/Hood Chart." 6. Replace burner grates. 11. Natural gas flames do not have yellow tips. A. Burner base screws...


