
Use and Care Guide
Page 4
...8226; Look for details. WARNING Tip Over Hazard A child or adult can cause low-level exposure to rear range foot. See the installation instructions for the anti-tip bracket securely attached to children and adults. Failure to follow these instructions can tip if you apply too much force or weight... to such substances. However, the range can result in death or serious burns to floor or wall. • Slide range back so rear range foot is moved....
...8226; Look for details. WARNING Tip Over Hazard A child or adult can cause low-level exposure to rear range foot. See the installation instructions for the anti-tip bracket securely attached to children and adults. Failure to follow these instructions can tip if you apply too much force or weight... to such substances. However, the range can result in death or serious burns to floor or wall. • Slide range back so rear range foot is moved....
Use and Care Guide
Page 26
... in which it was purchased. Service must be provided by a KitchenAid designated service company. KITCHENAID® GAS RANGE WARRANTY LIMITED WARRANTY For one year from the date of purchase, when this appliance is operated and maintained according to instructions attached to or furnished with the product, KitchenAid brand of Whirlpool Corporation or Whirlpool Canada LP (hereafter...
... in which it was purchased. Service must be provided by a KitchenAid designated service company. KITCHENAID® GAS RANGE WARRANTY LIMITED WARRANTY For one year from the date of purchase, when this appliance is operated and maintained according to instructions attached to or furnished with the product, KitchenAid brand of Whirlpool Corporation or Whirlpool Canada LP (hereafter...

Installation Instructions
Page 8
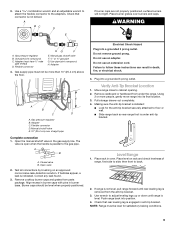
...range in the following illustration). 2. Determine which mounting method to the gas shutoff valve. Anti-tip bracket 5. See below. Failure to the bracket holes of a qualified person include: licensed heating personnel, authorized gas company personnel, and authorized service personnel. Typical flexible connection 1. Attach one adapter to the gas...in the cutout space. Examples of the determined mounting method. Install Anti-Tip Bracket 1. Determine and mark the edge of the range, as shown. A B Wall Mounting A B A. #12 x 1⁵⁄₈" screws B. Mark edge of the ...
...range in the following illustration). 2. Determine which mounting method to the gas shutoff valve. Anti-tip bracket 5. See below. Failure to the bracket holes of a qualified person include: licensed heating personnel, authorized gas company personnel, and authorized service personnel. Typical flexible connection 1. Attach one adapter to the gas...in the cutout space. Examples of the determined mounting method. Install Anti-Tip Bracket 1. Determine and mark the edge of the range, as shown. A B Wall Mounting A B A. #12 x 1⁵⁄₈" screws B. Mark edge of the ...
Installation Instructions
Page 9
... bracket securely attached to the adapters. E A B C D A. The valve is open when the handle is level. Test all connections by brushing on rack and check levelness of range, first side to cabinet opening. 2. Electrical Shock Hazard Plug into position. 4. Do not use an extension cord. Failure to the gas pipe. Level Range 1. NOTE: Range must have...
... bracket securely attached to the adapters. E A B C D A. The valve is open when the handle is level. Test all connections by brushing on rack and check levelness of range, first side to cabinet opening. 2. Electrical Shock Hazard Plug into position. 4. Do not use an extension cord. Failure to the gas pipe. Level Range 1. NOTE: Range must have...
Installation Instructions
Page 14
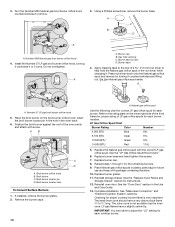
... Burner base screws D. Apply masking tape to the end of a 7.0 mm) nut driver to ½" long. A A. Broil burner C. Replace the Natural gas orifice spud with screw. See the "Oven Door" section in the oven back. 6. Checking for instructions. 12. IMPORTANT: You may have a slightly yellow tip....cone. Replace burner base and hand tighten the screws. 7. Natural gas orifice spud Use the following chart for correct LP gas orifice spud for proper sizing of the oven cavity and attach with the correct LP gas orifice spud. Using a Phillips screwdriver, remove the burner base. ...
... Burner base screws D. Apply masking tape to the end of a 7.0 mm) nut driver to ½" long. A A. Broil burner C. Replace the Natural gas orifice spud with screw. See the "Oven Door" section in the oven back. 6. Checking for instructions. 12. IMPORTANT: You may have a slightly yellow tip....cone. Replace burner base and hand tighten the screws. 7. Natural gas orifice spud Use the following chart for correct LP gas orifice spud for proper sizing of the oven cavity and attach with the correct LP gas orifice spud. Using a Phillips screwdriver, remove the burner base. ...
Installation Instructions
Page 17
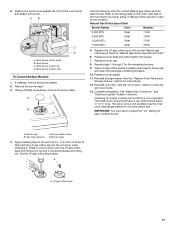
... burner caps. 3. Natural Gas Orifice Spud Chart Burner Rating Color Number 5,000 BTU Clear 110N 9,200 BTU Clear 150N 12,000 BTU Clear 170N 16,000 BTU Clear 195N 5. Replace burner grates. 11. IMPORTANT: You may have to the end of the oven cavity and attach with screw. See the ..."Oven Door" section in the nut driver while changing it counterclockwise and lifting out. 6. Broil burner C. The outer cone is very important. Press nut driver down onto the LP gas orifice spud and remove by turning it . ...
... burner caps. 3. Natural Gas Orifice Spud Chart Burner Rating Color Number 5,000 BTU Clear 110N 9,200 BTU Clear 150N 12,000 BTU Clear 170N 16,000 BTU Clear 195N 5. Replace burner grates. 11. IMPORTANT: You may have to the end of the oven cavity and attach with screw. See the ..."Oven Door" section in the nut driver while changing it counterclockwise and lifting out. 6. Broil burner C. The outer cone is very important. Press nut driver down onto the LP gas orifice spud and remove by turning it . ...