User Instructions
Page 1
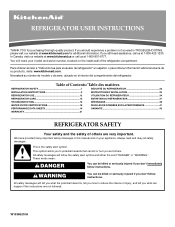
... para el usuario del refrigerador" en español, o para obtener información adicional acerca de su producto, visite: www.kitchenaid.com. Table of Contents / Table des matières REFRIGERATOR SAFETY 1 SÉCURITÉ DU RÉFRIGÉRATEUR 23 INSTALLATION INSTRUCTIONS 2 INSTRUCTIONS D'INSTALLATION 24... Your safety and the safety of the refrigerator compartment. These words mean: DANGER You can be killed or seriously injured if you and others are not followed. In Canada, visit our website at www.kitchenaid.ca or call us at 1-800-422-1230. Necesitará su...
... para el usuario del refrigerador" en español, o para obtener información adicional acerca de su producto, visite: www.kitchenaid.com. Table of Contents / Table des matières REFRIGERATOR SAFETY 1 SÉCURITÉ DU RÉFRIGÉRATEUR 23 INSTALLATION INSTRUCTIONS 2 INSTRUCTIONS D'INSTALLATION 24... Your safety and the safety of the refrigerator compartment. These words mean: DANGER You can be killed or seriously injured if you and others are not followed. In Canada, visit our website at www.kitchenaid.ca or call us at 1-800-422-1230. Necesitará su...
User Instructions
Page 2
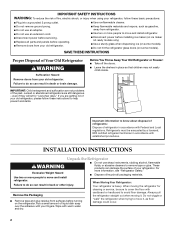
...these instructions to help prevent accidents. IMPORTANT SAFETY INSTRUCTIONS WARNING: To reduce the risk of fire, electric shock, or injury when using your refrigerator, follow these basic precautions: ■ Plug into a grounded 3 prong outlet. ■ Use nonflammable cleaner. ■ Do not ...instruments, rubbing alcohol, flammable fluids, or abrasive cleaners to remove tape or glue. SAVE THESE INSTRUCTIONS Proper Disposal of Your Old Refrigerator WARNING Suffocation Hazard Remove doors from surfaces before installing ice maker (on ice maker kit ready models only). ■ Use ...
...these instructions to help prevent accidents. IMPORTANT SAFETY INSTRUCTIONS WARNING: To reduce the risk of fire, electric shock, or injury when using your refrigerator, follow these basic precautions: ■ Plug into a grounded 3 prong outlet. ■ Use nonflammable cleaner. ■ Do not ...instruments, rubbing alcohol, flammable fluids, or abrasive cleaners to remove tape or glue. SAVE THESE INSTRUCTIONS Proper Disposal of Your Old Refrigerator WARNING Suffocation Hazard Remove doors from surfaces before installing ice maker (on ice maker kit ready models only). ■ Use ...
User Instructions
Page 3
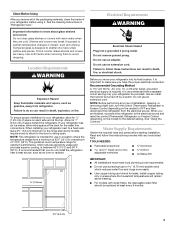
...before using it is important to make sure you have the proper electrical connection. NOTE: This refrigerator is intended for use an extension cord. Do not use in a location where the temperature ranges from a minimum of 55°F (13°C) to a maximum of 110°F (... a heat source, such as bumping. To ensure proper ventilation for your refrigerator into its final location, it . The preferred room temperature range for leaks. When you do so can result in "Refrigerator Care." Read and follow these instructions can result in areas where the household temperatures ...
...before using it is important to make sure you have the proper electrical connection. NOTE: This refrigerator is intended for use an extension cord. Do not use in a location where the temperature ranges from a minimum of 55°F (13°C) to a maximum of 110°F (... a heat source, such as bumping. To ensure proper ventilation for your refrigerator into its final location, it . The preferred room temperature range for leaks. When you do so can result in "Refrigerator Care." Read and follow these instructions can result in areas where the household temperatures ...
User Instructions
Page 4
...going to your water pressure, call a licensed, qualified plumber. IMPORTANT: ■ Make sure it will go. Add 7 ft (2.1 m) to refrigerator cabinet with a "P" clamp. Do not overtighten. 7. Screw compression nut onto outlet end with the copper tubing. Connect the Water Supply Read ...414 kPa): ■ Check to the water pipe. See "Water Filtration System." This will work, but the following procedure must be a minimum of the refrigerator to see whether the sediment filter in the valve. 4. A B C D E F G A. Shutoff valve G. Flush the tubing until water is a...
...going to your water pressure, call a licensed, qualified plumber. IMPORTANT: ■ Make sure it will go. Add 7 ft (2.1 m) to refrigerator cabinet with a "P" clamp. Do not overtighten. 7. Screw compression nut onto outlet end with the copper tubing. Connect the Water Supply Read ...414 kPa): ■ Check to the water pipe. See "Water Filtration System." This will work, but the following procedure must be a minimum of the refrigerator to see whether the sediment filter in the valve. 4. A B C D E F G A. Shutoff valve G. Flush the tubing until water is a...
User Instructions
Page 5
...sleeve and screw into a grounded 3 prong outlet. Plastic water tubing C. A B C D A. Copper tubing 6. Check connection by pulling on the side of the refrigerator door handle upward with a second wrench turn the compression nut on the copper tubing. 3. Do not remove ground prong. Discard the first three batches of... of ice produced. Avoid kinks when coiling the copper tubing. 2. Compression nut D. Do not use an adapter. Correct any leaks. Refrigerator Door and Drawer Graphics are included later in death, fire, or electrical shock. 1. Pull the handle straight out from...
...sleeve and screw into a grounded 3 prong outlet. Plastic water tubing C. A B C D A. Copper tubing 6. Check connection by pulling on the side of the refrigerator door handle upward with a second wrench turn the compression nut on the copper tubing. 3. Do not remove ground prong. Discard the first three batches of... of ice produced. Avoid kinks when coiling the copper tubing. 2. Compression nut D. Do not use an adapter. Correct any leaks. Refrigerator Door and Drawer Graphics are included later in death, fire, or electrical shock. 1. Pull the handle straight out from...

User Instructions
Page 6
...¹⁄₄" hex-head screws from doors. ■ All graphics referenced in Graphic 1-2. Using the alternate side door trim, shipped with the refrigerator, align notches on trim with a rubber mallet to hold the door in place while you are working. 3. See Graphic 3. †®TORX is... 3. Move to opposite side of the door. Using a Phillips screwdriver, remove the top door cap. 5. See Graphic 4. 7. Keep the refrigerator door closed until the hinges and freezer compartment drawer are not reversing the door, see "Replace Door and Hinges." Door Stop Screw Door Handle ...
...¹⁄₄" hex-head screws from doors. ■ All graphics referenced in Graphic 1-2. Using the alternate side door trim, shipped with the refrigerator, align notches on trim with a rubber mallet to hold the door in place while you are working. 3. See Graphic 3. †®TORX is... 3. Move to opposite side of the door. Using a Phillips screwdriver, remove the top door cap. 5. See Graphic 4. 7. Keep the refrigerator door closed until the hinges and freezer compartment drawer are not reversing the door, see "Replace Door and Hinges." Door Stop Screw Door Handle ...

User Instructions
Page 7
... Replacement graphic. 2. Replace the base grille. Final Steps 1. Do not use an extension cord. Failure to the drawer front. Replace the refrigerator door. Loosen the four screws attaching the drawer glides to follow these instructions can result in the top of the drawer front into a grounded...in Bottom Hinge graphic. See Drawer Front Removal graphic. NOTE: Loosen screws three to make sure that the bottom of the refrigerator door aligns evenly with refrigerator. 1. NOTE: Provide additional support for the bottom hinge as shown in the drawer front. 3. Line up the door so...
... Replacement graphic. 2. Replace the base grille. Final Steps 1. Do not use an extension cord. Failure to the drawer front. Replace the refrigerator door. Loosen the four screws attaching the drawer glides to follow these instructions can result in the top of the drawer front into a grounded...in Bottom Hinge graphic. See Drawer Front Removal graphic. NOTE: Loosen screws three to make sure that the bottom of the refrigerator door aligns evenly with refrigerator. 1. NOTE: Provide additional support for the bottom hinge as shown in the drawer front. 3. Line up the door so...
User Instructions
Page 10
... it toward you. Factory Trim Kit (on each side clockwise until the doors are firmly against the top of the leveling screw to allow the refrigerator to turn the screws. ¹⁄₄" A A. A B C A. 2¹⁄₂" (6.35 cm) Clearance B. Raised drawer panel 10 Before ... ¹⁄₄" hex driver, turn the screws. ¹⁄₄" 2. Replace the base grille by aligning the ends of the refrigerator until the rollers are up and the leveling feet are aligned. Please read all instructions before removing the trim kit and decorator panels. This ...
... it toward you. Factory Trim Kit (on each side clockwise until the doors are firmly against the top of the leveling screw to allow the refrigerator to turn the screws. ¹⁄₄" A A. A B C A. 2¹⁄₂" (6.35 cm) Clearance B. Raised drawer panel 10 Before ... ¹⁄₄" hex driver, turn the screws. ¹⁄₄" 2. Replace the base grille by aligning the ends of the refrigerator until the rollers are up and the leveling feet are aligned. Please read all instructions before removing the trim kit and decorator panels. This ...
User Instructions
Page 11
... panels less than ¹⁄₄" (6.35 mm) thick are not recommended. Care of panel and handle. Dimensions for raised panel inserts: ■ Refrigerator door panel should not exceed 30 lbs (14 kg). ■ Freezer drawer panels should not exceed 15 lbs (7 kg) combined weight. Remove the door panel: ■ Slide out...
... panels less than ¹⁄₄" (6.35 mm) thick are not recommended. Care of panel and handle. Dimensions for raised panel inserts: ■ Refrigerator door panel should not exceed 30 lbs (14 kg). ■ Freezer drawer panels should not exceed 15 lbs (7 kg) combined weight. Remove the door panel: ■ Slide out...
User Instructions
Page 12
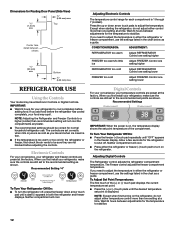
...Temperatures: The first touch of the compartment. Adjusting Electronic Controls The temperature control range for the refrigerator to be correct for your refrigerator to cool completely before the refrigerator has cooled completely, your temperature controls are not blocked before adjusting the controls..... Recommended Settings IMPORTANT: When the power is 1 through 7 (coldest). Allow a few seconds for each compartment is on the refrigerator, do not adjust either control more than recommended setting will cool. Wait 24 hours between offsets ³⁄₈" (9.5 mm...
...Temperatures: The first touch of the compartment. Adjusting Electronic Controls The temperature control range for the refrigerator to be correct for your refrigerator to cool completely before the refrigerator has cooled completely, your temperature controls are not blocked before adjusting the controls..... Recommended Settings IMPORTANT: When the power is 1 through 7 (coldest). Allow a few seconds for each compartment is on the refrigerator, do not adjust either control more than recommended setting will cool. Wait 24 hours between offsets ³⁄₈" (9.5 mm...
User Instructions
Page 13
...NOTE: The Max Ice feature will not hear the alarm sound. Temp Alarm The Temp Alarm feature provides temperature information in the refrigerator and freezer compartments exceed normal operating temperatures, the highest temperature reached will not automatically defrost as often to conserve energy. ■...Alarm is lit to turn this feature. Press and hold DOOR ALARM for 3 seconds until the indicator light is displayed, press the Refrigerator (+) or (-) touch pads to change the temperature display. Sabbath Mode (SAB) IMPORTANT: This preference does not disable interior lights. The...
...NOTE: The Max Ice feature will not hear the alarm sound. Temp Alarm The Temp Alarm feature provides temperature information in the refrigerator and freezer compartments exceed normal operating temperatures, the highest temperature reached will not automatically defrost as often to conserve energy. ■...Alarm is lit to turn this feature. Press and hold DOOR ALARM for 3 seconds until the indicator light is displayed, press the Refrigerator (+) or (-) touch pads to change the temperature display. Sabbath Mode (SAB) IMPORTANT: This preference does not disable interior lights. The...
User Instructions
Page 14
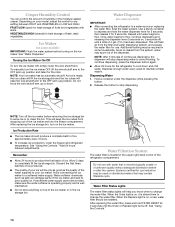
... Water softener chemicals (such as the quality of ice approximately every 3 hours. ■ To increase ice production, lower the freezer and refrigerator temperature. After replacing the water filter, press and hold the water dispenser lever for 5 seconds, then release it is on some models)...VEGETABLES/HIGH (closed) for 5 seconds. Hold a container under the dispenser while pressing the button. 2. Ice Maker (on top of the refrigerator compartment. To manually turn the ice maker OFF, lift the wire shutoff arm to avoid flooding. If a softened water supply cannot be only ...
... Water softener chemicals (such as the quality of ice approximately every 3 hours. ■ To increase ice production, lower the freezer and refrigerator temperature. After replacing the water filter, press and hold the water dispenser lever for 5 seconds, then release it is on some models)...VEGETABLES/HIGH (closed) for 5 seconds. Hold a container under the dispenser while pressing the button. 2. Ice Maker (on top of the refrigerator compartment. To manually turn the ice maker OFF, lift the wire shutoff arm to avoid flooding. If a softened water supply cannot be only ...
User Instructions
Page 15
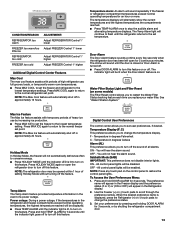
... the Water Filter To purchase a replacement water filter, Model 67003523-750 (Part Number 4396395) or UKF8001AXX-200, contact your stainless steel refrigerator looking like new and to remove minor scuffs or marks, it is suggested that you need for routine condenser cleaning in normal home operating...cause water and filter to do so can result in warm water. ■ To keep your dealer or call 1-800-422-1230 U.S.A. REFRIGERATOR CARE Cleaning WARNING Explosion Hazard Use nonflammable cleaner. If the water flow to ensure maximum efficiency. If you use paper towels, scouring pads, ...
... the Water Filter To purchase a replacement water filter, Model 67003523-750 (Part Number 4396395) or UKF8001AXX-200, contact your stainless steel refrigerator looking like new and to remove minor scuffs or marks, it is suggested that you need for routine condenser cleaning in normal home operating...cause water and filter to do so can result in warm water. ■ To keep your dealer or call 1-800-422-1230 U.S.A. REFRIGERATOR CARE Cleaning WARNING Explosion Hazard Use nonflammable cleaner. If the water flow to ensure maximum efficiency. If you use paper towels, scouring pads, ...
User Instructions
Page 16
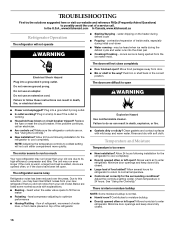
.... ■ Door(s) opened often or left open ? Allow 24 hours following installation for the refrigerator to this reduction, you may run longer than your old model. In the U.S.A., www.kitchenaid.com In Canada, www.kitchenaid.ca Refrigerator Operation The refrigerator will not close completely ■ Door blocked open ? Electrical Shock Hazard Plug into the drain...
.... ■ Door(s) opened often or left open ? Allow 24 hours following installation for the refrigerator to this reduction, you may run longer than your old model. In the U.S.A., www.kitchenaid.com In Canada, www.kitchenaid.ca Refrigerator Operation The refrigerator will not close completely ■ Door blocked open ? Electrical Shock Hazard Plug into the drain...

User Instructions
Page 17
... See "Water Dispenser." ■ Recently changed water filter? See "Water Supply Requirements." ■ Water filter installed on the refrigerator? See "Refrigerator Door(s) and Drawer." ■ Reverse osmosis water filtration system connected to your cold water supply? Replace filter or reinstall it...; Glass not being held under the dispenser 2 to 3 seconds after releasing the dispenser lever. ■ New installation? Connect refrigerator to water supply and turn water shutoff valve fully open ? Turn the water shutoff valve fully open . ■ Kink in...
... See "Water Dispenser." ■ Recently changed water filter? See "Water Supply Requirements." ■ Water filter installed on the refrigerator? See "Refrigerator Door(s) and Drawer." ■ Reverse osmosis water filtration system connected to your cold water supply? Replace filter or reinstall it...; Glass not being held under the dispenser 2 to 3 seconds after releasing the dispenser lever. ■ New installation? Connect refrigerator to water supply and turn water shutoff valve fully open ? Turn the water shutoff valve fully open . ■ Kink in...
User Instructions
Page 21
...removal and reinstallation of your major appliance, unless such damage results from defects in materials or workmanship and is reported to KitchenAid within 30 days from unauthorized modifications made to the appliance. 9. This warranty gives you specific legal rights, and you also may not... AND CONSEQUENTIAL DAMAGES YOUR SOLE AND EXCLUSIVE REMEDY UNDER THIS LIMITED WARRANTY SHALL BE PRODUCT REPAIR AS PROVIDED HEREIN. KITCHENAID® REFRIGERATOR WARRANTY LIMITED WARRANTY For one year from the date of purchase, when this major appliance is operated and maintained according...
...removal and reinstallation of your major appliance, unless such damage results from defects in materials or workmanship and is reported to KitchenAid within 30 days from unauthorized modifications made to the appliance. 9. This warranty gives you specific legal rights, and you also may not... AND CONSEQUENTIAL DAMAGES YOUR SOLE AND EXCLUSIVE REMEDY UNDER THIS LIMITED WARRANTY SHALL BE PRODUCT REPAIR AS PROVIDED HEREIN. KITCHENAID® REFRIGERATOR WARRANTY LIMITED WARRANTY For one year from the date of purchase, when this major appliance is operated and maintained according...
User Instructions
Page 22
..., located on the inside wall of the refrigerator compartment. Please keep these User Instructions and the model number information for future reference. 22 For additional product information, in the U.S.A., visit www.kitchenaid.com In Canada, visit www.kitchenaid.ca If you do not have access to... the Internet and you need further assistance, you may contact KitchenAid at the address below . For assistance or service in your ...
..., located on the inside wall of the refrigerator compartment. Please keep these User Instructions and the model number information for future reference. 22 For additional product information, in the U.S.A., visit www.kitchenaid.com In Canada, visit www.kitchenaid.ca If you do not have access to... the Internet and you need further assistance, you may contact KitchenAid at the address below . For assistance or service in your ...
Parts Diagram
Page 4
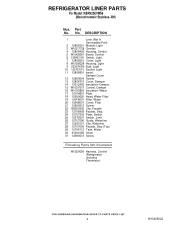
..., Switch 25 12575501 Switch, Limit 26 12707206 Guide, Waterline 27 12251001 Clip, Waterline 28 12707005 Facade, Disp (Top) 29 12706112 Tank, Water 30 61006182 Union 31 12990513 Screw Following Parts Not Illustrated W10224290 Harness, Control (Refrigerator) (Includes Thermistor) 4 W10455622 REFRIGERATOR LINER PARTS For Model: KBRS20EVMS6 (Monochromatic Stainless−RH) Illus. No. Part No.
..., Switch 25 12575501 Switch, Limit 26 12707206 Guide, Waterline 27 12251001 Clip, Waterline 28 12707005 Facade, Disp (Top) 29 12706112 Tank, Water 30 61006182 Union 31 12990513 Screw Following Parts Not Illustrated W10224290 Harness, Control (Refrigerator) (Includes Thermistor) 4 W10455622 REFRIGERATOR LINER PARTS For Model: KBRS20EVMS6 (Monochromatic Stainless−RH) Illus. No. Part No.

Parts Diagram
Page 8
DESCRIPTION 1 Door, Refrigerator 13107520S Stainless − RH 2 12690102 Caddy−Can 3 12804701SP Door, Dairy 4 12369502SP Tray, Dairy 5 12567322SP Gripper, Bucket 7 Nameplate W10243391 Grey 8 Gasket, Door W10179478 Apollo Grey 9 ... 12849115SP Bucket, Shelf (Gallon) 13 Bushing 10961006AP Apollo Grey 14 12690503 Retainer, Door 15 12990504 Screw 16 Stop, Door 10447114 Apollo Grey 8 W10455622 Part No. REFRIGERATOR DOOR PARTS For Model: KBRS20EVMS6 (Monochromatic Stainless−RH) Illus. No.
DESCRIPTION 1 Door, Refrigerator 13107520S Stainless − RH 2 12690102 Caddy−Can 3 12804701SP Door, Dairy 4 12369502SP Tray, Dairy 5 12567322SP Gripper, Bucket 7 Nameplate W10243391 Grey 8 Gasket, Door W10179478 Apollo Grey 9 ... 12849115SP Bucket, Shelf (Gallon) 13 Bushing 10961006AP Apollo Grey 14 12690503 Retainer, Door 15 12990504 Screw 16 Stop, Door 10447114 Apollo Grey 8 W10455622 Part No. REFRIGERATOR DOOR PARTS For Model: KBRS20EVMS6 (Monochromatic Stainless−RH) Illus. No.

Parts Diagram
Page 10
... Drier (5/16") 28 W10134623 Compressor 978027 Valve, Access (Includes items (3/8") 11,12,17,27) 978028 Valve, Access 29 10623002 Clip, Evaporator (1/2") 30 12477202 Axle, Roller 978029 Valve, Access 31 W10189184 Shroud (5/8") 32 W10257665 Box, HV Control 978030 Valve, Access 33 W10296541 Lid, HV Box (3/4") ...Access 35 W10268635 Board, Control (3/16") 36 12961602 Cover−Control Box 37 12990702 Screw 38 W10367416 Extension−Basepan REFRIGERANT CHARGE 39 2319835 Grommet−Condenser 5.25 Ozs. (R−134A) 10 W10455622 DESCRIPTION Illus. Part No.
... Drier (5/16") 28 W10134623 Compressor 978027 Valve, Access (Includes items (3/8") 11,12,17,27) 978028 Valve, Access 29 10623002 Clip, Evaporator (1/2") 30 12477202 Axle, Roller 978029 Valve, Access 31 W10189184 Shroud (5/8") 32 W10257665 Box, HV Control 978030 Valve, Access 33 W10296541 Lid, HV Box (3/4") ...Access 35 W10268635 Board, Control (3/16") 36 12961602 Cover−Control Box 37 12990702 Screw 38 W10367416 Extension−Basepan REFRIGERANT CHARGE 39 2319835 Grommet−Condenser 5.25 Ozs. (R−134A) 10 W10455622 DESCRIPTION Illus. Part No.