User Instructions
Page 4
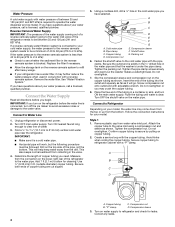
... copper tubing you begin. Follow the connection instructions for your cold water supply, the water pressure to the reverse osmosis system needs to your model. Attach the copper tube to the valve inlet using a compression nut and sleeve as it is connected to be between 35 and 120 psi (241 and...
... copper tubing you begin. Follow the connection instructions for your cold water supply, the water pressure to the reverse osmosis system needs to your model. Attach the copper tube to the valve inlet using a compression nut and sleeve as it is connected to be between 35 and 120 psi (241 and...
User Instructions
Page 5
.... Tap the bottom edge of the refrigerator door handle upward with a "P" clamp. 7. Style 2 1. Place a compression nut and sleeve on copper tubing. Plastic water tubing C. "P" clamp B. Attach the plastic water line to the refrigerator cabinet with a rubber mallet. 3. Failure to completely tighten. Discard the first three batches of each handle. Allow 3 days...
.... Tap the bottom edge of the refrigerator door handle upward with a "P" clamp. 7. Style 2 1. Place a compression nut and sleeve on copper tubing. Plastic water tubing C. "P" clamp B. Attach the plastic water line to the refrigerator cabinet with a rubber mallet. 3. Failure to completely tighten. Discard the first three batches of each handle. Allow 3 days...

User Instructions
Page 6
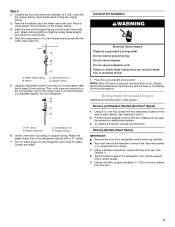
... from the cabinet top and move them to lift it free from the opposite side, follow these steps. Move to the opposite side of cabinet. Attach the door handle mounting posts to opposite side of door. Position refrigerator handle over mounting posts as shown in Graphic 2. Set aside the door until...
... from the cabinet top and move them to lift it free from the opposite side, follow these steps. Move to the opposite side of cabinet. Attach the door handle mounting posts to opposite side of door. Position refrigerator handle over mounting posts as shown in Graphic 2. Set aside the door until...

User Instructions
Page 7
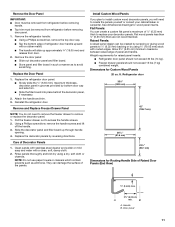
.... Do not tighten screws completely. 3. Line up the door so that hole plugs and screws are being moved. Remove Drawer Front 1. Loosen the four screws attaching the drawer glides to refrigerator. 7 See Drawer Front Replacement graphic. 3. See Top Hinge Graphic. Replace Door and Hinges NOTE: When reversing panel series door, use...
.... Do not tighten screws completely. 3. Line up the door so that hole plugs and screws are being moved. Remove Drawer Front 1. Loosen the four screws attaching the drawer glides to refrigerator. 7 See Drawer Front Replacement graphic. 3. See Top Hinge Graphic. Replace Door and Hinges NOTE: When reversing panel series door, use...
User Instructions
Page 11
..." (106.7 cm) 361/16" (91.6 cm) 231/4" (59.1 cm) Dimensions for raised panel inserts: ■ Refrigerator door panel should not exceed 30 lbs (14 kg). ■ Freezer drawer panels should not exceed 15 lbs (7 kg) combined weight. NOTE: Do not use paper towels or cleaners which... refrigerator door panel: ■ Slowly slide the ¹⁄₄" (6.35 mm), maximum thickness, decorator panel in such a manner as ammonia. Attach the handle and trim. 3. Reinstall the refrigerator door. Clean panels with stainless steel cleaner and polish or mild soap and water with a rubber mallet...
..." (106.7 cm) 361/16" (91.6 cm) 231/4" (59.1 cm) Dimensions for raised panel inserts: ■ Refrigerator door panel should not exceed 30 lbs (14 kg). ■ Freezer drawer panels should not exceed 15 lbs (7 kg) combined weight. NOTE: Do not use paper towels or cleaners which... refrigerator door panel: ■ Slowly slide the ¹⁄₄" (6.35 mm), maximum thickness, decorator panel in such a manner as ammonia. Attach the handle and trim. 3. Reinstall the refrigerator door. Clean panels with stainless steel cleaner and polish or mild soap and water with a rubber mallet...
User Instructions
Page 21
... have been removed, altered or cannot be easily determined. For 30 days from the date of purchase, when this filter is operated and maintained according to instructions attached to or furnished with the product, KitchenAid will pay for a replacement water filter to correct defects in ...and maintained according to instructions attached to or furnished with a water filter: 30 day limited warranty on the duration of implied warranties of original purchase date is operated and maintained according to instructions attached to or furnished with the product, KitchenAid will pay for factory ...
... have been removed, altered or cannot be easily determined. For 30 days from the date of purchase, when this filter is operated and maintained according to instructions attached to or furnished with the product, KitchenAid will pay for a replacement water filter to correct defects in ...and maintained according to instructions attached to or furnished with a water filter: 30 day limited warranty on the duration of implied warranties of original purchase date is operated and maintained according to instructions attached to or furnished with the product, KitchenAid will pay for factory ...