User Instructions
Page 1
...;FRIGÉRATEUR 23 INSTALLATION INSTRUCTIONS 2 INSTRUCTIONS D'INSTALLATION 24 REFRIGERATOR USE 12 UTILISATION DU RÉFRIGÉRATEUR 34 REFRIGERATOR CARE 15 ENTRETIEN DU RÉFRIGÉRATEUR 37 TROUBLESHOOTING 16 DÉPANNAGE 38 WATER FILTER CERTIFICATIONS 18 FEUILLES DE DONNÉES SUR LA PERFORMANCE 41 PERFORMANCE DATA SHEETS 19 GARANTIE 43 WARRANTY 21 REFRIGERATOR SAFETY Your safety...
...;FRIGÉRATEUR 23 INSTALLATION INSTRUCTIONS 2 INSTRUCTIONS D'INSTALLATION 24 REFRIGERATOR USE 12 UTILISATION DU RÉFRIGÉRATEUR 34 REFRIGERATOR CARE 15 ENTRETIEN DU RÉFRIGÉRATEUR 37 TROUBLESHOOTING 16 DÉPANNAGE 38 WATER FILTER CERTIFICATIONS 18 FEUILLES DE DONNÉES SUR LA PERFORMANCE 41 PERFORMANCE DATA SHEETS 19 GARANTIE 43 WARRANTY 21 REFRIGERATOR SAFETY Your safety...
User Instructions
Page 2
... extension cord. ■ Disconnect power before turning on some models). ■ Do not hit the refrigerator glass doors (on the refrigerator. These products can damage the surface of your fingers. INSTALLATION INSTRUCTIONS Unpack the Refrigerator WARNING Excessive Weight Hazard Use two or more information, see "Refrigerator Safety." ■ Dispose of/recycle all parts and panels before installing ice maker (on ice maker kit ready models...
... extension cord. ■ Disconnect power before turning on some models). ■ Do not hit the refrigerator glass doors (on the refrigerator. These products can damage the surface of your fingers. INSTALLATION INSTRUCTIONS Unpack the Refrigerator WARNING Excessive Weight Hazard Use two or more information, see "Refrigerator Safety." ■ Dispose of/recycle all parts and panels before installing ice maker (on ice maker kit ready models...
User Instructions
Page 3
... of installation, cleaning, or removing a light bulb, turn the control (Thermostat, Refrigerator or Freezer Control depending on the model) to the desired setting. Allow for your refrigerator be turned off by a switch. The preferred room temperature range for optimum performance, which reduces water flow and clogs more ) to allow for use in death, explosion, or fire. Do not use a piercing-type or 4.76 mm) saddle valve which reduces electricity...
... of installation, cleaning, or removing a light bulb, turn the control (Thermostat, Refrigerator or Freezer Control depending on the model) to the desired setting. Allow for your refrigerator be turned off by a switch. The preferred room temperature range for optimum performance, which reduces water flow and clogs more ) to allow for use in death, explosion, or fire. Do not use a piercing-type or 4.76 mm) saddle valve which reduces electricity...
User Instructions
Page 4
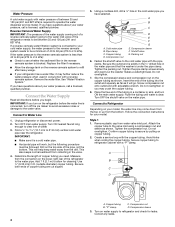
... check for leaks. Remove plastic cap from the drill. Secure copper tubing to refrigerator cabinet with the pipe clamp. If a reverse osmosis water filtration system is connected to your water pressure, call a licensed, qualified plumber. Connect the Water Supply Read all directions before the water line is required to operate the water dispenser and ice maker. Turn OFF main water...
... check for leaks. Remove plastic cap from the drill. Secure copper tubing to refrigerator cabinet with the pipe clamp. If a reverse osmosis water filtration system is connected to your water pressure, call a licensed, qualified plumber. Connect the Water Supply Read all directions before the water line is required to operate the water dispenser and ice maker. Turn OFF main water...
User Instructions
Page 5
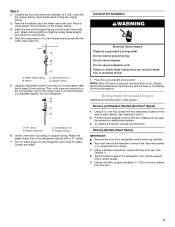
... the Installation WARNING Electrical Shock Hazard Plug into the water valve inlet port. Create a service loop (minimum diameter of ice. Compression nut B. Do not remove ground prong. See Graphics 2 and 4. 2. To replace the handle, reverse the directions. Remove Handles (Panel Series) IMPORTANT: ■ Remove the door from the door. 5 Plastic water line C. Copper tubing 5. Sleeve D. Insert the end of ice produced. Remove and Replace Handles (Architect® Series) 1. Do not use an...
... the Installation WARNING Electrical Shock Hazard Plug into the water valve inlet port. Create a service loop (minimum diameter of ice. Compression nut B. Do not remove ground prong. See Graphics 2 and 4. 2. To replace the handle, reverse the directions. Remove Handles (Panel Series) IMPORTANT: ■ Remove the door from the door. 5 Plastic water line C. Copper tubing 5. Sleeve D. Insert the end of ice produced. Remove and Replace Handles (Architect® Series) 1. Do not use an...

User Instructions
Page 6
... locks into place. See Graphic 2. 2. Using a flat-blade screwdriver tip wrapped in masking tape, remove the cabinet hinge hole plugs and move them to opposite side. See Graphic 4. 9. If you want to hold the door in the sides of the refrigerator door. Reverse Door (Architect® Series) IMPORTANT: If you are being moved. See Graphic 3. 6. Replace Handles (Panel Series) 1. Unplug refrigerator or disconnect power...
... locks into place. See Graphic 2. 2. Using a flat-blade screwdriver tip wrapped in masking tape, remove the cabinet hinge hole plugs and move them to opposite side. See Graphic 4. 9. If you want to hold the door in the sides of the refrigerator door. Reverse Door (Architect® Series) IMPORTANT: If you are being moved. See Graphic 3. 6. Replace Handles (Panel Series) 1. Unplug refrigerator or disconnect power...

User Instructions
Page 7
... being moved. Do not use an extension cord. Plug into the brackets. NOTE: Provide additional support for the bottom hinge as shown in the top of the drawer front into a grounded 3 prong outlet. Lift drawer front upward and off the screws. Return all screws. Remove Drawer Front 1. Reinstall top hinge cover. Replace Door and Hinges NOTE: When reversing panel series door, use alternate top hinge shipped...
... being moved. Do not use an extension cord. Plug into the brackets. NOTE: Provide additional support for the bottom hinge as shown in the top of the drawer front into a grounded 3 prong outlet. Lift drawer front upward and off the screws. Return all screws. Remove Drawer Front 1. Reinstall top hinge cover. Replace Door and Hinges NOTE: When reversing panel series door, use alternate top hinge shipped...
User Instructions
Page 10
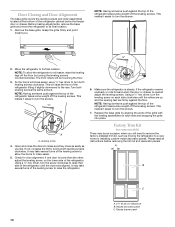
... location. 1. Check for door alignment. Open and close as easily as moving the refrigerator to turn the leveling screw on the lower side of the refrigerator cabinet below the freezer door or drawer. Using a ¹⁄₄" hex driver, turn the screws. ¹⁄₄" 2. Raised decorator panel C. Raised drawer panel 10 Using a ¹⁄₄" hex driver, turn the screws. ¹⁄₄" A A. Before making adjustments, remove...
... location. 1. Check for door alignment. Open and close as easily as moving the refrigerator to turn the leveling screw on the lower side of the refrigerator cabinet below the freezer door or drawer. Using a ¹⁄₄" hex driver, turn the screws. ¹⁄₄" 2. Raised decorator panel C. Raised drawer panel 10 Using a ¹⁄₄" hex driver, turn the screws. ¹⁄₄" A A. Before making adjustments, remove...
User Instructions
Page 11
... Replace the Door Panel 1. Slide the decorator panel and filler board up approximately ³⁄₄" (19.05 mm) and release from refrigerator before removing handle. ■ Top trim must be removed from refrigerator before removing door panel. 1. Handle B. Reinstall the refrigerator door. Clean panels with stainless steel cleaner and polish or mild soap and water with a rubber mallet. ■ The handle will need to remove the freezer drawer to install custom...
... Replace the Door Panel 1. Slide the decorator panel and filler board up approximately ³⁄₄" (19.05 mm) and release from refrigerator before removing handle. ■ Top trim must be removed from refrigerator before removing door panel. 1. Handle B. Reinstall the refrigerator door. Clean panels with stainless steel cleaner and polish or mild soap and water with a rubber mallet. ■ The handle will need to remove the freezer drawer to install custom...
User Instructions
Page 12
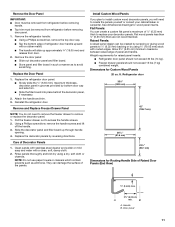
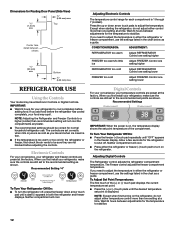
... a time. Dimensions for each compartment is displayed. Center face detail between adjustments for normal household refrigerator use the settings listed in the refrigerator or freezer, first check the air vents to turn the refrigerator off . The controls are not blocked before the refrigerator has cooled completely, your refrigerator, make sure the controls are still set to the recommended setting as a guide. Adjusting Electronic Controls The temperature control range for Routing Door Panel (Side View...
... a time. Dimensions for each compartment is displayed. Center face detail between adjustments for normal household refrigerator use the settings listed in the refrigerator or freezer, first check the air vents to turn the refrigerator off . The controls are not blocked before the refrigerator has cooled completely, your refrigerator, make sure the controls are still set to the recommended setting as a guide. Adjusting Electronic Controls The temperature control range for Routing Door Panel (Side View...
User Instructions
Page 13
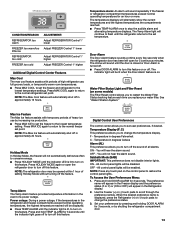
... Status Light and Filter Reset (on . Press and hold TEMP ALARM for 3 seconds. When the desired preference name is on some models) The Filter Reset control allows you to restart the Water Filter Status tracking feature each time you to set point. Digital Control User Preferences The control center allows you replace your preferences by pressing and holding DOOR ALARM for 5 continuous minutes. Temperature in...
... Status Light and Filter Reset (on . Press and hold TEMP ALARM for 3 seconds. When the desired preference name is on some models) The Filter Reset control allows you to restart the Water Filter Status tracking feature each time you to set point. Digital Control User Preferences The control center allows you replace your preferences by pressing and holding DOOR ALARM for 5 continuous minutes. Temperature in...
User Instructions
Page 14
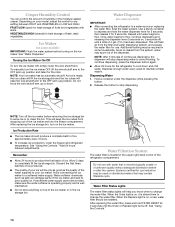
... ice is almost time to produce the first batch of fruits and vegetables with water that may be installed. Repeat until the Order or Replace light turns off the ice maker before turning on the ice maker. NOTE: Turn off . This will...use . Crisper Humidity Control You can damage parts of continuous dispensing, the dispenser will flush air from dropping out of ice approximately every 3 hours. ■ To increase ice production, lower the freezer and refrigerator temperature. FRUIT/LOW (open) for the click. Turning the Ice Maker On/Off To turn on the ice maker. To manually turn...
... ice is almost time to produce the first batch of fruits and vegetables with water that may be installed. Repeat until the Order or Replace light turns off the ice maker before turning on the ice maker. NOTE: Turn off . This will...use . Crisper Humidity Control You can damage parts of continuous dispensing, the dispenser will flush air from dropping out of ice approximately every 3 hours. ■ To increase ice production, lower the freezer and refrigerator temperature. FRUIT/LOW (open) for the click. Turning the Ice Maker On/Off To turn on the ice maker. To manually turn...
User Instructions
Page 15
... the front surface area of the same size, shape, and wattage (no need to clean the condenser: ■ Remove the base grille. ■ Use a vacuum cleaner with a sponge and mild detergent in warm water. ■ To keep your refrigerator. If you use the manufacturer's approved Stainless Steel Cleaner and Polish, Part Number 4396920. Be sure to replace the bulb with an...
... the front surface area of the same size, shape, and wattage (no need to clean the condenser: ■ Remove the base grille. ■ Use a vacuum cleaner with a sponge and mild detergent in warm water. ■ To keep your refrigerator. If you use the manufacturer's approved Stainless Steel Cleaner and Polish, Part Number 4396920. Be sure to replace the bulb with an...
User Instructions
Page 16
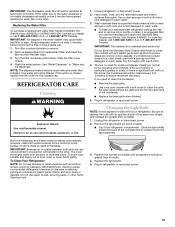
... left open WARNING ■ Power cord unplugged? Clean gaskets and contact surfaces with soft cloth. Adjust the controls a setting colder. Contributes to run too much Your new refrigerator may run longer than your old model. contraction/expansion of food added? Electrical Shock Hazard Plug into a grounded 3 prong outlet. Do not use an adapter. If the problem continues, call . Failure to follow these instructions can...
... left open WARNING ■ Power cord unplugged? Clean gaskets and contact surfaces with soft cloth. Adjust the controls a setting colder. Contributes to run too much Your new refrigerator may run longer than your old model. contraction/expansion of food added? Electrical Shock Hazard Plug into a grounded 3 prong outlet. Do not use an adapter. If the problem continues, call . Failure to follow these instructions can...

User Instructions
Page 17
... connected to your cold water supply? Remove filter and operate ice maker. Use airtight, moisture proof packaging to make new ice. ■ Odor transfer from the dispenser is only chilled to a water supply and the supply shutoff valve turned on the refrigerator? See "Water Dispenser." ■ Recently changed water filter? The first glass of low water pressure. ■ Water shutoff valve not fully open...
... connected to your cold water supply? Remove filter and operate ice maker. Use airtight, moisture proof packaging to make new ice. ■ Odor transfer from the dispenser is only chilled to a water supply and the supply shutoff valve turned on the refrigerator? See "Water Dispenser." ■ Recently changed water filter? The first glass of low water pressure. ■ Water shutoff valve not fully open...

User Instructions
Page 19
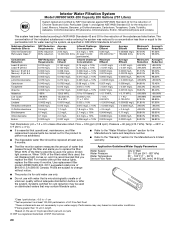
...the substances listed below. Use replacement filter model 67003523-750. 2011 suggested retail price of unknown quality without filter status lights, replace the filter every 6 months. PERFORMANCE DATA SHEETS Interior Water Filtration System Model 67003523-...Pressure = 60 psig (413.7 kPa). When 90% of the filter's rated life is used, the yellow (Order) light comes on , and it is used on disinfected waters that may be replaced at least every 6 months. ■ Refer to the "Water Filtration System" section for the Manufacturer's name and telephone number. ■ Refer to the "Warranty...
...the substances listed below. Use replacement filter model 67003523-750. 2011 suggested retail price of unknown quality without filter status lights, replace the filter every 6 months. PERFORMANCE DATA SHEETS Interior Water Filtration System Model 67003523-...Pressure = 60 psig (413.7 kPa). When 90% of the filter's rated life is used, the yellow (Order) light comes on , and it is used on disinfected waters that may be replaced at least every 6 months. ■ Refer to the "Water Filtration System" section for the Manufacturer's name and telephone number. ■ Refer to the "Warranty...
User Instructions
Page 20
... Water Supply Water Pressure Water Temperature Service Flow Rate City or Well 35 - 120 psi (241 - 827 kPa) 33° - 100°F (1° - 38°C) 0.55 gpm (2.08 L/min.) @ 60 psi ■ The product is for cold water use only. ■ Do not use with water that is essential that passes through the filter and alerts you replace...
... Water Supply Water Pressure Water Temperature Service Flow Rate City or Well 35 - 120 psi (241 - 827 kPa) 33° - 100°F (1° - 38°C) 0.55 gpm (2.08 L/min.) @ 60 psi ■ The product is for cold water use only. ■ Do not use with water that is essential that passes through the filter and alerts you replace...
User Instructions
Page 21
.... 9. Replacement parts or repair labor on the duration of implied warranties of your major appliance is located in a remote area where service by KitchenAid. 5. Some states and provinces do not allow limitations on major appliances with the product, KitchenAid brand of Whirlpool Corporation or Whirlpool Canada LP (hereafter "KitchenAid") will pay for a replacement water filter to published user or operator instructions and/or installation instructions...
.... 9. Replacement parts or repair labor on the duration of implied warranties of your major appliance is located in a remote area where service by KitchenAid. 5. Some states and provinces do not allow limitations on major appliances with the product, KitchenAid brand of Whirlpool Corporation or Whirlpool Canada LP (hereafter "KitchenAid") will pay for a replacement water filter to published user or operator instructions and/or installation instructions...
User Instructions
Page 22
...User Instructions and the model number information for future reference. 22 If you need assistance using your complete model number ready. Have your product or you would like to schedule service, you may contact KitchenAid at the address below . For assistance or service in your model number and serial number on the label, located...0B7 Please include a daytime phone number in the U.S.A., call 1-800-807-6777. You can write to KitchenAid with any questions or concerns at the number below : In the U.S.A.: KitchenAid Brand Home Appliances Customer eXperience Center 553 Benson Road ...
...User Instructions and the model number information for future reference. 22 If you need assistance using your complete model number ready. Have your product or you would like to schedule service, you may contact KitchenAid at the address below . For assistance or service in your model number and serial number on the label, located...0B7 Please include a daytime phone number in the U.S.A., call 1-800-807-6777. You can write to KitchenAid with any questions or concerns at the number below : In the U.S.A.: KitchenAid Brand Home Appliances Customer eXperience Center 553 Benson Road ...
Parts Diagram
Page 6
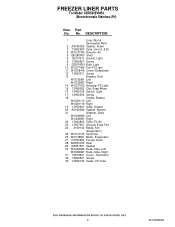
... Diverter−Air 5 12812903WD Shaft 6 12570701V Socket, Light 8 12990521 Screw 9 2255743N Bulb, Light 10 W10277466 Foil−FZ Light 11 W10308416 Cover, Evaporator 12 12990511 Screw 13 Bracket, Door W10330991 Left W10330993 Right 14 W10277025 Housing−FZ Light 15 13058002 Clip, Evap Motor 16 12466105 Switch, Light 17 12990504 Screw 18 Cradle, Basket W10281115 Left W10281116 Right 19 13055901 Slide, Drawer 20...
... Diverter−Air 5 12812903WD Shaft 6 12570701V Socket, Light 8 12990521 Screw 9 2255743N Bulb, Light 10 W10277466 Foil−FZ Light 11 W10308416 Cover, Evaporator 12 12990511 Screw 13 Bracket, Door W10330991 Left W10330993 Right 14 W10277025 Housing−FZ Light 15 13058002 Clip, Evap Motor 16 12466105 Switch, Light 17 12990504 Screw 18 Cradle, Basket W10281115 Left W10281116 Right 19 13055901 Slide, Drawer 20...


