Use and Care Guide
Page 5
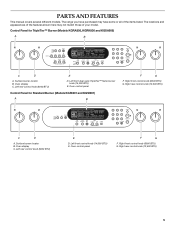
The range you have some or all of your model. Control Panel for Standard Burner (Models KGRI801 and KGSI901) A B F G F. Right front control knob (6000 BTU) G. Left rear control knob (6000 BTU) E D. Left rear control knob (6000 BTU) E D. Right rear control knob (12,500 BTU)...TIME Self Clean Cook Stop Duration Time TIMER Set/Start Off Clock Set/Start C D A. Left front control knob (14,000 BTU) E. Oven control panel F G F. Oven control panel Control Panel for TripleTier™ Burner (Models KGRA806, KGRK806 and KGSA906) A B CONVECT 325˚ 350˚...
The range you have some or all of your model. Control Panel for Standard Burner (Models KGRI801 and KGSI901) A B F G F. Right front control knob (6000 BTU) G. Left rear control knob (6000 BTU) E D. Left rear control knob (6000 BTU) E D. Right rear control knob (12,500 BTU)...TIME Self Clean Cook Stop Duration Time TIMER Set/Start Off Clock Set/Start C D A. Left front control knob (14,000 BTU) E. Oven control panel F G F. Oven control panel Control Panel for TripleTier™ Burner (Models KGRA806, KGRK806 and KGSA906) A B CONVECT 325˚ 350˚...
Use and Care Guide
Page 6
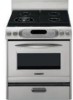
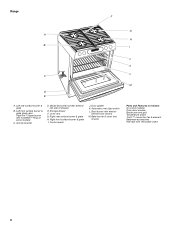
Model and serial number (behind left side of drawer) E. Oven vent G. Storage drawer F. Left rear surface burner & grate B. Control panel J. Automatic oven light switch L. Bake burner & cover (not shown) Parts and Features not shown (on some models) Oven door window Broiler pan and grid Temperature ...™ flame burner with InstaWok™ Ring on some models) C. Anti-tip bracket D. Broil burner with removable insert 6 Right rear surface burner & grate H. Door gasket K. Range F G A H B I . Right front surface burner & grate I 7 DI J K L C M D E A.
Model and serial number (behind left side of drawer) E. Oven vent G. Storage drawer F. Left rear surface burner & grate B. Control panel J. Automatic oven light switch L. Bake burner & cover (not shown) Parts and Features not shown (on some models) Oven door window Broiler pan and grid Temperature ...™ flame burner with InstaWok™ Ring on some models) C. Anti-tip bracket D. Broil burner with removable insert 6 Right rear surface burner & grate H. Door gasket K. Range F G A H B I . Right front surface burner & grate I 7 DI J K L C M D E A.
Use and Care Guide
Page 12
...) COOKS FOOD 10°F (5°C) ...a little more 20°F (10°C) ...moderately more 30°F (15°C) ...much more -10°F (-5°C) ...a little less -20°F (-10°C) ...moderately less -30°F (-15°C) ...much less To Adjust Oven Temperature Calibration: 1. Press 3 to increase the... The volume is also set time of day. 3. The absence of the oven. will be changed in 0. Control Lock The Control Lock shuts down the control panel pads to prevent unintended use a thermometer to low. Clock/Timer Display This is preset unlocked, but can be...
...) COOKS FOOD 10°F (5°C) ...a little more 20°F (10°C) ...moderately more 30°F (15°C) ...much more -10°F (-5°C) ...a little less -20°F (-10°C) ...moderately less -30°F (-15°C) ...much less To Adjust Oven Temperature Calibration: 1. Press 3 to increase the... The volume is also set time of day. 3. The absence of the oven. will be changed in 0. Control Lock The Control Lock shuts down the control panel pads to prevent unintended use a thermometer to low. Clock/Timer Display This is preset unlocked, but can be...
Use and Care Guide
Page 23
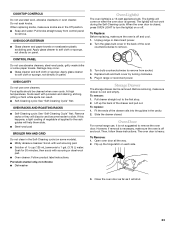
..., press OVEN LIGHT to remove the oven door. Flip up the back of ¹ ₂ cup (125 mL) ammonia to remove. 3. CONTROL PANEL Do not use oven cleaners. Damage may occur. Remove racks or they will not work during the Self-Cleaning cycle. Then, follow these instructions. ...cleaned when oven cools. Replace bulb and bulb cover by turning clockwise. 5. When replacing knobs, make sure the oven is off . Unplug range or disconnect power. 2. OVEN DOOR EXTERIOR s Glass cleaner and paper towels or nonabrasive plastic scrubbing pad: Apply glass cleaner to soft cloth ...
..., press OVEN LIGHT to remove the oven door. Flip up the back of ¹ ₂ cup (125 mL) ammonia to remove. 3. CONTROL PANEL Do not use oven cleaners. Damage may occur. Remove racks or they will not work during the Self-Cleaning cycle. Then, follow these instructions. ...cleaned when oven cools. Replace bulb and bulb cover by turning clockwise. 5. When replacing knobs, make sure the oven is off . Unplug range or disconnect power. 2. OVEN DOOR EXTERIOR s Glass cleaner and paper towels or nonabrasive plastic scrubbing pad: Apply glass cleaner to soft cloth ...


