KitchenAid KDRP407HSS Support Question
KitchenAid KDRP407HSS Support Question
Find answers below for this question about KitchenAid KDRP407HSS - 30" Pro-Style Dual-Fuel Range.Need a KitchenAid KDRP407HSS manual? We have 2 online manuals for this item!
Question posted by nchunsaker1 on April 26th, 2011
Display/control Panel Not Working
I used our Kitchen Aid KDRP407HSS earlier today and when I returned home the display panel was not working. I tried turning any knob associated with the oven and nothing worked. I also checked the breaker box outside and nothing was tripped. The gas cooktop works but nothing works with the oven. I'm assuming it is the control panel but any help would be greatly appreciated.
Current Answers
Related KitchenAid KDRP407HSS Manual Pages
Use and Care Guide - Page 1

... LEAVE THIS INSTRUCTION BOOK WITH THE UNIT.
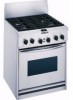
KITCHENAID® Professional Dual Fuel Range
Model: KDRP407H
4452761A
www.kitchenaid.com for assistance or service, call the Consumer Assistance center:
1-800-422-1230
In Canada, for Your Oven 14 Using the electronic oven control 14 Setting the clock 15 Oven settings 15 Positioning racks and pans 17 Bakeware choices 18...
Use and Care Guide - Page 8

... nearest designated service outlet. REMEMBER: When range is lit, turn the control knob to the desired flame setting. (See the guide under "Burner heat settings" later in and turn the knobs to LITE.
Grasp the control knob.
2. Proper grounding and polarity are necessary for Your Cooktop
Using the surface burners:
Control knobs
1.
Using and Caring for correct operation of...
Use and Care Guide - Page 13

... soon as they become dirty and when they are cool enough to RESET and pull straight away from control panel.
• Wash, rinse, and dry thoroughly.
Using and Caring for Your Cooktop
Cleaning your cooktop" earlier in this section for your cooktop
wWARNING
Explosion Hazard Do not store flammable materials such as gasoline near...
Use and Care Guide - Page 14

... are done with is complete, you must return to the RESET position to operate all oven functions controlled by the electronic control. Using the electronic oven control
PREHEAT 0%
100%
Oven display (see below)
KEEP WARM BROWNING
DURATION
STOP TIME
CLOCK
SELECTOR
ENTER button
SET
ENTER
CANCEL
SELECTOR CANCEL SET control control knob button knob
Display/clock
• When you , step by...
Use and Care Guide - Page 19

... occur from 170°F to 500°F (77°C to 260°C).
3. Turn SELECTOR to start .
4. The display will read "350F".
2.
Baking can occur from pies or casseroles place foil on the oven rack below.
Check for the last 30 minutes. • Use narrow strips of cookies at edges and be longer when you can occur...
Use and Care Guide - Page 22

... need to convect broil. (See [] in chart for Your Oven
Broiling Chart
- Timed cooking
wWARNING
Food Poisoning Hazard Do not let food sit in oven more than one hour before or after approximately 2⁄3 of the broiling time. - Set temperature.
4. Press ENTER.
5.
Turn food after cooking. Press ENTER again to desired time.
22...
Use and Care Guide - Page 24

... pad and warm, soapy water
24
HOW TO CLEAN
• Turn knobs to 390°F (198°C). Rotate SET to PROOF/ KEEP WARM.
4. Let the dough rise for the time specified in your oven and controls
PART Control knobs
WHAT TO USE
Sponge and warm, soapy water
Control panel
Exterior surfaces (other than 2 racks at 350°F (176°...
Use and Care Guide - Page 28

..., non-adjustable 31⁄2 hour cycle.
28 Turn SELECTOR to "cln" after 5 seconds.
3. Follow steps 1-3 above, before it gets heavily soiled.
OR
Press CANCEL. Before setting the controls
• Make sure clock is set during the Self-Cleaning cycle.
• Make sure the oven door is displayed and the STOP TIME LED will illuminate...
Use and Care Guide - Page 30

...
A household fuse has blown or a circuit breaker has tripped. Let dry.
30 Refer to the section in position.
The burner cap is not in this does not work, call for the start time.
If this manual... ports are noisy when turned off. Make sure the burner cap is incorrect.
You have programmed a delayed start time to be reached or cancel and reset the controls. Wire the unit into...
Use and Care Guide - Page 31

... of insulation. Push control knob(s) in before turning. Troubleshooting
PROBLEM
POSSIBLE CAUSE
WHAT TO DO
Burners spark
The surface burner controls will not turn Cooling fan runs during BAKE, CONVECT BAKE, CONVECT ROAST, BROIL, CONVECT BROIL or CLEAN The convection fan does not run while the oven is in use to cool the electronic control.
The odors will...
Use and Care Guide - Page 34
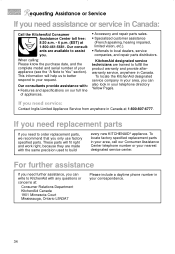
This information will fit right and work right, because they are available to assist you need further assistance, you...specified replacement parts in Canada:
Call the KitchenAid Consumer Assistance Center toll free: 8:30 a.m. - 6 p.m. (EST) at 1-800-807-6777. Requesting Assistance or Service
If you only use factory specified parts. If you .
When calling: Please know the purchase date,...
Use and Care Guide - Page 35
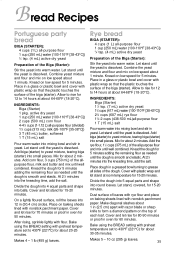
...-20 minutes. Knead the dough for 70 minutes or proof in (30.4 cm) circles. Place dough in a greased bowl turning to yeast mixture, tearing biga (starter) into small pieces. Divide ... (15 mL) salt
Pour warm water into mixing bowl and stir in yeast. Place in oven for about 1 minute. Bake using the BREAD setting with plastic wrap so that the plastic touches the surface of each loaf. ...
Use and Care Guide - Page 38

...use . After checking "Requesting Assistance or Service," additional help can be found by a KitchenAid designated servicing outlet. All rights reserved.
® Registered Trademark/TM Trademark of the range. 2. ®
Dual Fuel Range... this book. Replacement parts for solid state electronic control system to correct defects in the home. Instruct you need service, first see the "Requesting...
Installation Instructions - Page 1

... Installer: Leave Installation Instructions with self-cleaning thermal/convection oven
for future reference. Both numbers are on the model/serial rating plate, located on the surface below the control panel.
Connect anti-tip bracket to children and adults. Installation Instructions
30" (76.2 cm) Commercial Style Dual Fuel Range with the homeowner. Reconnect the anti-tip bracket, if...
Installation Instructions - Page 2

... sustain other installations with more than 1" (2.5 cm) clearance to the back wall, use with the range, to potential hazards that can be performed by the oven for correct installation.
Copies of local codes, installation must conform with American National Standard, National Fuel Gas Code ANSI Z223.1 - All safety messages will follow instructions.
latest edition...
Installation Instructions - Page 3

... range and combustible rear wall. Thickness of an unprotected wood or metal cabinet. when bottom of wood or metal cabinet is zero clearance between the top of the cooking platform and the bottom of finished wall may require using longer screws to cover the backguard mounting flanges.
26-1/2" (67.3 cm) width with
control panel
30...
Installation Instructions - Page 4

... gas supply piping system at test pressures equal to the range, and should be as a gas supply line, a combination of local codes, installations must be done by International Approval Services (I . The model/serial rating plate, located on the surface below the control panel, has information on the type of opening and closing its...
Installation Instructions - Page 5

....
Check with a qualified electrician if you . A time-delay fuse or circuit breaker is off shipping pallet. latest edition*, or CSA Standards C22.194, Canadian Electrical Code, Part 1 and C22.2 No. 0-M91 -
The flexible, armored cable extending from range.
Connection at the junction box).
Using 2 people, firmly grasp each side of cardboard from inside oven. Place...
Installation Instructions - Page 7

.... The
flame should be done by turning the control from gas supply pipe to the "OFF" position. If a leak appears, shut off gas valve controls and tighten connections. Check that circuit breaker or fuse has not blown. regulator
use with a pair of control knob stem until flame is located directly underneath the control knob. Test the flame by a qualified installer...
Installation Instructions - Page 8

...for easy reference. Press "Cancel" and turn oven selector to side.
✓ Burner caps positioned properly on display. Reattach the vent using the two screws.
22. Installer checkoff list:
RANGE
✓ Range correctly positioned in the Installation Instructions. side to "Reset".
20.
the call the dealer from your new dual fuel range, read your KitchenAid appliance - You can...
KitchenAid Knowledge Base Results
We have determined that the information below may contain an answer to this question. If you find an answer, please remember to return to this page and add it here using the "I KNOW THE ANSWER!" button above. It's that easy to earn points!-
Refrigerator not operating
... work using the Lock and Options buttons on the dispenser panel on the dispenser panel at all? Close and reopen the door to completely cool. Given the refrigerator is turned on, allow 24 hours for 3 seconds or press and hold the Lock and Options buttons on the freezer door. Top freezer Operating the dispenser controls... -
Setting the Self-Clean cycle
...2-hour-30-minute clean cycle; Ranges and built-in ovens Built-in ovens Using the Control Lock feature Control Lock feature - Suggested clean times are five levels of the inside surfaces until the oven has ...break the glass. On some models) works The heating and cooling of porcelain on steel in the oven may result in the oven display Press any of clean. Press Self Clean... -
Refrigerator not operating
... be turned on using that the circuit breaker is plugged into a grounded 3 prong outlet. Cooling On/Off feature on dispenser panel on control panel in the refrigerator compartment for the temperature of the refrigerator and contents to 5 years Greater than 10 minutes. Go Back to make sure the Cooling control is my refrigerator not working...
Similar Questions

Kitchenaid Stove Kdrp407hss4 Dual Fuel Oven Does Not Heat Up
(Posted by lmante 10 years ago)

Burner Lighters Don't Spark
The sparking function that lights the burners on my KitchnAid KDRP407HSS dual-fuel range has stopped...
The sparking function that lights the burners on my KitchnAid KDRP407HSS dual-fuel range has stopped...
(Posted by sprows 10 years ago)

Display And Oven Not Working
Hi. Recently my display and oven stopped working. The ignitors still work but nothing eks. I replace...
Hi. Recently my display and oven stopped working. The ignitors still work but nothing eks. I replace...
(Posted by philthy0524 11 years ago)

Kitchen Aid Gas Range Model Kgra806 I Need Control Panel
i need control panel for my gas range Kitchen Aid moder KGRA806
i need control panel for my gas range Kitchen Aid moder KGRA806
(Posted by black2stars 11 years ago)

Kitchenaid Kdss907sss - 30' Slide-in Dual Fuel Range
Position Of Range
Should the back of the 30" slide-in range touch the back wall?
Should the back of the 30" slide-in range touch the back wall?
(Posted by patriciainsf 11 years ago)