Use & Care Guide
Page 1
www.kitchenaid.com or www.KitchenAid.ca Table of Contents...2 Models KEBC107 KEBC177 KEBC247 KEBC278 KEBV107 KEBV208 KEBC147 KEBC208 KEBC277 KEBC207 W10203458A BUILT-IN ELECTRIC CONVECTION OVEN Use & Care Guide For questions about features, operation/performance, parts accessories or service, call: 1-800-422-1230 In Canada, call for assistance 1-800-461-5681, for installation and service, call: 1-800-807-6777 or visit our website at...
www.kitchenaid.com or www.KitchenAid.ca Table of Contents...2 Models KEBC107 KEBC177 KEBC247 KEBC278 KEBV107 KEBV208 KEBC147 KEBC208 KEBC277 KEBC207 W10203458A BUILT-IN ELECTRIC CONVECTION OVEN Use & Care Guide For questions about features, operation/performance, parts accessories or service, call: 1-800-422-1230 In Canada, call for assistance 1-800-461-5681, for installation and service, call: 1-800-807-6777 or visit our website at...
Use & Care Guide
Page 3
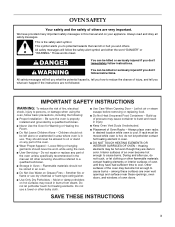
...have had sufficient time to persons, or damage when using the oven. ■ User Servicing - All safety messages will follow basic precautions, including the following: ■ Proper Installation - They should not be worn while using the oven, follow the safety alert symbol and either the word "DANGER" ...seriously injured if you how to sit or stand on Grease Fires - OVEN SAFETY Your safety and the safety of oven doors. This is properly installed and grounded by a qualified technician. ■ Never Use the Oven for Warming or Heating the Room. ■ Do Not Leave Children Alone...
...have had sufficient time to persons, or damage when using the oven. ■ User Servicing - All safety messages will follow basic precautions, including the following: ■ Proper Installation - They should not be worn while using the oven, follow the safety alert symbol and either the word "DANGER" ...seriously injured if you how to sit or stand on Grease Fires - OVEN SAFETY Your safety and the safety of oven doors. This is properly installed and grounded by a qualified technician. ■ Never Use the Oven for Warming or Heating the Room. ■ Do Not Leave Children Alone...
Use & Care Guide
Page 21
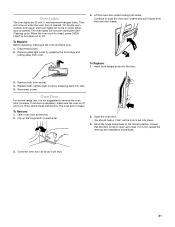
...wall. 5. Remove bulb from the oven door frame. Then, follow these instructions. Open the oven door. If it is not, repeat the removal and installation procedures. 3. Continue to turn them on each side. 2. Replace bulb, replace bulb cover by grasping the front edge and pulling away from oven. 4. Oven... Door For normal range use, it is not suggested to remove the oven door. However, if...
...wall. 5. Remove bulb from the oven door frame. Then, follow these instructions. Open the oven door. If it is not, repeat the removal and installation procedures. 3. Continue to turn them on each side. 2. Replace bulb, replace bulb cover by grasping the front edge and pulling away from oven. 4. Oven... Door For normal range use, it is not suggested to remove the oven door. However, if...
Use & Care Guide
Page 22
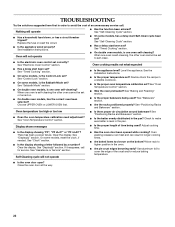
See Installation Instructions. See the Installation Instructions. ■ Is the proper temperature set ? See "Oven Temperature Control" section. ■ Was the oven preheated? See "Baking and Roasting" section. ■ Is the proper bakeware being used ? Check to higher position in the oven. &#...Clock" section. ■ Is the display showing a letter followed by a number? If it reappears, call . Choose UPPER OVEN or LOWER OVEN first. See "Oven Temperature Control" section. ■ Is the appliance level? Level the appliance. See "Self-Cleaning Cycle" section. ■ ...
See Installation Instructions. See the Installation Instructions. ■ Is the proper temperature set ? See "Oven Temperature Control" section. ■ Was the oven preheated? See "Baking and Roasting" section. ■ Is the proper bakeware being used ? Check to higher position in the oven. &#...Clock" section. ■ Is the display showing a letter followed by a number? If it reappears, call . Choose UPPER OVEN or LOWER OVEN first. See "Oven Temperature Control" section. ■ Is the appliance level? Level the appliance. See "Self-Cleaning Cycle" section. ■ ...
Use & Care Guide
Page 23
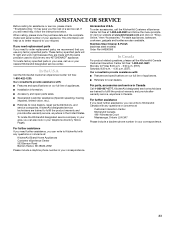
... service technicians are also available. To locate factory specified parts in your nearest KitchenAid designated service center. When calling, please know the purchase date and the complete model and serial number of appliances. ■ Installation information. ■ Accessory and repair parts sales. ■ Specialized customer assistance (Spanish speaking, hearing impaired, limited vision...
... service technicians are also available. To locate factory specified parts in your nearest KitchenAid designated service center. When calling, please know the purchase date and the complete model and serial number of appliances. ■ Installation information. ■ Accessory and repair parts sales. ■ Specialized customer assistance (Spanish speaking, hearing impaired, limited vision...
Use & Care Guide
Page 24
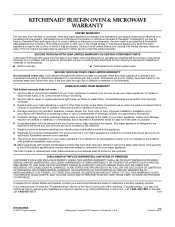
.... All rights reserved. ® Registered Trademark/TM Trademark of KitchenAid, U.S.A. 5/08 Printed in accordance with published installation instructions. 10. This limited warranty is valid only in the ...single-family household use or when it is used for other damage to the finish of your major appliance if it was purchased. Costs associated with the removal from your home of your authorized KitchenAid... In the U.S.A., call 1-800-807-6777. 9/07 W10203458A © 2008. KITCHENAID® BUILT-IN OVEN & MICROWAVE WARRANTY LIMITED WARRANTY For one year from the date of purchase, when...
.... All rights reserved. ® Registered Trademark/TM Trademark of KitchenAid, U.S.A. 5/08 Printed in accordance with published installation instructions. 10. This limited warranty is valid only in the ...single-family household use or when it is used for other damage to the finish of your major appliance if it was purchased. Costs associated with the removal from your home of your authorized KitchenAid... In the U.S.A., call 1-800-807-6777. 9/07 W10203458A © 2008. KITCHENAID® BUILT-IN OVEN & MICROWAVE WARRANTY LIMITED WARRANTY For one year from the date of purchase, when...
Installation Guide
Page 1
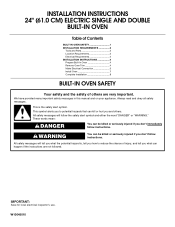
... symbol and either the word "DANGER" or "WARNING." INSTALLATION INSTRUCTIONS 24" (61.0 CM) ELECTRIC SINGLE AND DOUBLE BUILT-IN OVEN Table of Contents BUILT-IN OVEN SAFETY 1 INSTALLATION REQUIREMENTS 2 Tools and Parts 2 Location Requirements 2 Electrical Requirements 4 INSTALLATION INSTRUCTIONS 4 Prepare Built-In Oven 4 Remove Oven Trim 4 Make Electrical Connection 5 Install Oven 7 Complete Installation 8 BUILT-IN OVEN SAFETY Your safety and the safety of injury...
... symbol and either the word "DANGER" or "WARNING." INSTALLATION INSTRUCTIONS 24" (61.0 CM) ELECTRIC SINGLE AND DOUBLE BUILT-IN OVEN Table of Contents BUILT-IN OVEN SAFETY 1 INSTALLATION REQUIREMENTS 2 Tools and Parts 2 Location Requirements 2 Electrical Requirements 4 INSTALLATION INSTRUCTIONS 4 Prepare Built-In Oven 4 Remove Oven Trim 4 Make Electrical Connection 5 Install Oven 7 Complete Installation 8 BUILT-IN OVEN SAFETY Your safety and the safety of injury...
Installation Guide
Page 2
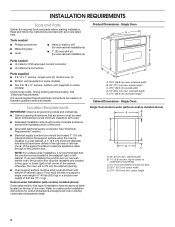
...Given dimensions provide minimum clearance with cooktop installed above ) A B E D C A. 24" (61 cm) min. Floor must be located 3" (7.6 cm) maximum below the support surface when the oven is recommended that are installing the junction box on some models) ...cm) max. recessed depth E. 27¹⁄₂" (69.9 cm) recessed height Cabinet Dimensions - Single Oven Single Oven Undercounter (without cooktop installed above ): Ovens approved for wall cabinet installations) Parts needed ■ UL listed or CSA approved conduit connector ■ UL listed wire connectors Parts ...
...Given dimensions provide minimum clearance with cooktop installed above ) A B E D C A. 24" (61 cm) min. Floor must be located 3" (7.6 cm) maximum below the support surface when the oven is recommended that are installing the junction box on some models) ...cm) max. recessed depth E. 27¹⁄₂" (69.9 cm) recessed height Cabinet Dimensions - Single Oven Single Oven Undercounter (without cooktop installed above ): Ovens approved for wall cabinet installations) Parts needed ■ UL listed or CSA approved conduit connector ■ UL listed wire connectors Parts ...

Installation Guide
Page 3
...B. 51" (129.5 cm) max. overall height C. 23³⁄₄" (60.3 cm) overall width D. 23" (58.4 cm) max. Oven front D. bottom of cutout to top of cutout to bottom of upper cabinet door C. 32" (81.3 cm) bottom of cabinet door F. 27³...;₂" (125.7 cm) recessed height A. 23¹⁄₄" (59.1 cm) min. cutout height Product Dimensions - Single Oven Installed in Cabinet A B F D E C A. 24" (61 cm) min. Double Oven Double Oven Installed in Cabinet A B F D E C A. 24" (61 cm) min. cabinet width B. 1" (2.5 cm) top of cutout to floor D. 22¹⁄₂" (57...
...B. 51" (129.5 cm) max. overall height C. 23³⁄₄" (60.3 cm) overall width D. 23" (58.4 cm) max. Oven front D. bottom of cutout to top of cutout to bottom of upper cabinet door C. 32" (81.3 cm) bottom of cabinet door F. 27³...;₂" (125.7 cm) recessed height A. 23¹⁄₄" (59.1 cm) min. cutout height Product Dimensions - Single Oven Installed in Cabinet A B F D E C A. 24" (61 cm) min. Double Oven Double Oven Installed in Cabinet A B F D E C A. 24" (61 cm) min. cabinet width B. 1" (2.5 cm) top of cutout to floor D. 22¹⁄₂" (57...

Installation Guide
Page 4
... two or more people to the oven's final location. A A Single oven A. See "Make Electrical Connection" section. ■ Flexible cable from inside the bag containing literature. 5. Do not use handle or any portion of the oven. ■ A UL listed or CSA approved conduit connector must conform with a qualified electrical installer if you will protect the lower...
... two or more people to the oven's final location. A A Single oven A. See "Make Electrical Connection" section. ■ Flexible cable from inside the bag containing literature. 5. Do not use handle or any portion of the oven. ■ A UL listed or CSA approved conduit connector must conform with a qualified electrical installer if you will protect the lower...
Installation Guide
Page 5
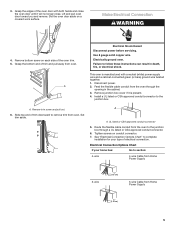
... 4-wire Cable from Home Power Supply 3-wire ½" (1.3 cm) 3-wire Cable from the oven to complete installation for your type of the oven trim. 5. 3. Set the oven door aside on conduit connector. 7. Remove bottom screw on each side of electrical connection. Install a UL listed or CSA approved conduit connector to follow these instructions can result...
... 4-wire Cable from Home Power Supply 3-wire ½" (1.3 cm) 3-wire Cable from the oven to complete installation for your type of the oven trim. 5. 3. Set the oven door aside on conduit connector. 7. Remove bottom screw on each side of electrical connection. Install a UL listed or CSA approved conduit connector to follow these instructions can result...
Installation Guide
Page 6
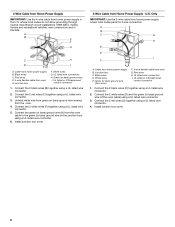
...new construction and in the U.S. A B E F G C H D I . Connect the 2 white wires (F) together using a UL listed wire connector. 4. Install junction box cover. 3-Wire Cable from home power supply B. Black wires D. Red wires H. UL listed wire connectors I A. Connect the 2 red wires (G) together...Cable from Home Power Supply IMPORTANT: Use the 4-wire cable from home power supply in Canada. Red wires D. 4-wire flexible cable from the oven. 4. Junction box F. White wires G. Green (or bare) ground wires I F A. UL listed or CSA approved conduit connector 1. Untwist ...
...new construction and in the U.S. A B E F G C H D I . Connect the 2 white wires (F) together using a UL listed wire connector. 4. Install junction box cover. 3-Wire Cable from home power supply B. Black wires D. Red wires H. UL listed wire connectors I A. Connect the 2 red wires (G) together...Cable from Home Power Supply IMPORTANT: Use the 4-wire cable from home power supply in Canada. Red wires D. 4-wire flexible cable from the oven. 4. Junction box F. White wires G. Green (or bare) ground wires I F A. UL listed or CSA approved conduit connector 1. Untwist ...
Installation Guide
Page 7
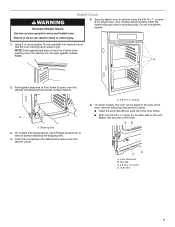
Securely fasten oven to move and install oven. Using 2 or more people to cabinet using the # 8-14 x 1" screws (2 for single oven, 4 for each side of oven front frame when pushing oven into slots (A) in mounting rails. Vent tab C. # 8-18 x ³⁄₈" screw D. Use two or more people, lift oven partially into cabinet cutout. NOTE: Push against outside edges...
Securely fasten oven to move and install oven. Using 2 or more people to cabinet using the # 8-14 x 1" screws (2 for single oven, 4 for each side of oven front frame when pushing oven into slots (A) in mounting rails. Vent tab C. # 8-18 x ³⁄₈" screw D. Use two or more people, lift oven partially into cabinet cutout. NOTE: Push against outside edges...
Installation Guide
Page 8
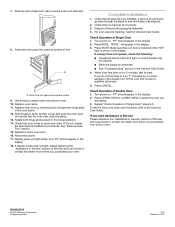
..."Troubleshooting" section in the display. 2. If you do not feel heat or if an "F" followed by inserting ends of your oven. Check Operation of Single Oven 1. Repeat "Check Operation of /recycle all of hinges into place and replace screw. 9. If you need Assistance or Service: ...purchased your tools. 3. Dispose of Single Oven" steps 2-5. "PF" should feel for lower oven door. 16. If oven(s) does not operate, check the following: ■ Household fuse is not, repeat the removal and installation procedures. To set the clock and other oven functions, refer to the locked position....
..."Troubleshooting" section in the display. 2. If you do not feel heat or if an "F" followed by inserting ends of your oven. Check Operation of Single Oven 1. Repeat "Check Operation of /recycle all of hinges into place and replace screw. 9. If you need Assistance or Service: ...purchased your tools. 3. Dispose of Single Oven" steps 2-5. "PF" should feel for lower oven door. 16. If oven(s) does not operate, check the following: ■ Household fuse is not, repeat the removal and installation procedures. To set the clock and other oven functions, refer to the locked position....


