Use & Care Guide
Page 1
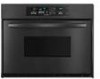
www.kitchenaid.com or www.KitchenAid.ca Table of Contents...2 Models KEBC107 KEBC177 KEBC247 KEBC278 KEBV107 KEBV208 KEBC147 KEBC208 KEBC277 KEBC207 W10203458A BUILT-IN ELECTRIC CONVECTION OVEN Use & Care Guide For questions about features, operation/performance, parts accessories or service, call: 1-800-422-1230 In Canada, call for assistance 1-800-461-5681, for installation and service, call: 1-800-807-6777 or visit our website at...
www.kitchenaid.com or www.KitchenAid.ca Table of Contents...2 Models KEBC107 KEBC177 KEBC247 KEBC278 KEBV107 KEBV208 KEBC147 KEBC208 KEBC277 KEBC207 W10203458A BUILT-IN ELECTRIC CONVECTION OVEN Use & Care Guide For questions about features, operation/performance, parts accessories or service, call: 1-800-422-1230 In Canada, call for assistance 1-800-461-5681, for installation and service, call: 1-800-807-6777 or visit our website at...
Use & Care Guide
Page 24
... find additional help by checking the "Assistance or Service" section or by an authorized KitchenAid servicer is not available. 9. Cosmetic damage, including scratches, dents, chips or other than normal, single-family household use your major appliance, unless such damage results from defects in materials or...YOU SPECIFIC LEGAL RIGHTS, AND YOU MAY ALSO HAVE OTHER RIGHTS WHICH VARY FROM STATE TO STATE OR PROVINCE TO PROVINCE. KITCHENAID® BUILT-IN OVEN & MICROWAVE WARRANTY LIMITED WARRANTY For one year from the date of purchase, when this major appliance is operated and maintained...
... find additional help by checking the "Assistance or Service" section or by an authorized KitchenAid servicer is not available. 9. Cosmetic damage, including scratches, dents, chips or other than normal, single-family household use your major appliance, unless such damage results from defects in materials or...YOU SPECIFIC LEGAL RIGHTS, AND YOU MAY ALSO HAVE OTHER RIGHTS WHICH VARY FROM STATE TO STATE OR PROVINCE TO PROVINCE. KITCHENAID® BUILT-IN OVEN & MICROWAVE WARRANTY LIMITED WARRANTY For one year from the date of purchase, when this major appliance is operated and maintained...
Installation Guide
Page 1
...." All safety messages will follow instructions. INSTALLATION INSTRUCTIONS 24" (61.0 CM) ELECTRIC SINGLE AND DOUBLE BUILT-IN OVEN Table of Contents BUILT-IN OVEN SAFETY 1 INSTALLATION REQUIREMENTS 2 Tools and Parts 2 Location Requirements 2 Electrical Requirements 4 INSTALLATION INSTRUCTIONS 4 Prepare Built-In Oven 4 Remove Oven Trim 4 Make Electrical Connection 5 Install Oven 7 Complete Installation 8 BUILT-IN OVEN SAFETY Your safety and the safety of injury, and...
...." All safety messages will follow instructions. INSTALLATION INSTRUCTIONS 24" (61.0 CM) ELECTRIC SINGLE AND DOUBLE BUILT-IN OVEN Table of Contents BUILT-IN OVEN SAFETY 1 INSTALLATION REQUIREMENTS 2 Tools and Parts 2 Location Requirements 2 Electrical Requirements 4 INSTALLATION INSTRUCTIONS 4 Prepare Built-In Oven 4 Remove Oven Trim 4 Make Electrical Connection 5 Install Oven 7 Complete Installation 8 BUILT-IN OVEN SAFETY Your safety and the safety of injury, and...

Installation Guide
Page 4
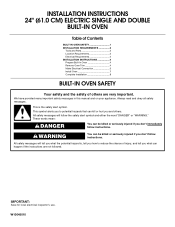
... damage, set aside racks and other injury. 2. Remove and set the oven onto cardboard prior to avoid drilling into cabinet. 3. Move oven and cardboard close to aluminum. A B A. Oven door latch in unlocked position 4 A A Single oven A. See "Make Electrical Connection" section. ■ Flexible cable from 7.3... standards can result in both hands to move and install oven. Open the oven door. 2. A copy of the front frame or trim for the oven. INSTALLATION INSTRUCTIONS Prepare Built-In Oven 1. This oven must be connected to do not remove the shipping feet at...
... damage, set aside racks and other injury. 2. Remove and set the oven onto cardboard prior to avoid drilling into cabinet. 3. Move oven and cardboard close to aluminum. A B A. Oven door latch in unlocked position 4 A A Single oven A. See "Make Electrical Connection" section. ■ Flexible cable from 7.3... standards can result in both hands to move and install oven. Open the oven door. 2. A copy of the front frame or trim for the oven. INSTALLATION INSTRUCTIONS Prepare Built-In Oven 1. This oven must be connected to do not remove the shipping feet at...
Installation Guide
Page 8
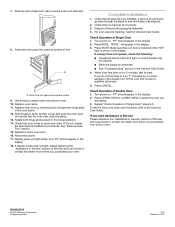
...BROIL" will go back through the steps to see which step was skipped. 2. Check Operation of Single Oven" steps 2-5. Press UPPER OVEN or LOWER OVEN, to oven. 10. A A. Replace oven racks. 11. See "Remove Oven Trim" section. 15. If there is not, repeat the removal and installation procedures. Push each ...18. Check that all parts are testing. 3. Make sure the oven door is closed and the "ON" light is intact and tight; Repeat "Check Operation of Double Oven 1. 7. Check that you purchased your built-in the display. Reconnect power. 17. If display panel does ...
...BROIL" will go back through the steps to see which step was skipped. 2. Check Operation of Single Oven" steps 2-5. Press UPPER OVEN or LOWER OVEN, to oven. 10. A A. Replace oven racks. 11. See "Remove Oven Trim" section. 15. If there is not, repeat the removal and installation procedures. Push each ...18. Check that all parts are testing. 3. Make sure the oven door is closed and the "ON" light is intact and tight; Repeat "Check Operation of Double Oven 1. 7. Check that you purchased your built-in the display. Reconnect power. 17. If display panel does ...


