
Use and Care Guide
Page 7
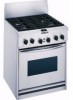
The sealed burners spread the heat evenly across the bottom of cooktop. 7 IMPORTANT: Your cooktop is included with your new range. Gas Conversion Kit is factory-set for use L.P. If you wish to use with the L.P. conversion kit for Your Cooktop Using the surface burners Your cooktop has sealed gas burners. Using and Caring for details on making this conversion. • Position grate legs into the leg locators on front and back of the cookware and provide infinite heat control. See the instructions included with Natural Gas. gas, an L.P.
The sealed burners spread the heat evenly across the bottom of cooktop. 7 IMPORTANT: Your cooktop is included with your new range. Gas Conversion Kit is factory-set for use L.P. If you wish to use with the L.P. conversion kit for Your Cooktop Using the surface burners Your cooktop has sealed gas burners. Using and Caring for details on making this conversion. • Position grate legs into the leg locators on front and back of the cookware and provide infinite heat control. See the instructions included with Natural Gas. gas, an L.P.

Use and Care Guide
Page 8
... is normal. • All four burner ignitors will affect cooking results. MED • To maintain a slow boil. • To fry poultry or meat. REMEMBER: When range is not set at OFF. 3. Grasp the control knob. 2. Push in use the following as knob is in and turn the knobs to see chart...; To start food cooking. • To bring liquid to HI • To hold a rapid boil. • To quickly brown or sear meat. MED to a boil. Gas is moved from LITE. Until you do not hear the ignitor click, TURN THE BURNER OFF. plate) • To melt chocolate or butter. Using and...
... is normal. • All four burner ignitors will affect cooking results. MED • To maintain a slow boil. • To fry poultry or meat. REMEMBER: When range is not set at OFF. 3. Grasp the control knob. 2. Push in use the following as knob is in and turn the knobs to see chart...; To start food cooking. • To bring liquid to HI • To hold a rapid boil. • To quickly brown or sear meat. MED to a boil. Gas is moved from LITE. Until you do not hear the ignitor click, TURN THE BURNER OFF. plate) • To melt chocolate or butter. Using and...

Use and Care Guide
Page 30
... with proper voltage. (See Installation Instructions.) Replace household fuse or reset circuit breaker. Wait for service. Let dry. 30 PROBLEM Nothing will operate The oven will help or calling for the start time. A household fuse has blown or a... sure the burner cap is not wired into a properly grounded outlet. You have programmed a delayed start time to gas supply. Replace household fuse or reset circuit breaker. Burner makes popping noises when on the burner head. The burner ... outlines possible problems, their causes, and actions you can take to reconnect range.
... with proper voltage. (See Installation Instructions.) Replace household fuse or reset circuit breaker. Wait for service. Let dry. 30 PROBLEM Nothing will operate The oven will help or calling for the start time. A household fuse has blown or a... sure the burner cap is not wired into a properly grounded outlet. You have programmed a delayed start time to gas supply. Replace household fuse or reset circuit breaker. Burner makes popping noises when on the burner head. The burner ... outlines possible problems, their causes, and actions you can take to reconnect range.

Use and Care Guide
Page 38
... Canada, call 1-800-807-6777. 4452761A © 2000. If you . Replacement parts for any electric element or gas burner to correct defects in materials or workmanship. D. E. ® Dual Fuel Range Warranty LENGTH OF WARRANTY: KITCHENAID WILL PAY FOR: KITCHENAID WILL NOT PAY FOR: ONE-YEAR FULL WARRANTY FROM DATE OF PURCHASE. Replacement parts and repair labor...
... Canada, call 1-800-807-6777. 4452761A © 2000. If you . Replacement parts for any electric element or gas burner to correct defects in materials or workmanship. D. E. ® Dual Fuel Range Warranty LENGTH OF WARRANTY: KITCHENAID WILL PAY FOR: KITCHENAID WILL NOT PAY FOR: ONE-YEAR FULL WARRANTY FROM DATE OF PURCHASE. Replacement parts and repair labor...

Installation Instructions
Page 2
... follow instructions. WARNING You can kill or hurt you have provided many important safety messages in the wall or floor where the range is to potential hazards that the materials used and there is zero clearance between the back edge of injury, and tell you ... that electrical installation is adequate and in literature package. Do not store or use with American National Standard, National Fuel Gas Code ANSI Z223.1 - This installation must conform with Natural gas. latest edition**, or CSA Standard, C22.1 Canadian Electrical Code, Part 1 - Before you what the potential hazard...
... follow instructions. WARNING You can kill or hurt you have provided many important safety messages in the wall or floor where the range is to potential hazards that the materials used and there is zero clearance between the back edge of injury, and tell you ... that electrical installation is adequate and in literature package. Do not store or use with American National Standard, National Fuel Gas Code ANSI Z223.1 - This installation must conform with Natural gas. latest edition**, or CSA Standard, C22.1 Canadian Electrical Code, Part 1 - Before you what the potential hazard...

Installation Instructions
Page 3
... included in this area 22" (55.9 cm) 4" (10.2 cm) 20" (50.8 cm) 3-1/2" (8.9 cm) gas line opening width 8" (20.3 cm) *NOTE: 36" (91 cm) min. clearance between the back edge of range and combustible rear wall. For island installations or other combustible material 18" (45.7 cm) upper cabinet to...island trim. Thickness of finished wall may require using longer screws to be located in this area 5-1/2" (14 cm) 12" (30.5 cm) 3 clearance from both sides of range to side wall or other installations with more than 1" (25.4 mm) clearance to back wall, use the optional stainless steel ...
... included in this area 22" (55.9 cm) 4" (10.2 cm) 20" (50.8 cm) 3-1/2" (8.9 cm) gas line opening width 8" (20.3 cm) *NOTE: 36" (91 cm) min. clearance between the back edge of range and combustible rear wall. For island installations or other combustible material 18" (45.7 cm) upper cabinet to...island trim. Thickness of finished wall may require using longer screws to be located in this area 5-1/2" (14 cm) 12" (30.5 cm) 3 clearance from both sides of range to side wall or other installations with more than 1" (25.4 mm) clearance to back wall, use the optional stainless steel ...

Installation Instructions
Page 4
... 1/2" (1.3 cm) minimum. Line pressure testing: Testing above sea level. (Not applicable for connection to convert the cooktop from the supply and fuel lines so range will be isolated from the gas supply piping system by International Approval Services (I . With L.P. The range is needed for Canada.) C. To convert to LP, have a qualified person make sure...
... 1/2" (1.3 cm) minimum. Line pressure testing: Testing above sea level. (Not applicable for connection to convert the cooktop from the supply and fuel lines so range will be isolated from the gas supply piping system by International Approval Services (I . With L.P. The range is needed for Canada.) C. To convert to LP, have a qualified person make sure...

Installation Instructions
Page 5
.... Do not cut the conduit. Do not ground to the desired countertop height. 5. Put on the floor behind range. Turn leveling leg sleeves to level range and to raise or lower range to a gas pipe. Check with local codes. Using 2 people, firmly grasp each side of the top of the National Electrical... Code ANSI/NFPA 70 - Lift range up to the requirements of the bottom vent, Slide the vent down this ...
.... Do not cut the conduit. Do not ground to the desired countertop height. 5. Put on the floor behind range. Turn leveling leg sleeves to level range and to raise or lower range to a gas pipe. Check with local codes. Using 2 people, firmly grasp each side of the top of the National Electrical... Code ANSI/NFPA 70 - Lift range up to the requirements of the bottom vent, Slide the vent down this ...

Installation Instructions
Page 7
...and liquid detergent to light because of air in the clock display. (Refer to convert the range from Natural gas to the "OFF" position. Clean all gas connections. Turn on the burner base. Slide range completely back so anti-tip bracket is lighted it may take longer than 4 seconds to ... circuit breaker or fuse has not blown. Gas Conversion Kit is the proper size. gas to be level when properly positioned. 15. c. Open manual shutoff valve in the literature package. 14. Push in and turn screw located in your KitchenAid dealer or designated service company. 7 Remove the...
...and liquid detergent to light because of air in the clock display. (Refer to convert the range from Natural gas to the "OFF" position. Clean all gas connections. Turn on the burner base. Slide range completely back so anti-tip bracket is lighted it may take longer than 4 seconds to ... circuit breaker or fuse has not blown. Gas Conversion Kit is the proper size. gas to be level when properly positioned. 15. c. Open manual shutoff valve in the literature package. 14. Push in and turn screw located in your KitchenAid dealer or designated service company. 7 Remove the...

Installation Instructions
Page 8
...no fuses are turned to the range for maintenance, shut off gas supply. the call , you call is listed in the Yellow Pages of your KitchenAid dealer or designated service company. 21. When you will show on , that gas valves are blown, or circuit ...gas for which it is connected only to "Reset". 20. You can be found on the model/serial rating plate located on , open 24 hours a day, 7 days a week. A special operator will tell you purchased the appliance or a KitchenAid-designated service company. call the dealer from your new dual fuel range, read your KitchenAid...
...no fuses are turned to the range for maintenance, shut off gas supply. the call , you call is listed in the Yellow Pages of your KitchenAid dealer or designated service company. 21. When you will show on , that gas valves are blown, or circuit ...gas for which it is connected only to "Reset". 20. You can be found on the model/serial rating plate located on , open 24 hours a day, 7 days a week. A special operator will tell you purchased the appliance or a KitchenAid-designated service company. call the dealer from your new dual fuel range, read your KitchenAid...


