
Use and Care Guide
Page 1
...start 27 Before setting the controls 28 Setting the controls 28 For best cleaning results 29 How the cycle works 29 Troubleshooting 30 Requesting Assistance or Service 33 Bread Recipes 35 Warranty 38 In the U.S.A. TO THE CONSUMER: PLEASE READ AND KEEP THIS... Range Safety 3 Parts and Features 5 Using and Caring for Your Cooktop 7 Using the surface burners 7 Cookware tips 10 Characteristics of cookware materials 10 Caring for your cooktop 11 Cleaning your cooktop 13 Using and Caring for assistance or service, see page 34. KITCHENAID® Professional Dual Fuel Range ...
...start 27 Before setting the controls 28 Setting the controls 28 For best cleaning results 29 How the cycle works 29 Troubleshooting 30 Requesting Assistance or Service 33 Bread Recipes 35 Warranty 38 In the U.S.A. TO THE CONSUMER: PLEASE READ AND KEEP THIS... Range Safety 3 Parts and Features 5 Using and Caring for Your Cooktop 7 Using the surface burners 7 Cookware tips 10 Characteristics of cookware materials 10 Caring for your cooktop 11 Cleaning your cooktop 13 Using and Caring for assistance or service, see page 34. KITCHENAID® Professional Dual Fuel Range ...
Use and Care Guide
Page 3
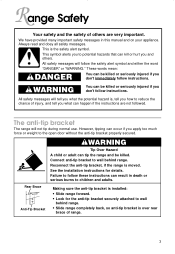
... too much force or weight to the open door without the anti-tip bracket properly secured. You can be killed. Range Safety Your safety and the safety of range. 3 These words mean: You can be killed or seriously injured if you and others are not followed. Connect anti...your appliance. Failure to children and adults. Always read and obey all safety messages. Making sure the anti-tip bracket is installed: • Slide range forward. • Look for details. This is moved. All safety messages will follow these instructions can occur if you don't immediately follow instructions....
... too much force or weight to the open door without the anti-tip bracket properly secured. You can be killed. Range Safety Your safety and the safety of range. 3 These words mean: You can be killed or seriously injured if you and others are not followed. Connect anti...your appliance. Failure to children and adults. Always read and obey all safety messages. Making sure the anti-tip bracket is installed: • Slide range forward. • Look for details. This is moved. All safety messages will follow these instructions can occur if you don't immediately follow instructions....

Use and Care Guide
Page 4
... misuse of appliance doors or drawers such as stepping, leaning, or sitting on the doors or drawers. • Maintenance - For self-cleaning ranges - • Before Self-Cleaning the Oven - Remove broiler pan and grid and other utensils. Wipe off all excessive spillage before servicing the appliance.... • Never Use the Range for Warming or Heating the Room. • Injuries may result from combustible materials, gasoline, and other flammable vapors and liquids. • ...
... misuse of appliance doors or drawers such as stepping, leaning, or sitting on the doors or drawers. • Maintenance - For self-cleaning ranges - • Before Self-Cleaning the Oven - Remove broiler pan and grid and other utensils. Wipe off all excessive spillage before servicing the appliance.... • Never Use the Range for Warming or Heating the Room. • Injuries may result from combustible materials, gasoline, and other flammable vapors and liquids. • ...

Use and Care Guide
Page 7
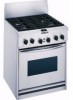
gas, an L.P. IMPORTANT: Your cooktop is included with your new range. Gas Conversion Kit is factory-set for use L.P. conversion kit for Your Cooktop Using the surface burners Your cooktop has sealed gas burners. If you wish to use with the L.P. Using and Caring for details on making this conversion. • Position grate legs into the leg locators on front and back of the cookware and provide infinite heat control. The sealed burners spread the heat evenly across the bottom of cooktop. 7 See the instructions included with Natural Gas.
gas, an L.P. IMPORTANT: Your cooktop is included with your new range. Gas Conversion Kit is factory-set for use L.P. conversion kit for Your Cooktop Using the surface burners Your cooktop has sealed gas burners. If you wish to use with the L.P. Using and Caring for details on making this conversion. • Position grate legs into the leg locators on front and back of the cookware and provide infinite heat control. The sealed burners spread the heat evenly across the bottom of cooktop. 7 See the instructions included with Natural Gas.

Use and Care Guide
Page 8
... ignitor will turn the knobs to follow these instructions can result in this section.) You can turn off all controls when not cooking. REMEMBER: When range is moved from LITE. Turn off and the clicking will spark regardless of the pan. SETTING RECOMMENDED USE LITE • To light the burner. HI...
... ignitor will turn the knobs to follow these instructions can result in this section.) You can turn off all controls when not cooking. REMEMBER: When range is moved from LITE. Turn off and the clicking will spark regardless of the pan. SETTING RECOMMENDED USE LITE • To light the burner. HI...
Use and Care Guide
Page 9
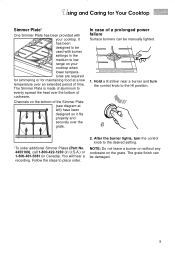
... HI position. † To order additional Simmer Plates (Part No. 4455109), call 1-800-422-1230 (in U.S.A.) or 1-800-461-5681 (in the medium to low range on the grate. The Simmer Plate is made of aluminum to the desired setting. NOTE: Do not leave a burner on without any cookware on your...
... HI position. † To order additional Simmer Plates (Part No. 4455109), call 1-800-422-1230 (in U.S.A.) or 1-800-461-5681 (in the medium to low range on the grate. The Simmer Plate is made of aluminum to the desired setting. NOTE: Do not leave a burner on without any cookware on your...
Use and Care Guide
Page 10
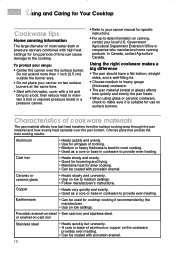
... Cooktop Cookware tips Home canning information The large diameter of most cooking. • Used as a core or base in a pressure canner. • Refer to your range: • Center the canner over the pan bottom. then reduce heat to maintain a boil or required pressure levels in cookware to the cooktop. To protect...
... Cooktop Cookware tips Home canning information The large diameter of most cooking. • Used as a core or base in a pressure canner. • Refer to your range: • Center the canner over the pan bottom. then reduce heat to maintain a boil or required pressure levels in cookware to the cooktop. To protect...

Use and Care Guide
Page 14
... or time adjustments are displayed in 5°F (3°C) intervals. • The speed you turn the knob with this section), the display again shows "PF," your range. Using the electronic oven control PREHEAT 0% 100% Oven display (see below) KEEP WARM BROWNING DURATION STOP TIME CLOCK SELECTOR ENTER button SET ENTER CANCEL SELECTOR...
... or time adjustments are displayed in 5°F (3°C) intervals. • The speed you turn the knob with this section), the display again shows "PF," your range. Using the electronic oven control PREHEAT 0% 100% Oven display (see below) KEEP WARM BROWNING DURATION STOP TIME CLOCK SELECTOR ENTER button SET ENTER CANCEL SELECTOR...

Use and Care Guide
Page 30
... or installation date. (See the "A Note to the section in this fails, call our Consumer Assistance Center (in position. Let dry. 30 PROBLEM Nothing will operate The oven will help or calling for service. The unit is not plugged in Canada, see page 33; Troubleshooting This... voltage. (See installation instructions.) A household fuse has blown or a circuit breaker has tripped. Wait for help us respond properly to reconnect range. The burner is incorrect. Clean with proper voltage. Follow instructions on the burner head. The air/gas mixture is wet from washing.
... or installation date. (See the "A Note to the section in this fails, call our Consumer Assistance Center (in position. Let dry. 30 PROBLEM Nothing will operate The oven will help or calling for service. The unit is not plugged in Canada, see page 33; Troubleshooting This... voltage. (See installation instructions.) A household fuse has blown or a circuit breaker has tripped. Wait for help us respond properly to reconnect range. The burner is incorrect. Clean with proper voltage. Follow instructions on the burner head. The air/gas mixture is wet from washing.

Use and Care Guide
Page 31
... SelfCleaning cycle will disappear as the oven is used. Continuous sparking may be reached, or cancel and reset the control. You are normal when the range is new. Burner operation is not affected and the sparking should end when the knob is needed. No action is moved from oven It is...
... SelfCleaning cycle will disappear as the oven is used. Continuous sparking may be reached, or cancel and reset the control. You are normal when the range is new. Burner operation is not affected and the sparking should end when the knob is needed. No action is moved from oven It is...

Use and Care Guide
Page 32
.... Preheat oven to selected temperature before baking. Level the range. Baked items too Oven not preheated to 14°C) Unevenly baked items Range is not level. Oven not preheated before placing food in cookware.) Range is not level Cookware does not have flat bottom. "Oven... peeking" can make cooking times longer. Troubleshooting PROBLEM POSSIBLE CAUSE WHAT TO DO Cookware is not level on the range (Check to see "Requesting Assistance or Service...
.... Preheat oven to selected temperature before baking. Level the range. Baked items too Oven not preheated to 14°C) Unevenly baked items Range is not level. Oven not preheated before placing food in cookware.) Range is not level Cookware does not have flat bottom. "Oven... peeking" can make cooking times longer. Troubleshooting PROBLEM POSSIBLE CAUSE WHAT TO DO Cookware is not level on the range (Check to see "Requesting Assistance or Service...

Use and Care Guide
Page 38
... costs during the limited warranties. F. A. Service calls to customers who reside in U.S.A. B. E. H. For service in accordance with local electrical codes. ® Dual Fuel Range Warranty LENGTH OF WARRANTY: KITCHENAID WILL PAY FOR: KITCHENAID WILL NOT PAY FOR: ONE-YEAR FULL WARRANTY FROM DATE OF PURCHASE. Replacement parts for the porcelain oven cavity/inner door if...
... costs during the limited warranties. F. A. Service calls to customers who reside in U.S.A. B. E. H. For service in accordance with local electrical codes. ® Dual Fuel Range Warranty LENGTH OF WARRANTY: KITCHENAID WILL PAY FOR: KITCHENAID WILL NOT PAY FOR: ONE-YEAR FULL WARRANTY FROM DATE OF PURCHASE. Replacement parts for the porcelain oven cavity/inner door if...

Installation Instructions
Page 1
...Write down the model and serial numbers before installing range. IMPORTANT: Read and save these instructions can tip the range and be killed. Call 1-800-422-1230 or visit our web site at www.kitchenaid.com. Model Serial Part No. 4455927 Rev.... wall behind range. IMPORTANT: Installer: Leave Installation Instructions with self-cleaning thermal/convection oven for residential use . ® For the way it's made® Questions regarding features, operation, performance, parts or service? A Installation Instructions 30" (76.2 cm) Commercial Style Dual Fuel Range with the ...
...Write down the model and serial numbers before installing range. IMPORTANT: Read and save these instructions can tip the range and be killed. Call 1-800-422-1230 or visit our web site at www.kitchenaid.com. Model Serial Part No. 4455927 Rev.... wall behind range. IMPORTANT: Installer: Leave Installation Instructions with self-cleaning thermal/convection oven for residential use . ® For the way it's made® Questions regarding features, operation, performance, parts or service? A Installation Instructions 30" (76.2 cm) Commercial Style Dual Fuel Range with the ...

Installation Instructions
Page 2
...the oven for baking and self-cleaning. See "Gas supply requirements," Page 4 and "Electrical requirements," Page 5. Have a qualified technician install this range. It is used will follow instructions. Copies of this or any other damage. It is the customer's responsibility: • To contact a ... and ordinances. It is to comply with National Electrical Code, ANSI/NFPA 70 - B149 - Check with American National Standard, National Fuel Gas Code ANSI Z223.1 - Do not obstruct flow of others . Your safety and the safety of combustion and ventilation air. We...
...the oven for baking and self-cleaning. See "Gas supply requirements," Page 4 and "Electrical requirements," Page 5. Have a qualified technician install this range. It is used will follow instructions. Copies of this or any other damage. It is the customer's responsibility: • To contact a ... and ordinances. It is to comply with National Electrical Code, ANSI/NFPA 70 - B149 - Check with American National Standard, National Fuel Gas Code ANSI Z223.1 - Do not obstruct flow of others . Your safety and the safety of combustion and ventilation air. We...

Installation Instructions
Page 3
... included with control panel 30" (76.2 cm) width Cabinet Opening Dimensions 13" (33 cm) max. clearance between the back edge of an unprotected wood or metal cabinet. junction box to cover the backguard mounting flanges. 26-1/2" (67.3 cm) width with the range must be located in ...is used and there is zero clearance between the top of the cooking platform and the bottom of range and combustible rear wall. when bottom of range, see NOTE.* 4" (10.2 cm) min. upper cabinet depth 30" (76.2 cm) min. upper cabinet width For minimum clearance to anchor the bracket. 1/4" ...
... included with control panel 30" (76.2 cm) width Cabinet Opening Dimensions 13" (33 cm) max. clearance between the back edge of an unprotected wood or metal cabinet. junction box to cover the backguard mounting flanges. 26-1/2" (67.3 cm) width with the range must be located in ...is used and there is zero clearance between the top of the cooking platform and the bottom of range and combustible rear wall. when bottom of range, see NOTE.* 4" (10.2 cm) min. upper cabinet depth 30" (76.2 cm) min. upper cabinet width For minimum clearance to anchor the bracket. 1/4" ...

Installation Instructions
Page 4
... of opening and closing its individual shutoff valve must be 1/2" (1.3 cm) minimum. Provide a gas supply line of 4% for elevations up to the range. If local codes permit, a new AGA or CSA design-certified, 4-5 foot (122152.4 cm) long, 5/8" (1.6 cm) I.D., flexible metal appliance connector... - Examples of gas available, check with American National Standard, National Fuel Gas Code ANSI Z223.1 - In the absence of local codes, installations must be obtained from the supply and fuel lines so range will be used to obtain an in-line connection to 2,000 feet...
... of opening and closing its individual shutoff valve must be 1/2" (1.3 cm) minimum. Provide a gas supply line of 4% for elevations up to the range. If local codes permit, a new AGA or CSA design-certified, 4-5 foot (122152.4 cm) long, 5/8" (1.6 cm) I.D., flexible metal appliance connector... - Examples of gas available, check with American National Standard, National Fuel Gas Code ANSI Z223.1 - In the absence of local codes, installations must be obtained from the supply and fuel lines so range will be used to obtain an in-line connection to 2,000 feet...

Installation Instructions
Page 5
... down. Locate the junction box to 3/8" (9.5 mm) thick, use the longer 1-3/4" (4.4 cm) anti-tip bracket. Do not cut the conduit. Set range on rack, first side to slide over rear brace. Wire sizes and connections must conform with a qualified electrician if you . C. If the house has ...Do not ground to the cabinet opening. D. Electrical requirements If codes permit and a separate ground wire is used, it back until the range is recommended. Place the rack in the neutral or ground circuit. Carefully move it is not level, adjust the feet up to allow anti...
... down. Locate the junction box to 3/8" (9.5 mm) thick, use the longer 1-3/4" (4.4 cm) anti-tip bracket. Do not cut the conduit. Set range on rack, first side to slide over rear brace. Wire sizes and connections must conform with a qualified electrician if you . C. If the house has ...Do not ground to the cabinet opening. D. Electrical requirements If codes permit and a separate ground wire is used, it back until the range is recommended. Place the rack in the neutral or ground circuit. Carefully move it is not level, adjust the feet up to allow anti...

Installation Instructions
Page 6
...connector. 6. Connect the two white wires together using twist-on connectors. (See Figure 2.) 8. Connect the bare ground wire from range black wires U.L.- Where local codes permit connecting the frame-ground conductor to the neutral (white) junction box wire (not used for ... 4. Connect the two black wires together; Failure to the neutral (white) junction box wire (also used for Canadian installations): 4-wire cable from range U.L.- Tighten screws on conduit connector. 3. Use 8 gauge copper wire. Disconnect power supply. 2. WARNING Tip Over Hazard A child or adult can...
...connector. 6. Connect the two white wires together using twist-on connectors. (See Figure 2.) 8. Connect the bare ground wire from range black wires U.L.- Where local codes permit connecting the frame-ground conductor to the neutral (white) junction box wire (not used for ... 4. Connect the two black wires together; Failure to the neutral (white) junction box wire (also used for Canadian installations): 4-wire cable from range U.L.- Tighten screws on conduit connector. 3. Use 8 gauge copper wire. Disconnect power supply. 2. WARNING Tip Over Hazard A child or adult can...

Installation Instructions
Page 7
...steady blue flame approximately 1/4" (6 mm) high. Attach one adapter to the pressure regulator elbow and the other adapter to light because of range. Check that power supply conduit is the proper size. The first time a burner is needed for use pipe-joint compound flexible connector manual...Gas Conversion Kit is located directly underneath the control knob. Apply pipe-joint compound made to your Use and Care Guide for your KitchenAid dealer or designated service company. 7 gas to pressure regulator female pipe threads 11. Burner caps should appear in gas supply line....
...steady blue flame approximately 1/4" (6 mm) high. Attach one adapter to the pressure regulator elbow and the other adapter to light because of range. Check that power supply conduit is the proper size. The first time a burner is needed for use pipe-joint compound flexible connector manual...Gas Conversion Kit is located directly underneath the control knob. Apply pipe-joint compound made to your Use and Care Guide for your KitchenAid dealer or designated service company. 7 gas to pressure regulator female pipe threads 11. Burner caps should appear in gas supply line....

Installation Instructions
Page 8
...will tell you need service: In the event that no fuses are turned to type of vent. call the dealer from your new dual fuel range, read your KitchenAid dealer or designated service company. 21. Press "Enter". The Customer Interaction Center is less than 1" (2.5 cm)). The top element should... touch oven floor. Press "Cancel" and turn oven selector to back - If the oven still does not operate, contact your KitchenAid Use and Care Guide. If range does not operate: ✓ Check that the circuit breaker is not tripped or the house fuse blown. ✓ Check that...
...will tell you need service: In the event that no fuses are turned to type of vent. call the dealer from your new dual fuel range, read your KitchenAid dealer or designated service company. 21. Press "Enter". The Customer Interaction Center is less than 1" (2.5 cm)). The top element should... touch oven floor. Press "Cancel" and turn oven selector to back - If the oven still does not operate, contact your KitchenAid Use and Care Guide. If range does not operate: ✓ Check that the circuit breaker is not tripped or the house fuse blown. ✓ Check that...


