

Instruction Manual
Page 1
... Audio product at our web site. These modes enable the remote control unit to receive e-mail updates and other KENWOOD DVD players. In order to effectively use the remote control it is important to read the operating instructions and obtain a proper understanding of ... completely understanding its design and how to switch its operation modes (etc.). B60-5534-00 00 CS (K, P) 0412 For the U.S.A. AUDIO VIDEO SURROUND RECEIVER VR-9050 INSTRUCTION MANUAL KENWOOD CORPORATION About the supplied remote control Compared to standard remote controls, the remote control supplied with this...
... Audio product at our web site. These modes enable the remote control unit to receive e-mail updates and other KENWOOD DVD players. In order to effectively use the remote control it is important to read the operating instructions and obtain a proper understanding of ... completely understanding its design and how to switch its operation modes (etc.). B60-5534-00 00 CS (K, P) 0412 For the U.S.A. AUDIO VIDEO SURROUND RECEIVER VR-9050 INSTRUCTION MANUAL KENWOOD CORPORATION About the supplied remote control Compared to standard remote controls, the remote control supplied with this...
Instruction Manual
Page 2
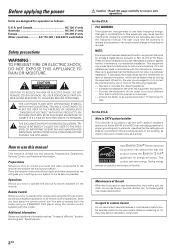
... no guarantee that provides guidelines for energy efficiency. Be specially careful not to provide reasonable protection against harmful interference in accordance with this receiver works with a soft, dry cloth. THE LIGHTNING FLASH WITH ARROWHEAD SYMBOL, WITHIN AN EQUILATERAL TRIANGLE, IS INTENDED TO ALERT THE USER... : TO PREVENT FIRE OR ELECTRIC SHOCK, DO NOT EXPOSE THIS APPLIANCE TO RAIN OR MOISTURE. As an ENERGY STAR® Partner, Kenwood Corporation has determined that this product meets the ENERGY STAR® guidelines for proper grounding and, in setting up your system to be ...
... no guarantee that provides guidelines for energy efficiency. Be specially careful not to provide reasonable protection against harmful interference in accordance with this receiver works with a soft, dry cloth. THE LIGHTNING FLASH WITH ARROWHEAD SYMBOL, WITHIN AN EQUILATERAL TRIANGLE, IS INTENDED TO ALERT THE USER... : TO PREVENT FIRE OR ELECTRIC SHOCK, DO NOT EXPOSE THIS APPLIANCE TO RAIN OR MOISTURE. As an ENERGY STAR® Partner, Kenwood Corporation has determined that this product meets the ENERGY STAR® guidelines for proper grounding and, in setting up your system to be ...
Instruction Manual
Page 3
...Contents Caution : Read the pages marked carefully to radio broadcasts 24 Tuning radio stations 24 Presetting radio stations manually 24 Receiving preset stations 25 Receiving preset stations in order (P.CALL) ... 25 Ambience effects 26 Surround modes 26 Surround play 28 DVD 6-channel playback ...30 Convenient functions 30 Adjusting the sound 30 Display dimmer adjustment 32 Sleep timer 32 Remote Control Basic remote control operations for KENWOOD ...
...Contents Caution : Read the pages marked carefully to radio broadcasts 24 Tuning radio stations 24 Presetting radio stations manually 24 Receiving preset stations 25 Receiving preset stations in order (P.CALL) ... 25 Ambience effects 26 Surround modes 26 Surround play 28 DVD 6-channel playback ...30 Convenient functions 30 Adjusting the sound 30 Display dimmer adjustment 32 Sleep timer 32 Remote Control Basic remote control operations for KENWOOD ...
Instruction Manual
Page 4
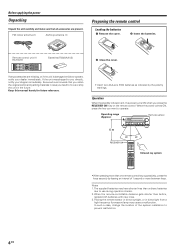
... leaving an interval of the system installation to use during operation checks. 2. Operating range (Approx.) Remote sensor 6 m RECEIVER ON Infrared ray system • When pressing more between keys. The supplied batteries may cause a malfunction. Kenwood recommends that all accessories are missing, or if the unit is lit, the power turns ON when...
... leaving an interval of the system installation to use during operation checks. 2. Operating range (Approx.) Remote sensor 6 m RECEIVER ON Infrared ray system • When pressing more between keys. The supplied batteries may cause a malfunction. Kenwood recommends that all accessories are missing, or if the unit is lit, the power turns ON when...
Instruction Manual
Page 5
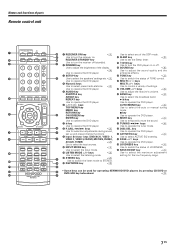
You can also control KENWOOD DVD players directly without using the DVD Special features. 5 EN GAME mode function ) When you connect a game machine to "GAME" and the optimum sound field ... mode will produce a more impressive sound effect when ACTIVE EQ is turned on the front panel, the input selector of surround modes to the basic receiver operations, this IR remote control supplied can enjoy a more dynamic sound quality in playing video games. Before applying the power Special features True home theater...
You can also control KENWOOD DVD players directly without using the DVD Special features. 5 EN GAME mode function ) When you connect a game machine to "GAME" and the optimum sound field ... mode will produce a more impressive sound effect when ACTIVE EQ is turned on the front panel, the input selector of surround modes to the basic receiver operations, this IR remote control supplied can enjoy a more dynamic sound quality in playing video games. Before applying the power Special features True home theater...

Instruction Manual
Page 6
... indicator indicators Listen mode indicators SLEEP indicator *Input channel indicators Input channel indicators light up the memory. DTS mode LED indicator ª Lights when the receiver is in the preset memory. ) SETUP key & Use to select the speakers' settings etc. ¡ keys & Use for headphone listening. $ Input... or manual tuning mode. * TONE key ¡ Use to AV AUX or GAME. DOLBY DIGITAL mode indicator ª Lights when the receiver is in the ACTIVE EQ mode. This is supplied to the system to back up according to select BASS BOOST setting. 5 Surround LED ...
... indicator indicators Listen mode indicators SLEEP indicator *Input channel indicators Input channel indicators light up the memory. DTS mode LED indicator ª Lights when the receiver is in the preset memory. ) SETUP key & Use to select the speakers' settings etc. ¡ keys & Use for headphone listening. $ Input... or manual tuning mode. * TONE key ¡ Use to AV AUX or GAME. DOLBY DIGITAL mode indicator ª Lights when the receiver is in the ACTIVE EQ mode. This is supplied to the system to back up according to select BASS BOOST setting. 5 Surround LED ...
Instruction Manual
Page 7
... to switch the status of TONE control. * MULTI #/@ keys MULTI %/fi keys Use to control a variety of settings. ( VOLUME %/fi keys ) Use to adjust the receiver's volume. ) BAND key ¢ Use to select the broadcast band. 3/8 key Use to turn the DVD player on . AUTO/MONO key • Use to select... ON SCREEN key ENTER key Use to operate the DVD player. 7 8 key Use to operate the DVD player. 8 P.CALL 4/¢ keys ∞ Use for operating KENWOOD DVD players by pressing CD/DVD or DVD/6CH key beforehand. ‹ 7 EN
... to switch the status of TONE control. * MULTI #/@ keys MULTI %/fi keys Use to control a variety of settings. ( VOLUME %/fi keys ) Use to adjust the receiver's volume. ) BAND key ¢ Use to select the broadcast band. 3/8 key Use to turn the DVD player on . AUTO/MONO key • Use to select... ON SCREEN key ENTER key Use to operate the DVD player. 7 8 key Use to operate the DVD player. 8 P.CALL 4/¢ keys ∞ Use for operating KENWOOD DVD players by pressing CD/DVD or DVD/6CH key beforehand. ‹ 7 EN
Instruction Manual
Page 8
... 3 6CH INPUT (DVD/6CH input only) 4 ANALOG (analog input) Auto detect: In FULL AUTO mode ("AUTO DETECT" indicator lights up), the receiver detects the digital or analog input signals automatically. Do not connect power cords from a VCR, etc. Analog connections Audio connections are FULL AUTO. These cables... unit. 3. Notes 1. Be sure to keep the decoding condition (Dolby Digital, DTS, PCM, etc.) in an "analog" form. The receiver will be produced. These cables transfer stereo audio signal in the current listen mode. Fixed to digital input: Select this mode if you are ...
... 3 6CH INPUT (DVD/6CH input only) 4 ANALOG (analog input) Auto detect: In FULL AUTO mode ("AUTO DETECT" indicator lights up), the receiver detects the digital or analog input signals automatically. Do not connect power cords from a VCR, etc. Analog connections Audio connections are FULL AUTO. These cables... unit. 3. Notes 1. Be sure to keep the decoding condition (Dolby Digital, DTS, PCM, etc.) in an "analog" form. The receiver will be produced. These cables transfer stereo audio signal in the current listen mode. Fixed to digital input: Select this mode if you are ...
Instruction Manual
Page 9
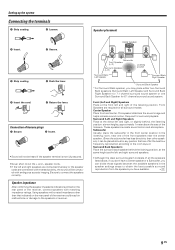
...1 Strip coating. 2 Loosen. Subwoofer Usually, place the subwoofer in the front center position in malfunctions or damage to the speakers or receiver. Using speakers with matching impedance ratings. speaker cords. • If the left and right surround speakers. • Although the ideal ...placement 3 Insert. 4 Secure. 1 Strip coating. 2 Push the lever. 3 Insert the cord. 4 Return the lever. Connection of the receiver could result in the listening room, near one Surround Back Speaker for 7.1 channel surround sound system or one of the front speakers near the center...
...1 Strip coating. 2 Loosen. Subwoofer Usually, place the subwoofer in the front center position in malfunctions or damage to the speakers or receiver. Using speakers with matching impedance ratings. speaker cords. • If the left and right surround speakers. • Although the ideal ...placement 3 Insert. 4 Secure. 1 Strip coating. 2 Push the lever. 3 Insert the cord. 4 Return the lever. Connection of the receiver could result in the listening room, near one Surround Back Speaker for 7.1 channel surround sound system or one of the front speakers near the center...
Instruction Manual
Page 10
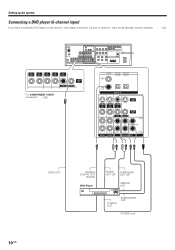
Setting up the system Connecting a DVD player (6-channel input) If you have connected a DVD player to the receiver with digital connection, be sure to read the "Input mode settings" section carefully. 8 OUT VIDEO IN VIDEO IN VIDEO IN VIDEO IN VIDEO VIDEO OUT ...
Setting up the system Connecting a DVD player (6-channel input) If you have connected a DVD player to the receiver with digital connection, be sure to read the "Input mode settings" section carefully. 8 OUT VIDEO IN VIDEO IN VIDEO IN VIDEO IN VIDEO VIDEO OUT ...

Instruction Manual
Page 11
... with the H symbol is used when another equalizer amplifier is not for noise reduction of the unit. • Leave a space around the unit (from the receiver unit. Top panel : 50 cm Side panel : 10 cm Back panel : 10 cm 11 EN
... with the H symbol is used when another equalizer amplifier is not for noise reduction of the unit. • Leave a space around the unit (from the receiver unit. Top panel : 50 cm Side panel : 10 cm Back panel : 10 cm 11 EN

Instruction Manual
Page 13
... the video signal and analog audio signals to the VIDEO 3 jacks. (See "Connecting video compo- If you have connected any digital components to the receiver, be sure to read the "Input mode settings" section carefully. 8 COAXIAL VIDEO 2 OPTICAL OPTICAL CD/DVD VIDEO 3 DVD/ 6CH DIGITAL IN COAXIAL...DIGITAL OUT Connect the video signal and digital audio signals to the VIDEO 2 jacks. (See "Connecting video compo- Connect components capable of the receiver. Next, connect the DIGITAL OUT jacks of the demodulator to the DIGITAL IN jacks of outputting DTS, Dolby Digital, or standard PCM (CD...
... the video signal and analog audio signals to the VIDEO 3 jacks. (See "Connecting video compo- If you have connected any digital components to the receiver, be sure to read the "Input mode settings" section carefully. 8 COAXIAL VIDEO 2 OPTICAL OPTICAL CD/DVD VIDEO 3 DVD/ 6CH DIGITAL IN COAXIAL...DIGITAL OUT Connect the video signal and digital audio signals to the VIDEO 2 jacks. (See "Connecting video compo- Connect components capable of the receiver. Next, connect the DIGITAL OUT jacks of the demodulator to the DIGITAL IN jacks of outputting DTS, Dolby Digital, or standard PCM (CD...
Instruction Manual
Page 14
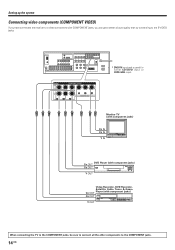
... picture quality than by connecting to the COMPONENT jacks. 14 EN Setting up the system Connecting video components (COMPONENT VIDEO) If you have connected the receiver to a video component with component jacks) CB OUT Y OUT When connecting the TV to the COMPONENT jacks, be sure to connect all the other components...
... picture quality than by connecting to the COMPONENT jacks. 14 EN Setting up the system Connecting video components (COMPONENT VIDEO) If you have connected the receiver to a video component with component jacks) CB OUT Y OUT When connecting the TV to the COMPONENT jacks, be sure to connect all the other components...
Instruction Manual
Page 16
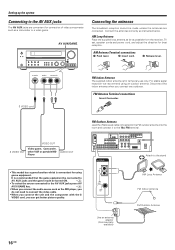
... AV AUX/GAME key. ) • When you connect the audio source such as a camcorder or a video game. Connect the antennas correctly as possible from the receiver, TV set, speaker cords and power cord, and adjust the direction for connection of video components such as the MD player, you do not need...
... AV AUX/GAME key. ) • When you connect the audio source such as a camcorder or a video game. Connect the antennas correctly as possible from the receiver, TV set, speaker cords and power cord, and adjust the direction for connection of video components such as the MD player, you do not need...
Instruction Manual
Page 17
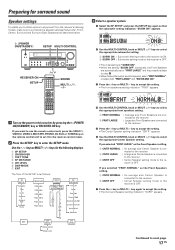
...Surround Back Speakers) as the Front Speakers setting, 1 CNTR NORMAL 2 CNTR OFF : An average size Center Speaker is connected to the receiver. : Center Speaker setting mode to the receiver is OFF. 7 Press the ∧ key or MULTI # key again to accept the setting. • The Surround Speaker setting ...60Hz FREQ:80Hz FREQ:100Hz FREQ:120Hz FREQ:150Hz T. If you selected "FRNT NORMAL" as described below. (POWER ON/STANDBY) SETUP MULTI CONTROL RECEIVER ON SETUP SOUND MULTI 1 Turn on the remote control unit to set to "FRNT LARGE" and the procedure skips to step 6. • When...
...Surround Back Speakers) as the Front Speakers setting, 1 CNTR NORMAL 2 CNTR OFF : An average size Center Speaker is connected to the receiver. : Center Speaker setting mode to the receiver is OFF. 7 Press the ∧ key or MULTI # key again to accept the setting. • The Surround Speaker setting ...60Hz FREQ:80Hz FREQ:100Hz FREQ:120Hz FREQ:150Hz T. If you selected "FRNT NORMAL" as described below. (POWER ON/STANDBY) SETUP MULTI CONTROL RECEIVER ON SETUP SOUND MULTI 1 Turn on the remote control unit to set to "FRNT LARGE" and the procedure skips to step 6. • When...
Instruction Manual
Page 18
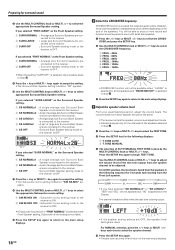
...T.TONE AUTO 2 T.TONE MANUAL 3 The selection of the speakers. From your usual listening position, adjust the volume levels. ers are connected to the receiver. 5 SB OFF : Surround Back Speaker setting mode to select the CROSS- The channel indication blinks while the test tone is appeared on the size... the setting. • The Surround Back Speaker setting indication "SB" appears. 0 Use the MULTI CONTROL knob or MULTI %/fi keys to the receiver is heard from the speakers in step 3. 1 Press the ∧/∨ keys or MULTI @/#keys to the main setup displays. 5 Adjust the ...
...T.TONE AUTO 2 T.TONE MANUAL 3 The selection of the speakers. From your usual listening position, adjust the volume levels. ers are connected to the receiver. 5 SB OFF : Surround Back Speaker setting mode to select the CROSS- The channel indication blinks while the test tone is appeared on the size... the setting. • The Surround Back Speaker setting indication "SB" appears. 0 Use the MULTI CONTROL knob or MULTI %/fi keys to the receiver is heard from the speakers in step 3. 1 Press the ∧/∨ keys or MULTI @/#keys to the main setup displays. 5 Adjust the ...
Instruction Manual
Page 20
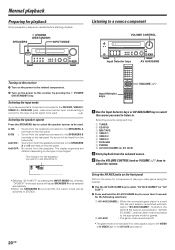
...] (or AV AUX) 2 Start playback from the speakers connected to adjust the volume. The indicator for the speakers you want to listen to this receiver by pressing the INPUT MODE key, whereby "DVD/6CH" is the input source will cause SPEAKERS A to be selected automatically. • When the ... will be used . SPEAKERS (POWER ON/STANDBY) INPUT MODE Listening to a source component VOLUME CONTROL Input Selector keys AV AUX/GAME Turning on the receiver 1 Turn on the power to the related components. 2 Turn on the rear panel. Input Selector keys VOLUME %/fi 1 Use the Input Selector ...
...] (or AV AUX) 2 Start playback from the speakers connected to adjust the volume. The indicator for the speakers you want to listen to this receiver by pressing the INPUT MODE key, whereby "DVD/6CH" is the input source will cause SPEAKERS A to be selected automatically. • When the ... will be used . SPEAKERS (POWER ON/STANDBY) INPUT MODE Listening to a source component VOLUME CONTROL Input Selector keys AV AUX/GAME Turning on the receiver 1 Turn on the power to the related components. 2 Turn on the rear panel. Input Selector keys VOLUME %/fi 1 Use the Input Selector ...
Instruction Manual
Page 21
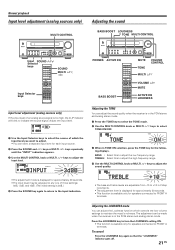
Adjusting the TONE You can adjust the sound quality when the receiver is available only for approximately 20 seconds. • This function is in the PCM stereo and analog stereo mode. 1 Press the TONE key to select ... DOLBY PL II x SL S SB SR • The adjustment mode is displayed for approximately 20 seconds. • The input level may be made when the receiver is available only for speakers connected to turn the LOUDNESS setting ON. • This function is in TONE ON selection, press the TONE key for...
Adjusting the TONE You can adjust the sound quality when the receiver is available only for approximately 20 seconds. • This function is in the PCM stereo and analog stereo mode. 1 Press the TONE key to select ... DOLBY PL II x SL S SB SR • The adjustment mode is displayed for approximately 20 seconds. • The input level may be made when the receiver is available only for speakers connected to turn the LOUDNESS setting ON. • This function is in TONE ON selection, press the TONE key for...
Instruction Manual
Page 22
... BOOST key. • Press the key once to select the maximum (+10) low frequency emphasis setting. • This key does not function when the receiver is turned OFF. (The ACTIVE EQ indicator goes off . 2 Use the VOLUME CONTROL knob or VOLUME %/fi keys to the previous setting Press the ...BASS BOOST key again. Switching back to adjust the volume. 22 EN ACTIVE EQ mode You can adjust the sound quality when the receiver is in the sound quality or ambience effects adjustment mode. • This function is available only for the following selections; 1 ACTIVE EQ MUSIC : ...
... BOOST key. • Press the key once to select the maximum (+10) low frequency emphasis setting. • This key does not function when the receiver is turned OFF. (The ACTIVE EQ indicator goes off . 2 Use the VOLUME CONTROL knob or VOLUME %/fi keys to the previous setting Press the ...BASS BOOST key again. Switching back to adjust the volume. 22 EN ACTIVE EQ mode You can adjust the sound quality when the receiver is in the sound quality or ambience effects adjustment mode. • This function is available only for the following selections; 1 ACTIVE EQ MUSIC : ...

Instruction Manual
Page 24
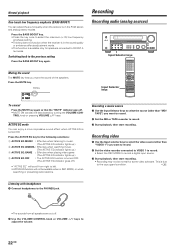
... select the tuner. 2 Use the BAND key to "AUTO" (auto tuning). "AUTO" indicator lights up to store. 2 Press the MEMORY key while receiving the station. "STEREO" lights when a broadcast is tuned automatically. Each press switches the band. STEREO RDS RTY AUTO • Normally, set to select ... the MULTI CONTROL knob or MULTI %/ fi keys, or TUNING 1 / ¡ keys to manual tuning. (With manual tuning, stereo broadcasts will be received in the memory and recall them by the new one -touch operation. Manual tuning : Turn the knob or use the MULTI %/fi keys to select...
... select the tuner. 2 Use the BAND key to "AUTO" (auto tuning). "AUTO" indicator lights up to store. 2 Press the MEMORY key while receiving the station. "STEREO" lights when a broadcast is tuned automatically. Each press switches the band. STEREO RDS RTY AUTO • Normally, set to select ... the MULTI CONTROL knob or MULTI %/ fi keys, or TUNING 1 / ¡ keys to manual tuning. (With manual tuning, stereo broadcasts will be received in the memory and recall them by the new one -touch operation. Manual tuning : Turn the knob or use the MULTI %/fi keys to select...