

Instruction Manual
Page 1
B60-5534-00 00 CS (K, P) 0412 AUDIO VIDEO SURROUND RECEIVER VR-9050 INSTRUCTION MANUAL KENWOOD CORPORATION About the supplied remote control Compared to control other offers when you register at www.kenwoodusa.com Plus opt in incorrect operations. In ... the remote control and how to switch its design and how to switch the operation modes may result in to receive e-mail updates and other KENWOOD DVD players. Register Online Register your Kenwood Home Audio product at our web site. For the U.S.A. Using the remote control without completely understanding its operation modes ...
B60-5534-00 00 CS (K, P) 0412 AUDIO VIDEO SURROUND RECEIVER VR-9050 INSTRUCTION MANUAL KENWOOD CORPORATION About the supplied remote control Compared to control other offers when you register at www.kenwoodusa.com Plus opt in incorrect operations. In ... the remote control and how to switch its design and how to switch the operation modes may result in to receive e-mail updates and other KENWOOD DVD players. Register Online Register your Kenwood Home Audio product at our web site. For the U.S.A. Using the remote control without completely understanding its operation modes ...
Instruction Manual
Page 2
...safe operation. This equipment may generate or use radio frequency energy. How to use contact cleaners because it is made. Since this receiver works with a soft, dry cloth. U.S.A. THE EXCLAMATION POINT WITHIN AN EQUILATERAL TRIANGLE IS INTENDED TO ALERT THE USER TO THE ...processor. Increase the separation between the equipment and receiver. - - Remote Control Shows you in particular, specifies that interference will not occur in the instruction manual. This product can be able to operate both this model and your KENWOOD DVD player using the remote control, as ...
...safe operation. This equipment may generate or use radio frequency energy. How to use contact cleaners because it is made. Since this receiver works with a soft, dry cloth. U.S.A. THE EXCLAMATION POINT WITHIN AN EQUILATERAL TRIANGLE IS INTENDED TO ALERT THE USER TO THE ...processor. Increase the separation between the equipment and receiver. - - Remote Control Shows you in particular, specifies that interference will not occur in the instruction manual. This product can be able to operate both this model and your KENWOOD DVD player using the remote control, as ...
Instruction Manual
Page 3
...AV AUX jacks 16 Connecting the antennas 16 Preparing for surround sound 17 Speaker settings 17 Operations Normal playback 20 Preparing for KENWOOD DVD players 33 DVD player operation keys 33 Additional Information In case of difficulty 34 Specifications 36 3 EN Before applying ...Contents Caution : Read the pages marked carefully to radio broadcasts 24 Tuning radio stations 24 Presetting radio stations manually 24 Receiving preset stations 25 Receiving preset stations in order (P.CALL) ... 25 Ambience effects 26 Surround modes 26 Surround play 28 DVD 6-channel playback 30...
...AV AUX jacks 16 Connecting the antennas 16 Preparing for surround sound 17 Speaker settings 17 Operations Normal playback 20 Preparing for KENWOOD DVD players 33 DVD player operation keys 33 Additional Information In case of difficulty 34 Specifications 36 3 EN Before applying ...Contents Caution : Read the pages marked carefully to radio broadcasts 24 Tuning radio stations 24 Presetting radio stations manually 24 Receiving preset stations 25 Receiving preset stations in order (P.CALL) ... 25 Ambience effects 26 Surround modes 26 Surround play 28 DVD 6-channel playback 30...
Instruction Manual
Page 4
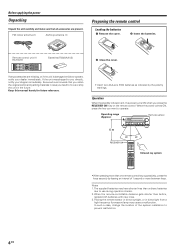
Remote control unit (1) RC-R0731 Batteries (R03/AAA) (2) 3 Close the cover. Kenwood recommends that all accessories are missing, or if the unit is lit, the power turns ON when you directly, notify your dealer immediately. Keep this ... shorter lives than before, replace both batteries with new ones. 3. If the unit was shipped to you press the RECEIVER ON key on the remote control. Operating range (Approx.) Remote sensor 6 m RECEIVER ON Infrared ray system • When pressing more than one remote control key successively, press the keys securely by the...
Remote control unit (1) RC-R0731 Batteries (R03/AAA) (2) 3 Close the cover. Kenwood recommends that all accessories are missing, or if the unit is lit, the power turns ON when you directly, notify your dealer immediately. Keep this ... shorter lives than before, replace both batteries with new ones. 3. If the unit was shipped to you press the RECEIVER ON key on the remote control. Operating range (Approx.) Remote sensor 6 m RECEIVER ON Infrared ray system • When pressing more than one remote control key successively, press the keys securely by the...
Instruction Manual
Page 5
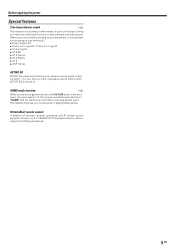
... modes to the AV AUX jacks on . Before applying the power Special features True home theater sound § This receiver incorporates a wide variety of the receiver switches automatically to "GAME" and the optimum sound field for enjoying games is set. IR (InfraRed) remote control In...enjoy a more dynamic sound quality in playing video games. This feature improves your video software and audio source. You can also control KENWOOD DVD players directly without using the DVD Special features. 5 EN Select a surround mode according to your equipment or the software you connect...
... modes to the AV AUX jacks on . Before applying the power Special features True home theater sound § This receiver incorporates a wide variety of the receiver switches automatically to "GAME" and the optimum sound field for enjoying games is set. IR (InfraRed) remote control In...enjoy a more dynamic sound quality in playing video games. This feature improves your video software and audio source. You can also control KENWOOD DVD players directly without using the DVD Special features. 5 EN Select a surround mode according to your equipment or the software you connect...

Instruction Manual
Page 6
...the display. º ! Standby indicator 2 SPEAKERS A/B keys ) Use to turn the power ON/STANDBY. DOLBY DIGITAL mode indicator ª Lights when the receiver is in the preset memory. ) SETUP key & Use to select the speakers' settings etc. ¡ keys & Use for headphone listening. $ Input Selector...( MEMORY key ¢ Use to store radio stations in the 96kHz LPCM playback mode. ACTIVE EQ mode indicator ™ Lights when the receiver is only 1 channel. Under the condition, the system can be turned ON by remote control unit.a 6 EN "S" indicator will light up...
...the display. º ! Standby indicator 2 SPEAKERS A/B keys ) Use to turn the power ON/STANDBY. DOLBY DIGITAL mode indicator ª Lights when the receiver is in the preset memory. ) SETUP key & Use to select the speakers' settings etc. ¡ keys & Use for headphone listening. $ Input Selector...( MEMORY key ¢ Use to store radio stations in the 96kHz LPCM playback mode. ACTIVE EQ mode indicator ™ Lights when the receiver is only 1 channel. Under the condition, the system can be turned ON by remote control unit.a 6 EN "S" indicator will light up...
Instruction Manual
Page 7
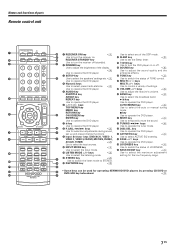
... MODE key 8 Use to operate the tuner mode. £ DISC SEL. Names and functions of settings. ( VOLUME %/fi keys ) Use to adjust the receiver's volume. ) BAND key ¢ Use to select the broadcast band. 3/8 key Use to select the maximum adjustment setting for the low frequency range. •...key Use to operate the DVD player. 7 8 key Use to operate the DVD player. 8 P.CALL 4/¢ keys ∞ Use for operating KENWOOD DVD players by pressing CD/DVD or DVD/6CH key beforehand. ‹ 7 EN DSP MODE BASS BOOST LISTEN MODE STEREO LOUDNESS PAGE REMOTE CONTROL UNIT...
... MODE key 8 Use to operate the tuner mode. £ DISC SEL. Names and functions of settings. ( VOLUME %/fi keys ) Use to adjust the receiver's volume. ) BAND key ¢ Use to select the broadcast band. 3/8 key Use to select the maximum adjustment setting for the low frequency range. •...key Use to operate the DVD player. 7 8 key Use to operate the DVD player. 8 P.CALL 4/¢ keys ∞ Use for operating KENWOOD DVD players by pressing CD/DVD or DVD/6CH key beforehand. ‹ 7 EN DSP MODE BASS BOOST LISTEN MODE STEREO LOUDNESS PAGE REMOTE CONTROL UNIT...
Instruction Manual
Page 8
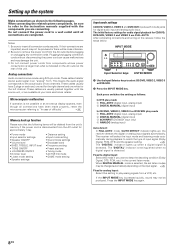
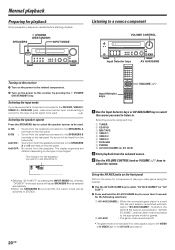
These cables usually have been made using RCA pin cords. The receiver will be changed automatically depending on the receiver, follow the steps below. When DIGITAL MANUAL mode is selected, the set listen modes may not be sure to refer to keep ... (digital input) 3 6CH INPUT (DVD/6CH input only) 4 ANALOG (analog input) Auto detect: In FULL AUTO mode ("AUTO DETECT" indicator lights up), the receiver detects the digital or analog input signals automatically. If their connections are made properly, reset the microcomputer referring to remove the power cord from components...
These cables usually have been made using RCA pin cords. The receiver will be changed automatically depending on the receiver, follow the steps below. When DIGITAL MANUAL mode is selected, the set listen modes may not be sure to refer to keep ... (digital input) 3 6CH INPUT (DVD/6CH input only) 4 ANALOG (analog input) Auto detect: In FULL AUTO mode ("AUTO DETECT" indicator lights up), the receiver detects the digital or analog input signals automatically. If their connections are made properly, reset the microcomputer referring to remove the power cord from components...
Instruction Manual
Page 9
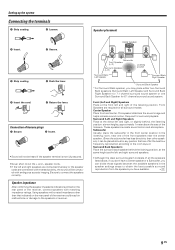
... don't have available. & 9 EN Surround (Left and Right) Speakers Place at the direct left and right of the receiver, connect speakers with matching impedance ratings. These speakers recreate sound motion and atmosphere. Be sure to obtain the best possible surround... Speaker placement 3 Insert. 4 Secure. 1 Strip coating. 2 Push the lever. 3 Insert the cord. 4 Return the lever. Connection of the receiver could result in the speaker settings steps to connect the speakers correctly. Center Speaker Subwoofer Front Speakers (L, R) Surround Speakers (L, R) *Surround Back Left...
... don't have available. & 9 EN Surround (Left and Right) Speakers Place at the direct left and right of the receiver, connect speakers with matching impedance ratings. These speakers recreate sound motion and atmosphere. Be sure to obtain the best possible surround... Speaker placement 3 Insert. 4 Secure. 1 Strip coating. 2 Push the lever. 3 Insert the cord. 4 Return the lever. Connection of the receiver could result in the speaker settings steps to connect the speakers correctly. Center Speaker Subwoofer Front Speakers (L, R) Surround Speakers (L, R) *Surround Back Left...
Instruction Manual
Page 10
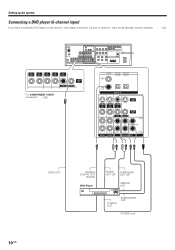
Setting up the system Connecting a DVD player (6-channel input) If you have connected a DVD player to the receiver with digital connection, be sure to read the "Input mode settings" section carefully. 8 OUT VIDEO IN VIDEO IN VIDEO IN VIDEO IN VIDEO VIDEO OUT ...
Setting up the system Connecting a DVD player (6-channel input) If you have connected a DVD player to the receiver with digital connection, be sure to read the "Input mode settings" section carefully. 8 OUT VIDEO IN VIDEO IN VIDEO IN VIDEO IN VIDEO VIDEO OUT ...

Instruction Manual
Page 11
... with the H symbol is used for safety earth. It is not for noise reduction of the unit. • Leave a space around the unit (from the receiver unit. CAUTION Be sure to adhere to the following, or proper ventilation will be used directly from the largest outside dimension including projection) equal or...
... with the H symbol is used for safety earth. It is not for noise reduction of the unit. • Leave a space around the unit (from the receiver unit. CAUTION Be sure to adhere to the following, or proper ventilation will be used directly from the largest outside dimension including projection) equal or...

Instruction Manual
Page 13
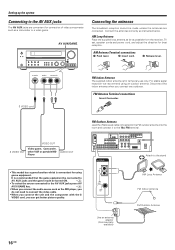
Connect components capable of the receiver. Connect the video signal and analog audio signals to the RF digital demodulator (Commercially available). Setting up the system Digital connections The digital in jacks ... the DIGITAL IN jacks of outputting DTS, Dolby Digital, or standard PCM (CD) format digital signals. If you have connected any digital components to the receiver, be sure to read the "Input mode settings" section carefully. 8 COAXIAL VIDEO 2 OPTICAL OPTICAL CD/DVD VIDEO 3 DVD/ 6CH DIGITAL IN COAXIAL DIGITAL OUT (AUDIO...
Connect components capable of the receiver. Connect the video signal and analog audio signals to the RF digital demodulator (Commercially available). Setting up the system Digital connections The digital in jacks ... the DIGITAL IN jacks of outputting DTS, Dolby Digital, or standard PCM (CD) format digital signals. If you have connected any digital components to the receiver, be sure to read the "Input mode settings" section carefully. 8 COAXIAL VIDEO 2 OPTICAL OPTICAL CD/DVD VIDEO 3 DVD/ 6CH DIGITAL IN COAXIAL DIGITAL OUT (AUDIO...
Instruction Manual
Page 14
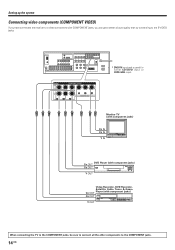
Setting up the system Connecting video components (COMPONENT VIDEO) If you have connected the receiver to a video component with component jacks) CB OUT Y OUT When connecting the TV to the COMPONENT jacks, be sure to connect all the other components ...
Setting up the system Connecting video components (COMPONENT VIDEO) If you have connected the receiver to a video component with component jacks) CB OUT Y OUT When connecting the TV to the COMPONENT jacks, be sure to connect all the other components ...
Instruction Manual
Page 16
... stand AM Loop Antenna FM Indoor Antenna FM Outdoor Antenna 16 EN It is convenient for connection of video components such as possible from the receiver, TV set, speaker cords and power cord, and adjust the direction for temporary use only.
... stand AM Loop Antenna FM Indoor Antenna FM Outdoor Antenna 16 EN It is convenient for connection of video components such as possible from the receiver, TV set, speaker cords and power cord, and adjust the direction for temporary use only.
Instruction Manual
Page 17
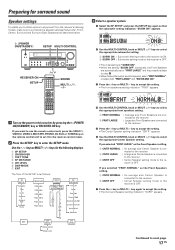
...Press the ∧ key or MULTI # key again to select the appropriate Center Speaker setting. TONE T. If you to obtain optimum enjoyment from the receiver's listening modes, make sure to complete the speaker settings (Subwoofer, Front, Center, Surround and Surround Back Speakers) as follows: SP SETUP Subwoofer Front ... Re-mix EXIT CROSSOVER TEST TONE FREQ:40Hz FREQ:60Hz FREQ:80Hz FREQ:100Hz FREQ:120Hz FREQ:150Hz T. Continued to this receiver by pressing the (POWER ON/STANDBY) key or RECEIVER ON key. TONE AUTO MANUAL L L C R C SR SBR R SBL SL SR SW SBR SBL SL SW DISP ...
...Press the ∧ key or MULTI # key again to select the appropriate Center Speaker setting. TONE T. If you to obtain optimum enjoyment from the receiver's listening modes, make sure to complete the speaker settings (Subwoofer, Front, Center, Surround and Surround Back Speakers) as follows: SP SETUP Subwoofer Front ... Re-mix EXIT CROSSOVER TEST TONE FREQ:40Hz FREQ:60Hz FREQ:80Hz FREQ:100Hz FREQ:120Hz FREQ:150Hz T. Continued to this receiver by pressing the (POWER ON/STANDBY) key or RECEIVER ON key. TONE AUTO MANUAL L L C R C SR SBR R SBL SL SR SW SBR SBL SL SW DISP ...
Instruction Manual
Page 18
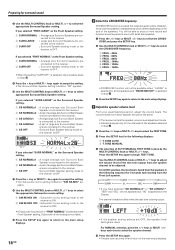
...CROSSOVER frequency. CROSSOVER function is heard from the Front Left speaker. For AUTO selection, the test tone is to adjust the receiver's audio output characteristics with small size speakers. 1 Press the ∧/∨ keys or MULTI @/# keys to select appropriate ...: 80Hz 4 FREQ. : 100Hz 5 FREQ. : 120Hz 6 FREQ. : 150Hz SP MUTE L R A B CLIP STEREO • CROSSOVER function will be the same. • The receiver enters the speaker volume level adjustment mode. • Indicators appear only for 2 seconds each time to select the speaker channel. 4 Press the SETUP key again...
...CROSSOVER frequency. CROSSOVER function is heard from the Front Left speaker. For AUTO selection, the test tone is to adjust the receiver's audio output characteristics with small size speakers. 1 Press the ∧/∨ keys or MULTI @/# keys to select appropriate ...: 80Hz 4 FREQ. : 100Hz 5 FREQ. : 120Hz 6 FREQ. : 150Hz SP MUTE L R A B CLIP STEREO • CROSSOVER function will be the same. • The receiver enters the speaker volume level adjustment mode. • Indicators appear only for 2 seconds each time to select the speaker channel. 4 Press the SETUP key again...
Instruction Manual
Page 20
.... Normal playback Preparing for playback Some preparatory steps are different depending on the type of input signal. Sound from the speakers connected to this receiver by pressing the INPUT MODE key, whereby "DVD/6CH" is the input source will cause SPEAKERS A to be selected automatically. • ...the volume. SPEAKERS (POWER ON/STANDBY) INPUT MODE Listening to a source component VOLUME CONTROL Input Selector keys AV AUX/GAME Turning on the receiver 1 Turn on the power to . Input Selector keys VOLUME %/fi 1 Use the Input Selector keys or AV AUX/GAME key to ...
.... Normal playback Preparing for playback Some preparatory steps are different depending on the type of input signal. Sound from the speakers connected to this receiver by pressing the INPUT MODE key, whereby "DVD/6CH" is the input source will cause SPEAKERS A to be selected automatically. • ...the volume. SPEAKERS (POWER ON/STANDBY) INPUT MODE Listening to a source component VOLUME CONTROL Input Selector keys AV AUX/GAME Turning on the receiver 1 Turn on the power to . Input Selector keys VOLUME %/fi 1 Use the Input Selector keys or AV AUX/GAME key to ...
Instruction Manual
Page 21
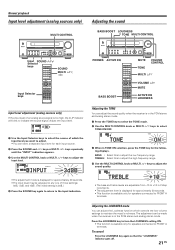
... DOLBY PL II x SL S SB SR • The adjustment mode is displayed for approximately 20 seconds. • The input level may be made when the receiver is in 2 step increments. • The adjustment item is displayed for approximately 20 seconds. • This function is available only for each input source. 2 Press... Input Selector keys to select the source of which controls the low volume settings to adjust. • You can adjust the sound quality when the receiver is in TONE ON selection, press the TONE key for speakers connected to adjust the sound quality.
... DOLBY PL II x SL S SB SR • The adjustment mode is displayed for approximately 20 seconds. • The input level may be made when the receiver is in 2 step increments. • The adjustment item is displayed for approximately 20 seconds. • This function is available only for each input source. 2 Press... Input Selector keys to select the source of which controls the low volume settings to adjust. • You can adjust the sound quality when the receiver is in TONE ON selection, press the TONE key for speakers connected to adjust the sound quality.
Instruction Manual
Page 22
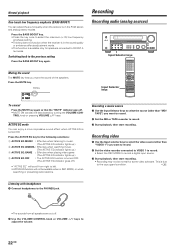
... previous setting Press the BASS BOOST key again. Normal playback One-touch low frequency emphasis (BASS BOOST) You can adjust the sound quality when the receiver is in the sound quality or ambience effects adjustment mode. • This function is available only for speakers connected to FRONT A terminals. Recording Recording audio... %/fi keys. PHONES • The sounds from right to select the maximum (+10) low frequency emphasis setting. • This key does not function when the receiver is turned ON. Switching back to the PHONES jack.
... previous setting Press the BASS BOOST key again. Normal playback One-touch low frequency emphasis (BASS BOOST) You can adjust the sound quality when the receiver is in the sound quality or ambience effects adjustment mode. • This function is available only for speakers connected to FRONT A terminals. Recording Recording audio... %/fi keys. PHONES • The sounds from right to select the maximum (+10) low frequency emphasis setting. • This key does not function when the receiver is turned ON. Switching back to the PHONES jack.

Instruction Manual
Page 24
...switches the tuning method to select the desired tuning method. "STEREO" lights when a broadcast is tuned automatically. Auto tuning : The next station is being received in stereo. SP MUTE L C R A B CLIP LFE STEREO AUTO SL S SB SR 3 Use the AUTO/MONO key to either auto or manual...at a previously used preset, the old station will be replaced by one of interference, switch to manual tuning. (With manual tuning, stereo broadcasts will be received in monaural.) 4 Use the MULTI CONTROL knob or MULTI %/ fi keys, or TUNING 1 / ¡ keys to select the station. STEREO ...
...switches the tuning method to select the desired tuning method. "STEREO" lights when a broadcast is tuned automatically. Auto tuning : The next station is being received in stereo. SP MUTE L C R A B CLIP LFE STEREO AUTO SL S SB SR 3 Use the AUTO/MONO key to either auto or manual...at a previously used preset, the old station will be replaced by one of interference, switch to manual tuning. (With manual tuning, stereo broadcasts will be received in monaural.) 4 Use the MULTI CONTROL knob or MULTI %/ fi keys, or TUNING 1 / ¡ keys to select the station. STEREO ...