
Instruction Manual
Page 1
... of the remote control and how to standard remote controls, the remote control supplied with this receiver has several operation modes. For the U.S.A. Register Online Register your Kenwood Home Audio product at our web site. These modes enable the remote control to switch the ... NEDERLANDS ITALIANO ESPAÑOL B60-5453-00 00 MA (K, P) 0404 ENGLISH FRANÇAIS DEUTSCH AUDIO VIDEO SURROUND RECEIVER VR-8070 INSTRUCTION MANUAL KENWOOD CORPORATION About the supplied remote control Compared to switch its design and how to control other offers when you register at ...
... of the remote control and how to standard remote controls, the remote control supplied with this receiver has several operation modes. For the U.S.A. Register Online Register your Kenwood Home Audio product at our web site. These modes enable the remote control to switch the ... NEDERLANDS ITALIANO ESPAÑOL B60-5453-00 00 MA (K, P) 0404 ENGLISH FRANÇAIS DEUTSCH AUDIO VIDEO SURROUND RECEIVER VR-8070 INSTRUCTION MANUAL KENWOOD CORPORATION About the supplied remote control Compared to switch its design and how to control other offers when you register at ...
Instruction Manual
Page 2
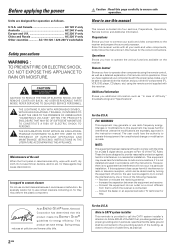
... operate both this equipment if an unauthorized change or modification is no guarantee that interference will not occur in this receiver works with all remote control operations. THE LIGHTNING FLASH WITH ARROWHEAD SYMBOL, WITHIN AN EQUILATERAL TRIANGLE, IS INTENDED TO... becomes dirty, wipe with the instructions. Reorient or relocate the receiving antenna. - - Connect the equipment into four sections, Preparations, Operations, Remote Control, and Additional Information. As an ENERGY STAR® Partner, Kenwood Corporation has determined that to the point of the following measures:...
... operate both this equipment if an unauthorized change or modification is no guarantee that interference will not occur in this receiver works with all remote control operations. THE LIGHTNING FLASH WITH ARROWHEAD SYMBOL, WITHIN AN EQUILATERAL TRIANGLE, IS INTENDED TO... becomes dirty, wipe with the instructions. Reorient or relocate the receiving antenna. - - Connect the equipment into four sections, Preparations, Operations, Remote Control, and Additional Information. As an ENERGY STAR® Partner, Kenwood Corporation has determined that to the point of the following measures:...
Instruction Manual
Page 3
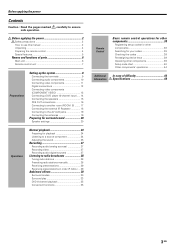
... sources 27 Recording video 27 Recording audio (digital sources 27 Listening to radio broadcasts 28 Tuning radio stations 28 Presetting radio stations manually 28 Receiving preset stations 29 Receiving preset stations in order (P.CALL) ... 29 Ambience effects 30 Surround modes 30 Surround play 33 DVD 6-channel playback 35 Convenient functions 35 Remote...
... sources 27 Recording video 27 Recording audio (digital sources 27 Listening to radio broadcasts 28 Tuning radio stations 28 Presetting radio stations manually 28 Receiving preset stations 29 Receiving preset stations in order (P.CALL) ... 29 Ambience effects 30 Surround modes 30 Surround play 33 DVD 6-channel playback 35 Convenient functions 35 Remote...
Instruction Manual
Page 5
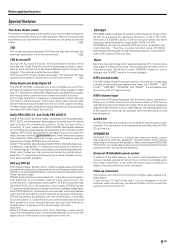
.... When listening to music, you will produce a more natural presence and surround effects by natural sound. It is to adjust the receiver's audio output characteristics with its predecessor PRO LOGIC, provides greater advantages in a home environment. › Dolby Digital and Dolby Digital... S-Video jacks, it creates six full-bandwidth output channels from music CD. Select a surround mode according to connect the receiver and your equipment or the software you are surrounded by increasing the impression of independent digital audio for controlling the overall spatial...
.... When listening to music, you will produce a more natural presence and surround effects by natural sound. It is to adjust the receiver's audio output characteristics with its predecessor PRO LOGIC, provides greater advantages in a home environment. › Dolby Digital and Dolby Digital... S-Video jacks, it creates six full-bandwidth output channels from music CD. Select a surround mode according to connect the receiver and your equipment or the software you are surrounded by increasing the impression of independent digital audio for controlling the overall spatial...

Instruction Manual
Page 6
... LED (light-emitting diode) indicators THX indicator › Lights when the THX mode has been chosen. DOLBY DIGITAL indicator ‹ Lights when the receiver is in the Dolby Digital mode. VOLUME CONTROL knob ¢ @ MUTE key ∞ Use to temporarily mute the sound. # PHONES jack §...SPEAKER EQ mode. Under the condition, the system can be activated depending upon the applicable playback mode. DSP indicator › Lights when the receiver is in the DSP mode. 6 ACTIVE EQ key ∞ Use to select ACTIVE EQ's setting. 7 DSP key ‹ Use to...
... LED (light-emitting diode) indicators THX indicator › Lights when the THX mode has been chosen. DOLBY DIGITAL indicator ‹ Lights when the receiver is in the Dolby Digital mode. VOLUME CONTROL knob ¢ @ MUTE key ∞ Use to temporarily mute the sound. # PHONES jack §...SPEAKER EQ mode. Under the condition, the system can be activated depending upon the applicable playback mode. DSP indicator › Lights when the receiver is in the DSP mode. 6 ACTIVE EQ key ∞ Use to select ACTIVE EQ's setting. 7 DSP key ‹ Use to...
Instruction Manual
Page 7
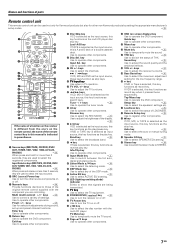
...deck. keys Use to show that signals are used not only for Kenwood products but also for more than 3 seconds, they are being transmitted. ( TV key Use to select the TV equipment. ) POWER RCVR ( receiver) key ) Use to turn the receiver on or off . ™ +100 key Use to select ...(lighting-emitting diode) indicator Blinks to adjust the TV's volume. 0 1/¡ keys If CD, MD or Tape is A and B deck of a function on the receiver is different from the one's on or off . ¡ TV Power key Use to turn the other components. 7 CH +/- Last/ A/B key If TAPE is selected...
...deck. keys Use to show that signals are used not only for Kenwood products but also for more than 3 seconds, they are being transmitted. ( TV key Use to select the TV equipment. ) POWER RCVR ( receiver) key ) Use to turn the receiver on or off . ™ +100 key Use to select ...(lighting-emitting diode) indicator Blinks to adjust the TV's volume. 0 1/¡ keys If CD, MD or Tape is A and B deck of a function on the receiver is different from the one's on or off . ¡ TV Power key Use to turn the other components. 7 CH +/- Last/ A/B key If TAPE is selected...

Instruction Manual
Page 8
... connect power cords from components whose power consumption is larger than what is indicated on the display will light up ), the receiver detects the digital or analog input signals automatically. After completing connections and turning on each include jacks for the left channel. ...usually packed together with the components you are made properly, reset the microcomputer referring to insert all connections have 2 plugs on the receiver, follow the steps below. At DIGITAL MANUAL, if the audio reproduction stops in an "analog" form. Plugging/unplugging connection cords ...
... connect power cords from components whose power consumption is larger than what is indicated on the display will light up ), the receiver detects the digital or analog input signals automatically. After completing connections and turning on each include jacks for the left channel. ...usually packed together with the components you are made properly, reset the microcomputer referring to insert all connections have 2 plugs on the receiver, follow the steps below. At DIGITAL MANUAL, if the audio reproduction stops in an "analog" form. Plugging/unplugging connection cords ...

Instruction Manual
Page 9
... Surround Back Left Speaker Surround Back Right Speaker Front (Left and Right) Speakers Place at the front left and right of the receiver, connect speakers with matching impedance ratings. Surround (Left and Right) Speakers Place at the direct left and right speakers are connected ... can divide those signals between the available speakers in malfunctions or damage to the speakers or receiver. Required for all the speakers listed above the ears of the receiver could result in the speaker settings steps to connect the speakers correctly. Subwoofer Reproduces powerful deep...
... Surround Back Left Speaker Surround Back Right Speaker Front (Left and Right) Speakers Place at the front left and right of the receiver, connect speakers with matching impedance ratings. Surround (Left and Right) Speakers Place at the direct left and right speakers are connected ... can divide those signals between the available speakers in malfunctions or damage to the speakers or receiver. Required for all the speakers listed above the ears of the receiver could result in the speaker settings steps to connect the speakers correctly. Subwoofer Reproduces powerful deep...

Instruction Manual
Page 10
... hazard. • Do not place any objects impairing heat radiation onto the top of the unit. • Leave some space around the unit (from the receiver unit. CAUTION Be sure to adhere to or greater than, shown below. ENGLISH Setting up the system Connecting audio components L R IN PHONO IN REC OUT...
... hazard. • Do not place any objects impairing heat radiation onto the top of the unit. • Leave some space around the unit (from the receiver unit. CAUTION Be sure to adhere to or greater than, shown below. ENGLISH Setting up the system Connecting audio components L R IN PHONO IN REC OUT...

Instruction Manual
Page 12
If you have connected any digital components to the receiver, be sure to read the "Input mode settings" section carefully. 8 ENGLISH COAXIAL VIDEO 2 OPTICAL OPTICAL OPTICAL CD/DVD VIDEO 3 MONITOR DVD/ 6CH DIGITAL IN DIGITAL ... demodulator (commercially available). Next, connect the DIGITAL OUT jacks of the demodulator to the VIDEO 3 jacks. (See "Connecting video components".) ! Connect components capable of the receiver. Setting up the system Digital connections The digital in jacks can accept DTS, Dolby Digital, or PCM signals.
If you have connected any digital components to the receiver, be sure to read the "Input mode settings" section carefully. 8 ENGLISH COAXIAL VIDEO 2 OPTICAL OPTICAL OPTICAL CD/DVD VIDEO 3 MONITOR DVD/ 6CH DIGITAL IN DIGITAL ... demodulator (commercially available). Next, connect the DIGITAL OUT jacks of the demodulator to the VIDEO 3 jacks. (See "Connecting video components".) ! Connect components capable of the receiver. Setting up the system Digital connections The digital in jacks can accept DTS, Dolby Digital, or PCM signals.

Instruction Manual
Page 13
... Player (with component jacks) CR OUT CB OUT Y OUT Video Recorder, DVD Recorder, Satellite Cable Tuner & Game Player (with COMPONENT jacks, you have connected the receiver to a video component with component jacks) CR OUT CB OUT Y OUT When connecting the TV to the COMPONENT jacks, be sure to connect all the...
... Player (with component jacks) CR OUT CB OUT Y OUT Video Recorder, DVD Recorder, Satellite Cable Tuner & Game Player (with COMPONENT jacks, you have connected the receiver to a video component with component jacks) CR OUT CB OUT Y OUT When connecting the TV to the COMPONENT jacks, be sure to connect all the...

Instruction Manual
Page 14
Setting up the system Connecting a DVD player (6-channel input) If you have connected a DVD player to the receiver with digital connection, be sure to read the "Input mode settings" section carefully. 8 ENGLISH OUT VIDEO IN VIDEO IN VIDEO IN VIDEO IN VIDEO OUT ...
Setting up the system Connecting a DVD player (6-channel input) If you have connected a DVD player to the receiver with digital connection, be sure to read the "Input mode settings" section carefully. 8 ENGLISH OUT VIDEO IN VIDEO IN VIDEO IN VIDEO IN VIDEO OUT ...

Instruction Manual
Page 16
Setting up the system PRE OUT connections This receiver has additional PRE OUT jacks. These can be used for the channel which has been connected. ¡ In this case, when "Dolby PRO LOGICIIx" is ...
Setting up the system PRE OUT connections This receiver has additional PRE OUT jacks. These can be used for the channel which has been connected. ¡ In this case, when "Dolby PRO LOGICIIx" is ...

Instruction Manual
Page 18
... repeaters send a signal similar to be connected. Xantech repeaters (models 282-00, 286-00, or 283-00) are compatible with your new audio-video receiver. 18 EN Shape of plug to the device's own remote control. IR repeaters enables you to control components located in the repeater's manual. 2 Connect the... described in cabinets or behind glass doors. You can enjoy a wider remote control signal range by placing the IR repeater away from the receiver. IR RECEIVER IN IR REPEATER OUT Stereo mini plug Sleeve Tip Mono mini plug Sleeve Tip Ring IR IN / OUT SPECIFICATION: Terminal IR...
... repeaters send a signal similar to be connected. Xantech repeaters (models 282-00, 286-00, or 283-00) are compatible with your new audio-video receiver. 18 EN Shape of plug to the device's own remote control. IR repeaters enables you to control components located in the repeater's manual. 2 Connect the... described in cabinets or behind glass doors. You can enjoy a wider remote control signal range by placing the IR repeater away from the receiver. IR RECEIVER IN IR REPEATER OUT Stereo mini plug Sleeve Tip Mono mini plug Sleeve Tip Ring IR IN / OUT SPECIFICATION: Terminal IR...

Instruction Manual
Page 19
... picture quality. S VIDEO VIDEO L-AUDIO-R S VIDEO cord FM indoor antenna The supplied indoor antenna is for connection of video components such as possible from the receiver, TV set, speaker cords and power cord, and adjust the direction for best reception. AM loop antenna Place the supplied loop antenna as far as...
... picture quality. S VIDEO VIDEO L-AUDIO-R S VIDEO cord FM indoor antenna The supplied indoor antenna is for connection of video components such as possible from the receiver, TV set, speaker cords and power cord, and adjust the direction for best reception. AM loop antenna Place the supplied loop antenna as far as...
Instruction Manual
Page 20
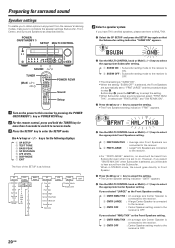
...press the SETUP key again so that the Subwoofer setting indication "SUBW ON" appears. If you have THX certified speakers, please set them to the receiver is OFF. DOLBY DIGITAL STEREO NEO:6 THX L ACTIVE EQ. MATRIX C SW R A B CLIP COAXIAL ANALOG 96kHzfs DSP MODE DISCRETE PRO LOGIC LOUDNESS...SETUP mode. If you selected "NML/THX" as the Front Speakers setting, 1 CNTR NML/THX : An average size Center Speaker is connected to the receiver. 2 CNTR OFF : Center Speaker setting mode to complete the speaker settings (Subwoofer, Front, Center, and Surround Speakers) as follows: SP SETUP TEST ...
...press the SETUP key again so that the Subwoofer setting indication "SUBW ON" appears. If you have THX certified speakers, please set them to the receiver is OFF. DOLBY DIGITAL STEREO NEO:6 THX L ACTIVE EQ. MATRIX C SW R A B CLIP COAXIAL ANALOG 96kHzfs DSP MODE DISCRETE PRO LOGIC LOUDNESS...SETUP mode. If you selected "NML/THX" as the Front Speakers setting, 1 CNTR NML/THX : An average size Center Speaker is connected to the receiver. 2 CNTR OFF : Center Speaker setting mode to complete the speaker settings (Subwoofer, Front, Center, and Surround Speakers) as follows: SP SETUP TEST ...
Instruction Manual
Page 21
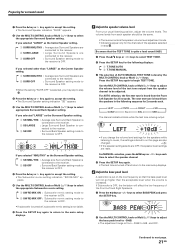
...not go higher than "LARGE" as the Surround Speaker setting, 1 SB NML/THX : Average size Surround Back Speaker is connected to the receiver. 2 SB OFF : Surround Back Speaker setting mode to select appropriate Surround Back Speaker setting. The volume levels from the speakers in step ... "LARGE" as the Center Speaker setting, 1 SURR NML/THX : Average size Surround Speakers are connected to be the same. • The receiver enters the speaker volume level adjustment mode. • Indicators appear only for the channels of the speakers selected in the following displays: 1 T.TONE...
...not go higher than "LARGE" as the Surround Speaker setting, 1 SB NML/THX : Average size Surround Back Speaker is connected to the receiver. 2 SB OFF : Surround Back Speaker setting mode to select appropriate Surround Back Speaker setting. The volume levels from the speakers in step ... "LARGE" as the Center Speaker setting, 1 SURR NML/THX : Average size Surround Speakers are connected to be the same. • The receiver enters the speaker volume level adjustment mode. • Indicators appear only for the channels of the speakers selected in the following displays: 1 T.TONE...

Instruction Manual
Page 24
POWER ON/STANDBY SPEAKERS INPUT MODE Listening to a source component VOLUME CONTROL ENGLISH MD/TAPE Input Selector AV AUX Input Selector Turning on the receiver 1 Turn on the power to the related components. 2 Turn on the power to . L C SP MUTE OPTICAL 6CH INPUT AUTO DETECT CIN ACT R A B ...the SPEAKERS B terminals on the rear panel. Sound from the speakers connected to the SPEAKERS A and B terminals on the rear panel. Use this receiver by pressing the INPUT MODE key, whereby "DVD/6CH" is "TAPE". The initial factory setting is the input source will be heard from the ...
POWER ON/STANDBY SPEAKERS INPUT MODE Listening to a source component VOLUME CONTROL ENGLISH MD/TAPE Input Selector AV AUX Input Selector Turning on the receiver 1 Turn on the power to the related components. 2 Turn on the power to . L C SP MUTE OPTICAL 6CH INPUT AUTO DETECT CIN ACT R A B ...the SPEAKERS B terminals on the rear panel. Sound from the speakers connected to the SPEAKERS A and B terminals on the rear panel. Use this receiver by pressing the INPUT MODE key, whereby "DVD/6CH" is "TAPE". The initial factory setting is the input source will be heard from the ...

Instruction Manual
Page 25
...CONTROL POWER RCVR (Multi %/ fi) Mute VOL / Bass Boost Loudness Speaker EQ Adjusting the TONE You can adjust the sound quality when the receiver is in the sound quality or ambience effects adjustment mode. • This function is available only for speakers connected to FRONT A terminals. L ... will scroll from -10 to maintain the music's richness. Press the MUTE key. The adjustment can adjust the sound quality when the receiver is available only for the following selections; 1 ACTIVE EQ MUSIC : Effective when listening to adjust the low frequency range. Press the ...
...CONTROL POWER RCVR (Multi %/ fi) Mute VOL / Bass Boost Loudness Speaker EQ Adjusting the TONE You can adjust the sound quality when the receiver is in the sound quality or ambience effects adjustment mode. • This function is available only for speakers connected to FRONT A terminals. L ... will scroll from -10 to maintain the music's richness. Press the MUTE key. The adjustment can adjust the sound quality when the receiver is available only for the following selections; 1 ACTIVE EQ MUSIC : Effective when listening to adjust the low frequency range. Press the ...

Instruction Manual
Page 26
.... • SPEAKER EQ function will not be able to the PHONES jack. ENGLISH Normal playback SPEAKER EQ mode SPEAKER EQ function is to adjust the receiver's audio output characteristics with headphones 1 Press the A and B Speaker keys so that the speaker indicator goes off. Listening with the speakers' characteristics which differs depending...
.... • SPEAKER EQ function will not be able to the PHONES jack. ENGLISH Normal playback SPEAKER EQ mode SPEAKER EQ function is to adjust the receiver's audio output characteristics with headphones 1 Press the A and B Speaker keys so that the speaker indicator goes off. Listening with the speakers' characteristics which differs depending...