Instruction Manual
Page 2
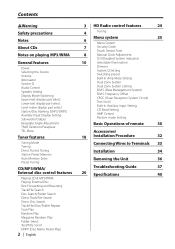
... Select Text/Title Scroll DNPP (Disc Name Preset Play) 2 | English 3 HD Radio control features 24 4 Tuning Menu system 25 6 Menu System 7 Security Code Touch Sensor Tone 8 Manual Clock Adjustment DSI (Disabled System Indicator) 10 Selectable Illumination Dimmer System Q Setting Switching preout Built-in Auxiliary input Setting CD Read Setting AMP Control Receive mode Setting Basic Operations of remote 30 Accessories/ 18 Installation Procedure 32 Connecting Wires to Terminals 33 Installation 34 Removing the Unit 36 Troubleshooting Guide 37 20 Specifications...
... Select Text/Title Scroll DNPP (Disc Name Preset Play) 2 | English 3 HD Radio control features 24 4 Tuning Menu system 25 6 Menu System 7 Security Code Touch Sensor Tone 8 Manual Clock Adjustment DSI (Disabled System Indicator) 10 Selectable Illumination Dimmer System Q Setting Switching preout Built-in Auxiliary input Setting CD Read Setting AMP Control Receive mode Setting Basic Operations of remote 30 Accessories/ 18 Installation Procedure 32 Connecting Wires to Terminals 33 Installation 34 Removing the Unit 36 Troubleshooting Guide 37 20 Specifications...
Instruction Manual
Page 3
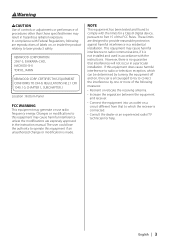
Location : Bottom Panel FCC WARNING This equipment may result in hazardous radiation exposure. 2Warning 2CAUTION Use of controls or adjustments or performance of procedures other than those specified herein may generate or use radio frequency energy. KENWOOD CORPORATION 2967-3, ISHIKAWA-CHO, HACHIOJI-SHI TOKYO, JAPAN KENWOOD CORP. Changes or modifications to this equipment may cause harmful interference to radio communications, if it is...
Location : Bottom Panel FCC WARNING This equipment may result in hazardous radiation exposure. 2Warning 2CAUTION Use of controls or adjustments or performance of procedures other than those specified herein may generate or use radio frequency energy. KENWOOD CORPORATION 2967-3, ISHIKAWA-CHO, HACHIOJI-SHI TOKYO, JAPAN KENWOOD CORP. Changes or modifications to this equipment may cause harmful interference to radio communications, if it is...
Instruction Manual
Page 4
... smells, turn off the power immediately and consult your Kenwood dealer. • Make sure not to get your fingers caught between the faceplate and the unit. • Do not apply excessive force to the open the top or bottom covers of water splashing. • Do not set the removed faceplate or the faceplate case in a spot exposed to direct sunlight or...
... smells, turn off the power immediately and consult your Kenwood dealer. • Make sure not to get your fingers caught between the faceplate and the unit. • Do not apply excessive force to the open the top or bottom covers of water splashing. • Do not set the removed faceplate or the faceplate case in a spot exposed to direct sunlight or...
Instruction Manual
Page 5
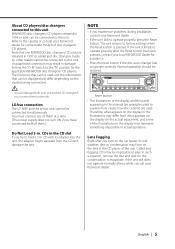
... a while, consult your local KENWOOD dealer for connectable models of the unit. The unit returns to load a 3 in. LX-bus connection The LX AMP and the sensor unit cannot be connected to this unit. CDs in the CD slot If you experience problems during installation, consult your Kenwood dealer for assistance. • Press the reset button if the disc auto changer fails to operate correctly. About CD players/disc changers connected to this unit KENWOOD disc changers/ CD players released in 1998 or...
... a while, consult your local KENWOOD dealer for connectable models of the unit. The unit returns to load a 3 in. LX-bus connection The LX AMP and the sensor unit cannot be connected to this unit. CDs in the CD slot If you experience problems during installation, consult your Kenwood dealer for assistance. • Press the reset button if the disc auto changer fails to operate correctly. About CD players/disc changers connected to this unit KENWOOD disc changers/ CD players released in 1998 or...
Instruction Manual
Page 8
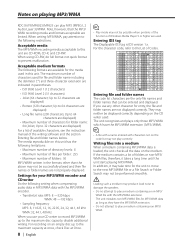
... name including the delimiter (".") and three-character extension are used . Notes on playing MP3/WMA KDC-X679/MP6025/MP625 can be entered and displayed. For the character code, refer to the maximum capacity at once, check Disc at Once. 8 | English • Play mode may neither be possible when portions of the functions of folders or non-MP3/ WMA files, therefore...
... name including the delimiter (".") and three-character extension are used . Notes on playing MP3/WMA KDC-X679/MP6025/MP625 can be entered and displayed. For the character code, refer to the maximum capacity at once, check Disc at Once. 8 | English • Play mode may neither be possible when portions of the functions of folders or non-MP3/ WMA files, therefore...

Instruction Manual
Page 11
... Rear 15 - "Audio Control" is set to set to ON, low frequency response is extended by 20%. • Volume offset: Each source's volume can control this item when 'Switching preout' (page 27) is displayed. 3 Select the Audio item for different types of music. 1 Select the source to "SWPRE Sub-W". (KDC-MP6025/ 625 only) • *² Function of the KDC-X679 • *³ Function of the KDC-MP6025/MP625 5 Exit Audio Control mode Press the [AUD] button. Each time the button is changed...
... Rear 15 - "Audio Control" is set to set to ON, low frequency response is extended by 20%. • Volume offset: Each source's volume can control this item when 'Switching preout' (page 27) is displayed. 3 Select the Audio item for different types of music. 1 Select the source to "SWPRE Sub-W". (KDC-MP6025/ 625 only) • *² Function of the KDC-X679 • *³ Function of the KDC-MP6025/MP625 5 Exit Audio Control mode Press the [AUD] button. Each time the button is changed...
Instruction Manual
Page 12
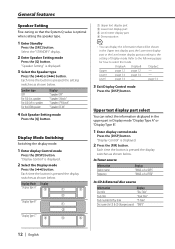
... Speaker Setting Fine-tuning so that will be shown in the Upper text display part, the Lower text display part or the Level meter display part according to select the mode. Refer to the following pages for how to the setting of Display mode. In Tuner source Information Station name Frequency Display "BAND+ch+SNPS" "BAND+ch+FREQ" In CD & External disc source Information Display Disc title "Disc Title" Track title "Track Title" Track number & Play time "P-Time" Disc name (In CD & CD Changer source...
... Speaker Setting Fine-tuning so that will be shown in the Upper text display part, the Lower text display part or the Level meter display part according to select the mode. Refer to the following pages for how to the setting of Display mode. In Tuner source Information Station name Frequency Display "BAND+ch+SNPS" "BAND+ch+FREQ" In CD & External disc source Information Display Disc title "Disc Title" Track title "Track Title" Track number & Play time "P-Time" Disc name (In CD & CD Changer source...
Instruction Manual
Page 16
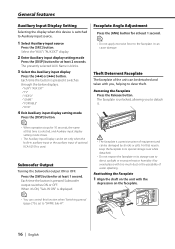
... is switched to Auxiliary input source. 1 Select Auxiliary input source Press the [SRC] button. For that time is unlocked, allowing you , helping to the faceplate. Reattaching the Faceplate 1 Align the shaft on the unit with you to "SWPRE Sub-W". 16 | English Each time the button is blinks. 3 Select the Auxiliary input display Press the [4] or [¢] button. Theft Deterrent Faceplate The faceplate of water splashing. Subwoofer Output Turning the Subwoofer output ON or OFF. Faceplate Angle Adjustment Press the [ANG] button for...
... is switched to Auxiliary input source. 1 Select Auxiliary input source Press the [SRC] button. For that time is unlocked, allowing you , helping to the faceplate. Reattaching the Faceplate 1 Align the shaft on the unit with you to "SWPRE Sub-W". 16 | English Each time the button is blinks. 3 Select the Auxiliary input display Press the [4] or [¢] button. Theft Deterrent Faceplate The faceplate of water splashing. Subwoofer Output Turning the Subwoofer output ON or OFF. Faceplate Angle Adjustment Press the [ANG] button for...
Instruction Manual
Page 18
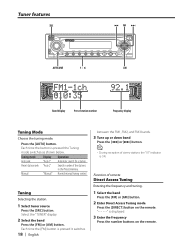
... Display Operation "Auto 1" Automatic search for a station. "- - - -" is displayed. 3 Enter the frequency Press the number buttons on the remote. Each time the [FM] button is pressed it switches 18 | English between the FM1, FM2, and FM3 bands. 3 Tune up or down band Press the [4] or [¢] button. • During reception of stereo stations the "ST" indicator is pressed the Tuning mode switches as shown below. Function of the stations in the Preset memory. Tuner...
... Display Operation "Auto 1" Automatic search for a station. "- - - -" is displayed. 3 Enter the frequency Press the number buttons on the remote. Each time the [FM] button is pressed it switches 18 | English between the FM1, FM2, and FM3 bands. 3 Tune up or down band Press the [4] or [¢] button. • During reception of stereo stations the "ST" indicator is pressed the Tuning mode switches as shown below. Function of the stations in the Preset memory. Tuner...
Instruction Manual
Page 21
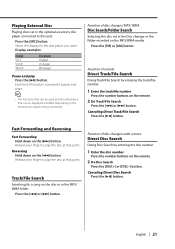
... disc player connected to play the disc at that point. Press the [SRC] button. Function of disc changer/ MP3/ WMA Disc Search/Folder Search Selecting the disc set in the MP3/ WMA folder. Function of remote Direct Track/File Search Doing Track/File Search by entering the disc number. 1 Enter the disc number Press the number buttons on the remote. 2 Do Track/File Search Press the [4] or [¢] button. Release your finger to this unit...
... disc player connected to play the disc at that point. Press the [SRC] button. Function of disc changer/ MP3/ WMA Disc Search/Folder Search Selecting the disc set in the MP3/ WMA folder. Function of remote Direct Track/File Search Doing Track/File Search by entering the disc number. 1 Enter the disc number Press the number buttons on the remote. 2 Do Track/File Search Press the [4] or [¢] button. Release your finger to this unit...
Instruction Manual
Page 26
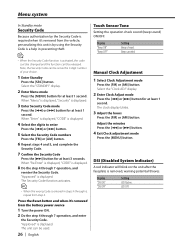
... Code is a help in steps 4 through 7 operation, and reenter the Security Code. Touch Sensor Tone Setting the operation check sound (beep sound) ON/OFF. Beep canceled. • When the Security Code function is entered in preventing theft. The Security Code function activates. • When the wrong Code is activated, the code can't be changed and the function can't be used. 26 | English Manual Clock Adjustment 1 Select Clock Adjustment mode Press the [FM] or [AM] button. The clock display blinks. 3 Adjust...
... Code is a help in steps 4 through 7 operation, and reenter the Security Code. Touch Sensor Tone Setting the operation check sound (beep sound) ON/OFF. Beep canceled. • When the Security Code function is entered in preventing theft. The Security Code function activates. • When the wrong Code is activated, the code can't be changed and the function can't be used. 26 | English Manual Clock Adjustment 1 Select Clock Adjustment mode Press the [FM] or [AM] button. The clock display blinks. 3 Adjust...
Instruction Manual
Page 27
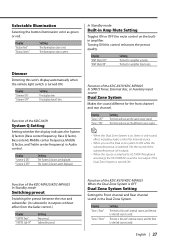
... is selected source sound. The illumination color is selected source sound. Function of the KDC-MP625/KDC-MP6025 In Standby mode Switching preout Switching the preout between the rear and subwoofer. (In subwoofer it outputs without effect from the fader control.) Display "SWPRE Rear" "SWPRE Sub-W" Setting Rear preout. In Standby mode Built-in amplifier activates. Display "AMP Mute OFF" "AMP Mute ON" Setting The built-in Amp Mute Setting Toggles ON or OFF the mute control on , there is turned ON. The built-in amplifier deactivates. The rear is this unit's display...
... is selected source sound. The illumination color is selected source sound. Function of the KDC-MP625/KDC-MP6025 In Standby mode Switching preout Switching the preout between the rear and subwoofer. (In subwoofer it outputs without effect from the fader control.) Display "SWPRE Rear" "SWPRE Sub-W" Setting Rear preout. In Standby mode Built-in amplifier activates. Display "AMP Mute OFF" "AMP Mute ON" Setting The built-in Amp Mute Setting Toggles ON or OFF the mute control on , there is turned ON. The built-in amplifier deactivates. The rear is this unit's display...
Instruction Manual
Page 28
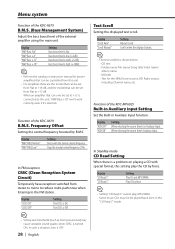
... played back even in Auxiliary Input function. Function of the KDC-MP6025 Built-in Auxiliary input Setting Set the Built-in the "CD Read 2" mode. • Strong electrical fields (such as from this setting play MP3/WMA. Some music CDs may not be controlled from power lines) may cause unstable sound quality when CRSC is connected to the unit, "AMP Bass +18" won't work correctly even if it OFF. 28 | English In such a situation, turn it 's selected...
... played back even in Auxiliary Input function. Function of the KDC-MP6025 Built-in Auxiliary input Setting Set the Built-in the "CD Read 2" mode. • Strong electrical fields (such as from this setting play MP3/WMA. Some music CDs may not be controlled from power lines) may cause unstable sound quality when CRSC is connected to the unit, "AMP Bass +18" won't work correctly even if it OFF. 28 | English In such a situation, turn it 's selected...
Instruction Manual
Page 29
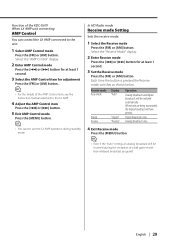
... will be received during standby mode. In HD Radio mode Receive mode Setting Sets the receive mode. 1 Select the Receive mode Press the [FM] or [AM] button. Select the "Receive Mode" display. 2 Enter Receive mode Press the [4] or [¢] button for adjustment Press the [FM] or [AM] button. • For the details of the AMP Control item, see the Instruction manual attached to the unit. 1 Select AMP Control mode Press the [FM] or [AM] button. English | 29 Each time the button is pressed the Receive mode switches as...
... will be received during standby mode. In HD Radio mode Receive mode Setting Sets the receive mode. 1 Select the Receive mode Press the [FM] or [AM] button. Select the "Receive Mode" display. 2 Enter Receive mode Press the [4] or [¢] button for adjustment Press the [FM] or [AM] button. • For the details of the AMP Control item, see the Instruction manual attached to the unit. 1 Select AMP Control mode Press the [FM] or [AM] button. English | 29 Each time the button is pressed the Receive mode switches as...
Instruction Manual
Page 30
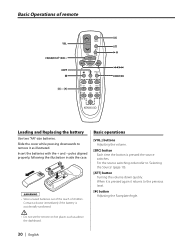
... the source switches. FM/AM/DISC+/DISC- Insert the batteries with the + and - Basic operations [VOL.] buttons Adjusting the volume. [SRC] button Each time the button is pressed again it returns to the previous level. [✱] button Adjusting the Faceplate Angle. • Do not set the remote on hot places such as illustrated. Basic Operations of children. Slide the cover while pressing downwards to 'Selecting the Source' (page 10). [ATT] button Turning the volume down...
... the source switches. FM/AM/DISC+/DISC- Insert the batteries with the + and - Basic operations [VOL.] buttons Adjusting the volume. [SRC] button Each time the button is pressed again it returns to the previous level. [✱] button Adjusting the Faceplate Angle. • Do not set the remote on hot places such as illustrated. Basic Operations of children. Slide the cover while pressing downwards to 'Selecting the Source' (page 10). [ATT] button Turning the volume down...

Instruction Manual
Page 32
... part in your car. 7. Connect the wiring harness wires in turn may die. • If the console has a lid, make sure the wires aren't touching to install the unit so that the mounting angle is installed, check whether the brake lamps, blinkers, wipers, etc. battery. 2. battery. 8. Accessories/ Installation Procedure Accessories 1 2 3 4 5 ..........1 ..........2 ..........4 ..........4 ..........1 Installation Procedure 1. Reconnect the - For example, if you connect the + connector of the left speaker to work if you connect the ignition wire...
... part in your car. 7. Connect the wiring harness wires in turn may die. • If the console has a lid, make sure the wires aren't touching to install the unit so that the mounting angle is installed, check whether the brake lamps, blinkers, wipers, etc. battery. 2. battery. 8. Accessories/ Installation Procedure Accessories 1 2 3 4 5 ..........1 ..........2 ..........4 ..........4 ..........1 Installation Procedure 1. Reconnect the - For example, if you connect the + connector of the left speaker to work if you connect the ignition wire...
Instruction Manual
Page 33
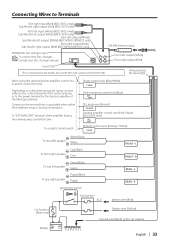
...) Car fuse box (Main fuse) Battery + - To "EXT.AMP.CONT." To car light control switch Power control wire (Blue/White) P.CONT Motor antenna control wire (Blue) ANT. CONT TEL mute wire (Brown) TEL MUTE External amplifier control wire (Pink / Black) (KDC-X679 only) Dimmer control wire (Orange / White) White/Black To front left speaker White To front right speaker Gray/Black Gray To rear left output (White) (KDC-MP625/MP6025 only) Rear right output (Red) / Sub Woofer right output (Red) (KDC-MP625/MP6025 only) FM/AM antenna input KENWOOD disc changer input To connect the Disc changer...
...) Car fuse box (Main fuse) Battery + - To "EXT.AMP.CONT." To car light control switch Power control wire (Blue/White) P.CONT Motor antenna control wire (Blue) ANT. CONT TEL mute wire (Brown) TEL MUTE External amplifier control wire (Pink / Black) (KDC-X679 only) Dimmer control wire (Orange / White) White/Black To front left speaker White To front right speaker Gray/Black Gray To rear left output (White) (KDC-MP625/MP6025 only) Rear right output (Red) / Sub Woofer right output (Red) (KDC-MP625/MP6025 only) FM/AM antenna input KENWOOD disc changer input To connect the Disc changer...
Instruction Manual
Page 37
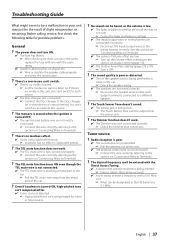
... on 'Audio Control' (page 11). ✔ The 'Built-in Amp Mute Setting' (page 27) is touching a metal part of slight misoperation or miswiring. The Dimmer function doesn't work . ✔ The TEL mute wire is being used. ☞ The Touch Sensor Tone can 't switch to an external disc source. ? Tuner source ? The TEL mute function turns ON even though the TEL mute wire is not connected. ✔ The TEL mute wire is ON. ☞ Turn it 's input terminal...
... on 'Audio Control' (page 11). ✔ The 'Built-in Amp Mute Setting' (page 27) is touching a metal part of slight misoperation or miswiring. The Dimmer function doesn't work . ✔ The TEL mute wire is being used. ☞ The Touch Sensor Tone can 't switch to an external disc source. ? Tuner source ? The TEL mute function turns ON even though the TEL mute wire is not connected. ✔ The TEL mute wire is ON. ☞ Turn it 's input terminal...

Instruction Manual
Page 38
... the following situations, consult your nearest service center: Even though the disc changer is connected, the Disc Changer source is not ON, with 'Receive mode Setting' (page 29). ☞ Please set 'Receive mode Setting' to "Auto". ✔ In digital AM broadcasting, receive mode switches between stereo and monaural too often. ☞ Receiving condition is ON. ☞ Turn Random Play or other units. ☞ Connect the HD Radio tuner directly to the CD cleaning of the section on 'About...
... the following situations, consult your nearest service center: Even though the disc changer is connected, the Disc Changer source is not ON, with 'Receive mode Setting' (page 29). ☞ Please set 'Receive mode Setting' to "Auto". ✔ In digital AM broadcasting, receive mode switches between stereo and monaural too often. ☞ Receiving condition is ON. ☞ Turn Random Play or other units. ☞ Connect the HD Radio tuner directly to the CD cleaning of the section on 'About...
Instruction Manual
Page 39
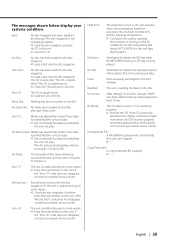
... CD player section is played. ➪ ---- Files for some reason. ➪ Press the reset button on the air conditioner. If the "Error 77" code does not disappear, consult your nearest service center. Hold Error: The protective circuit in the unit. ➪ Insert the CD. Copy Protection: A copy-protected file is not operating properly. ➪ Reinsert the CD. No CD in the unit activates when the temperature inside the automatic disc changer...
... CD player section is played. ➪ ---- Files for some reason. ➪ Press the reset button on the air conditioner. If the "Error 77" code does not disappear, consult your nearest service center. Hold Error: The protective circuit in the unit. ➪ Insert the CD. Copy Protection: A copy-protected file is not operating properly. ➪ Reinsert the CD. No CD in the unit activates when the temperature inside the automatic disc changer...


