
Instruction Manual
Page 2
... Basic Operations of Optional Hardwired Remote 27 Accessories/ Installation Procedure 29 Connecting Wires to Terminals 30 Installation 31 Troubleshooting Guide 32 Specifications 35 2 | English Contents Warning 3 Safety precautions 4 Notes 6 About CDs 7 Notes on playing MP3/WMA 8 General features 10 Power Selecting the... 16 Playing CD & MP3/WMA Playing External Disc Fast Forwarding and Reversing Track/File Search Disc Search/Folder Search Track/File/Disc/Folder Repeat Scan Play Random Play Magazine Random Play Folder Select Text/Title Scroll HD Radio control features ...
... Basic Operations of Optional Hardwired Remote 27 Accessories/ Installation Procedure 29 Connecting Wires to Terminals 30 Installation 31 Troubleshooting Guide 32 Specifications 35 2 | English Contents Warning 3 Safety precautions 4 Notes 6 About CDs 7 Notes on playing MP3/WMA 8 General features 10 Power Selecting the... 16 Playing CD & MP3/WMA Playing External Disc Fast Forwarding and Reversing Track/File Search Disc Search/Folder Search Track/File/Disc/Folder Repeat Scan Play Random Play Magazine Random Play Folder Select Text/Title Scroll HD Radio control features ...
Instruction Manual
Page 4
... the way in until it may cause your unit to malfunction. • To prevent a short circuit when replacing a fuse, first disconnect the wiring harness. • Do not use your Kenwood dealer. 2CAUTION To prevent damage to the machine, take the following precautions: • Make sure to ground the unit to a negative 12V...
... the way in until it may cause your unit to malfunction. • To prevent a short circuit when replacing a fuse, first disconnect the wiring harness. • Do not use your Kenwood dealer. 2CAUTION To prevent damage to the machine, take the following precautions: • Make sure to ground the unit to a negative 12V...
Instruction Manual
Page 29
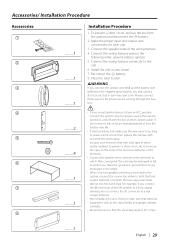
... the unit so that the mounting angle is left speaker to the power source running through the fuse box. • If your vessel. 7. Connect the wiring harness connector to work if you may start a fire. battery. 8. connector to a rear output terminal. • After installing the unit, check to make sure ...or to any metal part in turn may cause a short circuit, that can be turned on for each unit. 3. Make the proper input and output wire connections for an extended period of the left on and off with vinyl tape or other control switch. If the receiver is 30° or...
... the unit so that the mounting angle is left speaker to the power source running through the fuse box. • If your vessel. 7. Connect the wiring harness connector to work if you may start a fire. battery. 8. connector to a rear output terminal. • After installing the unit, check to make sure ...or to any metal part in turn may cause a short circuit, that can be turned on for each unit. 3. Make the proper input and output wire connections for an extended period of the left on and off with vinyl tape or other control switch. If the receiver is 30° or...

Instruction Manual
Page 30
... 1/ TEL mute wire (Brown) To light control switch To "EXT.AMP.CONT." Dimmer control wire (Orange / White) External amplifier control wire (Pink/Black)...202;, Fuse box (Main fuse) Battery ³ ACC Ignition wire (Red) Battery wire (Yellow) Ground wire (Black) (To a negative ground point of the amplifier having ...wire come out from the tab. terminal of the vessel) q 30 | English Do not let the wire come out from the tab. Connecting Wires... in the vessel. *° " / Power control/Antenna control wire (Blue/White) Connect to Terminals KTS-MP400MR KTS-300MR A Rear...
... 1/ TEL mute wire (Brown) To light control switch To "EXT.AMP.CONT." Dimmer control wire (Orange / White) External amplifier control wire (Pink/Black)...202;, Fuse box (Main fuse) Battery ³ ACC Ignition wire (Red) Battery wire (Yellow) Ground wire (Black) (To a negative ground point of the amplifier having ...wire come out from the tab. terminal of the vessel) q 30 | English Do not let the wire come out from the tab. Connecting Wires... in the vessel. *° " / Power control/Antenna control wire (Blue/White) Connect to Terminals KTS-MP400MR KTS-300MR A Rear...
Instruction Manual
Page 31
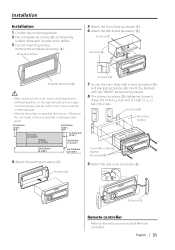
... Foam Tape (accessory 7). 6 Attach the drip shield (accessory 6). Installation Installation 1 Confirm the mounting position. 2 Place template (accessory 8) on the opposite side such as a pipe , or wiring harness, and be careful not to cause scratches or other damage. • Machine the surface to specified dimensions. English | 31
... Foam Tape (accessory 7). 6 Attach the drip shield (accessory 6). Installation Installation 1 Confirm the mounting position. 2 Place template (accessory 8) on the opposite side such as a pipe , or wiring harness, and be careful not to cause scratches or other damage. • Machine the surface to specified dimensions. English | 31

Instruction Manual
Page 32
...even though the TEL mute wire is not connected. ✔ The TEL mute wire is connected to a different speaker. ? The Touch Sensor Tone doesn't sound. ✔ The preout jack is not extended. ☞ Pull the antenna out all the way to one with the same rating. ? Radio reception is poor. ✔... The antenna is being pinched by a screw in the wires, replace the fuse with one side. ☞ Center the fader and balance settings. ✔ The input/output...
...even though the TEL mute wire is not connected. ✔ The TEL mute wire is connected to a different speaker. ? The Touch Sensor Tone doesn't sound. ✔ The preout jack is not extended. ☞ Pull the antenna out all the way to one with the same rating. ? Radio reception is poor. ✔... The antenna is being pinched by a screw in the wires, replace the fuse with one side. ☞ Center the fader and balance settings. ✔ The input/output...


