Instruction Manual
Page 3
... version display Unique ID display Audio Preset Memory Audio Preset Recall Demonstration mode Setting Basic Operations of remote control 52 Accessories/ Installation Procedure 55 Connecting Wires to Terminals 56 Installation 57 Removing the Unit 59 Troubleshooting Guide 60 Specifications 64 The "AAC" logo is trademark of Dolby Laboratories.
... version display Unique ID display Audio Preset Memory Audio Preset Recall Demonstration mode Setting Basic Operations of remote control 52 Accessories/ Installation Procedure 55 Connecting Wires to Terminals 56 Installation 57 Removing the Unit 59 Troubleshooting Guide 60 Specifications 64 The "AAC" logo is trademark of Dolby Laboratories.
Instruction Manual
Page 4
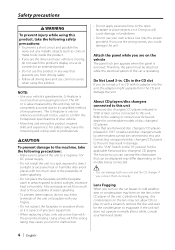
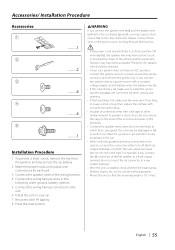
NOTE: • Like your Kenwood dealer for connectable models of disc changers/ CD players. For safety's sake, leave the mounting and wiring work to professionals. 2CAUTION To prevent damage to the machine, take the following precautions: • Make sure to ground the unit to a negative 12V...8226; Do not use a new fuse with the wrong rating may cause your vehicle. • Mounting and wiring this product requires skills and experience. Do Not Load 3-in a spot exposed to this unit Kenwood disc changers/ CD players released in the CD player of the unit or faceplate with too much dust...
NOTE: • Like your Kenwood dealer for connectable models of disc changers/ CD players. For safety's sake, leave the mounting and wiring work to professionals. 2CAUTION To prevent damage to the machine, take the following precautions: • Make sure to ground the unit to a negative 12V...8226; Do not use a new fuse with the wrong rating may cause your vehicle. • Mounting and wiring this product requires skills and experience. Do Not Load 3-in a spot exposed to this unit Kenwood disc changers/ CD players released in the CD player of the unit or faceplate with too much dust...
Instruction Manual
Page 13
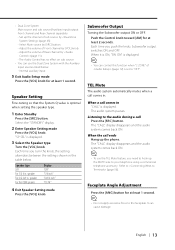
... Fine-tuning so that the System Q value is displayed. 3 Select the Speaker type Turn the [VOL] knob. Refer to the faceplate. Set up the MUTE wire to "OFF". Faceplate Angle Adjustment Press the [ANG] button for at least 1 second. Select Main source by (page 45). - Select the "STANDBY" display. 2 Enter Speaker...
... Fine-tuning so that the System Q value is displayed. 3 Select the Speaker type Turn the [VOL] knob. Refer to the faceplate. Set up the MUTE wire to "OFF". Faceplate Angle Adjustment Press the [ANG] button for at least 1 second. Select Main source by (page 45). - Select the "STANDBY" display. 2 Enter Speaker...
Instruction Manual
Page 55
...and opening. • If the fuse blows, first make sure to install the unit so that in turn may have been activated. Connect the wiring harness wires in your car's ignition does not have a short-circuit or touched the chasis of the left speaker to cause a short circuit, then replace ... vehicle and the protection function may start a fire. To prevent a short circuit, remove the key from the ignition and disconnect the - Connect the wiring harness connector to the power source running through the fuse box. • If the power is not turned ON (or it is installed, check whether...
...and opening. • If the fuse blows, first make sure to install the unit so that in turn may have been activated. Connect the wiring harness wires in your car's ignition does not have a short-circuit or touched the chasis of the left speaker to cause a short circuit, then replace ... vehicle and the protection function may start a fire. To prevent a short circuit, remove the key from the ignition and disconnect the - Connect the wiring harness connector to the power source running through the fuse box. • If the power is not turned ON (or it is installed, check whether...

Instruction Manual
Page 56
... input (White) FM/AM antenna input Wiring harness (Accessory1) Power control wire (Blue/White) If no connections are using the optional power amplifier, connect to its power P.CONT control terminal. To connect the Kenwood navigation system, consult your car is grounded... your navigation manual. TEL mute wire (Brown) Connect to the relevant instruction manuals. terminal of the film-type antenna. When using , connect either the MUTE telephone rings or during conversation. Connecting Wires to Terminals To Kenwood disc changer/ External optional accessory To...
... input (White) FM/AM antenna input Wiring harness (Accessory1) Power control wire (Blue/White) If no connections are using the optional power amplifier, connect to its power P.CONT control terminal. To connect the Kenwood navigation system, consult your car is grounded... your navigation manual. TEL mute wire (Brown) Connect to the relevant instruction manuals. terminal of the film-type antenna. When using , connect either the MUTE telephone rings or during conversation. Connecting Wires to Terminals To Kenwood disc changer/ External optional accessory To...
Instruction Manual
Page 60
...; Tuner source is set to . The Dimmer function does not work . ✔ The TEL mute wire is turned OFF. ✔ The ignition and battery wire are incorrectly connected. ☞ Connect the wire correctly, referring to the section on . ? Even if Loudness is turned ON, high-pitched tone isn...output from Subwoofer or it ON. ? If there's no media in the car. ☞ Check the speaker wiring. ✔ The speakers are not wired correctly. ☞ Reconnect the speaker wires so that each source. ✔ The Disc changer isn't connected. ☞ Connect the Disc changer. The ...
...; Tuner source is set to . The Dimmer function does not work . ✔ The TEL mute wire is turned OFF. ✔ The ignition and battery wire are incorrectly connected. ☞ Connect the wire correctly, referring to the section on . ? Even if Loudness is turned ON, high-pitched tone isn...output from Subwoofer or it ON. ? If there's no media in the car. ☞ Check the speaker wiring. ✔ The speakers are not wired correctly. ☞ Reconnect the speaker wires so that each source. ✔ The Disc changer isn't connected. ☞ Connect the Disc changer. The ...
Instruction Manual
Page 61
... OFF. Radio reception is poor. ✔ The car antenna is not extended. ☞ Pull the antenna out all the way. ✔ The antenna control wire is to the section on . ? "AUX EXT" is displayed without achieving External disc control mode. ✔ Unsupported disc changer is connected. ☞ Use... the disc changer mentioned in the FM band is not connected. ☞ Connect the wire correctly, referring to 0.1 MHz. ? If more than the set sound volume is less than the tuner sound volume. ☞ If the tuner sound ...
... OFF. Radio reception is poor. ✔ The car antenna is not extended. ☞ Pull the antenna out all the way. ✔ The antenna control wire is to the section on . ? "AUX EXT" is displayed without achieving External disc control mode. ✔ Unsupported disc changer is connected. ☞ Use... the disc changer mentioned in the FM band is not connected. ☞ Connect the wire correctly, referring to 0.1 MHz. ? If more than the set sound volume is less than the tuner sound volume. ☞ If the tuner sound ...
Instruction Manual
Page 63
... Make sure that a files created with a format that can 't support. ➪ ---- IN (Blink): The CD player section is activated. ➪ Wire or insulate the speaker cable properly and press the reset button. Can't Download: Download Error: This unit does not work properly for the SIRIUS tuner... source is still displayed, consult a local Kenwood dealer. No Display File: No file that this unit cannot read. ➪ Recreate the file. As the temperature falls below 60°C ...
... Make sure that a files created with a format that can 't support. ➪ ---- IN (Blink): The CD player section is activated. ➪ Wire or insulate the speaker cable properly and press the reset button. Can't Download: Download Error: This unit does not work properly for the SIRIUS tuner... source is still displayed, consult a local Kenwood dealer. No Display File: No file that this unit cannot read. ➪ Recreate the file. As the temperature falls below 60°C ...


