
Instruction Manual
Page 1
Familiarity with installation and operation procedures will help you call upon your new CD-receiver. Refer to read through this instruction manual. For your Kenwood product at www.Kenwoodusa.com © B64-3301-00/01 (KW/K0) Model KDC-X790/ KDC-MP732 Serial number US Residence Only Register... unit, in the spaces designated on the product. CD-RECEIVER KDC-X790 KDC-MP732 INSTRUCTION MANUAL Take the time to the model and serial numbers whenever you obtain the best performance from your Kenwood dealer for information or service on the warranty card, and in the space provided below.
Familiarity with installation and operation procedures will help you call upon your new CD-receiver. Refer to read through this instruction manual. For your Kenwood product at www.Kenwoodusa.com © B64-3301-00/01 (KW/K0) Model KDC-X790/ KDC-MP732 Serial number US Residence Only Register... unit, in the spaces designated on the product. CD-RECEIVER KDC-X790 KDC-MP732 INSTRUCTION MANUAL Take the time to the model and serial numbers whenever you obtain the best performance from your Kenwood dealer for information or service on the warranty card, and in the space provided below.
Instruction Manual
Page 3
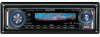
... Stop Watch Dual Zone System Setting Supreme Setting B.M.S. (Bass Management System) B.M.S. Menu system 38 Menu System Activating Security Code Deactivating Security Code Touch Sensor Tone Manual Clock Adjustment Date Adjustment Date Mode Synchronize Clock DSI (Disabled System Indicator) Selectable Illumination Display Illumination Control Dimmer Built-in Auxiliary input Setting CD Read...
... Stop Watch Dual Zone System Setting Supreme Setting B.M.S. (Bass Management System) B.M.S. Menu system 38 Menu System Activating Security Code Deactivating Security Code Touch Sensor Tone Manual Clock Adjustment Date Adjustment Date Mode Synchronize Clock DSI (Disabled System Indicator) Selectable Illumination Display Illumination Control Dimmer Built-in Auxiliary input Setting CD Read...

Instruction Manual
Page 5
...problems during installation, consult your Kenwood dealer. • When you purchase optional accessories, check with your Kenwood dealer to make sure that they work where the service is not supported by any broadcasting station. • There are places in this manual where lit indicators are used to...restored. Cleaning the Unit If the faceplate of the display and the panel appearing in (page 18). • The illustrations of this manual are examples used . If the faceplate is in your model and in the following settings. English | 5 Cleaning the Faceplate Terminals If...
...problems during installation, consult your Kenwood dealer. • When you purchase optional accessories, check with your Kenwood dealer to make sure that they work where the service is not supported by any broadcasting station. • There are places in this manual where lit indicators are used to...restored. Cleaning the Unit If the faceplate of the display and the panel appearing in (page 18). • The illustrations of this manual are examples used . If the faceplate is in your model and in the following settings. English | 5 Cleaning the Faceplate Terminals If...
Instruction Manual
Page 6
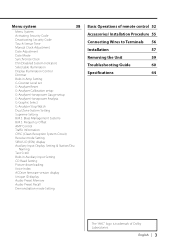
... TO DHHS REGULATIONS N0.21 CFR 1040. 10, CHAPTER 1, SUBCHAPTER J. Open Auto Ensemble Memory Entry. http://www.kenwood.mediamanager.jp • Contact Kenwood for the operation method of the FCC Rules. Changes or modifications to this equipment may cause harmful interference unless the ...receiving antenna. • Increase the separation between the equipment and receiver. • Connect the equipment into an outlet on the Instruction manual of DAB Tuner KTC-9090DAB (optional accessory) for help. However, there is no guarantee that to which can play CD (hereafter called...
... TO DHHS REGULATIONS N0.21 CFR 1040. 10, CHAPTER 1, SUBCHAPTER J. Open Auto Ensemble Memory Entry. http://www.kenwood.mediamanager.jp • Contact Kenwood for the operation method of the FCC Rules. Changes or modifications to this equipment may cause harmful interference unless the ...receiving antenna. • Increase the separation between the equipment and receiver. • Connect the equipment into an outlet on the Instruction manual of DAB Tuner KTC-9090DAB (optional accessory) for help. However, there is no guarantee that to which can play CD (hereafter called...
Instruction Manual
Page 7
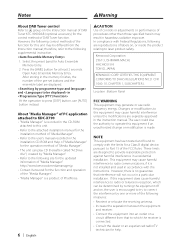
... unit can only play a CD-R or CD-RW that are easier to your CD-R/CD-RW writing software, and your CDR/CD-RW recorder instruction manual.) CD storage • Do not place CDs in direct sunlight (On the seat or dashboard etc.) or where the temperature is high. • Store CDs...
... unit can only play a CD-R or CD-RW that are easier to your CD-R/CD-RW writing software, and your CDR/CD-RW recorder instruction manual.) CD storage • Do not place CDs in direct sunlight (On the seat or dashboard etc.) or where the temperature is high. • Store CDs...
Instruction Manual
Page 9
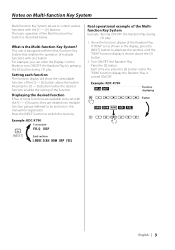
... to control various functions with the Multi-function Key System that enables the operation of the Random Play. If "RDM" is not shown in this manual) for registration. Turn ON/OFF the Random Play. Press the [3] button. Each time you can enter the Display Control Mode or turn ON/OFF the...
... to control various functions with the Multi-function Key System that enables the operation of the Random Play. If "RDM" is not shown in this manual) for registration. Turn ON/OFF the Random Play. Press the [3] button. Each time you can enter the Display Control Mode or turn ON/OFF the...
Instruction Manual
Page 16
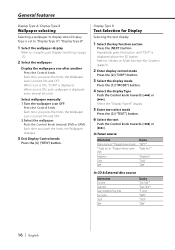
... knob, the Wallpaper scan is turned ON and OFF. 2 Select the wallpaper. When scan is ON, each wallpaper is displayed above the [2] button. Select wallpaper manually 1 Turn the wallpaper scan OFF. Display Type B Text Selection for Display Selecting the text display. 1 Select the key function section Press the [NEXT] button. Repeatedly...
... knob, the Wallpaper scan is turned ON and OFF. 2 Select the wallpaper. When scan is ON, each wallpaper is displayed above the [2] button. Select wallpaper manually 1 Turn the wallpaper scan OFF. Display Type B Text Selection for Display Selecting the text display. 1 Select the key function section Press the [NEXT] button. Repeatedly...
Instruction Manual
Page 23
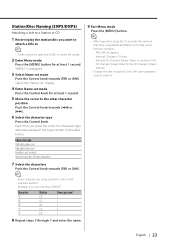
... file media. 2 Enter Menu mode Press the [MENU] button for at least 1 second. English | 23 FM/ AM: 30 stations - Refer to the CD changer/ player manual. • Change the title of station/CD by using a remote control with numbers buttons. Character "D" "A" "N" "C" "E" Button [3] [2] [6] [2] [3] Times pressed 1 1 2 3 2 8 Repeat steps 5 through 7 and enter the name...
... file media. 2 Enter Menu mode Press the [MENU] button for at least 1 second. English | 23 FM/ AM: 30 stations - Refer to the CD changer/ player manual. • Change the title of station/CD by using a remote control with numbers buttons. Character "D" "A" "N" "C" "E" Button [3] [2] [6] [2] [3] Times pressed 1 1 2 3 2 8 Repeat steps 5 through 7 and enter the name...
Instruction Manual
Page 24
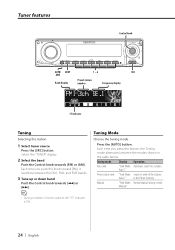
Press the [AUTO] button. Auto1" Preset station seek Manual "Seek Mode Auto2" "Seek Mode Manual" Search in order of stereo stations the "ST" indicator is ON. 24 | English Each time you press the button, the Tuning mode alternates between the ... AUTO/ NEXT 1 - 6 SRC AME Band display Preset station number Frequency display ST indicator Tuning Selecting the station. 1 Select tuner source Press the [SRC] button. Normal manual tuning control. • During reception of the stations in the table below.
Press the [AUTO] button. Auto1" Preset station seek Manual "Seek Mode Auto2" "Seek Mode Manual" Search in order of stereo stations the "ST" indicator is ON. 24 | English Each time you press the button, the Tuning mode alternates between the ... AUTO/ NEXT 1 - 6 SRC AME Band display Preset station number Frequency display ST indicator Tuning Selecting the station. 1 Select tuner source Press the [SRC] button. Normal manual tuning control. • During reception of the stations in the table below.
Instruction Manual
Page 34
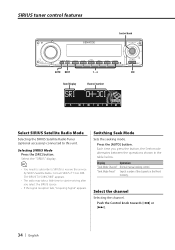
... SIRIUS Satellite Radio. Each time you select the SIRIUS source. • If the signal reception fails, "Acquiring Signal" appears. Display Operation "Seek Mode Channel" Normal manual seeking control. Push the Control knob towards [4] or [¢]. 34 | English Switching Seek Mode Sets the seeking mode. Selecting SIRIUS Mode Press the [SRC] button...
... SIRIUS Satellite Radio. Each time you select the SIRIUS source. • If the signal reception fails, "Acquiring Signal" appears. Display Operation "Seek Mode Channel" Normal manual seeking control. Push the Control knob towards [4] or [¢]. 34 | English Switching Seek Mode Sets the seeking mode. Selecting SIRIUS Mode Press the [SRC] button...
Instruction Manual
Page 38
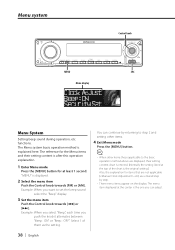
Example: When you select "Beep", each time you want to the basic operation method above are entered step by returning to step 2 and setting other items. 4 Exit Menu mode Press the [MENU] button. • When other items those applicable to set the beep sound select the "Beep" display. 3 Set the menu item Push the Control knob towards [FM] or [AM]. Select 1 of the chart is the original setting.) Also, the explanation for items that are not applicable ( etc.) are displayed, their setting content is displayed. 2 Select the menu item Push the Control knob towards [4] or [¢]. ...
Example: When you select "Beep", each time you want to the basic operation method above are entered step by returning to step 2 and setting other items. 4 Exit Menu mode Press the [MENU] button. • When other items those applicable to set the beep sound select the "Beep" display. 3 Set the menu item Push the Control knob towards [FM] or [AM]. Select 1 of the chart is the original setting.) Also, the explanation for items that are not applicable ( etc.) are displayed, their setting content is displayed. 2 Select the menu item Push the Control knob towards [4] or [¢]. ...
Instruction Manual
Page 40
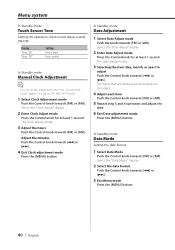
Select the "Date Mode" display. 2 Select the date format Push the Control knob towards [FM] or [AM]. In Standby mode Manual Clock Adjustment • You can adjust. 4 Adjust each item Push the Control knob towards [FM] or [AM]. The items that are blinking are items that ...
Select the "Date Mode" display. 2 Select the date format Push the Control knob towards [FM] or [AM]. In Standby mode Manual Clock Adjustment • You can adjust. 4 Adjust each item Push the Control knob towards [FM] or [AM]. The items that are blinking are items that ...
Instruction Manual
Page 41
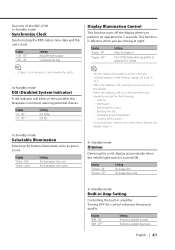
... Standby mode Built-in Amp Setting Controlling the built-in amplifier deactivates. The built-in amplifier. Display "SYNC : OFF" "SYNC : ON" Setting Adjust the time manually. Display "Display : ON" "Display : OFF" Setting Keeps the display on the display. • When the display is turned ON. Turns off , you are driving at...
... Standby mode Built-in Amp Setting Controlling the built-in amplifier deactivates. The built-in amplifier. Display "SYNC : OFF" "SYNC : ON" Setting Adjust the time manually. Display "Display : ON" "Display : OFF" Setting Keeps the display on the display. • When the display is turned ON. Turns off , you are driving at...
Instruction Manual
Page 46
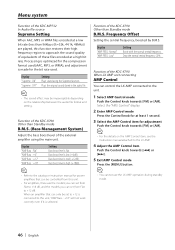
... [¢]. 5 Exit AMP Control mode Press the [MENU] button. • Refer to the catalog or instruction manual for power amplifiers that can only be imperceptible depending on the AMP Control item, see the Instruction manual attached to the LX AMP. 4 Adjust the AMP Control item Push the Control knob towards [FM] or...
... [¢]. 5 Exit AMP Control mode Press the [MENU] button. • Refer to the catalog or instruction manual for power amplifiers that can only be imperceptible depending on the AMP Control item, see the Instruction manual attached to the LX AMP. 4 Adjust the AMP Control item Push the Control knob towards [FM] or...
Instruction Manual
Page 48
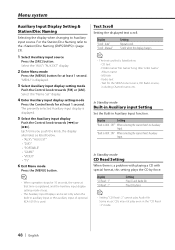
... Read : 2" mode. 48 | English Folder name/ File name/ Song title/ Artist name/ Album name - Text Scroll Setting the displayed text scroll. Display "Scroll : Auto" "Scroll : Manual" Setting Repeats scroll. Scrolls when the display changes. • The text scrolled is displayed. 3 Select Auxiliary input display setting mode Push the Control knob towards...
... Read : 2" mode. 48 | English Folder name/ File name/ Song title/ Artist name/ Album name - Text Scroll Setting the displayed text scroll. Display "Scroll : Auto" "Scroll : Manual" Setting Repeats scroll. Scrolls when the display changes. • The text scrolled is displayed. 3 Select Auxiliary input display setting mode Push the Control knob towards...

Instruction Manual
Page 56
...the external amp control function. When using , connect either the MUTE telephone rings or during conversation. Connecting Wires to Terminals To Kenwood disc changer/ External optional accessory To connect these leads, refer to its power P.CONT control terminal. CONT Depending on what ... If no connections are using the optional power amplifier, connect to the relevant instruction manuals. TEL mute wire (Brown) Connect to an exclusive remote adapter (not supplied) matches your navigation manual. Battery To use the steering wheel remote control feature, you are made, do...
...the external amp control function. When using , connect either the MUTE telephone rings or during conversation. Connecting Wires to Terminals To Kenwood disc changer/ External optional accessory To connect these leads, refer to its power P.CONT control terminal. CONT Depending on what ... If no connections are using the optional power amplifier, connect to the relevant instruction manuals. TEL mute wire (Brown) Connect to an exclusive remote adapter (not supplied) matches your navigation manual. Battery To use the steering wheel remote control feature, you are made, do...


