
Instruction Manual
Page 1
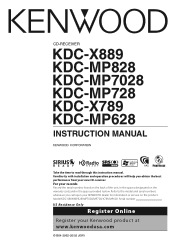
Refer to read through this instruction manual. For your records Record the serial number, found on the back of the unit, in the spaces designated on the product. Model KDC-X889/MP828/MP7028/MP728/X789/MP628 Serial number US Residence Only Register Online Register your Kenwood product at www.kenwoodusa.com ©...; B64-2962-20/02 (KW) Familiarity with installation and operation procedures will help you call upon your KENWOOD dealer for information or service on the warranty card, and in the space provided below. CD-RECEIVER KDC-X889 KDC-MP828 KDC-MP7028 KDC...
Refer to read through this instruction manual. For your records Record the serial number, found on the back of the unit, in the spaces designated on the product. Model KDC-X889/MP828/MP7028/MP728/X789/MP628 Serial number US Residence Only Register Online Register your Kenwood product at www.kenwoodusa.com ©...; B64-2962-20/02 (KW) Familiarity with installation and operation procedures will help you call upon your KENWOOD dealer for information or service on the warranty card, and in the space provided below. CD-RECEIVER KDC-X889 KDC-MP828 KDC-MP7028 KDC...
Instruction Manual
Page 3
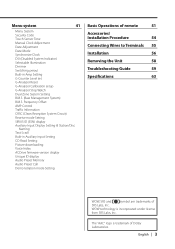
... "AAC" logo is incorporated under license from SRS Labs, Inc. Menu system 41 Basic Operations of remote 51 Menu System Security Code Touch Sensor Tone Manual Clock Adjustment Date Adjustment Date Mode Synchronize Clock DSI (Disabled System Indicator) Selectable Illumination Dimmer Switching preout Built-in Auxiliary input Setting CD Read Setting...
... "AAC" logo is incorporated under license from SRS Labs, Inc. Menu system 41 Basic Operations of remote 51 Menu System Security Code Touch Sensor Tone Manual Clock Adjustment Date Adjustment Date Mode Synchronize Clock DSI (Disabled System Indicator) Selectable Illumination Dimmer Switching preout Built-in Auxiliary input Setting CD Read Setting...
Instruction Manual
Page 5
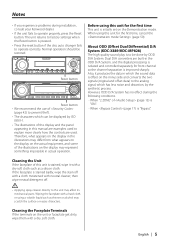
...signals (original and offset data) to operate properly, press the Reset button. However, ODD D/A System has no effect during installation, consult your Kenwood dealer. • If the unit fails to the analog signal, which can be restored. Cleaning the Unit If the faceplate of the illustrations .... If the faceplate is offset on the Demonstration mode. Dual D/A converters are examples used . Also, it with a hard cloth or using this manual are built-in which the sound data is stained badly, wipe the stain off with a cloth moistened with a dry, soft cloth. The unit ...
...signals (original and offset data) to operate properly, press the Reset button. However, ODD D/A System has no effect during installation, consult your Kenwood dealer. • If the unit fails to the analog signal, which can be restored. Cleaning the Unit If the faceplate of the illustrations .... If the faceplate is offset on the Demonstration mode. Dual D/A converters are examples used . Also, it with a hard cloth or using this manual are built-in which the sound data is stained badly, wipe the stain off with a cloth moistened with a dry, soft cloth. The unit ...
Instruction Manual
Page 6
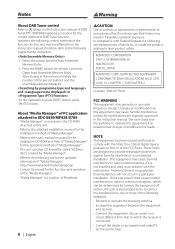
...installation. KENWOOD CORPORATION 2967-3, ISHIKAWA-MACHI, HACHIOJI-SHI TOKYO, JAPAN KENWOOD CORP. However, there is recorded in the CD-ROM attached to this unit. • Refer to the attached installation manual for the installation method of "Media Manager". • Refer to the user's manual recorded ... that interference will not occur in the memory finishes, the number of the FCC Rules. http://www.kenwood.mediamanager.jp • Contact Kenwood for this equipment may cause harmful interference unless the modifications are displayed. However, the following are designed to...
...installation. KENWOOD CORPORATION 2967-3, ISHIKAWA-MACHI, HACHIOJI-SHI TOKYO, JAPAN KENWOOD CORP. However, there is recorded in the CD-ROM attached to this unit. • Refer to the attached installation manual for the installation method of "Media Manager". • Refer to the user's manual recorded ... that interference will not occur in the memory finishes, the number of the FCC Rules. http://www.kenwood.mediamanager.jp • Contact Kenwood for this equipment may cause harmful interference unless the modifications are displayed. However, the following are designed to...

Instruction Manual
Page 7
... have the mark. • A CD-R or CD-RW that are easier to your CD-R/CD-RW writing software, and your CDR/CD-RW recorder instruction manual.) CD storage • Don't place them out horizontally. English | 7 CDs that can't be used • CDs that aren't round can't be used. • This unit...
... have the mark. • A CD-R or CD-RW that are easier to your CD-R/CD-RW writing software, and your CDR/CD-RW recorder instruction manual.) CD storage • Don't place them out horizontally. English | 7 CDs that can't be used • CDs that aren't round can't be used. • This unit...

Instruction Manual
Page 9
... S.MODE SCAN RDM REP F SEL S.MODE SCAN RDM REP FSEL English | 9 The basic operation of the Multi-function Key System is not shown in this manual) for registration. What's the Multi-function Key System? Press the [NEXT] button to switch the sections until the "RDM" function display is turned ON/OFF...
... S.MODE SCAN RDM REP F SEL S.MODE SCAN RDM REP FSEL English | 9 The basic operation of the Multi-function Key System is not shown in this manual) for registration. What's the Multi-function Key System? Press the [NEXT] button to switch the sections until the "RDM" function display is turned ON/OFF...

Instruction Manual
Page 14
... adjustment items can be adjusted when (page 14) is set to "SW ON" • Xover (Crossover Network Setup) You can manually set a crossover frequency of speakers. • DTA (Digital Time Alignment) Manually set to (page 18). • "SW" can be selected by selecting "MEM". Also, you cannot select "S.F.C". • * The following pages...
... adjustment items can be adjusted when (page 14) is set to "SW ON" • Xover (Crossover Network Setup) You can manually set a crossover frequency of speakers. • DTA (Digital Time Alignment) Manually set to (page 18). • "SW" can be selected by selecting "MEM". Also, you cannot select "S.F.C". • * The following pages...
Instruction Manual
Page 19
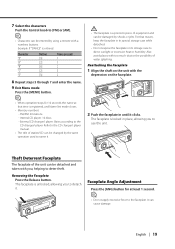
... Angle Adjustment Press the [ANG] button for 10 seconds the name at least 1 second. • Do not apply excessive force to the CD changer/ player manual. • The title of water splashing. Refer to the faceplate. Reattaching the Faceplate 1 Align the shaft on the unit with a numbers buttons. External CD changer...
... Angle Adjustment Press the [ANG] button for 10 seconds the name at least 1 second. • Do not apply excessive force to the CD changer/ player manual. • The title of water splashing. Refer to the faceplate. Reattaching the Faceplate 1 Align the shaft on the unit with a numbers buttons. External CD changer...
Instruction Manual
Page 21
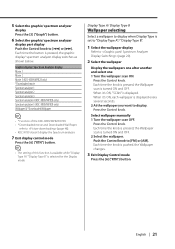
... the wallpaper you want to display. When it 's ON, "SCAN" is pushed, the Wallpaper changes. 3 Exit Display Control mode Press the [6] ("RTN") button. Select wallpaper manually 1 Turn the wallpaper scan OFF. Each time the knob is pressed, the Wallpaper scan is pressed, the graphic display/ spectrum analyzer display switches as shown...
... the wallpaper you want to display. When it 's ON, "SCAN" is pushed, the Wallpaper changes. 3 Exit Display Control mode Press the [6] ("RTN") button. Select wallpaper manually 1 Turn the wallpaper scan OFF. Each time the knob is pressed, the Wallpaper scan is pressed, the graphic display/ spectrum analyzer display switches as shown...

Instruction Manual
Page 28
Each time the button is ON. Normal manual tuning control. Each time the knob is pushed to [FM], it switches between the FM1, FM2, and FM3 bands. 3 Tune up or down band Push ... pressed, the Tuning mode switches as shown below. 28 | English Tuning mode Display Auto seek "Seek Mode Auto 1" Preset station seek "Seek Mode Auto 2" Manual "Seek Mode Manual" Operation Automatic search for a station. Function of remote Direct Access Tuning Entering the frequency and tuning. 1 Select the band Press the [FM] or [AM...
Each time the button is ON. Normal manual tuning control. Each time the knob is pushed to [FM], it switches between the FM1, FM2, and FM3 bands. 3 Tune up or down band Push ... pressed, the Tuning mode switches as shown below. 28 | English Tuning mode Display Auto seek "Seek Mode Auto 1" Preset station seek "Seek Mode Auto 2" Manual "Seek Mode Manual" Operation Automatic search for a station. Function of remote Direct Access Tuning Entering the frequency and tuning. 1 Select the band Press the [FM] or [AM...
Instruction Manual
Page 37
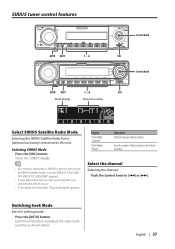
Display "Seek Mode Channel" "Seek Mode Preset" Operation Normal manual seeking control. Search in order of the channels in the Preset memory. Push the Control knob to start receiving after you selected the SIRIUS source. &#...
Display "Seek Mode Channel" "Seek Mode Preset" Operation Normal manual seeking control. Search in order of the channels in the Preset memory. Push the Control knob to start receiving after you selected the SIRIUS source. &#...

Instruction Manual
Page 41
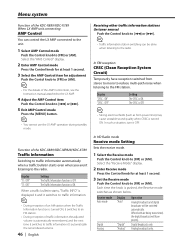
Example: When "Beep" is selected, each time the knob is displayed. 2 Select the menu item Push the Control knob to [FM] or [AM]. Menu system MENU MENU Menu display Control knob Control knob Menu System Setting during operation beep sound etc. "Menu" is pushed it switches "Beep : ON" or "Beep : OFF". English | 41 The reference for the Menu items and their setting content is after this operation explanation. 1 Enter Menu mode Press the [MENU] button for items that aren't applicable ( etc.) are entered step by returning to step 2 and setting other items. 4 Exit Menu mode Press ...
Example: When "Beep" is selected, each time the knob is displayed. 2 Select the menu item Push the Control knob to [FM] or [AM]. Menu system MENU MENU Menu display Control knob Control knob Menu System Setting during operation beep sound etc. "Menu" is pushed it switches "Beep : ON" or "Beep : OFF". English | 41 The reference for the Menu items and their setting content is after this operation explanation. 1 Enter Menu mode Press the [MENU] button for items that aren't applicable ( etc.) are entered step by returning to step 2 and setting other items. 4 Exit Menu mode Press ...

Instruction Manual
Page 42
.... • When the Security Code function is set as OFF. 1 Select Clock Adjustment mode Push the Control knob to [FM] or [AM]. In Standby mode Manual Clock Adjustment • This adjustment can be released. "Approved" is displayed. In Standby mode Date Adjustment 1 Select Date Adjust mode Push the knob to [FM...
.... • When the Security Code function is set as OFF. 1 Select Clock Adjustment mode Push the Control knob to [FM] or [AM]. In Standby mode Manual Clock Adjustment • This adjustment can be released. "Approved" is displayed. In Standby mode Date Adjustment 1 Select Date Adjust mode Push the knob to [FM...

Instruction Manual
Page 43
... date format Push the Control knob to [4] or [¢]. 3 Exit Menu mode Press the [MENU] button. Display "SYNC : OFF" "SYNC : ON" Setting Adjust the time manually. Function of the KDC-X889/KDC-MP828/KDC-X789 In Standby mode Synchronize Clock Synchronizing the RDS station time data and this unit's display automatically...
... date format Push the Control knob to [4] or [¢]. 3 Exit Menu mode Press the [MENU] button. Display "SYNC : OFF" "SYNC : ON" Setting Adjust the time manually. Function of the KDC-X889/KDC-MP828/KDC-X789 In Standby mode Synchronize Clock Synchronizing the RDS station time data and this unit's display automatically...
Instruction Manual
Page 45
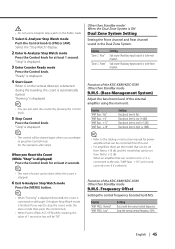
... can be set to +12 is connected to +12 dB. When an amplifier that can only be "00". • Refer to the catalog or instruction manual for at least 2 seconds. • The reset of 1 second or less will be rear channel. Frequency Offset Setting the central frequency boosted by pressing the...
... can be set to +12 is connected to +12 dB. When an amplifier that can only be "00". • Refer to the catalog or instruction manual for at least 2 seconds. • The reset of 1 second or less will be rear channel. Frequency Offset Setting the central frequency boosted by pressing the...
Instruction Manual
Page 46
... the Control knob for adjustment Push the Contol knob to [FM] or [AM]. • For the details of the AMP Control item, see the Instruction manual attached to the LX AMP. 4 Adjust the AMP Control item Push the Control knob to [4] or [¢]. 5 Exit AMP Control mode Press the [MENU] button...
... the Control knob for adjustment Push the Contol knob to [FM] or [AM]. • For the details of the AMP Control item, see the Instruction manual attached to the LX AMP. 4 Adjust the AMP Control item Push the Control knob to [4] or [¢]. 5 Exit AMP Control mode Press the [MENU] button...

Instruction Manual
Page 47
... unit serial number and the electronic SIRIUS Identification number for the SIRIUS tuner source, HD Radio source, including Channel name, etc. Display "Scroll : Auto" "Scroll : Manual" Setting Repeats scroll. Folder name/ File name/ Song title/ Artist name/ Album name - Radio text - Select the "Name Set" display. 4 Enter Auxiliary input display setting...
... unit serial number and the electronic SIRIUS Identification number for the SIRIUS tuner source, HD Radio source, including Channel name, etc. Display "Scroll : Auto" "Scroll : Manual" Setting Repeats scroll. Folder name/ File name/ Song title/ Artist name/ Album name - Radio text - Select the "Name Set" display. 4 Enter Auxiliary input display setting...
Instruction Manual
Page 55
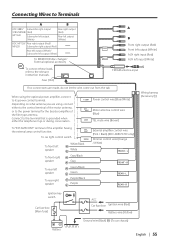
... the optional power amplifier, connect to the power terminal for the booster amplifier of the film-type antenna. Connect to the relevant instruction manuals. Depending on what antenna you are made, do not let the wire come out from the tab. CONT Motor antenna control wire (Blue...output (White) KDC-MP728/ Rear right output (Red)/ MP628 Subwoofer right output (Red) Rear left output (White)/ Subwoofer left output (White) To KENWOOD disc changer/ External optional accessory To connect these leads, refer to the terminal that is grounded when either to the control terminal of the motor...
... the optional power amplifier, connect to the power terminal for the booster amplifier of the film-type antenna. Connect to the relevant instruction manuals. Depending on what antenna you are made, do not let the wire come out from the tab. CONT Motor antenna control wire (Blue...output (White) KDC-MP728/ Rear right output (Red)/ MP628 Subwoofer right output (Red) Rear left output (White)/ Subwoofer left output (White) To KENWOOD disc changer/ External optional accessory To connect these leads, refer to the terminal that is grounded when either to the control terminal of the motor...


