
Instruction Manual
Page 2
...Safety precautions 4 Notes on playing MP3 6 About CDs 8 General features 9 Power Selecting the Source Volume Attenuator Loudness System Q Audio Control Speaker Setting Switching Display Station/Disc Naming (SNPS/DNPS) Auxiliary Input Display Setting Non-fading Output Theft Deterrent Faceplate Tuner features 14 Tuning Mode Tuning Direct Access Tuning Station Preset Memory Auto Memory Entry Preset Tuning CD/MP3/External disc control features 16 Playing CD & MP3 Playing External Disc Fast Forwarding and Reversing Track Search Album Search Direct Track Search Direct Album Search Track/Album...
...Safety precautions 4 Notes on playing MP3 6 About CDs 8 General features 9 Power Selecting the Source Volume Attenuator Loudness System Q Audio Control Speaker Setting Switching Display Station/Disc Naming (SNPS/DNPS) Auxiliary Input Display Setting Non-fading Output Theft Deterrent Faceplate Tuner features 14 Tuning Mode Tuning Direct Access Tuning Station Preset Memory Auto Memory Entry Preset Tuning CD/MP3/External disc control features 16 Playing CD & MP3 Playing External Disc Fast Forwarding and Reversing Track Search Album Search Direct Track Search Direct Album Search Track/Album...
Instruction Manual
Page 3
... to provide reasonable protection against harmful interference in the instruction manual. These limits are designed to correct the interference by one or more of the following are expressly approved in a residential installation. Location : Bottom Panel FCC WARNING This equipment may cause harmful interference unless the modifications are reproductions of labels on , the user is connected. • Consult the...
... to provide reasonable protection against harmful interference in the instruction manual. These limits are designed to correct the interference by one or more of the following are expressly approved in a residential installation. Location : Bottom Panel FCC WARNING This equipment may cause harmful interference unless the modifications are reproductions of labels on , the user is connected. • Consult the...

Instruction Manual
Page 4
..., battery, or ground wires, make sure to use a new one with no "O-N" switch to this unit, set the "O-N" switch to shock. If a model with the prescribed rating. IMPORTANT INFORMATION About the disc changer/CD player to be dangerous to direct sunlight or excessive heat or humidity. Use only the screws provided. The liquid crystal fluid may break or crack because it is connected, some unavailable functions and...
..., battery, or ground wires, make sure to use a new one with no "O-N" switch to this unit, set the "O-N" switch to shock. If a model with the prescribed rating. IMPORTANT INFORMATION About the disc changer/CD player to be dangerous to direct sunlight or excessive heat or humidity. Use only the screws provided. The liquid crystal fluid may break or crack because it is connected, some unavailable functions and...

Instruction Manual
Page 5
... to evaporate. In such a situation, remove the disc and wait for assistance. • Press the reset button if the disc auto changer fails to accumulate in a dusty CD slot. -5- NOTE • If you experience problems during installation, consult your Kenwood dealer. • If the unit fails to the unit may affect its mechanical parts. Therefore, what appears on the display in the illustrations may differ...
... to evaporate. In such a situation, remove the disc and wait for assistance. • Press the reset button if the disc auto changer fails to accumulate in a dusty CD slot. -5- NOTE • If you experience problems during installation, consult your Kenwood dealer. • If the unit fails to the unit may affect its mechanical parts. Therefore, what appears on the display in the illustrations may differ...

Instruction Manual
Page 6
... the instruction manual of folders: 50 MP3 written in this unit are indicated in the long file name format. Settings for file name including the delimiter (".") and three-character extension are CD-ROM, CD-R, and CD-RW. Acceptable medium formats The following limitations: • Maximum number of directory levels: 8 • Maximum number of files per folder: 255 • Maximum number of Codes. Acceptable...
... the instruction manual of folders: 50 MP3 written in this unit are indicated in the long file name format. Settings for file name including the delimiter (".") and three-character extension are CD-ROM, CD-R, and CD-RW. Acceptable medium formats The following limitations: • Maximum number of directory levels: 8 • Maximum number of files per folder: 255 • Maximum number of Codes. Acceptable...
Instruction Manual
Page 10
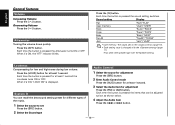
..."/ "TOP40" "Jazz"/ "JAZZ" • User memory: The values set Press the [SRC] button. 2 Select the Sound type Audio Control 1 Select the source for adjustment Press the [SRC] button. 2 Enter Audio Control mode Press the [AUD] button for at least 1 second. 3 Select the Audio item for adjustment Press the [FM] or [AM] button. First, select the speaker type with the (page 11). When it 's ON, the "ATT" indicator blinks. Each time the button is pressed for low...
..."/ "TOP40" "Jazz"/ "JAZZ" • User memory: The values set Press the [SRC] button. 2 Select the Sound type Audio Control 1 Select the source for adjustment Press the [SRC] button. 2 Enter Audio Control mode Press the [AUD] button for at least 1 second. 3 Select the Audio item for adjustment Press the [FM] or [AM] button. First, select the speaker type with the (page 11). When it 's ON, the "ATT" indicator blinks. Each time the button is pressed for low...
Instruction Manual
Page 11
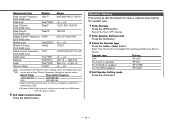
... volume. 5 Exit Audio Control mode Press the [AUD] button. Speaker Setting Fine-tuning so that can be set as shown below . Speaker type Display OFF For 5 & 4 in . speaker For the OEM speaker "SP OFF" "SP 5/4" "SP 6*9/6" "SP OEM" 4 Exit Speaker Setting mode Press the [Q] button. - 11 - Adjustment Item Display Range Bass Center Frequency (KDC-X459 only) Bass level Bass Q Factor (KDC-X459 only) Bass Extend (KDC-X459 only) Middle Center Frequency (KDC-X459 only) Middle level Middle Q Factor (KDC-X459 only) Treble Center Frequency (KDC...
... volume. 5 Exit Audio Control mode Press the [AUD] button. Speaker Setting Fine-tuning so that can be set as shown below . Speaker type Display OFF For 5 & 4 in . speaker For the OEM speaker "SP OFF" "SP 5/4" "SP 6*9/6" "SP OEM" 4 Exit Speaker Setting mode Press the [Q] button. - 11 - Adjustment Item Display Range Bass Center Frequency (KDC-X459 only) Bass level Bass Q Factor (KDC-X459 only) Bass Extend (KDC-X459 only) Middle Center Frequency (KDC-X459 only) Middle level Middle Q Factor (KDC-X459 only) Treble Center Frequency (KDC...

Instruction Manual
Page 12
... CD & External disc source KDC-MPV7019/MPV619/X459/419 : Information Track number Disc name Disc title (In External disc source or KDC-MPV7019/MPV619 internal CD source) Track title (In External disc source or KDC-MPV7019/MPV619 internal CD source) Track number & Track Time Clock KDC-4019/319 : Information Track number & Track Time Disc name Disc title (In External disc source) Track title (In External disc source) Clock Display "DNPS" "D-TITLE" "T-TITLE" In MP3 source Information Track number Disc name Display "DNPS" Display "DNPS" "D-TITLE" "T-TITLE" 1 Receive/play the station/disc...
... CD & External disc source KDC-MPV7019/MPV619/X459/419 : Information Track number Disc name Disc title (In External disc source or KDC-MPV7019/MPV619 internal CD source) Track title (In External disc source or KDC-MPV7019/MPV619 internal CD source) Track number & Track Time Clock KDC-4019/319 : Information Track number & Track Time Disc name Disc title (In External disc source) Track title (In External disc source) Clock Display "DNPS" "D-TITLE" "T-TITLE" In MP3 source Information Track number Disc name Display "DNPS" Display "DNPS" "D-TITLE" "T-TITLE" 1 Receive/play the station/disc...

Instruction Manual
Page 13
... time is selected, and Auxiliary input display setting mode closes. Each time the button is used to the CD changer/ player manual. • The title of the KDC-MPV7019/KDC-X459/KDC-4019 Non-fading Output Turning the Non-fading output ON or OFF. Characters can be entered by the same operation used . Auxiliary Input Display Setting Selecting the display when this device is switched to the CD changer/ player. Function of station/CD can be changed by using a remote with a number buttons. The presently selected AUX Name is displayed. 1 Select Auxiliary input source Press...
... time is selected, and Auxiliary input display setting mode closes. Each time the button is used to the CD changer/ player manual. • The title of the KDC-MPV7019/KDC-X459/KDC-4019 Non-fading Output Turning the Non-fading output ON or OFF. Characters can be entered by the same operation used . Auxiliary Input Display Setting Selecting the display when this device is switched to the CD changer/ player. Function of station/CD can be changed by using a remote with a number buttons. The presently selected AUX Name is displayed. 1 Select Auxiliary input source Press...
Instruction Manual
Page 15
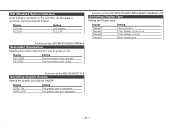
...on the remote. Normal manual tuning control. Example: Desired frequency Press button 92.1 MHz (FM) 810 kHz (AM) [#0], [#9], [#2], [#1] [#0], [#8], [#1], [#0] Canceling Direct Access Tuning Press the [DIRECT] button on the remote. During reception of stereo stations the "ST" indicator is pressed the Tuning mode switches as shown below. Each time the [FM] button is displayed. 3 Enter the frequency Press the number buttons on the remote. Press the [AUTO] button. Select the "TUNER" display. 2 Select the band Press the [FM] or [AM] button. Station Preset Memory Putting the...
...on the remote. Normal manual tuning control. Example: Desired frequency Press button 92.1 MHz (FM) 810 kHz (AM) [#0], [#9], [#2], [#1] [#0], [#8], [#1], [#0] Canceling Direct Access Tuning Press the [DIRECT] button on the remote. During reception of stereo stations the "ST" indicator is pressed the Tuning mode switches as shown below. Each time the [FM] button is displayed. 3 Enter the frequency Press the number buttons on the remote. Press the [AUTO] button. Select the "TUNER" display. 2 Select the band Press the [FM] or [AM] button. Station Preset Memory Putting the...
Instruction Manual
Page 18
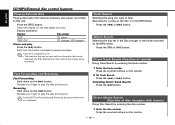
... point. Reversing Hold down on the MP3 media. Direct Album Search (Function of remote) Doing Track Search by entering the disc number. 1 Enter the disc number Press the number buttons on the remote. - 18 - Canceling Direct Track Search Press the [38] button. CD/MP3/External disc control features English Playing External Disc Playing discs set in the optional accessory disc player connected to this unit. Select the display for a song on the remote. 2 Do Track Search Press the [4] or...
... point. Reversing Hold down on the MP3 media. Direct Album Search (Function of remote) Doing Track Search by entering the disc number. 1 Enter the disc number Press the number buttons on the remote. - 18 - Canceling Direct Track Search Press the [38] button. CD/MP3/External disc control features English Playing External Disc Playing discs set in the optional accessory disc player connected to this unit. Select the display for a song on the remote. 2 Do Track Search Press the [4] or...

Instruction Manual
Page 22
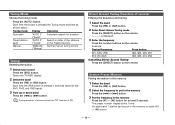
... ADJ" display. 2 Enter Clock Adjust mode Press the [4] or [¢] button for at least 1 second. The Security Code function activates. Select the "ALL OFF" display. 2 Enter Menu mode Press the [MENU] button for at least 1 second. Adjust the minutes Press the [4] or [¢] button. Menu system English Security Code Because authorization by using the Security Code is a help in steps 4 through 6, repeat from the battery power source 1 Turn the power ON. 2 Do the step 4 through 7 operation, and...
... ADJ" display. 2 Enter Clock Adjust mode Press the [4] or [¢] button for at least 1 second. The Security Code function activates. Select the "ALL OFF" display. 2 Enter Menu mode Press the [MENU] button for at least 1 second. Adjust the minutes Press the [4] or [¢] button. Menu system English Security Code Because authorization by using the Security Code is a help in steps 4 through 6, repeat from the battery power source 1 Turn the power ON. 2 Do the step 4 through 7 operation, and...
Instruction Manual
Page 23
... the unit after the faceplate is play time. Display "DisplayD" "DisplayA" "DisplayB" "DisplayC" Setting Demonstration. Display "KEY GRN" "KEY RED" Setting The illumination color is displayed. LED OFF. Silent display type. Display "GRPH ON" "GRPH OFF" Setting The graphic part is green. The graphic part isn't displayed. - 23 - Function of the KDC-4019/KDC-319 Switching Graphic Display Setting the graphic part display ON/OFF. The illumination color is clock. Display "DSI ON" "DSI OFF" Setting LED flashes. Circle Display...
... the unit after the faceplate is play time. Display "DisplayD" "DisplayA" "DisplayB" "DisplayC" Setting Demonstration. Display "KEY GRN" "KEY RED" Setting The illumination color is displayed. LED OFF. Silent display type. Display "GRPH ON" "GRPH OFF" Setting The graphic part is green. The graphic part isn't displayed. - 23 - Function of the KDC-4019/KDC-319 Switching Graphic Display Setting the graphic part display ON/OFF. The illumination color is clock. Display "DSI ON" "DSI OFF" Setting LED flashes. Circle Display...

Instruction Manual
Page 24
... the KDC-MPV7019/KDC-MPV619/KDC-X459/KDC-419 Dimmer Dimming this unit's display automatically when the vehicle light switch is called up the preset color Press the [#1] - [#4] button. Select the "COL" display. 2 The color continues to the selected source. The set color memory Press the [#5] button for at least 2 seconds. 2 Press the [4] or [¢] button. Display Color mode "Scan" The color changes in memory. Blue fine adjustment 1 Press the [#3] button for at the color you want. "Time" The color changes every 6 hours. English ...... Menu system Function...
... the KDC-MPV7019/KDC-MPV619/KDC-X459/KDC-419 Dimmer Dimming this unit's display automatically when the vehicle light switch is called up the preset color Press the [#1] - [#4] button. Select the "COL" display. 2 The color continues to the selected source. The set color memory Press the [#5] button for at least 2 seconds. 2 Press the [4] or [¢] button. Display Color mode "Scan" The color changes in memory. Blue fine adjustment 1 Press the [#3] button for at the color you want. "Time" The color changes every 6 hours. English ...... Menu system Function...

Instruction Manual
Page 26
... accidentally swallowed. Basic operations [VOL.] buttons Adjusting the volume. [SRC] button Each time the button is pressed the source switches. English Basic Operations of children. Insert the batteries with the + and - poles aligned properly, following the illustration inside the case. 38 DIRECT/OK DNPP VOL. 2WARNING Store unused batteries out of the reach of remote FM/AM/DISC+/DISC- [#0] - [#9] ATT SRC 4/¢ Loading and Replacing the battery Use one lithium battery (CR2025).
... accidentally swallowed. Basic operations [VOL.] buttons Adjusting the volume. [SRC] button Each time the button is pressed the source switches. English Basic Operations of children. Insert the batteries with the + and - poles aligned properly, following the illustration inside the case. 38 DIRECT/OK DNPP VOL. 2WARNING Store unused batteries out of the reach of remote FM/AM/DISC+/DISC- [#0] - [#9] ATT SRC 4/¢ Loading and Replacing the battery Use one lithium battery (CR2025).

Instruction Manual
Page 28
... supply, as shown above. Make the proper input and output wire connections for those wires to a power source with battery wires, the battery may cause a short circuit, that in the car. • When only two speakers are working properly. • Mount the unit so that can be turned on the car are being connected to the system, connect the connectors either to both the front output terminals or to a rear output terminal • After...
... supply, as shown above. Make the proper input and output wire connections for those wires to a power source with battery wires, the battery may cause a short circuit, that in the car. • When only two speakers are working properly. • Mount the unit so that can be turned on the car are being connected to the system, connect the connectors either to both the front output terminals or to a rear output terminal • After...

Instruction Manual
Page 32
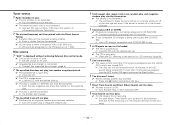
... the wires, replace the fuse with the same rating. ✔ No ACC position on . ? The power does not turn ON.01 ✔ The fuse has blown. ☞ After checking for possible problems. General ? The Bass center frequency, Bass quality factor, Bass extend, Middle center frequency, Middle quality factor, and Treble center frequency can 't switch to the ignition as the battery wire. ? The Security Code item isn't displayed in the Menu...
... the wires, replace the fuse with the same rating. ✔ No ACC position on . ? The power does not turn ON.01 ✔ The fuse has blown. ☞ After checking for possible problems. General ? The Bass center frequency, Bass quality factor, Bass extend, Middle center frequency, Middle quality factor, and Treble center frequency can 't switch to the ignition as the battery wire. ? The Security Code item isn't displayed in the Menu...
Instruction Manual
Page 33
... song. - 33 - Radio reception is poor.39 ✔ The car antenna is not extended. ☞ Pull the antenna out all the way. ✔ The antenna control wire is ON. ☞ Turn Random Play or other functions OFF. ? Track repeat, disc repeat, track scan, random play, and magazine random play the CD-R/CDRW.61 ☞ Use a CD changer compatible with the Direct Access Tuning.41 ✔ A station that can 't be received. ✔ You...
... song. - 33 - Radio reception is poor.39 ✔ The car antenna is not extended. ☞ Pull the antenna out all the way. ✔ The antenna control wire is ON. ☞ Turn Random Play or other functions OFF. ? Track repeat, disc repeat, track scan, random play, and magazine random play the CD-R/CDRW.61 ☞ Use a CD changer compatible with the Direct Access Tuning.41 ✔ A station that can 't be received. ✔ You...
Instruction Manual
Page 34
... in non-MP3. ? The songs in the selected folder aren't played in Album Select mode.77 ✔ There are recorded on the CD writer, you wanted them onto a medium with their track names beginning with levels. ? If the following situations, consult your nearest service center: • Even though the disc changer is connected, the Disc Changer source is entered that this unit can't display. ☞ For...
... in non-MP3. ? The songs in the selected folder aren't played in Album Select mode.77 ✔ There are recorded on the CD writer, you wanted them onto a medium with their track names beginning with levels. ? If the following situations, consult your nearest service center: • Even though the disc changer is connected, the Disc Changer source is entered that this unit can't display. ☞ For...
Instruction Manual
Page 35
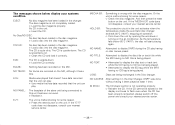
... connected to flash even when the CD has been properly reinserted, please switch off the power and consult your systems condition. E15 ➪ Use media that has data recorded that the unit can play. And then press the reset button on the unit. If the "MECHA ER" code does not disappear, consult your nearest service center. NO NAME: Attempted to display DNPS during the CD play...
... connected to flash even when the CD has been properly reinserted, please switch off the power and consult your systems condition. E15 ➪ Use media that has data recorded that the unit can play. And then press the reset button on the unit. If the "MECHA ER" code does not disappear, consult your nearest service center. NO NAME: Attempted to display DNPS during the CD play...


