Instruction Manual
Page 2
... HD Radio control features 18 About HD Radio Tuning Menu system 19 Menu System Activating Security Code Deactivating Security Code Touch Sensor Tone Manual Clock Adjustment DSI (Disabled System Indicator) Supreme Setting CRSC (Clean Reception System Circuit) Receive mode Setting SIRIUS ID (ESN) display Auxiliary Input Display Setting Text Scroll CD Read Setting Demonstration mode Setting Basic Operations of remote control 24 Accessories/ Installation Procedure 26 Connecting Wires to Terminals 27 Installation 28 Removing the Unit 30 Troubleshooting Guide 31 Specifications 34...
... HD Radio control features 18 About HD Radio Tuning Menu system 19 Menu System Activating Security Code Deactivating Security Code Touch Sensor Tone Manual Clock Adjustment DSI (Disabled System Indicator) Supreme Setting CRSC (Clean Reception System Circuit) Receive mode Setting SIRIUS ID (ESN) display Auxiliary Input Display Setting Text Scroll CD Read Setting Demonstration mode Setting Basic Operations of remote control 24 Accessories/ Installation Procedure 26 Connecting Wires to Terminals 27 Installation 28 Removing the Unit 30 Troubleshooting Guide 31 Specifications 34...
Instruction Manual
Page 3
... found to comply with the limits for help. In compliance with the instructions. CERTIFIES THIS EQUIPMENT CONFORMS TO DHHS REGULATIONS N0.21 CFR 1040. 10, CHAPTER 1, SUBCHAPTER J. English | 3 2Warning 2CAUTION Use of controls or adjustments or performance of procedures other than those specified herein may generate or use radio frequency energy. Location : Bottom Panel FCC WARNING This equipment may result...
... found to comply with the limits for help. In compliance with the instructions. CERTIFIES THIS EQUIPMENT CONFORMS TO DHHS REGULATIONS N0.21 CFR 1040. 10, CHAPTER 1, SUBCHAPTER J. English | 3 2Warning 2CAUTION Use of controls or adjustments or performance of procedures other than those specified herein may generate or use radio frequency energy. Location : Bottom Panel FCC WARNING This equipment may result...
Instruction Manual
Page 4
... to this unit. Refer to play. Also avoid places with too much dust or the possibility of precision equipment. • When replacing a fuse, only use and the information that any Kenwood disc changers/ CD players released in 1997 or earlier and disc changers made by other makers cannot be connected to direct sunlight, excessive heat or humidity. If the unit still does not operate normally...
... to this unit. Refer to play. Also avoid places with too much dust or the possibility of precision equipment. • When replacing a fuse, only use and the information that any Kenwood disc changers/ CD players released in 1997 or earlier and disc changers made by other makers cannot be connected to direct sunlight, excessive heat or humidity. If the unit still does not operate normally...
Instruction Manual
Page 5
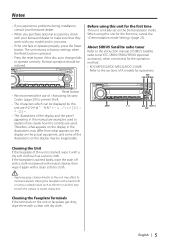
... Unit If the faceplate of A models for operations. Before using this unit is pressed. • Press the reset button if the disc auto changer fails to factory settings when the Reset button is stained, wipe it again with a hard cloth or using a volatile liquid such as a silicon cloth. About SIRIUS Satellite radio tuner Refer to the instruction manual of SIRIUS Satellite radio tuner KTC-SR901/SR902/SR903 (optional accessory), when connected, for the operation method. • KDC-MP2032/KDC-MP232/KDC...
... Unit If the faceplate of A models for operations. Before using this unit is pressed. • Press the reset button if the disc auto changer fails to factory settings when the Reset button is stained, wipe it again with a hard cloth or using a volatile liquid such as a silicon cloth. About SIRIUS Satellite radio tuner Refer to the instruction manual of SIRIUS Satellite radio tuner KTC-SR901/SR902/SR903 (optional accessory), when connected, for the operation method. • KDC-MP2032/KDC-MP232/KDC...
Instruction Manual
Page 8
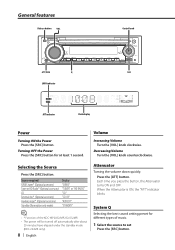
... Q Selecting the best sound setting preset for at least 1 second. Press the [ATT] button. General features Release button VOL Control knob ATT/DIM Q SRC LOUD indicator ATT indicator Clock display Power Turning ON the Power Press the [SRC] button. Decreasing Volume Turn the [VOL] knob counterclockwise. Selecting the Source Press the [SRC] button. Source required Display SIRIUS tuner* (Optional accessory) "SIRIUS" Tuner or HD Radio* (Optional accessory) "TUNER" or "HD RADIO" CD "CD" External disc* (Optional accessory) "CD CH" Auxiliary input* (Optional accessory) "AUX...
... Q Selecting the best sound setting preset for at least 1 second. Press the [ATT] button. General features Release button VOL Control knob ATT/DIM Q SRC LOUD indicator ATT indicator Clock display Power Turning ON the Power Press the [SRC] button. Decreasing Volume Turn the [VOL] knob counterclockwise. Selecting the Source Press the [SRC] button. Source required Display SIRIUS tuner* (Optional accessory) "SIRIUS" Tuner or HD Radio* (Optional accessory) "TUNER" or "HD RADIO" CD "CD" External disc* (Optional accessory) "CD CH" Auxiliary input* (Optional accessory) "AUX...
Instruction Manual
Page 9
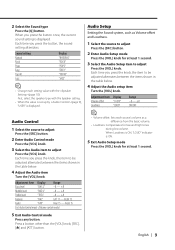
...] button. 2 Enter Audio Control mode Press the [VOL] knob. 3 Select the Audio item to adjust Press the [VOL] knob. Right 15 Fader "FAD" Rear 15 - Press a button other than the [VOL] knob, [SRC], [0] and [ATT] button. • Volume offset: Sets each setting value with the Speaker setting. • When the value is set up by (page 9), "USER" is displayed. Each time you press the button once, the current sound setting is displayed. Adjustment Item Display Range Bass level...
...] button. 2 Enter Audio Control mode Press the [VOL] knob. 3 Select the Audio item to adjust Press the [VOL] knob. Right 15 Fader "FAD" Rear 15 - Press a button other than the [VOL] knob, [SRC], [0] and [ATT] button. • Volume offset: Sets each setting value with the Speaker setting. • When the value is set up by (page 9), "USER" is displayed. Each time you press the button once, the current sound setting is displayed. Adjustment Item Display Range Bass level...
Instruction Manual
Page 10
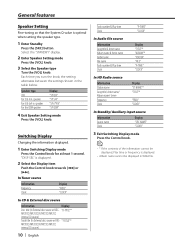
... Track number & Play time Clock Display "TITLE"* "ALBUM"* "FOLDER" "FILE" "P-TIME" "CLOCK" In HD Radio source Information Station name Song title/ Artist name/ Album name/ Genre Frequency Clock Display "ST NAME"* "TITLE"* "FREQ" "CLOCK" In Standby/ Auxiliary input source Information Source name Clock Display "SRC NAME" "CLOCK" 3 Exit Switching Display mode Press the Control knob. • * If the contents of the information cannot be displayed in . Select the "STANDBY" display. 2 Enter Speaker Setting mode Press the [VOL] knob. 3 Select the Speaker type Turn the...
... Track number & Play time Clock Display "TITLE"* "ALBUM"* "FOLDER" "FILE" "P-TIME" "CLOCK" In HD Radio source Information Station name Song title/ Artist name/ Album name/ Genre Frequency Clock Display "ST NAME"* "TITLE"* "FREQ" "CLOCK" In Standby/ Auxiliary input source Information Source name Clock Display "SRC NAME" "CLOCK" 3 Exit Switching Display mode Press the Control knob. • * If the contents of the information cannot be displayed in . Select the "STANDBY" display. 2 Enter Speaker Setting mode Press the [VOL] knob. 3 Select the Speaker type Turn the...
Instruction Manual
Page 12
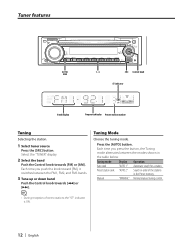
Select the "TUNER" display. 2 Select the band Push the Control knob towards [4] or [¢]. Normal manual tuning control. • During reception of the stations in the Preset memory. Each time you push the knob toward [FM], it switches between the modes shown in order of stereo stations the "ST" indicator is ON. 12 | English Tuning mode Auto seek Preset station seek Manual Display "AUTO 1" "AUTO 2" "MANUAL" Operation Automatic search for a station. Search in the table below. Press the [AUTO] button. Tuning Mode Choose...
Select the "TUNER" display. 2 Select the band Push the Control knob towards [4] or [¢]. Normal manual tuning control. • During reception of the stations in the Preset memory. Each time you push the knob toward [FM], it switches between the modes shown in order of stereo stations the "ST" indicator is ON. 12 | English Tuning mode Auto seek Preset station seek Manual Display "AUTO 1" "AUTO 2" "MANUAL" Operation Automatic search for a station. Search in the table below. Press the [AUTO] button. Tuning Mode Choose...
Instruction Manual
Page 14
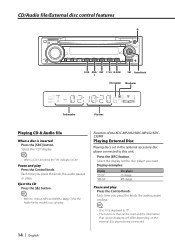
... M.RDM 3 SRC Control knob Disc number IN indicator Track number Play time Playing CD & Audio file When a disc is ON. Select the "CD" display. • When a CD is inserted, the "IN" indicator is inserted Press the [SRC] button. Eject the CD Press the [0] button. • Refer to this unit. Function of the KDC-MP2032/KDC-MP232/KDC232MR Playing External Disc Playing discs set in the optional accessory disc player connected to (page 7) for the disc player you press...
... M.RDM 3 SRC Control knob Disc number IN indicator Track number Play time Playing CD & Audio file When a disc is ON. Select the "CD" display. • When a CD is inserted, the "IN" indicator is inserted Press the [SRC] button. Eject the CD Press the [0] button. • Refer to this unit. Function of the KDC-MP2032/KDC-MP232/KDC232MR Playing External Disc Playing discs set in the optional accessory disc player connected to (page 7) for the disc player you press...
Instruction Manual
Page 18
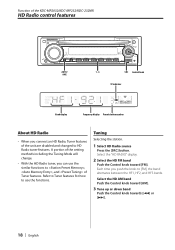
... the setting methods including the Tuning Mode will change. • With the HD Radio tuner, you can use the functions. Refer to Tuner features for how to HD Radio tuner features. Select the HD AM band Push the Control knob toward [FM]. Function of the KDC-MP2032/KDC-MP232/KDC-232MR HD Radio control features AUTO/ AME 1 - 6 SRC Control knob ST indicator Band display Frequency display Preset station number About HD Radio • When you connect an HD Radio, Tuner features...
... the setting methods including the Tuning Mode will change. • With the HD Radio tuner, you can use the functions. Refer to Tuner features for how to HD Radio tuner features. Select the HD AM band Push the Control knob toward [FM]. Function of the KDC-MP2032/KDC-MP232/KDC-232MR HD Radio control features AUTO/ AME 1 - 6 SRC Control knob ST indicator Band display Frequency display Preset station number About HD Radio • When you connect an HD Radio, Tuner features...
Instruction Manual
Page 20
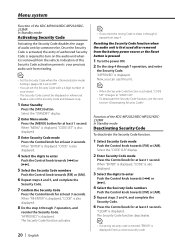
... Security Code cannot be displayed or referenced. Make a note of audio unit by someone else. Resetting the Security Code function when the audio unit is first used after removed from step 4. "CLEAR" is displayed. When "ENTER" is displayed, "CODE" is also displayed. 4 Select the digits to turn on the audio unit when it up. 1 Enter Standby Press the [SRC] button. Menu system Function of the KDC-MP2032/KDC-MP232/KDC232MR In Standby mode Activating Security Code Activating the Security Code...
... Security Code cannot be displayed or referenced. Make a note of audio unit by someone else. Resetting the Security Code function when the audio unit is first used after removed from step 4. "CLEAR" is displayed. When "ENTER" is displayed, "CODE" is also displayed. 4 Select the digits to turn on the audio unit when it up. 1 Enter Standby Press the [SRC] button. Menu system Function of the KDC-MP2032/KDC-MP232/KDC232MR In Standby mode Activating Security Code Activating the Security Code...
Instruction Manual
Page 21
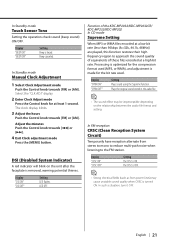
... CRSC is removed, warning potential thieves. The clock display blinks. 3 Adjust the hours Push the Control knob towards [4] or [¢]. 4 Exit Clock adjustment mode Press the [MENU] button. English | 21 In Standby mode Manual Clock Adjustment 1 Select Clock Adjustment mode Push the Control knob towards [FM] or [AM]. Display "SPRM ON" "SPRM OFF" Setting Plays sound using the Supreme function. In FM reception CRSC (Clean Reception System Circuit) Temporarily have reception alternate from power lines) may...
... CRSC is removed, warning potential thieves. The clock display blinks. 3 Adjust the hours Push the Control knob towards [4] or [¢]. 4 Exit Clock adjustment mode Press the [MENU] button. English | 21 In Standby mode Manual Clock Adjustment 1 Select Clock Adjustment mode Push the Control knob towards [FM] or [AM]. Display "SPRM ON" "SPRM OFF" Setting Plays sound using the Supreme function. In FM reception CRSC (Clean Reception System Circuit) Temporarily have reception alternate from power lines) may...

Instruction Manual
Page 22
... received, the Receive mode will automatically switch to retain the unit serial number and the electronic SIRIUS Identification number for 10 seconds, the name at least 1 second. Menu system Function of the KDC-MP2032/KDC-MP232/KDC232MR In HD Radio mode Receive mode Setting Sets the receive mode. 1 Select the Receive mode Push the Control knob towards [FM] or [AM]. Function of the KDC-MP2032/KDC-MP232/KDC232MR Auxiliary Input Display Setting Selecting the display when alternating to Auxiliary input source. 1 Select Auxiliary input source Press the [SRC] button. Receive mode Auto...
... received, the Receive mode will automatically switch to retain the unit serial number and the electronic SIRIUS Identification number for 10 seconds, the name at least 1 second. Menu system Function of the KDC-MP2032/KDC-MP232/KDC232MR In HD Radio mode Receive mode Setting Sets the receive mode. 1 Select the Receive mode Push the Control knob towards [FM] or [AM]. Function of the KDC-MP2032/KDC-MP232/KDC232MR Auxiliary Input Display Setting Selecting the display when alternating to Auxiliary input source. 1 Select Auxiliary input source Press the [SRC] button. Receive mode Auto...
Instruction Manual
Page 24
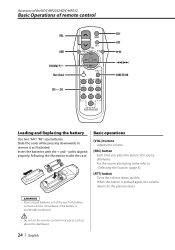
Insert the batteries with the + and - When the button is accidentally swallowed. • Do not set the remote control in hot places such as illustrated. Accessory of the KDC-MP2032/KDC-MP232 Basic Operations of children. For the source alternating order refer to remove it as above the dashboard. 24 | English Not Used [0] - [9] SRC ATT VOL AUD 38 FM+ 4 ¢ AM- DIRECT /OK ABC...
Insert the batteries with the + and - When the button is accidentally swallowed. • Do not set the remote control in hot places such as illustrated. Accessory of the KDC-MP2032/KDC-MP232 Basic Operations of children. For the source alternating order refer to remove it as above the dashboard. 24 | English Not Used [0] - [9] SRC ATT VOL AUD 38 FM+ 4 ¢ AM- DIRECT /OK ABC...
Instruction Manual
Page 25
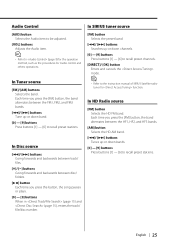
... the operation method, such as the procedures for function. In Disc source [4]/ [¢] buttons Going forwards and backwards between track/ files. [+]/ [-] buttons Going forwards and backwards between the FM1, FM2, and FM3 bands. [4]/ [¢] buttons Tune up or down band. [0] - [9] buttons Press buttons [1] - [6] to recall preset stations. In SIRIUS tuner source [FM] button Selects the preset band. [4]/ [¢] buttons Searches up or down channels. [0] - [9] buttons Press buttons [1] - [6] to the instruction manual of SIRIUS Satellite radio tuner for Audio control and...
... the operation method, such as the procedures for function. In Disc source [4]/ [¢] buttons Going forwards and backwards between track/ files. [+]/ [-] buttons Going forwards and backwards between the FM1, FM2, and FM3 bands. [4]/ [¢] buttons Tune up or down band. [0] - [9] buttons Press buttons [1] - [6] to recall preset stations. In SIRIUS tuner source [FM] button Selects the preset band. [4]/ [¢] buttons Searches up or down channels. [0] - [9] buttons Press buttons [1] - [6] to the instruction manual of SIRIUS Satellite radio tuner for Audio control and...
Instruction Manual
Page 26
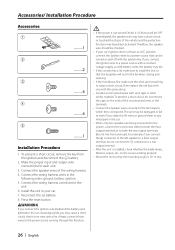
... key. Accessories/ Installation Procedure Accessories 1 ..........1 2 ..........2 3 ..........4 4 ..........4 5 ..........1 Installation Procedure 1. To prevent a short circuit, remove the key from the ignition and disconnect the - Make the proper input and output wire connections for each unit. 3. Install the unit in the car. • When only two speakers are working properly. • Mount the unit so that in the following order: ground, battery, ignition. 5. Therefore, the speaker wire should be turned on the ends of the wiring harness. 4.
... key. Accessories/ Installation Procedure Accessories 1 ..........1 2 ..........2 3 ..........4 4 ..........4 5 ..........1 Installation Procedure 1. To prevent a short circuit, remove the key from the ignition and disconnect the - Make the proper input and output wire connections for each unit. 3. Install the unit in the car. • When only two speakers are working properly. • Mount the unit so that in the following order: ground, battery, ignition. 5. Therefore, the speaker wire should be turned on the ends of the wiring harness. 4.
Instruction Manual
Page 31
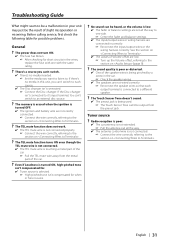
... and balance settings. ✔ The input/output wires or wiring harness are incorrectly connected. ☞ Connect the wire correctly, referring to an external disc source. ? Before calling service, first check the following table for short circuits in your unit may just be output from the metal part of the car. ☞ Pull the TEL mute wire away from the preout jack. If the Disc changer isn't connected to it's input terminal, You can 't switch...
... and balance settings. ✔ The input/output wires or wiring harness are incorrectly connected. ☞ Connect the wire correctly, referring to an external disc source. ? Before calling service, first check the following table for short circuits in your unit may just be output from the metal part of the car. ☞ Pull the TEL mute wire away from the preout jack. If the Disc changer isn't connected to it's input terminal, You can 't switch...
Instruction Manual
Page 32
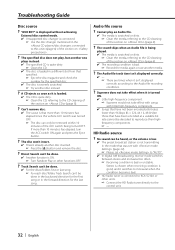
... rate cannot be decoded to the CD cleaning of the section on . ? HD Radio source ? Troubleshooting Guide Disc source ? "AUX EXT" is displayed without achieving External disc control mode. ✔ Unsupported disc changer is ON. ☞ Turn Random Play or other units. ☞ Connect the HD Radio tuner directly to the CD cleaning of the ACC switch being played. ✔ The media is scratched or dirty. ☞ Clean the media, referring to...
... rate cannot be decoded to the CD cleaning of the section on . ? HD Radio source ? Troubleshooting Guide Disc source ? "AUX EXT" is displayed without achieving External disc control mode. ✔ Unsupported disc changer is ON. ☞ Turn Random Play or other units. ☞ Connect the HD Radio tuner directly to the CD cleaning of the ACC switch being played. ✔ The media is scratched or dirty. ☞ Clean the media, referring to...
Instruction Manual
Page 33
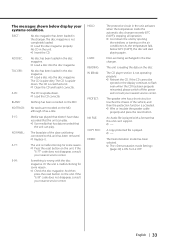
... below display your nearest service center. An Audio file is activated. ➪ Wire or insulate the speaker cable properly and press the reset button. Turn it . No CD in the changer. A copy-protected file is reading the data on the unit. The unit is played. ➪ ---- The messages shown below 60°C (140°F), the disc will start playing again. NO DISC: No disc has been loaded in the Disc changer...
... below display your nearest service center. An Audio file is activated. ➪ Wire or insulate the speaker cable properly and press the reset button. Turn it . No CD in the changer. A copy-protected file is reading the data on the unit. The unit is played. ➪ ---- The messages shown below 60°C (140°F), the disc will start playing again. NO DISC: No disc has been loaded in the Disc changer...
Instruction Manual
Page 34
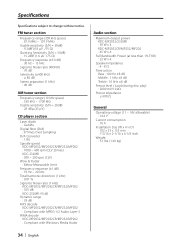
... with Windows Media Audio Audio section Maximum output power KDC-MP2032/232MR : 50 W x 4 KDC-MP2032CR/MP232/MP202 : 45 W x 4 Full Bandwidth Power (at less than 1% THD) : 22 W x 4 Speaker impedance : 4 - 8 Ω Tone action Bass : 100 Hz ±8 dB Middle : 1 kHz ±8 dB Treble : 10 kHz ±8 dB Preout level / Load (during disc play) : 2000 mV/10 kΩ Preout impedance : ≤ 600 Ω General Operating voltage (11...
... with Windows Media Audio Audio section Maximum output power KDC-MP2032/232MR : 50 W x 4 KDC-MP2032CR/MP232/MP202 : 45 W x 4 Full Bandwidth Power (at less than 1% THD) : 22 W x 4 Speaker impedance : 4 - 8 Ω Tone action Bass : 100 Hz ±8 dB Middle : 1 kHz ±8 dB Treble : 10 kHz ±8 dB Preout level / Load (during disc play) : 2000 mV/10 kΩ Preout impedance : ≤ 600 Ω General Operating voltage (11...


