
Instruction Manual
Page 43
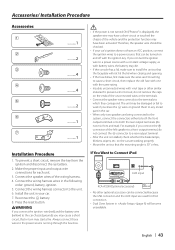
... should be checked. • If your car. 7. Accessories/ Installation Procedure Accessories 1 2 3 4 5 6 7 ..........1 ..........2 ..........4 ..........4 ..........2 ..........1 ..........1 Installation Procedure 1. Connect the wiring harness connector to both the rear output terminals (do not connect the - battery. 8. If you share the - Reconnect the - Make the proper input and output wire... (yellow) to the car chassis (ground), you connect the + connector of the wiring harness. 4. To prevent a short circuit, remove the key from the ignition and disconnect the -
... should be checked. • If your car. 7. Accessories/ Installation Procedure Accessories 1 2 3 4 5 6 7 ..........1 ..........2 ..........4 ..........4 ..........2 ..........1 ..........1 Installation Procedure 1. Connect the wiring harness connector to both the rear output terminals (do not connect the - battery. 8. If you share the - Reconnect the - Make the proper input and output wire... (yellow) to the car chassis (ground), you connect the + connector of the wiring harness. 4. To prevent a short circuit, remove the key from the ignition and disconnect the -
Instruction Manual
Page 44
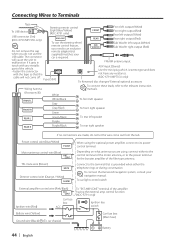
... any metallic part of the vehicle. • Fasten the connector with the tape so that is required. Battery Fuse (10A) (KDC-X791/MP735U only) To Kenwood disc changer/ External optional accessory Wiring harness (Accessory1) White To connect these leads, refer to its power control terminal. Connect to malfunction if it gets in FM...
... any metallic part of the vehicle. • Fasten the connector with the tape so that is required. Battery Fuse (10A) (KDC-X791/MP735U only) To Kenwood disc changer/ External optional accessory Wiring harness (Accessory1) White To connect these leads, refer to its power control terminal. Connect to malfunction if it gets in FM...

