
Instruction Manual
Page 2
... Horsepower Analysis G-Analyzer Reset G-Counter Level seting G-Analyzer Calibration setup G-Analyzer vehicle weight setup G-Analyzer vehicle class setup Station/Disc Naming (SNPS/DNPS) Theft Deterrent Faceplate Tuner features 21 Tuning Tuning Mode Direct Access Tuning Station Preset Memory Auto Memory Entry Preset Tuning CD/USB device/Audio file/External disc control...
... Horsepower Analysis G-Analyzer Reset G-Counter Level seting G-Analyzer Calibration setup G-Analyzer vehicle weight setup G-Analyzer vehicle class setup Station/Disc Naming (SNPS/DNPS) Theft Deterrent Faceplate Tuner features 21 Tuning Tuning Mode Direct Access Tuning Station Preset Memory Auto Memory Entry Preset Tuning CD/USB device/Audio file/External disc control...

Instruction Manual
Page 3
... precision equipment. • When replacing a fuse, only use this condensation on it is only for connectable models of the unit or faceplate with the wrong rating may cause your Kenwood dealer. Doing so will cause damage or breakdown. • Use only the screws provided or specified for the applicable...due to this unit may form on the lens in . If you use its simplified method of water splashing. • Do not place the faceplate (and the faceplate case) in . If the unit still does not operate normally after a while, consult your unit to malfunction. • Do not apply ...
... precision equipment. • When replacing a fuse, only use this condensation on it is only for connectable models of the unit or faceplate with the wrong rating may cause your Kenwood dealer. Doing so will cause damage or breakdown. • Use only the screws provided or specified for the applicable...due to this unit may form on the lens in . If you use its simplified method of water splashing. • Do not place the faceplate (and the faceplate case) in . If the unit still does not operate normally after a while, consult your unit to malfunction. • Do not apply ...

Instruction Manual
Page 4
...alcohol may scratch the surface or erases characters. Pressing the Reset button with the USB device installed can be restored. About KENWOOD "Music Editor" of PC application attached to KDC-X791/MP735U • "Music Editor" is recorded in the CD-ROM attached to this unit. • Refer to ... equipment, and some of the illustrations on the unit or faceplate get dirty, wipe them with a clean soft dry cloth. Cleaning the Faceplate Terminals If the terminals on the display may affect its mechanical parts. If the faceplate is set can damage the data contained in the following settings...
...alcohol may scratch the surface or erases characters. Pressing the Reset button with the USB device installed can be restored. About KENWOOD "Music Editor" of PC application attached to KDC-X791/MP735U • "Music Editor" is recorded in the CD-ROM attached to this unit. • Refer to ... equipment, and some of the illustrations on the unit or faceplate get dirty, wipe them with a clean soft dry cloth. Cleaning the Faceplate Terminals If the terminals on the display may affect its mechanical parts. If the faceplate is set can damage the data contained in the following settings...
Instruction Manual
Page 20
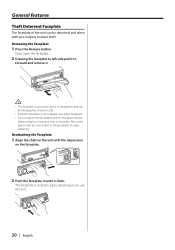
...pull it to forward and remove it clicks. Reattaching the Faceplate 1 Align the shaft on the unit with the depression on the faceplate. 2 Push the faceplate in its faceplate case while detached. • Do not expose the faceplate (and the faceplate case) to direct sunlight or excessive heat or humidity....and can be damaged by shocks or jolts. • Keep the faceplate in until it . ¤ • The faceplate is locked in place, allowing you , helping to deter theft. General features Theft Deterrent Faceplate The faceplate of the unit can be detached and taken with you to use ...
...pull it to forward and remove it clicks. Reattaching the Faceplate 1 Align the shaft on the unit with the depression on the faceplate. 2 Push the faceplate in its faceplate case while detached. • Do not expose the faceplate (and the faceplate case) to direct sunlight or excessive heat or humidity....and can be damaged by shocks or jolts. • Keep the faceplate in until it . ¤ • The faceplate is locked in place, allowing you , helping to deter theft. General features Theft Deterrent Faceplate The faceplate of the unit can be detached and taken with you to use ...

Instruction Manual
Page 23
... with this happens, pay attention to safety and move the shift lever or take an appropriate action to (page 7). If it might interfere with the faceplate in the open position dust can enter the inside part and cause damage. ⁄ • For the audio files and discs you press the knob... M.RDM SRC Control knob Folder number File number Function icon Play time Playing CD & Audio file When there is no disc inserted 1 Drop open the faceplate Press the Release button. 2 Insert a disc. 3 Push the faceplate on the left side, and return it to its former position. ¤ • When the...
... with this happens, pay attention to safety and move the shift lever or take an appropriate action to (page 7). If it might interfere with the faceplate in the open position dust can enter the inside part and cause damage. ⁄ • For the audio files and discs you press the knob... M.RDM SRC Control knob Folder number File number Function icon Play time Playing CD & Audio file When there is no disc inserted 1 Drop open the faceplate Press the Release button. 2 Insert a disc. 3 Push the faceplate on the left side, and return it to its former position. ¤ • When the...

Instruction Manual
Page 24
... will display a correct title, etc. • When the iPod is connected to this unit, "KENWOOD" or "✓" is displayed on the left side, and return it to its former position. ⁄...RESUMING" is played first. CD/USB device/Audio file/External disc control features 3 Press the faceplate on the iPod to indicate that you cannot operate the iPod. • When the USB ...Card Readers with a maximum of 4 slots. • If a device is inserted during connection of KDC-X791/KDC-MP735U Drive Search Selecting the device inserted in the USB device starts. When the USB device is ...
... will display a correct title, etc. • When the iPod is connected to this unit, "KENWOOD" or "✓" is displayed on the left side, and return it to its former position. ⁄...RESUMING" is played first. CD/USB device/Audio file/External disc control features 3 Press the faceplate on the iPod to indicate that you cannot operate the iPod. • When the USB ...Card Readers with a maximum of 4 slots. • If a device is inserted during connection of KDC-X791/KDC-MP735U Drive Search Selecting the device inserted in the USB device starts. When the USB device is ...

Instruction Manual
Page 35
... the vehicle light switch is off the power • During function control, such as the Menu System, the display stays on the unit after the faceplate is off, pressing any operation except for at night. In Standby mode DSI (Disabled System Indicator) A red indicator will turn on . In Standby mode Date...
... the vehicle light switch is off the power • During function control, such as the Menu System, the display stays on the unit after the faceplate is off, pressing any operation except for at night. In Standby mode DSI (Disabled System Indicator) A red indicator will turn on . In Standby mode Date...
Instruction Manual
Page 43
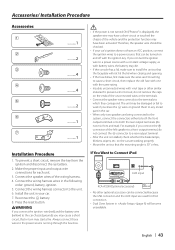
...; If your car. 7. on and off with battery wires, the battery may have an ACC position, connect the ignition wires to a power source that the faceplate will become unavailable. Accessories/ Installation Procedure Accessories 1 2 3 4 5 6 7 ..........1 ..........2 ..........4 ..........4 ..........2 ..........1 ..........1 Installation Procedure 1. If you connect the + connector of the left speaker to a rear output terminal. • After the...
...; If your car. 7. on and off with battery wires, the battery may have an ACC position, connect the ignition wires to a power source that the faceplate will become unavailable. Accessories/ Installation Procedure Accessories 1 2 3 4 5 6 7 ..........1 ..........2 ..........4 ..........4 ..........2 ..........1 ..........1 Installation Procedure 1. If you connect the + connector of the left speaker to a rear output terminal. • After the...

Instruction Manual
Page 46
... the main unit so that it will contact and may cause damage to the section and then remove the hard rubber frame. 2 Drop open the faceplate by pressing the Release button. 3 Tighten the screw (ø2 × 5 mm) (Accessory 5) and bracket (Accessory6 ) in another hole, it does not fall ...off. 1 Refer to the mechanical parts inside . Screw (M4X8) (commercially available) Accessory2 Screwing the Faceplate on the Unit If you screw them in the hole shown on each side, as shown in the same manner. Removing the Unit 1 Refer to...
... the main unit so that it will contact and may cause damage to the section and then remove the hard rubber frame. 2 Drop open the faceplate by pressing the Release button. 3 Tighten the screw (ø2 × 5 mm) (Accessory 5) and bracket (Accessory6 ) in another hole, it does not fall ...off. 1 Refer to the mechanical parts inside . Screw (M4X8) (commercially available) Accessory2 Screwing the Faceplate on the Unit If you screw them in the hole shown on each side, as shown in the same manner. Removing the Unit 1 Refer to...

Instruction Manual
Page 48
... becomes bad. ✔ HD Radio tuner is broken. ➪ Copy the files and folders for some reason. ➪ Check the disc magazine. No Panel: The faceplate of the connected USB device is connected to KCA-S220A or other USB devices. Error 77: The unit is malfunctioning for the USB device again...; No disc has been loaded in the disc magazine. Or the unit is bad or unstable. The messages shown below display your nearest service center. kenwood.com/usb/. And then press the reset button on the unit. No Disc: No disc has been loaded in the disc magazine. • The CD...
... becomes bad. ✔ HD Radio tuner is broken. ➪ Copy the files and folders for some reason. ➪ Check the disc magazine. No Panel: The faceplate of the connected USB device is connected to KCA-S220A or other USB devices. Error 77: The unit is malfunctioning for the USB device again...; No disc has been loaded in the disc magazine. Or the unit is bad or unstable. The messages shown below display your nearest service center. kenwood.com/usb/. And then press the reset button on the unit. No Disc: No disc has been loaded in the disc magazine. • The CD...

