Instruction Manual
Page 1
... number © B64-2926-10/01 (KW) For your KENWOOD dealer for information or service on the warranty card, and in the space provided below. KDC-MP2028 KDC-MP228 KDC-228 CD-RECEIVER INSTRUCTION MANUAL AMPLI-TUNER-LECTEUR DE CD MODE D'EMPLOI REPRODUCTOR DE DISCOS COMPACTOS RECEPTOR DE FM/AM MANUAL DE INSTRUCCIONES Take the time to the model and...
... number © B64-2926-10/01 (KW) For your KENWOOD dealer for information or service on the warranty card, and in the space provided below. KDC-MP2028 KDC-MP228 KDC-228 CD-RECEIVER INSTRUCTION MANUAL AMPLI-TUNER-LECTEUR DE CD MODE D'EMPLOI REPRODUCTOR DE DISCOS COMPACTOS RECEPTOR DE FM/AM MANUAL DE INSTRUCCIONES Take the time to the model and...
Instruction Manual
Page 2
...CDs 6 About MP3 and WMA 7 General features 8 Power Selecting the Source Volume Attenuator System Q Audio Control Audio Setup Speaker Setting Switching Display Dimmer Control Theft Deterrent Faceplate TEL Mute Tuner features 12 Tuning Tuning Mode Station Preset Memory Auto Memory Entry Preset Tuning CD...Menu System Security Code Touch Sensor Tone Manual Clock Adjustment DSI (Disabled System Indicator) CRSC (Clean Reception System Circuit) Receive mode Setting SIRIUS ID (ESN) display Auxiliary Input Display Setting Text Scroll CD Read Setting Demonstration mode Setting Basic Operations ...
...CDs 6 About MP3 and WMA 7 General features 8 Power Selecting the Source Volume Attenuator System Q Audio Control Audio Setup Speaker Setting Switching Display Dimmer Control Theft Deterrent Faceplate TEL Mute Tuner features 12 Tuning Tuning Mode Station Preset Memory Auto Memory Entry Preset Tuning CD...Menu System Security Code Touch Sensor Tone Manual Clock Adjustment DSI (Disabled System Indicator) CRSC (Clean Reception System Circuit) Receive mode Setting SIRIUS ID (ESN) display Auxiliary Input Display Setting Text Scroll CD Read Setting Demonstration mode Setting Basic Operations ...

Instruction Manual
Page 3
...and receiver. • Connect the equipment into an outlet on , or inside the product relating to comply with the limits for help. This equipment may cause harmful interference unless the modifications are designed to radio communications, if it is not installed and used in the instruction manual....on, the user is made. The user could lose the authority to Part 15 of the FCC Rules. KENWOOD CORPORATION 2967-3, ISHIKAWA-MACHI, HACHIOJI-SHI TOKYO, JAPAN KENWOOD CORP. 2Warning 2CAUTION Use of controls or adjustments or performance of procedures other than those specified herein may ...
...and receiver. • Connect the equipment into an outlet on , or inside the product relating to comply with the limits for help. This equipment may cause harmful interference unless the modifications are designed to radio communications, if it is not installed and used in the instruction manual....on, the user is made. The user could lose the authority to Part 15 of the FCC Rules. KENWOOD CORPORATION 2967-3, ISHIKAWA-MACHI, HACHIOJI-SHI TOKYO, JAPAN KENWOOD CORP. 2Warning 2CAUTION Use of controls or adjustments or performance of procedures other than those specified herein may ...
Instruction Manual
Page 5
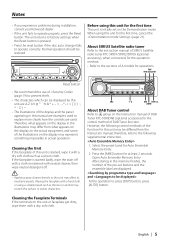
...Open Auto Ensemble Memory Entry. Before using a volatile liquid such as a silicon cloth. About SIRIUS Satellite radio tuner Refer to the instruction manual of SIRIUS Satellite radio tuner KTC-SR901/SR902/SR903 (optional accessory), when connected, for the operation method. • Refer to prevent theft... control method of the function for this unit for at least 2 seconds. Notes • If you experience problems during installation, consult your Kenwood dealer. • If the unit fails to press [DISP] button, press [AUTO] button. The unit returns to factory settings when the...
...Open Auto Ensemble Memory Entry. Before using a volatile liquid such as a silicon cloth. About SIRIUS Satellite radio tuner Refer to the instruction manual of SIRIUS Satellite radio tuner KTC-SR901/SR902/SR903 (optional accessory), when connected, for the operation method. • Refer to prevent theft... control method of the function for this unit for at least 2 seconds. Notes • If you experience problems during installation, consult your Kenwood dealer. • If the unit fails to press [DISP] button, press [AUTO] button. The unit returns to factory settings when the...

Instruction Manual
Page 6
...don't use disc type accessories. It may not correctly play discs which do not have the mark. • A CD-R or CD-RW that aren't round can't be used. • CD-R and CD-RW are dirty can't be used. • This unit can 't be played. (For the finalization process refer ...surface of the disc and move outward. 6 | English Use a CD-R or a CD-RW after removing them with tape stuck on the recording surface or that are easier to your CD-R/CD-RW writing software, and your CDR/CD-RW recorder instruction manual.) CD storage • Don't place them out horizontally. Burrs Burrs •...
...don't use disc type accessories. It may not correctly play discs which do not have the mark. • A CD-R or CD-RW that aren't round can't be used. • CD-R and CD-RW are dirty can't be used. • This unit can 't be played. (For the finalization process refer ...surface of the disc and move outward. 6 | English Use a CD-R or a CD-RW after removing them with tape stuck on the recording surface or that are easier to your CD-R/CD-RW writing software, and your CDR/CD-RW recorder instruction manual.) CD storage • Don't place them out horizontally. Burrs Burrs •...

Instruction Manual
Page 12
... Control knob to [FM] or [AM]. Each time the button is ON. 12 | English Tuning mode Auto seek Preset station seek Manual Display "AUTO 1" "AUTO 2" "MANUAL" Operation Automatic search for a station. Normal manual tuning control. • During reception of the stations in the Preset memory. Select the "TUNER" display. 2 Select the band Push...
... Control knob to [FM] or [AM]. Each time the button is ON. 12 | English Tuning mode Auto seek Preset station seek Manual Display "AUTO 1" "AUTO 2" "MANUAL" Operation Automatic search for a station. Normal manual tuning control. • During reception of the stations in the Preset memory. Select the "TUNER" display. 2 Select the band Push...

Instruction Manual
Page 18
The Menu system basic operation method is pushed it switches "BEEP ON" or "BEEP OFF". Example: When you want to set the beep sound select the "BEEP" display. 3 Set the menu item Push the Control knob to [FM] or [AM]. "MENU" is displayed. 2 Select the menu item Push the Control knob to [4] or [¢]. You can continue by returning to step 2 and setting other items. 18 | English 4 Exit Menu mode Press the [MENU] button. • When other items that aren't applicable ( etc.) are displayed, afterwards their setting content is the original setting.) Also, the explanation for ...
The Menu system basic operation method is pushed it switches "BEEP ON" or "BEEP OFF". Example: When you want to set the beep sound select the "BEEP" display. 3 Set the menu item Push the Control knob to [FM] or [AM]. "MENU" is displayed. 2 Select the menu item Push the Control knob to [4] or [¢]. You can continue by returning to step 2 and setting other items. 18 | English 4 Exit Menu mode Press the [MENU] button. • When other items that aren't applicable ( etc.) are displayed, afterwards their setting content is the original setting.) Also, the explanation for ...
Instruction Manual
Page 19
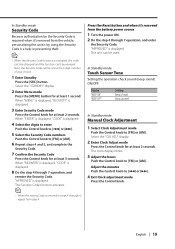
... and the function can be set as the 4 digit number of your choice. 1 Enter Standby Press the [SRC] button. "APPROVED" is heard. In Standby mode Manual Clock Adjustment 1 Select Clock Adjustment mode Push the Control knob to [FM] or [AM]. Select the "CLK ADJ" display. 2 Enter Clock Adjust mode Press the...
... and the function can be set as the 4 digit number of your choice. 1 Enter Standby Press the [SRC] button. "APPROVED" is heard. In Standby mode Manual Clock Adjustment 1 Select Clock Adjustment mode Push the Control knob to [FM] or [AM]. Select the "CLK ADJ" display. 2 Enter Clock Adjust mode Press the...
Instruction Manual
Page 25
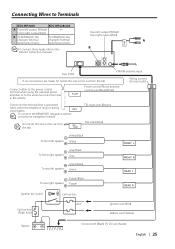
... antenna input Wiring harness (Accessory1) Connect either the telephone rings or during MUTE conversation. Front right output (Red) B To KENWOOD disc To KENWOOD disc Rear left speaker Green/Black Green To rear right speaker Purple/Black Purple FRONT L FRONT R REAR L REAR R Ignition...instruction manuals. Do not let the wire come out from the tab. P.CONT Power control/Motor antenna control wire (Blue/White) Connect to the terminal that is grounded when either to the power control terminal when using the optional power amplifier, or to Terminals KDC-MP2028 KDC-MP228/...
... antenna input Wiring harness (Accessory1) Connect either the telephone rings or during MUTE conversation. Front right output (Red) B To KENWOOD disc To KENWOOD disc Rear left speaker Green/Black Green To rear right speaker Purple/Black Purple FRONT L FRONT R REAR L REAR R Ignition...instruction manuals. Do not let the wire come out from the tab. P.CONT Power control/Motor antenna control wire (Blue/White) Connect to the terminal that is grounded when either to the power control terminal when using the optional power amplifier, or to Terminals KDC-MP2028 KDC-MP228/...


