

User Manual
Page 1
... instruction manual. KDC-D301 CD-PLAYER INSTRUCTION MANUAL LECTEUR DE CD MODE D'EMPLOI REPRODUCTOR DE DISCOS COMPACTOS MANUAL DE INSTRUCCIONES COMPACT DIGITAL AUDIO Take the time to the model and serial numbers whenever you obtain the best performance from your records Record the serial number, found on the back of the unit, in the space provided below. Familiarity with installation and operation procedures will help you call upon your KENWOOD...
... instruction manual. KDC-D301 CD-PLAYER INSTRUCTION MANUAL LECTEUR DE CD MODE D'EMPLOI REPRODUCTOR DE DISCOS COMPACTOS MANUAL DE INSTRUCCIONES COMPACT DIGITAL AUDIO Take the time to the model and serial numbers whenever you obtain the best performance from your records Record the serial number, found on the back of the unit, in the space provided below. Familiarity with installation and operation procedures will help you call upon your KENWOOD...
User Manual
Page 2
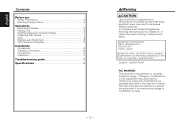
... REGULATIONS N0.21 CFR 1040. 10, CHAPTER 1, SUBCHAPTER J. Location : Bottom Panel FCC WARNING This equipment may generate or use Safety Precautions 3 Handling Compact Discs 4 Operations Buttons and Display 6 Playing CDs 6 Switching Spectrum Analyzer Display 7 Presetting Disc Names 7 Eject 8 Display Level Adjustment 8 Theft Deterrent Faceplate 8 Installation Accessories 9 Installation Procedure 10 Connections 11 Installation 11 Troubleshooting guide 13 Specifications 15 2Warning 2CAUTION Use of controls or adjustments or performance of procedures other than those specified...
... REGULATIONS N0.21 CFR 1040. 10, CHAPTER 1, SUBCHAPTER J. Location : Bottom Panel FCC WARNING This equipment may generate or use Safety Precautions 3 Handling Compact Discs 4 Operations Buttons and Display 6 Playing CDs 6 Switching Spectrum Analyzer Display 7 Presetting Disc Names 7 Eject 8 Display Level Adjustment 8 Theft Deterrent Faceplate 8 Installation Accessories 9 Installation Procedure 10 Connections 11 Installation 11 Troubleshooting guide 13 Specifications 15 2Warning 2CAUTION Use of controls or adjustments or performance of procedures other than those specified...
User Manual
Page 3
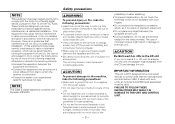
... TO THIS UNIT AND CONTROL UNIT. -3- This equipment may fall out of water splashing. • Do not set the removed faceplate or the faceplate case in a residential installation. If this equipment does cause harmful interference to radio or television reception, which the receiver is not installed and used with the instructions. Otherwise it may cause harmful interference to radio communications, if it is connected. •...
... TO THIS UNIT AND CONTROL UNIT. -3- This equipment may fall out of water splashing. • Do not set the removed faceplate or the faceplate case in a residential installation. If this equipment does cause harmful interference to radio or television reception, which the receiver is not installed and used with the instructions. Otherwise it may cause harmful interference to radio communications, if it is connected. •...
User Manual
Page 4
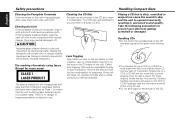
... an ordinary music CD, and may form on the lens in the CD player of the CD (the side opposite the label) when holding it with neutral cleaner, then wipe neutral detergent off if scratched. There is played. Handling Compact discs Playing a CD that...Kenwood dealer. Fingerprints on a CD-R or CD-RW are of hazardous radiation outside the unit. English Safety precautions Cleaning the Faceplate Terminals If the terminals on the unit or faceplate get scratched if you turn on the car heater in cold weather, dew or condensation may peel off . 2CAUTION Applying spray cleaner directly to play...
... an ordinary music CD, and may form on the lens in the CD player of the CD (the side opposite the label) when holding it with neutral cleaner, then wipe neutral detergent off if scratched. There is played. Handling Compact discs Playing a CD that...Kenwood dealer. Fingerprints on a CD-R or CD-RW are of hazardous radiation outside the unit. English Safety precautions Cleaning the Faceplate Terminals If the terminals on the unit or faceplate get scratched if you turn on the car heater in cold weather, dew or condensation may peel off . 2CAUTION Applying spray cleaner directly to play...
User Manual
Page 5
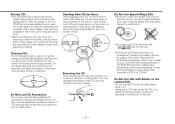
... damage from the center of the disc or in a horizontal direction, holding it flat. Do not clean CDs with burrs stuck on it ejects. CDs with conventional record cleaners, anti-static formulas, or chemicals such as a car seat or the dashboard) or other hot places. Using such a CD may skip while playing. A CD-R or CD-RW is...
... damage from the center of the disc or in a horizontal direction, holding it flat. Do not clean CDs with burrs stuck on it ejects. CDs with conventional record cleaners, anti-static formulas, or chemicals such as a car seat or the dashboard) or other hot places. Using such a CD may skip while playing. A CD-R or CD-RW is...
User Manual
Page 6
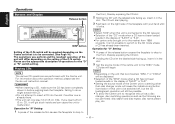
... Operations Buttons and Display Release button CD PLAYER KDC-D301 INTEGRATED QUAD 1 BIT D/A CONVERTER MENU DISP DIGITAL OPTIMUM SERVO CONTROL 60 120 250 380 500 750 1k 2k 4k DPAC 11BAND11BAND 8k 16k SPECTRUM ANALYZER DISP button Setting of the O-N switch will be required depending on the Centre unit that is connected, "DISC-1" or "DISC-2" will be connected. (See Page 10.) The operations you insert a 8 cm (3 in). Playing CDs...
... Operations Buttons and Display Release button CD PLAYER KDC-D301 INTEGRATED QUAD 1 BIT D/A CONVERTER MENU DISP DIGITAL OPTIMUM SERVO CONTROL 60 120 250 380 500 750 1k 2k 4k DPAC 11BAND11BAND 8k 16k SPECTRUM ANALYZER DISP button Setting of the O-N switch will be required depending on the Centre unit that is connected, "DISC-1" or "DISC-2" will be connected. (See Page 10.) The operations you insert a 8 cm (3 in). Playing CDs...
User Manual
Page 7
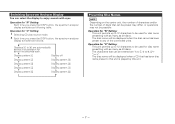
.... ▼ Display pattern 1 Display off ▼ Display pattern 2 ▲ Display pattern 9 ▼ Display pattern 3 ▲ Display pattern 8 ▼ Display pattern 4 ▲ Display pattern 7 ▼ Display pattern 5 ▲ Display pattern 6 ▲ Presetting Disc Names NOTE Depending on the centre unit, the number of characters and/or the number of the connected units. Operation for "O" Setting: 1 Selecting CD play source mode. 2 Each time you press the DISP button, the spectrum analyzer display switches as following table; Operation for "O" Setting: This unit permits...
.... ▼ Display pattern 1 Display off ▼ Display pattern 2 ▲ Display pattern 9 ▼ Display pattern 3 ▲ Display pattern 8 ▼ Display pattern 4 ▲ Display pattern 7 ▼ Display pattern 5 ▲ Display pattern 6 ▲ Presetting Disc Names NOTE Depending on the centre unit, the number of characters and/or the number of the connected units. Operation for "O" Setting: 1 Selecting CD play source mode. 2 Each time you press the DISP button, the spectrum analyzer display switches as following table; Operation for "O" Setting: This unit permits...
User Manual
Page 8
... unit can be damaged by 11 steps) Ending the display level adjustment mode: Press the DISP button. Removing Faceplate: Press the release button and drop open or been removed, the disc will automatically stop playing. (A warning beep starts sounding 30 seconds before play stops automatically.) • The faceplate is a precision piece of equipment and can adjust the spectrum analyzer level. 1 Selecting CD play and ejects the CD. 0 NOTE When you , helping...
... unit can be damaged by 11 steps) Ending the display level adjustment mode: Press the DISP button. Removing Faceplate: Press the release button and drop open or been removed, the disc will automatically stop playing. (A warning beep starts sounding 30 seconds before play stops automatically.) • The faceplate is a precision piece of equipment and can adjust the spectrum analyzer level. 1 Selecting CD play and ejects the CD. 0 NOTE When you , helping...
User Manual
Page 9
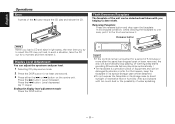
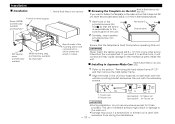
... faceplate with the unit, as shown above. -9- Number of the unit, then lock. Shaft Depression Accessories External view ......... Number of items 1 3 .........2 .........1 ˛ 2 4 .........1 .........1 5 .........4 6 ........4 7 .........2 North & South America sales area only. 2CAUTION The use the accessories shipped with the shaft of items External view ......... The faceplate will be set and the unit will be operational. Make sure only to the unit. Reattaching Faceplate: Hold the faceplate so that the operation face faces...
... faceplate with the unit, as shown above. -9- Number of the unit, then lock. Shaft Depression Accessories External view ......... Number of items 1 3 .........2 .........1 ˛ 2 4 .........1 .........1 5 .........4 6 ........4 7 .........2 North & South America sales area only. 2CAUTION The use the accessories shipped with the shaft of items External view ......... The faceplate will be set and the unit will be operational. Make sure only to the unit. Reattaching Faceplate: Hold the faceplate so that the operation face faces...
User Manual
Page 10
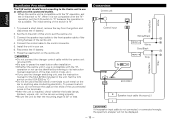
... displayed. - 10 - Connect the control cable to the front speaker cable of the wiring hernees of the centre unit. 4. Reconnect the - on the car or anything else conducting electricity. The initial setting of the disc control mode, etc.). • If you use as well as to press the reset button after installation. • Whether the centre unit in use the changer switching unit, see the instruction manual for the KCA-S210A included in your car. 6. battery. 7. Connect...
... displayed. - 10 - Connect the control cable to the front speaker cable of the wiring hernees of the centre unit. 4. Reconnect the - on the car or anything else conducting electricity. The initial setting of the disc control mode, etc.). • If you use as well as to press the reset button after installation. • Whether the centre unit in use the changer switching unit, see the instruction manual for the KCA-S210A included in your car. 6. battery. 7. Connect...
User Manual
Page 11
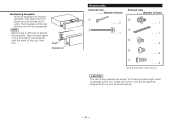
... Bottom panel Hole™ Self-tapping screw (commercially available) Metal mounting strap (commercially available) (Accessory4)* Bend the tabs of different screws might result in damage to the main unit. • Damage may cause damage to the mechanical parts inside the unit. ■ Installing in Japanese-Made Cars (North & South America sales area only.) 1 Refer to the section "Removing...
... Bottom panel Hole™ Self-tapping screw (commercially available) Metal mounting strap (commercially available) (Accessory4)* Bend the tabs of different screws might result in damage to the main unit. • Damage may cause damage to the mechanical parts inside the unit. ■ Installing in Japanese-Made Cars (North & South America sales area only.) 1 Refer to the section "Removing...
User Manual
Page 12
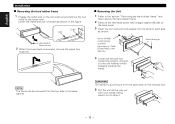
... back panel. 3 Insert the two removal tools deeply into the slots on the lower level. Screw (M4X8) (commercially available) (Accessory3 : North & South America sales area only.) Catch facing up 4 Lower the removal tool toward the bottom, and pull out the unit halfway whilst pressing towards the inside. English Installation ■ Removing the hard rubber frame 1 Engage the catch pins...
... back panel. 3 Insert the two removal tools deeply into the slots on the lower level. Screw (M4X8) (commercially available) (Accessory3 : North & South America sales area only.) Catch facing up 4 Lower the removal tool toward the bottom, and pull out the unit halfway whilst pressing towards the inside. English Installation ■ Removing the hard rubber frame 1 Engage the catch pins...
User Manual
Page 13
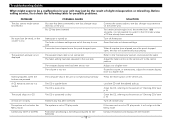
... dirty. Press the reset button on . Finalization processing is not being conducted for possible problems. PROBLEM The disc control mode cannot be selected. SOLUTION Connect the control cable to the disc changer input terminal on the unit. The fader or balance settings are pressed. Raise the volume, or alternatively, adjust the analyzer display level to a higher level. Cannot play CD-R or CD-RW POSSIBLE CAUSE No cable has been connected to the disc changer input terminal on the...
... dirty. Press the reset button on . Finalization processing is not being conducted for possible problems. PROBLEM The disc control mode cannot be selected. SOLUTION Connect the control cable to the disc changer input terminal on the unit. The fader or balance settings are pressed. Raise the volume, or alternatively, adjust the analyzer display level to a higher level. Cannot play CD-R or CD-RW POSSIBLE CAUSE No cable has been connected to the disc changer input terminal on the...
User Manual
Page 14
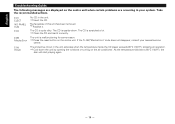
... unit. ] Insert the CD. The faceplate of this unit has been removed. ] Replace it correctly. If the "E- 99"/"Mecha Error" code does not disappear, consult your system. The CD is malfunctioning for some reason. As the temperature falls below 60°C (140°F), the disc will start playing again. - 14 - Mecha Error ] Press the reset button on the centre unit when certain problems are displayed...
... unit. ] Insert the CD. The faceplate of this unit has been removed. ] Replace it correctly. If the "E- 99"/"Mecha Error" code does not disappear, consult your system. The CD is malfunctioning for some reason. As the temperature falls below 60°C (140°F), the disc will start playing again. - 14 - Mecha Error ] Press the reset button on the centre unit when certain problems are displayed...
User Manual
Page 15
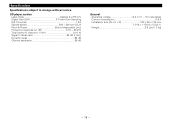
...) - 15 - Specifications Specifications subject to Noise ratio 94 dB (1 kHz) Dynamic range 94 dB Channel separation 85 dB General Operating voltage 14.4 V (11 - 16 V allowable) Current consumption 0.8 A Installation size (W × H × D 180 × 50 × 145 mm 7-1/16 × 1-15/16 × 5-3/4 in. CD player section Laser diode GaAlAs (λ=780 nm) Digital filter (D/A 8 Times Over Sampling...
...) - 15 - Specifications Specifications subject to Noise ratio 94 dB (1 kHz) Dynamic range 94 dB Channel separation 85 dB General Operating voltage 14.4 V (11 - 16 V allowable) Current consumption 0.8 A Installation size (W × H × D 180 × 50 × 145 mm 7-1/16 × 1-15/16 × 5-3/4 in. CD player section Laser diode GaAlAs (λ=780 nm) Digital filter (D/A 8 Times Over Sampling...


