
Instruction Manual
Page 2
... Compact Discs 5 General features Power 6 Selecting the Source 6 Disc control features Playing Disc 7 Fast Fowarding and Reversing 7 Track Search 7 Disc Search 8 Direct Track Search 8 Direct Disc Search 8 Track/Disc Repeat 8 Track Scan 8 Random Play 8 Magazine Random Play 9 Switching Display 9 Menu system Menu System 10 Changing the Transmission Frequency 11 Modulation level 11 Dynamic control 11 Text Scroll 11 Basic Operations of remote 12 Installation Accessories 14 Installation Procedure 14 Installation 15 Connecting Wires to Terminals 17 Troubleshooting guide...
... Compact Discs 5 General features Power 6 Selecting the Source 6 Disc control features Playing Disc 7 Fast Fowarding and Reversing 7 Track Search 7 Disc Search 8 Direct Track Search 8 Direct Disc Search 8 Track/Disc Repeat 8 Track Scan 8 Random Play 8 Magazine Random Play 9 Switching Display 9 Menu system Menu System 10 Changing the Transmission Frequency 11 Modulation level 11 Dynamic control 11 Text Scroll 11 Basic Operations of remote 12 Installation Accessories 14 Installation Procedure 14 Installation 15 Connecting Wires to Terminals 17 Troubleshooting guide...
Instruction Manual
Page 3
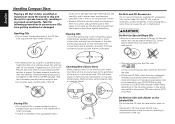
... if the KDC-C521FM is used in proper working properly, first press the Reset button. Using a fuse with the wrong rating may be dangerous to your unit to malfunction. • To prevent a short circuit when replacing a fuse, first disconnect the wiring harness. Reset button 2CAUTION Take the following precautions to prevent fire and avoid personal injury: • When extending the ignition wire, battery wire, or ground wire, use 0.75mm2 (AWG18...
... if the KDC-C521FM is used in proper working properly, first press the Reset button. Using a fuse with the wrong rating may be dangerous to your unit to malfunction. • To prevent a short circuit when replacing a fuse, first disconnect the wiring harness. Reset button 2CAUTION Take the following precautions to prevent fire and avoid personal injury: • When extending the ignition wire, battery wire, or ground wire, use 0.75mm2 (AWG18...
Instruction Manual
Page 4
... from the center of time. • Remove CDs from getting scratched or damaged. Fingerprints on finalization processing, refer to cause skipping when the disc is played. Handling CDs • Do not touch the recorded side of the unit. For these reasons, handle the disc very carefully. Use of the CD. Detailed handling instructions will appear on the CD-R or CD-RW package: read...
... from the center of time. • Remove CDs from getting scratched or damaged. Fingerprints on finalization processing, refer to cause skipping when the disc is played. Handling CDs • Do not touch the recorded side of the unit. For these reasons, handle the disc very carefully. Use of the CD. Detailed handling instructions will appear on the CD-R or CD-RW package: read...
Instruction Manual
Page 5
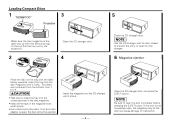
... ejected. NOTE Use the CD changer with the label facing upwards. If the door is not completely open the door completely before pressing the EJECT button. ' ' ' ' Loading Compact Discs 1 3 "KENWOOD" Projection Make sure the disc magazine is the right way up with the Kenwood logo on the tray with its door closed to prevent the entry of malfunction. If an 8-cm disc adapter is used, the disc...
... ejected. NOTE Use the CD changer with the label facing upwards. If the door is not completely open the door completely before pressing the EJECT button. ' ' ' ' Loading Compact Discs 1 3 "KENWOOD" Projection Make sure the disc magazine is the right way up with the Kenwood logo on the tray with its door closed to prevent the entry of malfunction. If an 8-cm disc adapter is used, the disc...
Instruction Manual
Page 6
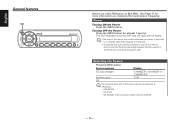
...ordinary Radio broadcasting because antenna output is necessary. - KCA-S210A - Power Turning ON the Power Press the [SRC] button. Turning OFF the Power Press the [SRC] button for more information on changing the transmission frequency. CD changer with an Auxiliary input function installed. -6- See Page 11 for at least 1 second. Selecting the Source Press the [SRC] button. Source required Display CD auto-changer Auxiliary input Off "CHANGER"/ "CHANGER-1"/ "CHANGER-2" "AUX" For Auxiliary input one of the below optional accessories is switched into compact disc player's side...
...ordinary Radio broadcasting because antenna output is necessary. - KCA-S210A - Power Turning ON the Power Press the [SRC] button. Turning OFF the Power Press the [SRC] button for more information on changing the transmission frequency. CD changer with an Auxiliary input function installed. -6- See Page 11 for at least 1 second. Selecting the Source Press the [SRC] button. Source required Display CD auto-changer Auxiliary input Off "CHANGER"/ "CHANGER-1"/ "CHANGER-2" "AUX" For Auxiliary input one of the below optional accessories is switched into compact disc player's side...
Instruction Manual
Page 7
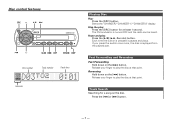
... modulator is turned OFF and the radio can be heard. Release your finger to play the disc at that point. Disc control features SRC u ¢ 6 4 d SCAN RDM REP M.RDM DISP Disc number Track number Track time Indicator Playing Disc Play: Press the [SRC] button. Release your finger to play the disc at least 1 second. Track Search Searching for at that point. Stop the play : Press the [6] (38...Remote) button. Select the "CHANGER"/ "CHANGER-1"/ "CHANGER-2" display...
... modulator is turned OFF and the radio can be heard. Release your finger to play the disc at that point. Disc control features SRC u ¢ 6 4 d SCAN RDM REP M.RDM DISP Disc number Track number Track time Indicator Playing Disc Play: Press the [SRC] button. Release your finger to play the disc at least 1 second. Track Search Searching for at that point. Stop the play : Press the [6] (38...Remote) button. Select the "CHANGER"/ "CHANGER-1"/ "CHANGER-2" display...
Instruction Manual
Page 8
...] button. English Disc control features Disc Search Selecting the disc set in the Disc changer you're listening to. Press the [u] or [d] button. Canceling Direct Track Search Press the [38] button. blinks. Direct Disc Search (Function of each song on the remote. 2 Do Disc Search Press the [+] or [-] button. Press the [REP] button. Repeat play Display Track Repeat Disc Repeat OFF Track No. Track/Disc Repeat Replaying the song, disc in the Disc changer. Track Scan Playing...
...] button. English Disc control features Disc Search Selecting the disc set in the Disc changer you're listening to. Press the [u] or [d] button. Canceling Direct Track Search Press the [38] button. blinks. Direct Disc Search (Function of each song on the remote. 2 Do Disc Search Press the [+] or [-] button. Press the [REP] button. Repeat play Display Track Repeat Disc Repeat OFF Track No. Track/Disc Repeat Replaying the song, disc in the Disc changer. Track Scan Playing...
Instruction Manual
Page 9
... disc number blink. Select the information of disc changer) Play the songs on all the discs in the disc changer in random order. Magazine Random Play (Function of P-Time. -9- Information Display P-Time Disc title Track title "DISC TITLE" "TRACK TITLE" This unit does not display the information of Disc title and Track title. Each time the button is pressed, the next song select starts. Switching Display Switching the information displayed. When the [¢] button is pressed the display switches...
... disc number blink. Select the information of disc changer) Play the songs on all the discs in the disc changer in random order. Magazine Random Play (Function of P-Time. -9- Information Display P-Time Disc title Track title "DISC TITLE" "TRACK TITLE" This unit does not display the information of Disc title and Track title. Each time the button is pressed, the next song select starts. Switching Display Switching the information displayed. When the [¢] button is pressed the display switches...
Instruction Manual
Page 10
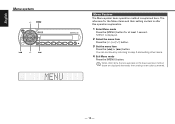
... items that are applicable to the basic operation method above are displayed afterwards their setting content is explained here. English Menu system u MENU 4 d ¢ Menu System The Menu system basic operation method is after this operation explanation. 1 Enter Menu mode Press the [MENU] button for the Menu items and their setting content chart is displayed. 2 Select the menu item Press the [u] or [d] button. 3 Set the menu item Press the [4] or [¢...
... items that are applicable to the basic operation method above are displayed afterwards their setting content is explained here. English Menu system u MENU 4 d ¢ Menu System The Menu system basic operation method is after this operation explanation. 1 Enter Menu mode Press the [MENU] button for the Menu items and their setting content chart is displayed. 2 Select the menu item Press the [u] or [d] button. 3 Set the menu item Press the [4] or [¢...

Instruction Manual
Page 11
... car radios cannot receive a 87.7 MHz frequency. Display "MOD LEVEL 1" "MOD LEVEL 2" (Initial setting) "MOD LEVEL 3" "MOD LEVEL 4" Dynamic control Settingt the Dynamic control. In this case, reduce the modulation level. Display Setting "D-CONT ON" "D-CONT OFF" The dynamic control is set but does not function. - 11 - If a disc with the prevention of distortion function is set to "ON", the sound extension is distorted severely, press the [4] or [¢] button on the display unit and then set...
... car radios cannot receive a 87.7 MHz frequency. Display "MOD LEVEL 1" "MOD LEVEL 2" (Initial setting) "MOD LEVEL 3" "MOD LEVEL 4" Dynamic control Settingt the Dynamic control. In this case, reduce the modulation level. Display Setting "D-CONT ON" "D-CONT OFF" The dynamic control is set but does not function. - 11 - If a disc with the prevention of distortion function is set to "ON", the sound extension is distorted severely, press the [4] or [¢] button on the display unit and then set...
Instruction Manual
Page 12
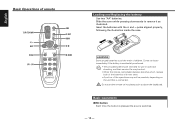
... REP SCAN [0] - [9] T. Do not set the remote on the unit that is pressed the source switches. - 12 - Basic operations [SRC] button Each time the button is connected. Insert the batteries with new ones. • A portion of the batteries with the + and - RDM 38 CH-SEARCH SCAN M.RDM DIRECT SRC D.REP RDM M.RDM Loading and Replacing the battery Use two "AA" batteries. English Basic Operations of children. Slide the...
... REP SCAN [0] - [9] T. Do not set the remote on the unit that is pressed the source switches. - 12 - Basic operations [SRC] button Each time the button is connected. Insert the batteries with new ones. • A portion of the batteries with the + and - RDM 38 CH-SEARCH SCAN M.RDM DIRECT SRC D.REP RDM M.RDM Loading and Replacing the battery Use two "AA" batteries. English Basic Operations of children. Slide the...

Instruction Manual
Page 13
... Disc source [T.UP]/ [T.DOWN] buttons Doing track forward and backward. [+]/ [-] buttons Doing disc forward and backward. [38] button Each time the button is pressed the song pauses and plays. [REP] button Each time the button is pressed Track Repeat function turns ON or OFF. [D.REP] button Each time the button is pressed Disc Repeat function turns ON or OFF. [RDM] button Each time the button is pressed Random Play turns ON or OFF. [M.RDM] button Each time...
... Disc source [T.UP]/ [T.DOWN] buttons Doing track forward and backward. [+]/ [-] buttons Doing disc forward and backward. [38] button Each time the button is pressed the song pauses and plays. [REP] button Each time the button is pressed Track Repeat function turns ON or OFF. [D.REP] button Each time the button is pressed Disc Repeat function turns ON or OFF. [RDM] button Each time the button is pressed Random Play turns ON or OFF. [M.RDM] button Each time...
Instruction Manual
Page 14
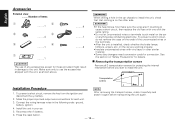
... - After removing the transport screw, retain it carefully and attach it again before you start to install the unit, check first that nothing is installed, check whether the brake lamps, blinkers, wipers, etc. battery. Make the proper input and output wire connections for protecting the internal mechanism before transporting the unit again. 2. battery. 6. Connect the wiring harness wires in your car. 5. Reconnect the - on the car are working properly. •...
... - After removing the transport screw, retain it carefully and attach it again before you start to install the unit, check first that nothing is installed, check whether the brake lamps, blinkers, wipers, etc. battery. Make the proper input and output wire connections for protecting the internal mechanism before transporting the unit again. 2. battery. 6. Connect the wiring harness wires in your car. 5. Reconnect the - on the car are working properly. •...
Instruction Manual
Page 15
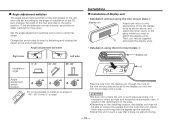
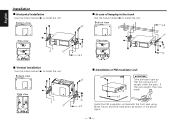
... the installing location, the display unit may occur. ■ Angle adjustment switches The angle adjustment switches on the both of the CD auto changer. Install them after confirming that it is not possible to install at the end of each step. It results in such a way that the signals can be set properly, sound skip or other flat object. Pass the wire from the controller unit. Set the angle adjustment switches...
... the installing location, the display unit may occur. ■ Angle adjustment switches The angle adjustment switches on the both of the CD auto changer. Install them after confirming that it is not possible to install at the end of each step. It results in such a way that the signals can be set properly, sound skip or other flat object. Pass the wire from the controller unit. Set the angle adjustment switches...
Instruction Manual
Page 16
... and Bind head screw as shown in the trunk Use the holes marked (¶) to install the unit. Bottom view 2 φ 4 3 φ 4 Side view 0 45 90 0 45 90 1 3 2 ■ Installation of hanging in the above figure. - 16 - Bottom view Side view 1 0 45 90 90 45 0 ■ In case of FM modulator unit 6 2 2CAUTION Take sufficient care so that the wires are caught...
... and Bind head screw as shown in the trunk Use the holes marked (¶) to install the unit. Bottom view 2 φ 4 3 φ 4 Side view 0 45 90 0 45 90 1 3 2 ■ Installation of hanging in the above figure. - 16 - Bottom view Side view 1 0 45 90 90 45 0 ■ In case of FM modulator unit 6 2 2CAUTION Take sufficient care so that the wires are caught...
Instruction Manual
Page 17
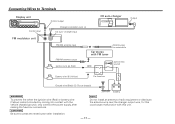
... the ignition wire (Red) or battery wire (Yellow) is short-circuited by coming into contact with this unit. - 17 - changer input CD auto-changer Output FM modulator unit FM/AM antenna input FM/AM antenna output Ignition wire + (Red) Car stereo with FM tuner Antenna plug for this could cause malfunction with the vehicle chassis (ground), only connect the power supply after making the fuse box connections. 2CAUTION Be sure to Terminals Display unit Control input Control output Changer connection wire 4 CD auto - Connecting Wires to press the reset button after installation.
... the ignition wire (Red) or battery wire (Yellow) is short-circuited by coming into contact with this unit. - 17 - changer input CD auto-changer Output FM modulator unit FM/AM antenna input FM/AM antenna output Ignition wire + (Red) Car stereo with FM tuner Antenna plug for this could cause malfunction with the vehicle chassis (ground), only connect the power supply after making the fuse box connections. 2CAUTION Be sure to Terminals Display unit Control input Control output Changer connection wire 4 CD auto - Connecting Wires to press the reset button after installation.

Instruction Manual
Page 18
... problems. General ? Cannot play , but another disc instead. ? English Troubleshooting Guide What might seem to be a malfunction in your unit may just be the result of the display unit is not connected properly. ☞ Connect the control output properly. Nothing happens when the buttons are pressed.04 ✔ The computer chip in the unit is not functioning normally. ☞ Press the Reset button on sources. ☞ Change the Modulation level / Dynamic control setting...
... problems. General ? Cannot play , but another disc instead. ? English Troubleshooting Guide What might seem to be a malfunction in your unit may just be the result of the display unit is not connected properly. ☞ Connect the control output properly. Nothing happens when the buttons are pressed.04 ✔ The computer chip in the unit is not functioning normally. ☞ Press the Reset button on sources. ☞ Change the Modulation level / Dynamic control setting...
Instruction Manual
Page 19
... the information concerning the CD auto-changer is displayed.67 ✔ The radio volume is sets to vibration.67 ✔ Something is touching the CD auto-changer. ☞ Keep it away from the CD auto-changer. ✔ The disc is dirty or damaged.68 ☞ If sound skips at the same part, the disc is faulty. Sound skips due to the minimum level. ☞ Turn the radio volume up. ✔ The microcomputer...
... the information concerning the CD auto-changer is displayed.67 ✔ The radio volume is sets to vibration.67 ✔ Something is touching the CD auto-changer. ☞ Keep it away from the CD auto-changer. ✔ The disc is dirty or damaged.68 ☞ If sound skips at the same part, the disc is faulty. Sound skips due to the minimum level. ☞ Turn the radio volume up. ✔ The microcomputer...
Instruction Manual
Page 20
... the disc magazine.E04 ➪ Load a disc into the disc magazine. If the "Mecha Error" code does not disappear, consult your nearest service center. As the temperature falls below display your systems condition. Or the unit is malfunctioning for some reason.E99 ➪ Check the disc magazine, and then press the reset button on the display unit. The CD is quite dirty. English Troubleshooting Guide The...
... the disc magazine.E04 ➪ Load a disc into the disc magazine. If the "Mecha Error" code does not disappear, consult your nearest service center. As the temperature falls below display your systems condition. Or the unit is malfunctioning for some reason.E99 ➪ Check the disc magazine, and then press the reset button on the display unit. The CD is quite dirty. English Troubleshooting Guide The...
Instruction Manual
Page 21
... × 11/16 in.) FM modulator unit 126 × 30 × 69 mm (4-15/16 × 1-3/16 × 2-6/8 in.) Trim mount plate 188 × 58 × 18 mm (7-3/8 × 2-5/16 × 11/16 in.) Weight CD changer 2 kg (4.4 lbs) Controller 0.09 kg (0.2 lbs) Display unit 0.145 kg (0.32 lbs) FM modulator unit 0.4 kg (0.88 lbs) - 21 - Specifications Specifications subject to change without notice.
... × 11/16 in.) FM modulator unit 126 × 30 × 69 mm (4-15/16 × 1-3/16 × 2-6/8 in.) Trim mount plate 188 × 58 × 18 mm (7-3/8 × 2-5/16 × 11/16 in.) Weight CD changer 2 kg (4.4 lbs) Controller 0.09 kg (0.2 lbs) Display unit 0.145 kg (0.32 lbs) FM modulator unit 0.4 kg (0.88 lbs) - 21 - Specifications Specifications subject to change without notice.


