Quick Start Guide
Page 2
..., contact a physician immediately. Therefore, what appears on the display on the actual equipment, and some of the images on the following website: manual.kenwood.com/edition/im368 To refer to the Instruction Manual, a browser such as Internet Explorer 7 or later, Firefox 3.6 or later, Chrome 20 or ...Safari 5.1 or later, iOS Safari 4.0 or later, or Android 2.2 or later is in hot places such as on the reverse side of the faceplate) General: • Avoid using the mounting sleeve (Japanese car 9 Removing the Unit 9 Installing the Microphone Unit 9 Appendix 10 Specifications 11 The ...
..., contact a physician immediately. Therefore, what appears on the display on the actual equipment, and some of the images on the following website: manual.kenwood.com/edition/im368 To refer to the Instruction Manual, a browser such as Internet Explorer 7 or later, Firefox 3.6 or later, Chrome 20 or ...Safari 5.1 or later, iOS Safari 4.0 or later, or Android 2.2 or later is in hot places such as on the reverse side of the faceplate) General: • Avoid using the mounting sleeve (Japanese car 9 Removing the Unit 9 Installing the Microphone Unit 9 Appendix 10 Specifications 11 The ...

Quick Start Guide
Page 3
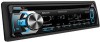
... selected for about 15 seconds or if you turn on . Auxiliary input 1 Open the cover. 2 Connect a portable audio device using buttons on the faceplate. • [ ] indicates the buttons on unless you cancel it can be damaged by shocks or jolts. • To prevent deterioration, do not ...the power on the power (or after you turn the volume knob to select "NO" in its casing while detached. (for KDC-X797) • The faceplate is done for the initial setting. 2 Press the volume knob again. Cancel the display demonstration The display demonstration is recommended to move...
... selected for about 15 seconds or if you turn on . Auxiliary input 1 Open the cover. 2 Connect a portable audio device using buttons on the faceplate. • [ ] indicates the buttons on unless you cancel it can be damaged by shocks or jolts. • To prevent deterioration, do not ...the power on the power (or after you turn the volume knob to select "NO" in its casing while detached. (for KDC-X797) • The faceplate is done for the initial setting. 2 Press the volume knob again. Cancel the display demonstration The display demonstration is recommended to move...
Quick Start Guide
Page 7
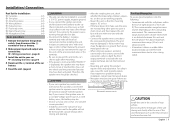
... If you connect the ignition wire (red) and the battery wire (yellow) to the car's chassis again after the use your Kenwood dealer. • Reception may start a fire. English | 7 CAUTION Install this unit in the console of this unit to the... part of your vehicle. X (page 8) 3 Install the unit to ground this unit during installation, consult your own screws. Installation/ Connection Part list for installation: A Faceplate 1) B Trim plate 1) C Mounting sleeve 1) D Wiring harness 1) E Extraction key 2) F Flat head screw 4) G Round head screw 4) H Microphone (3 m ...
... If you connect the ignition wire (red) and the battery wire (yellow) to the car's chassis again after the use your Kenwood dealer. • Reception may start a fire. English | 7 CAUTION Install this unit in the console of this unit to the... part of your vehicle. X (page 8) 3 Install the unit to ground this unit during installation, consult your own screws. Installation/ Connection Part list for installation: A Faceplate 1) B Trim plate 1) C Mounting sleeve 1) D Wiring harness 1) E Extraction key 2) F Flat head screw 4) G Round head screw 4) H Microphone (3 m ...
Quick Start Guide
Page 9
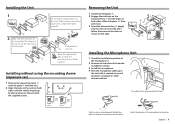
G ø5mm Removing the Unit 1 Detach the faceplate A. 2 Engage the catch pin on the extraction key E into the slots on each side, then follow the arrows instructions as illustrated. 4 5 A Connect the wiring harness ...
G ø5mm Removing the Unit 1 Detach the faceplate A. 2 Engage the catch pin on the extraction key E into the slots on each side, then follow the arrows instructions as illustrated. 4 5 A Connect the wiring harness ...

