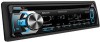
Quick Start Guide
Page 2
...the laser lens, eject the disc and wait for any loss of used batteries promptly. Connector (on the following website: manual.kenwood.com/edition/im368 To refer to operate properly, press the reset button. Handling discs • Do not touch the recording ... Started 3 Basic Operations 3 CD/USB/iPod 4 HD Radio™ Technology 4 Hands-free Phoning 5 Audio Adjustments/ Function Settings 6 Installation/ Connection 7 Wiring connection 8 Installing the Unit 9 Installing without using the USB device or iPod/ iPhone if it might hinder driving safety. • Make sure all important...
...the laser lens, eject the disc and wait for any loss of used batteries promptly. Connector (on the following website: manual.kenwood.com/edition/im368 To refer to operate properly, press the reset button. Handling discs • Do not touch the recording ... Started 3 Basic Operations 3 CD/USB/iPod 4 HD Radio™ Technology 4 Hands-free Phoning 5 Audio Adjustments/ Function Settings 6 Installation/ Connection 7 Wiring connection 8 Installing the Unit 9 Installing without using the USB device or iPod/ iPhone if it might hinder driving safety. • Make sure all important...
Quick Start Guide
Page 7
... can interfere with the same rating. • Connect the speaker wires correctly to the car's chassis again after the use your Kenwood dealer. • Reception may start a fire. English | 7 Always connect those wires to the power source running through the fuse box. • Disconnect... the battery's negative terminal and make sure the wires are being connected to the system,...
... can interfere with the same rating. • Connect the speaker wires correctly to the car's chassis again after the use your Kenwood dealer. • Reception may start a fire. English | 7 Always connect those wires to the power source running through the fuse box. • Disconnect... the battery's negative terminal and make sure the wires are being connected to the system,...
Quick Start Guide
Page 8
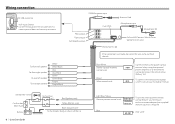
...the car Light Blue/Yellow (Steering remote control wire) REMOTE CONT STEERING WHEEL REMOTE INPUT To use the steering wheel remote control feature, you need to the antenna control terminal in the vehicle. (Max. 300mA, 12V) To connect the Kenwood navigation MUTE system, consult your car is ...stereo type and does not have any resistance. Wiring connection USB connector AUX input (Stereo) Use the mini-plug (3.5 mm ø) cable which is ...
...the car Light Blue/Yellow (Steering remote control wire) REMOTE CONT STEERING WHEEL REMOTE INPUT To use the steering wheel remote control feature, you need to the antenna control terminal in the vehicle. (Max. 300mA, 12V) To connect the Kenwood navigation MUTE system, consult your car is ...stereo type and does not have any resistance. Wiring connection USB connector AUX input (Stereo) Use the mini-plug (3.5 mm ø) cable which is ...
Quick Start Guide
Page 9
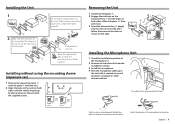
... sleeve firmly in the unit (on both sides) with the vehicle mounting bracket and secure the unit with a commercial item of the trim plate. Other wiring connection have been completed earlier. (page 8) 3 B 1 C D 2 Dashboard of the trim plate B, then pull it secured at several positions using the ...mounting sleeve (Japanese car) 1 Remove the mounting sleeve C and trim plate B from the H installation surface. 3 Install the microphone. 4 Wire the microphone cable up to the unit with it out. 3 Insert the extraction key E deeply into the holes on both sides of your car ...
... sleeve firmly in the unit (on both sides) with the vehicle mounting bracket and secure the unit with a commercial item of the trim plate. Other wiring connection have been completed earlier. (page 8) 3 B 1 C D 2 Dashboard of the trim plate B, then pull it secured at several positions using the ...mounting sleeve (Japanese car) 1 Remove the mounting sleeve C and trim plate B from the H installation surface. 3 Install the microphone. 4 Wire the microphone cable up to the unit with it out. 3 Insert the extraction key E deeply into the holes on both sides of your car ...


