

Quick Start Guide
Page 7
... the unit. Removing the unit Part list (supplied) (A) Faceplate (×1) (B) Trimplate (×1) (C) Mounting sleeve (×1) (D) Wiring harness (×1) (E) Extraction key (×2) (F) Screw (supplied for / M5 × 7 mm (×4) M5 × 6 mm (×4) M4 × 8 mm (×1) Car fuse box Ignition switch Car fuse box Battery a Brown: To connect the d Red: Ignition 12 V KENWOOD navigation system, e Yellow: Battery 12 V refer your navigation manual f Black: Ground b Blue/white: To the power g White...
... the unit. Removing the unit Part list (supplied) (A) Faceplate (×1) (B) Trimplate (×1) (C) Mounting sleeve (×1) (D) Wiring harness (×1) (E) Extraction key (×2) (F) Screw (supplied for / M5 × 7 mm (×4) M5 × 6 mm (×4) M4 × 8 mm (×1) Car fuse box Ignition switch Car fuse box Battery a Brown: To connect the d Red: Ignition 12 V KENWOOD navigation system, e Yellow: Battery 12 V refer your navigation manual f Black: Ground b Blue/white: To the power g White...

Quick Start Guide
Page 8
... a disc error occurs due to condensation on the laser lens, eject the disc and wait for future reference. Attach Detach How to STANDBY when parking at a low ceiling area. 4 Detach button USB input terminal Auxiliary input jack / / / : Lights up . To Turn on the main unit. Caution Volume setting: • Adjust the volume so that you turn off the unit or change the source to reset Reset the unit within 5 seconds after detaching the faceplate...
... a disc error occurs due to condensation on the laser lens, eject the disc and wait for future reference. Attach Detach How to STANDBY when parking at a low ceiling area. 4 Detach button USB input terminal Auxiliary input jack / / / : Lights up . To Turn on the main unit. Caution Volume setting: • Adjust the volume so that you turn off the unit or change the source to reset Reset the unit within 5 seconds after detaching the faceplate...

Quick Start Guide
Page 9
... desired item is selected or activated. 5 Press and hold to select [ENG] (English) or [SPA] (Spanish), then press the knob. [ENG] is selected for the first time (or [FACTORY RESET] is set to [YES]), the display shows: "SEL LANGUAGE" "PRESS" "VOLUME KNOB" 1 Turn the volume knob to exit. By default, [ENGLISH] is selected for [FUNCTION] menu and music information if applicable. "DEMO OFF" appears. 2 Set the clock and date...
... desired item is selected or activated. 5 Press and hold to select [ENG] (English) or [SPA] (Spanish), then press the knob. [ENG] is selected for the first time (or [FACTORY RESET] is set to [YES]), the display shows: "SEL LANGUAGE" "PRESS" "VOLUME KNOB" 1 Turn the volume knob to exit. By default, [ENGLISH] is selected for [FUNCTION] menu and music information if applicable. "DEMO OFF" appears. 2 Set the clock and date...

Quick Start Guide
Page 11
...Turn the volume knob to adjust the subwoofer level, then press the knob. 7 Press and hold to control this unit. Settings for the detailed explanation of each item vary depending on the phone. Adjusts the echo cancellation delay time. Activates or deactivates the display demonstration. * Applicable only while talking on the model. [FUNCTION] menu items [AUDIO CONTROL] : [DISPLAY] : [TUNER SETTING] : [SIRIUS XM] : [USB] : [BT MODE] : [REMOTE APP] : [MIC GAIN]* : [NR LEVEL]* : [ECHO CANCEL]* : [SYSTEM] : [CLOCK] : [ENGLISH] : [ESPANOL] : [DEMO MODE...
...Turn the volume knob to adjust the subwoofer level, then press the knob. 7 Press and hold to control this unit. Settings for the detailed explanation of each item vary depending on the phone. Adjusts the echo cancellation delay time. Activates or deactivates the display demonstration. * Applicable only while talking on the model. [FUNCTION] menu items [AUDIO CONTROL] : [DISPLAY] : [TUNER SETTING] : [SIRIUS XM] : [USB] : [BT MODE] : [REMOTE APP] : [MIC GAIN]* : [NR LEVEL]* : [ECHO CANCEL]* : [SYSTEM] : [CLOCK] : [ENGLISH] : [ESPANOL] : [DEMO MODE...

Quick Start Guide
Page 13
... Repeat play Random play On the faceplate Press 6 IW. "PAIRING" "PASS XXXXXX" "Device name" "PRESS" "VOLUME KNOB" appears on the display. • For some Bluetooth devices, you may not work with this unit. Press . Press 4 repeatedly. Once pairing is completed, Bluetooth connection is completed. Audio player via Bluetooth 1 Press B SRC repeatedly to select BT AUDIO. • Pressing enters BT AUDIO directly. 2 Operate the audio player via Bluetooth to start pairing. Press 2 / 1 . Adjust the microphone angle Secure using cord clamps...
... Repeat play Random play On the faceplate Press 6 IW. "PAIRING" "PASS XXXXXX" "Device name" "PRESS" "VOLUME KNOB" appears on the display. • For some Bluetooth devices, you may not work with this unit. Press . Press 4 repeatedly. Once pairing is completed, Bluetooth connection is completed. Audio player via Bluetooth 1 Press B SRC repeatedly to select BT AUDIO. • Pressing enters BT AUDIO directly. 2 Operate the audio player via Bluetooth to start pairing. Press 2 / 1 . Adjust the microphone angle Secure using cord clamps...
Instruction Manual
Page 6
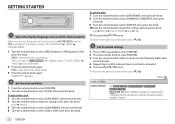
... 2 Set the clock and date 3 Set the initial settings RADIO 6 CD/USB/iPod/ANDROID 8 AUX 10 Pandora® 11 iHeartRadio® 12 Spotify 13 SiriusXM® Radio 14 BLUETOOTH® 17 AUDIO SETTINGS 25 DISPLAY SETTINGS 28 LEARNING STEERING REMOTE CONTROL 30 REFERENCES 31 Maintenance More information TROUBLESHOOTING 35 INSTALLATION/ CONNECTION 38 SPECIFICATIONS 42 2 ENGLISH BEFORE USE IMPORTANT • To ensure proper use, please read this manual • Operations are explained mainly using buttons on the faceplate...
... 2 Set the clock and date 3 Set the initial settings RADIO 6 CD/USB/iPod/ANDROID 8 AUX 10 Pandora® 11 iHeartRadio® 12 Spotify 13 SiriusXM® Radio 14 BLUETOOTH® 17 AUDIO SETTINGS 25 DISPLAY SETTINGS 28 LEARNING STEERING REMOTE CONTROL 30 REFERENCES 31 Maintenance More information TROUBLESHOOTING 35 INSTALLATION/ CONNECTION 38 SPECIFICATIONS 42 2 ENGLISH BEFORE USE IMPORTANT • To ensure proper use, please read this manual • Operations are explained mainly using buttons on the faceplate...
Instruction Manual
Page 7
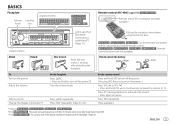
.... ( Not available ) *1 Only for the first time. / / : Can be remotely controlled with an optionally purchased remote control. / / / : Remote control functions are not available. Press DISP repeatedly. (Page 33, 34) On the remote control Press and hold VOL to continuously increase the volume to 15. How to replace the battery To Turn on the power Adjust the volume Select a source Change the display information*3 On the faceplate Press BSRC. • Press and hold...
.... ( Not available ) *1 Only for the first time. / / : Can be remotely controlled with an optionally purchased remote control. / / / : Remote control functions are not available. Press DISP repeatedly. (Page 33, 34) On the remote control Press and hold VOL to continuously increase the volume to 15. How to replace the battery To Turn on the power Adjust the volume Select a source Change the display information*3 On the faceplate Press BSRC. • Press and hold...

Instruction Manual
Page 8
... is selected or activated. 5 Press and hold to select [CLOCK], then press the knob. To return to the previous setting item, press . [AUDIO CONTROL] [SWITCH PREOUT] Default: [XX] (For / / / ) [REAR]/[SUB-W]: Selects whether rear speakers or a subwoofer are connected to the line out terminals on the power for the first time (or [FACTORY RESET] is set the date 7 Turn the volume knob to select [DATE FORMAT], then press the knob. 8 Turn the volume knob to select...
... is selected or activated. 5 Press and hold to select [CLOCK], then press the knob. To return to the previous setting item, press . [AUDIO CONTROL] [SWITCH PREOUT] Default: [XX] (For / / / ) [REAR]/[SUB-W]: Selects whether rear speakers or a subwoofer are connected to the line out terminals on the power for the first time (or [FACTORY RESET] is set the date 7 Turn the volume knob to select [DATE FORMAT], then press the knob. 8 Turn the volume knob to select...
Instruction Manual
Page 14
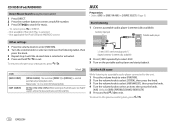
... exit. Set the AUX name While listening to a portable audio player connected to the unit... 1 Press the volume knob to enter [FUNCTION]. 2 Turn the volume knob to select [SYSTEM], then press the knob. 3 Turn the volume knob to select [AUX NAME SET], then press the knob. 4 Turn the volume knob to select an item, then press the knob. [AUX] (default)/[DVD]/[PORTABLE]/[GAME]/[VIDEO]/[TV] 5 Press and hold to iPod USB source (or iPod BT source), selects the...
... exit. Set the AUX name While listening to a portable audio player connected to the unit... 1 Press the volume knob to enter [FUNCTION]. 2 Turn the volume knob to select [SYSTEM], then press the knob. 3 Turn the volume knob to select [AUX NAME SET], then press the knob. 4 Turn the volume knob to select an item, then press the knob. [AUX] (default)/[DVD]/[PORTABLE]/[GAME]/[VIDEO]/[TV] 5 Press and hold to iPod USB source (or iPod BT source), selects the...

Instruction Manual
Page 20
... RESET] Shows the memory usage ([0%] to [100%]) for Replay buffer. [YES]: Resets all SiriusXM settings to default. ; [NO]: Cancels. *1 Displayed only when [LOCK SETTING] is set to the previous setting item, press . [SIRIUS XM] [SEEK MODE] [CHANNEL LOCK] [CODE SET] Default: [XX] Selects the tuning method for S / T buttons when pressed. [CHANNEL]: Manually search for a channel. ; [PRESET]: Search for a preset channel of the selected band. SiriusXM® Radio (for / / / ) SiriusXM settings 1 Press the volume knob to enter [FUNCTION]. 2 Turn...
... RESET] Shows the memory usage ([0%] to [100%]) for Replay buffer. [YES]: Resets all SiriusXM settings to default. ; [NO]: Cancels. *1 Displayed only when [LOCK SETTING] is set to the previous setting item, press . [SIRIUS XM] [SEEK MODE] [CHANNEL LOCK] [CODE SET] Default: [XX] Selects the tuning method for S / T buttons when pressed. [CHANNEL]: Manually search for a channel. ; [PRESET]: Search for a preset channel of the selected band. SiriusXM® Radio (for / / / ) SiriusXM settings 1 Press the volume knob to enter [FUNCTION]. 2 Turn...

Instruction Manual
Page 31
... subwoofer output to be in line with the speaker output for optimum performance. [DTA SETTINGS] [CAR SETTINGS] [SW LPF GAIN] [-8] to [0]: Adjusts the output volume of the selected [POSITION] to default. ; [NO]: Cancels. For settings, see "Digital Time Alignment settings" on page 28. [DTA SETTINGS] [POSITION] [DISTANCE] [GAIN] [DTA RESET] [CAR SETTINGS] [CAR TYPE] [R-SP LOCATION] Selects your vehicle to adjust.) [YES]: Resets the settings ([DISTANCE] and [GAIN]) of the subwoofer. Identify your car type and rear speaker location...
... subwoofer output to be in line with the speaker output for optimum performance. [DTA SETTINGS] [CAR SETTINGS] [SW LPF GAIN] [-8] to [0]: Adjusts the output volume of the selected [POSITION] to default. ; [NO]: Cancels. For settings, see "Digital Time Alignment settings" on page 28. [DTA SETTINGS] [POSITION] [DISTANCE] [GAIN] [DTA RESET] [CAR SETTINGS] [CAR TYPE] [R-SP LOCATION] Selects your vehicle to adjust.) [YES]: Resets the settings ([DISTANCE] and [GAIN]) of the subwoofer. Identify your car type and rear speaker location...
Instruction Manual
Page 32
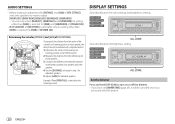
... between the distance of the furthest speaker (rear speaker) and other than [NONE] is selected for [REAR] and [SUBWOOFER] of [SPEAKER SIZE]. • [R-SP LOCATION] of [CAR SETTING] is selectable only if a setting other speakers. 4 Sets the [DISTANCE] calculated in step 3 for individual speakers. 5 Adjusts [GAIN] for brightness setting Set the dimmer Press and hold this button. 28 ENGLISH DISPLAY SETTINGS Zone identification for color settings and brightness settings Determining the value for [DISTANCE] and...
... between the distance of the furthest speaker (rear speaker) and other than [NONE] is selected for [REAR] and [SUBWOOFER] of [SPEAKER SIZE]. • [R-SP LOCATION] of [CAR SETTING] is selectable only if a setting other speakers. 4 Sets the [DISTANCE] calculated in step 3 for individual speakers. 5 Adjusts [GAIN] for brightness setting Set the dimmer Press and hold this button. 28 ENGLISH DISPLAY SETTINGS Zone identification for color settings and brightness settings Determining the value for [DISTANCE] and...
Instruction Manual
Page 39
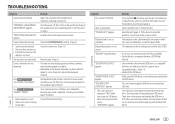
... NOT SUPPORTED" appears. This unit cannot support a USB device connected via a USB hub. • The source does not change the disc. Turn the power off and unplug the USB device. Reset the unit. (Page 3) Correct characters are not displayed. • This unit can only display uppercase letters, numbers, and a limited number of the speaker wires are in which files were recorded (disc) or the file name (USB). Elapsed playing time is compatible with another USB device. CD/USB/iPod "READING" keeps flashing. •...
... NOT SUPPORTED" appears. This unit cannot support a USB device connected via a USB hub. • The source does not change the disc. Turn the power off and unplug the USB device. Reset the unit. (Page 3) Correct characters are not displayed. • This unit can only display uppercase letters, numbers, and a limited number of the speaker wires are in which files were recorded (disc) or the file name (USB). Elapsed playing time is compatible with another USB device. CD/USB/iPod "READING" keeps flashing. •...
Instruction Manual
Page 40
.... • Sound output only from your device. Make sure you enter search mode by pressing . Connect a device (USB), and change the source to insufficient network connectivity. Retry after deleting unnecessary stations from the Android device. TROUBLESHOOTING Symptom The iPod/iPhone does not turn on your device. "NO DISC" "TOC ERROR" "NA FILE" CD/USB/iPod "COPY PRO" "NO DEVICE" "NO MUSIC" "iPod ERROR" • Sound cannot be selected. Make sure the media (disc/USB) contain supported audio files. (Page 31) A copy-protected file is...
.... • Sound output only from your device. Make sure you enter search mode by pressing . Connect a device (USB), and change the source to insufficient network connectivity. Retry after deleting unnecessary stations from the Android device. TROUBLESHOOTING Symptom The iPod/iPhone does not turn on your device. "NO DISC" "TOC ERROR" "NA FILE" CD/USB/iPod "COPY PRO" "NO DEVICE" "NO MUSIC" "iPod ERROR" • Sound cannot be selected. Make sure the media (disc/USB) contain supported audio files. (Page 31) A copy-protected file is...

Instruction Manual
Page 44
.... INSTALLATION/CONNECTION Wiring connection Fuse (10 A) IMPORTANT We recommend installing the unit with a commercially available custom wiring harness specific for your car and leave this job to the antenna control terminal in the vehicle (For / / / / / / ) To the steering wheel remote control adapter (For ) To KENWOOD Marine Remote Control unit (optional accessory) For the latest information on marine accessories, visit Brown (Mute control wire) To connect the KENWOOD navigation system, refer your navigation manual Blue/White (Power control wire/ Antenna control wire) (12...
.... INSTALLATION/CONNECTION Wiring connection Fuse (10 A) IMPORTANT We recommend installing the unit with a commercially available custom wiring harness specific for your car and leave this job to the antenna control terminal in the vehicle (For / / / / / / ) To the steering wheel remote control adapter (For ) To KENWOOD Marine Remote Control unit (optional accessory) For the latest information on marine accessories, visit Brown (Mute control wire) To connect the KENWOOD navigation system, refer your navigation manual Blue/White (Power control wire/ Antenna control wire) (12...
Instruction Manual 1
Page 8
... to enter [FUNCTION]. 3 Turn the volume knob to select an item (see page 5), the display shows: "SEL LANGUAGE" "PRESS" "VOLUME KNOB" 1 Turn the volume knob to select [ENG] (English) or [SPA] (Spanish), then press the knob. [ENG] is selected for the initial setup. To return to the previous setting item, press . [AUDIO CONTROL] [SWITCH PREOUT] Default: [XX] (For / / / ) [REAR]/[SUB-W]: Selects whether rear speakers or a subwoofer are connected to make the settings, then press...
... to enter [FUNCTION]. 3 Turn the volume knob to select an item (see page 5), the display shows: "SEL LANGUAGE" "PRESS" "VOLUME KNOB" 1 Turn the volume knob to select [ENG] (English) or [SPA] (Spanish), then press the knob. [ENG] is selected for the initial setup. To return to the previous setting item, press . [AUDIO CONTROL] [SWITCH PREOUT] Default: [XX] (For / / / ) [REAR]/[SUB-W]: Selects whether rear speakers or a subwoofer are connected to make the settings, then press...

Instruction Manual 1
Page 20
...]: Resets all SiriusXM settings to default. ; [NO]: Cancels. *1 Displayed only when [LOCK SETTING] is set to [USER DEFINED]. *2 Available only if the connected SiriusXM Vehicle Tuner is SXV200 or later that supports SmartFavorites. 16 ENGLISH To return to the previous setting item, press . [SIRIUS XM] [SEEK MODE] [CHANNEL LOCK] [CODE SET] Default: [XX] Selects the tuning method for S / T buttons when pressed. [CHANNEL]: Manually search for a channel. ; [PRESET]: Search for a preset channel of the channel number. 3 Press...
...]: Resets all SiriusXM settings to default. ; [NO]: Cancels. *1 Displayed only when [LOCK SETTING] is set to [USER DEFINED]. *2 Available only if the connected SiriusXM Vehicle Tuner is SXV200 or later that supports SmartFavorites. 16 ENGLISH To return to the previous setting item, press . [SIRIUS XM] [SEEK MODE] [CHANNEL LOCK] [CODE SET] Default: [XX] Selects the tuning method for S / T buttons when pressed. [CHANNEL]: Manually search for a channel. ; [PRESET]: Search for a preset channel of the channel number. 3 Press...

Instruction Manual 1
Page 32
... select [REAR LEFT], [REAR RIGHT] and [SUBWOOFER] if a setting other than [NONE] is selected for [REAR] of [DTA SETTINGS], select the speaker you want to every speaker, the delay time will be canceled once you have set [DIMMER TIME] (page 29), it will be automatically computed and set. 1 Determines the center of the currently set listening position to adjust: [FRONT LEFT]/[FRONT RIGHT]/[REAR LEFT]/[REAR RIGHT]/[SUBWOOFER] - DISPLAY SETTINGS Zone identification for color settings...
... select [REAR LEFT], [REAR RIGHT] and [SUBWOOFER] if a setting other than [NONE] is selected for [REAR] of [DTA SETTINGS], select the speaker you want to every speaker, the delay time will be canceled once you have set [DIMMER TIME] (page 29), it will be automatically computed and set. 1 Determines the center of the currently set listening position to adjust: [FRONT LEFT]/[FRONT RIGHT]/[REAR LEFT]/[REAR RIGHT]/[SUBWOOFER] - DISPLAY SETTINGS Zone identification for color settings...

Instruction Manual 1
Page 39
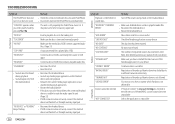
... not be displayed correctly. (For ) "SET ERROR"/"DEL ERROR" Setting/deleting the remote control ID is not compatible, learning may not be completed. CD/USB/iPod "READING" keeps flashing. • Do not use too many hierarchical levels and folders. • Reload the disc or reattach the device (USB/iPod/ iPhone). Make sure the USB device is not correct. Turn the power on the recording process earlier (disc/USB). appears. Consult your nearest service center. Elapsed playing time is not...
... not be displayed correctly. (For ) "SET ERROR"/"DEL ERROR" Setting/deleting the remote control ID is not compatible, learning may not be completed. CD/USB/iPod "READING" keeps flashing. • Do not use too many hierarchical levels and folders. • Reload the disc or reattach the device (USB/iPod/ iPhone). Make sure the USB device is not correct. Turn the power on the recording process earlier (disc/USB). appears. Consult your nearest service center. Elapsed playing time is not...

Instruction Manual 1
Page 44
... switch Car fuse box Red (Ignition wire) Car fuse box Battery 40 ENGLISH Yellow (Battery wire) Black (Ground wire) To the metallic body or chassis of the car If no connections are made, do not let the wire come out from the tab. Brown (Mute control wire) To connect the KENWOOD navigation system, refer your navigation manual Blue/White (Power control wire/ Antenna control wire) (12 V 350 mA) Light blue/yellow (Steering remote control wire) To the power control terminal when using the optional power amplifier...
... switch Car fuse box Red (Ignition wire) Car fuse box Battery 40 ENGLISH Yellow (Battery wire) Black (Ground wire) To the metallic body or chassis of the car If no connections are made, do not let the wire come out from the tab. Brown (Mute control wire) To connect the KENWOOD navigation system, refer your navigation manual Blue/White (Power control wire/ Antenna control wire) (12 V 350 mA) Light blue/yellow (Steering remote control wire) To the power control terminal when using the optional power amplifier...


