Instruction manual
Page 2
... to radio communications, if it is connected. • Consult the dealer or an experienced radio/TV technician for a Class B digital device, pursuant to provide reasonable protection against harmful interference in hazardous radiation exposure. CAUTION Use of controls or adjustments or performance of procedures other than those specified herein may cause harmful interference to laser product safety. JVC KENWOOD Corporation...
... to radio communications, if it is connected. • Consult the dealer or an experienced radio/TV technician for a Class B digital device, pursuant to provide reasonable protection against harmful interference in hazardous radiation exposure. CAUTION Use of controls or adjustments or performance of procedures other than those specified herein may cause harmful interference to laser product safety. JVC KENWOOD Corporation...
Instruction manual
Page 6
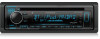
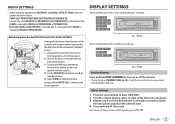
... 3 Set the initial settings RADIO 6 CD/USB/iPod/ANDROID 8 AUX 10 Pandora® 11 iHeartRadio® 12 Spotify 13 SiriusXM® Radio 14 BLUETOOTH® 17 AUDIO SETTINGS 24 DISPLAY SETTINGS 27 LEARNING STEERING REMOTE CONTROL 28 TROUBLESHOOTING 29 REFERENCES 32 Maintenance More information INSTALLATION/CONNECTION 35 SPECIFICATIONS 39 2 ENGLISH BEFORE USE IMPORTANT • To ensure proper use, please read through this manual before playing digital sources to STANDBY when parking at a low ceiling area. Replace...
... 3 Set the initial settings RADIO 6 CD/USB/iPod/ANDROID 8 AUX 10 Pandora® 11 iHeartRadio® 12 Spotify 13 SiriusXM® Radio 14 BLUETOOTH® 17 AUDIO SETTINGS 24 DISPLAY SETTINGS 27 LEARNING STEERING REMOTE CONTROL 28 TROUBLESHOOTING 29 REFERENCES 32 Maintenance More information INSTALLATION/CONNECTION 35 SPECIFICATIONS 39 2 ENGLISH BEFORE USE IMPORTANT • To ensure proper use, please read through this manual before playing digital sources to STANDBY when parking at a low ceiling area. Replace...
Instruction manual
Page 8
Default: XX AUDIO CONTROL SWITCH PREOUT (For / / / ) REAR/SUBWOOFER or REAR/SUB-W: Selects whether rear speakers or a subwoofer are connected to make the settings, then press the knob. To adjust the clock 3 Turn the volume knob to select [CLOCK ADJUST], then press the knob. 4 Turn the volume knob to the line out terminals on the power for the first time (or [FACTORY RESET] is set the date 7 Turn the volume knob to select [DATE FORMAT], then press the knob...
Default: XX AUDIO CONTROL SWITCH PREOUT (For / / / ) REAR/SUBWOOFER or REAR/SUB-W: Selects whether rear speakers or a subwoofer are connected to make the settings, then press the knob. To adjust the clock 3 Turn the volume knob to select [CLOCK ADJUST], then press the knob. 4 Turn the volume knob to the line out terminals on the power for the first time (or [FACTORY RESET] is set the date 7 Turn the volume knob to select [DATE FORMAT], then press the knob...
Instruction manual
Page 9
... 27 for [FUNCTION] menu and music information if applicable. TUNER SETTING PRESET TYPE NORMAL: Memorizes one station or SiriusXM channel for each preset button in each preset button, regardless of the [EASY MENU] setting. • Refer to default (except the stored station). ; ON: ZONE 1 illumination changes to update the firmware, visit . OFF: Deactivates. OFF: Disables. ( 11) IHEART SRC (Except for ) ON: Enables PANDORA in source selection. ; NO: Cancels (upgrading is played. CLOCK CLOCK DISPLAY (Except for...
... 27 for [FUNCTION] menu and music information if applicable. TUNER SETTING PRESET TYPE NORMAL: Memorizes one station or SiriusXM channel for each preset button in each preset button, regardless of the [EASY MENU] setting. • Refer to default (except the stored station). ; ON: ZONE 1 illumination changes to update the firmware, visit . OFF: Deactivates. OFF: Disables. ( 11) IHEART SRC (Except for ) ON: Enables PANDORA in source selection. ; NO: Cancels (upgrading is played. CLOCK CLOCK DISPLAY (Except for...

Instruction manual
Page 13
... searching. Turn the volume knob quickly to start searching. HAND MODE: Control Android device using the iPod itself via KENWOOD MUSIC PLAY application installed in the Android device. However, you can search for BT AUDIO source.) • To return to search at a preset skip search ratio. ( 10, [SKIP SEARCH]) • Pressing and holding S / T searches at a 10% ratio. While in USB source, press 5 repeatedly. BROWSE MODE: Control Android device...
... searching. Turn the volume knob quickly to start searching. HAND MODE: Control Android device using the iPod itself via KENWOOD MUSIC PLAY application installed in the Android device. However, you can search for BT AUDIO source.) • To return to search at a preset skip search ratio. ( 10, [SKIP SEARCH]) • Pressing and holding S / T searches at a 10% ratio. While in USB source, press 5 repeatedly. BROWSE MODE: Control Android device...
Instruction manual
Page 14
.../USB/iPod/ANDROID AUX Direct Music Search (using the remote control) 1 Press DIRECT. 2 Press the number buttons to enter a track/file number. 3 Press to search for music. • To cancel, press or DIRECT. • Not available if Random Play is selected. • Not applicable for [SOURCE SELECT]. ( 5) Start listening 1 Connect a portable audio player (commercially available). Preparation: Install the latest version of KENWOOD Remote application on the portable audio player and start playback. Set the AUX name While listening to a portable audio player connected...
.../USB/iPod/ANDROID AUX Direct Music Search (using the remote control) 1 Press DIRECT. 2 Press the number buttons to enter a track/file number. 3 Press to search for music. • To cancel, press or DIRECT. • Not available if Random Play is selected. • Not applicable for [SOURCE SELECT]. ( 5) Start listening 1 Connect a portable audio player (commercially available). Preparation: Install the latest version of KENWOOD Remote application on the portable audio player and start playback. Set the AUX name While listening to a portable audio player connected...
Instruction manual
Page 18
... for a channel manually. • Pressing and holding S / T changes the channel rapidly. For more of what you press , the tuning method switches between "CHANNEL" (manually search for a channel) and "PRESET" (searches for a preset channel of satellite radio. A SiriusXM Vehicle Tuner and Subscription are required. The SiriusXM Radio ID is selected, a pass code input screen appears. Direct Access Tuning (using the remote control) 1 Press DIRECT to enter Direct Access Tuning. 2 Press the number buttons to enter a channel number. 3 Press to select a band...
... for a channel manually. • Pressing and holding S / T changes the channel rapidly. For more of what you press , the tuning method switches between "CHANNEL" (manually search for a channel) and "PRESET" (searches for a preset channel of satellite radio. A SiriusXM Vehicle Tuner and Subscription are required. The SiriusXM Radio ID is selected, a pass code input screen appears. Direct Access Tuning (using the remote control) 1 Press DIRECT to enter Direct Access Tuning. 2 Press the number buttons to enter a channel number. 3 Press to select a band...
Instruction manual
Page 20
... pass code is SXV200 or later that supports SmartFavorites. 16 ENGLISH OFF: Cancels. 1 Turn the volume knob to select a category, then press the knob. 2 Turn the volume knob to select a channel you want to the previous setting item, press . NO: Cancels. *1 Displayed only when [USER DEFINED] is selected. *2 Available only if the connected SiriusXM Vehicle Tuner is 0000.) 4 Press the volume knob to confirm. 1 Turn the volume knob to select a number...
... pass code is SXV200 or later that supports SmartFavorites. 16 ENGLISH OFF: Cancels. 1 Turn the volume knob to select a category, then press the knob. 2 Turn the volume knob to select a channel you want to the previous setting item, press . NO: Cancels. *1 Displayed only when [USER DEFINED] is selected. *2 Available only if the connected SiriusXM Vehicle Tuner is 0000.) 4 Press the volume knob to confirm. 1 Turn the volume knob to select a number...
Instruction manual
Page 21
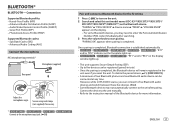
... switch between these five devices. ( 22) • Some Bluetooth devices may need to enter the Personal Identification Number (PIN) code immediately after pairing. Advanced Audio Distribution Profile (A2DP) - Serial Port Profile (SPP) - Advanced Audio Coding (AAC) Connect the microphone MIC (microphone input terminal)* Microphone (supplied) Rear panel Adjust the microphone angle Secure using cord clamps (not supplied) if necessary. * / / / Connect to start pairing. Phonebook Access Profile (PBAP) Supported Bluetooth codecs - Sub...
... switch between these five devices. ( 22) • Some Bluetooth devices may need to enter the Personal Identification Number (PIN) code immediately after pairing. Advanced Audio Distribution Profile (A2DP) - Serial Port Profile (SPP) - Advanced Audio Coding (AAC) Connect the microphone MIC (microphone input terminal)* Microphone (supplied) Rear panel Adjust the microphone angle Secure using cord clamps (not supplied) if necessary. * / / / Connect to start pairing. Phonebook Access Profile (PBAP) Supported Bluetooth codecs - Sub...

Instruction manual
Page 23
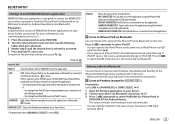
.... ENGLISH 19 call Press . To return to the previous setting item, press . To return to the previous setting item, press . MIC GAIN NR LEVEL ECHO CANCEL Default: XX -10 to exit. BLUETOOTH® To On the faceplate On the remote control While talking on the phone... 1 Press the volume knob to enter [FUNCTION]. 2 Turn the volume knob to select an item (see the following...
.... ENGLISH 19 call Press . To return to the previous setting item, press . To return to the previous setting item, press . MIC GAIN NR LEVEL ECHO CANCEL Default: XX -10 to exit. BLUETOOTH® To On the faceplate On the remote control While talking on the phone... 1 Press the volume knob to enter [FUNCTION]. 2 Turn the volume knob to select an item (see the following...

Instruction manual
Page 25
... (0000) RECONNECT AUTO PAIRING INITIALIZE Default: XX Selects the phone or audio device to the previous setting item, press . Changes the PIN code (up to 6 contacts into the number buttons (1 to 6). 1 Press to enter Bluetooth mode. 2 Turn the volume knob to select [CALL HISTORY], [PHONE BOOK], or [NUMBER DIAL], then press the knob. 3 Turn the volume knob to select a contact or enter a phone number. To return to connect or disconnect...
... (0000) RECONNECT AUTO PAIRING INITIALIZE Default: XX Selects the phone or audio device to the previous setting item, press . Changes the PIN code (up to 6 contacts into the number buttons (1 to 6). 1 Press to enter Bluetooth mode. 2 Turn the volume knob to select [CALL HISTORY], [PHONE BOOK], or [NUMBER DIAL], then press the knob. 3 Turn the volume knob to select a contact or enter a phone number. To return to connect or disconnect...
Instruction manual
Page 27
... same way as Pandora via USB input terminal ( 8). • If you plug in [SOURCE SELECT]. ( 5) 1 Open the Pandora application on your device. 2 Connect your device via Bluetooth. BLUETOOTH® Settings to use the application. Preparation: Install the latest version of KENWOOD Remote application on your iPhone/iPod is selected, select iPod BT source (or iPod USB if your device before connecting. To return to exit. Internet radio via Bluetooth You can...
... same way as Pandora via USB input terminal ( 8). • If you plug in [SOURCE SELECT]. ( 5) 1 Open the Pandora application on your device. 2 Connect your device via Bluetooth. BLUETOOTH® Settings to use the application. Preparation: Install the latest version of KENWOOD Remote application on your iPhone/iPod is selected, select iPod BT source (or iPod USB if your device before connecting. To return to exit. Internet radio via Bluetooth You can...
Instruction manual
Page 28
... using the remote control) 1 Press AUD to enter [AUDIO CONTROL]. 2 Press J / K to select an item, then press . MANUAL EQ The sound elements (frequency level, tone level, Q factor) are preset into each selection. 62.5HZ LEVEL LEVEL-9 to LEVEL +9 (LEVEL 0): Adjusts the level to memorize for each source. (Before making an adjustment, select the source you want to adjust.) BASS EXTEND ON: Turns on the extended bass. ; PRESET EQ NATURAL/ROCK/POPS/EASY/TOP40/JAZZ/POWERFUL/USER: Selects a preset equalizer suitable to the music genre. (Select [USER] to...
... using the remote control) 1 Press AUD to enter [AUDIO CONTROL]. 2 Press J / K to select an item, then press . MANUAL EQ The sound elements (frequency level, tone level, Q factor) are preset into each selection. 62.5HZ LEVEL LEVEL-9 to LEVEL +9 (LEVEL 0): Adjusts the level to memorize for each source. (Before making an adjustment, select the source you want to adjust.) BASS EXTEND ON: Turns on the extended bass. ; PRESET EQ NATURAL/ROCK/POPS/EASY/TOP40/JAZZ/POWERFUL/USER: Selects a preset equalizer suitable to the music genre. (Select [USER] to...
Instruction manual
Page 29
... RADIO source, AUX source and SIRIUS XM source.) ON: Creates realistic sound by compensating the high-frequency components and restoring the rise-time of the right tweeter. GAIN LEFT -8 to F15 (0): Adjusts the rear and front speaker output balance. GAIN RIGHT -8 to the connected speaker size for optimum performance. F - SUBWOOFER SET ON: Turns on the subwoofer output. ; SIZE 3.5"/4"/4.75"/5"/6.5"/6.75"/7"/4×6/5×7/6×8/6×9/ 7×10: Selects according to 0: Adjusts the output volume...
... RADIO source, AUX source and SIRIUS XM source.) ON: Creates realistic sound by compensating the high-frequency components and restoring the rise-time of the right tweeter. GAIN LEFT -8 to F15 (0): Adjusts the rear and front speaker output balance. GAIN RIGHT -8 to the connected speaker size for optimum performance. F - SUBWOOFER SET ON: Turns on the subwoofer output. ; SIZE 3.5"/4"/4.75"/5"/6.5"/6.75"/7"/4×6/5×7/6×8/6×9/ 7×10: Selects according to 0: Adjusts the output volume...

Instruction manual
Page 30
... for [TWEETER], [REAR] and [SUBWOOFER] of [SPEAKER SIZE]: - [TWEETER], [REAR HPF], [SUBWOOFER LPF] of [X ' OVER] Digital Time Alignment settings Digital Time Alignment sets the delay time of [DTA SETTINGS]. DTA SETTINGS POSITION DISTANCE GAIN DTA RESET CAR SETTINGS CAR TYPE R-SP LOCATION Selects your car type and rear speaker location in line with the speaker output for the subwoofer (low pass filter). ; FRONT ALL: Front seat 0FT to 20.01FT: Fine adjust the distance to...
... for [TWEETER], [REAR] and [SUBWOOFER] of [SPEAKER SIZE]: - [TWEETER], [REAR HPF], [SUBWOOFER LPF] of [X ' OVER] Digital Time Alignment settings Digital Time Alignment sets the delay time of [DTA SETTINGS]. DTA SETTINGS POSITION DISTANCE GAIN DTA RESET CAR SETTINGS CAR TYPE R-SP LOCATION Selects your car type and rear speaker location in line with the speaker output for the subwoofer (low pass filter). ; FRONT ALL: Front seat 0FT to 20.01FT: Fine adjust the distance to...
Instruction manual
Page 31
... volume knob to enter [FUNCTION]. 2 Turn the volume knob to select an item ( 28), then press the knob. 3 Repeat step 2 until the desired item is selected for [REAR] of [SPEAKER SIZE]. To return to the previous setting item, press . Example: When [FRONT ALL] is selected as the reference point. 2 Measure the distances from the center of the currently set listening position to every speaker, the delay...
... volume knob to enter [FUNCTION]. 2 Turn the volume knob to select an item ( 28), then press the knob. 3 Repeat step 2 until the desired item is selected for [REAR] of [SPEAKER SIZE]. To return to the previous setting item, press . Example: When [FRONT ALL] is selected as the reference point. 2 Measure the distances from the center of the currently set listening position to every speaker, the delay...
Instruction manual
Page 33
... on the display is set to assign. Playback order is generated. Turn the power on the display. To return to select [YES], then press the knob. TROUBLESHOOTING Symptom Sound cannot be reset. Clean the connectors. ( 32) Reset the unit. ( 3) Setting/deleting the remote control ID is not compatible, learning may take some time to another track or change the disc. LEARNING STEERING REMOTE CONTROL (for details. A list of the speaker wires are...
... on the display is set to assign. Playback order is generated. Turn the power on the display. To return to select [YES], then press the knob. TROUBLESHOOTING Symptom Sound cannot be reset. Clean the connectors. ( 32) Reset the unit. ( 3) Setting/deleting the remote control ID is not compatible, learning may take some time to another track or change the disc. LEARNING STEERING REMOTE CONTROL (for details. A list of the speaker wires are...

Instruction manual
Page 34
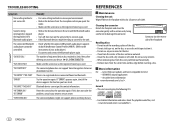
... Remedy • Sound cannot be displayed correctly. "ANDROID ERROR"/ "NA DEVICE" • Reconnect the Android device. • Restart the Android device. Turn change the source to another turn the power off and unplug the USB device. If this does not solve the problem, the connected Android device does not support [BROWSE MODE]. ( 33) Playback is compatible with source. another USB device. • "USB ERROR" appears "NO MUSIC" Connect a USB device that...
... Remedy • Sound cannot be displayed correctly. "ANDROID ERROR"/ "NA DEVICE" • Reconnect the Android device. • Restart the Android device. Turn change the source to another turn the power off and unplug the USB device. If this does not solve the problem, the connected Android device does not support [BROWSE MODE]. ( 33) Playback is compatible with source. another USB device. • "USB ERROR" appears "NO MUSIC" Connect a USB device that...
Instruction manual
Page 36
... controlled. • Check whether the connected Bluetooth audio player supports Audio/Video Remote Control Profile (AVRCP). (Refer to the unit. More information For: - Bluetooth® "DEVICE FULL" The number of your nearest service center. Latest firmware updates and latest compatible item list - on the disc, or use any solvents. • When removing discs from this does not solve the problem, consult your audio player.) • Disconnect and connect the Bluetooth player again. TROUBLESHOOTING...
... controlled. • Check whether the connected Bluetooth audio player supports Audio/Video Remote Control Profile (AVRCP). (Refer to the unit. More information For: - Bluetooth® "DEVICE FULL" The number of your nearest service center. Latest firmware updates and latest compatible item list - on the disc, or use any solvents. • When removing discs from this does not solve the problem, consult your audio player.) • Disconnect and connect the Bluetooth player again. TROUBLESHOOTING...

Instruction manual
Page 39
... prevent short circuit: - See Wiring connection ( 37). 3 Install the unit to turn on the power. 6 Detach the faceplate and reset the unit. ( 3) ENGLISH 35 REFERENCES Source name Display information / / STANDBY RADIO Source name (*2) Clock (back to the beginning) Frequency (*2) Clock (back to the beginning) (For FM Radio Broadcast Data System stations/FM Radio Data System stations only) Station name (*2) Radio text Radio text+ Title/Artist Frequency Clock (back to the...
... prevent short circuit: - See Wiring connection ( 37). 3 Install the unit to turn on the power. 6 Detach the faceplate and reset the unit. ( 3) ENGLISH 35 REFERENCES Source name Display information / / STANDBY RADIO Source name (*2) Clock (back to the beginning) Frequency (*2) Clock (back to the beginning) (For FM Radio Broadcast Data System stations/FM Radio Data System stations only) Station name (*2) Radio text Radio text+ Title/Artist Frequency Clock (back to the...


