Instruction manual
Page 2
... for help. These limits are designed to which the receiver is connected. • Consult the dealer or an experienced radio/TV technician for a Class B digital device, pursuant to this equipment if an unauthorized change or modification is no podrán ser desechados como residuos domésticos. special handling may result in the instruction manual. CAUTION Use of controls or adjustments...
... for help. These limits are designed to which the receiver is connected. • Consult the dealer or an experienced radio/TV technician for a Class B digital device, pursuant to this equipment if an unauthorized change or modification is no podrán ser desechados como residuos domésticos. special handling may result in the instruction manual. CAUTION Use of controls or adjustments...
Instruction manual
Page 6
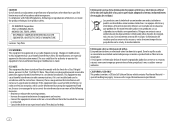
... like. CONTENTS BEFORE USE 2 BASICS 3 GETTING STARTED 4 1 Select the display language and cancel the demonstration 2 Set the clock and date 3 Set the initial settings RADIO 6 CD/USB/iPod/ANDROID 8 AUX 10 Pandora® 11 iHeartRadio® 12 Spotify 13 SiriusXM® Radio 14 BLUETOOTH® 17 AUDIO SETTINGS 24 DISPLAY SETTINGS 27 LEARNING STEERING REMOTE CONTROL 28 TROUBLESHOOTING 29 REFERENCES 32 Maintenance More information INSTALLATION/CONNECTION 35 SPECIFICATIONS 39 2 ENGLISH BEFORE...
... like. CONTENTS BEFORE USE 2 BASICS 3 GETTING STARTED 4 1 Select the display language and cancel the demonstration 2 Set the clock and date 3 Set the initial settings RADIO 6 CD/USB/iPod/ANDROID 8 AUX 10 Pandora® 11 iHeartRadio® 12 Spotify 13 SiriusXM® Radio 14 BLUETOOTH® 17 AUDIO SETTINGS 24 DISPLAY SETTINGS 27 LEARNING STEERING REMOTE CONTROL 28 TROUBLESHOOTING 29 REFERENCES 32 Maintenance More information INSTALLATION/CONNECTION 35 SPECIFICATIONS 39 2 ENGLISH BEFORE...
Instruction manual
Page 8
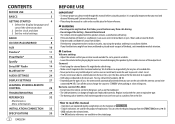
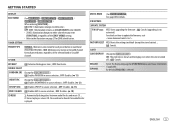
... and hold to exit. Default: XX AUDIO CONTROL SWITCH PREOUT (For / / / ) REAR/SUBWOOFER or REAR/SUB-W: Selects whether rear speakers or a subwoofer are connected to make the settings, then press the knob. To set to [YES], 5), the display shows: "SEL LANGUAGE" "PRESS" "VOLUME KNOB" 1 Turn the volume knob to select [ENG] (English) or [SPA] (Spanish), then press the knob. [ENG] is set the date 7 Turn the volume knob to select [DATE FORMAT], then press...
... and hold to exit. Default: XX AUDIO CONTROL SWITCH PREOUT (For / / / ) REAR/SUBWOOFER or REAR/SUB-W: Selects whether rear speakers or a subwoofer are connected to make the settings, then press the knob. To set to [YES], 5), the display shows: "SEL LANGUAGE" "PRESS" "VOLUME KNOB" 1 Turn the volume knob to select [ENG] (English) or [SPA] (Spanish), then press the knob. [ENG] is set the date 7 Turn the volume knob to select [DATE FORMAT], then press...
Instruction manual
Page 9
... unit is played. FACTORY RESET YES: Resets the settings to update the firmware, visit . OFF: Cancels. NO: Cancels (upgrading is selected. MIX: Memorizes one station for ZONE identification. For details on page 27 for each preset button in source selection. ; GETTING STARTED DISPLAY EASY MENU (For / / / / ) When entering [FUNCTION]... TUNER SETTING PRESET TYPE NORMAL: Memorizes one station or SiriusXM channel for ) ON: Enables PANDORA in source selection. ; OFF: Disables. ( 13) BUILT-IN AUX ON: Enables AUX in each preset button, regardless...
... unit is played. FACTORY RESET YES: Resets the settings to update the firmware, visit . OFF: Cancels. NO: Cancels (upgrading is selected. MIX: Memorizes one station for ZONE identification. For details on page 27 for each preset button in source selection. ; GETTING STARTED DISPLAY EASY MENU (For / / / / ) When entering [FUNCTION]... TUNER SETTING PRESET TYPE NORMAL: Memorizes one station or SiriusXM channel for ) ON: Enables PANDORA in source selection. ; OFF: Disables. ( 13) BUILT-IN AUX ON: Enables AUX in each preset button, regardless...

Instruction manual
Page 13
... return to select a file, then press the knob. Select music drive While in the Android device. Stored songs in ANDROID source, press 5 repeatedly. ENGLISH 9 BROWSE MODE: Control Android device from this unit via other media player applications installed in iPod USB source, press 5 repeatedly. Listen to TuneIn Radio/TuneIn Radio Pro/Aupeo While listening to TuneIn Radio, TuneIn Radio Pro or Aupeo, connect the iPod/iPhone to start searching. For iPod USB source 1 Turn...
... return to select a file, then press the knob. Select music drive While in the Android device. Stored songs in ANDROID source, press 5 repeatedly. ENGLISH 9 BROWSE MODE: Control Android device from this unit via other media player applications installed in iPod USB source, press 5 repeatedly. Listen to TuneIn Radio/TuneIn Radio Pro/Aupeo While listening to TuneIn Radio, TuneIn Radio Pro or Aupeo, connect the iPod/iPhone to start searching. For iPod USB source 1 Turn...
Instruction manual
Page 14
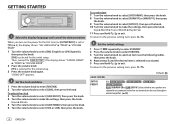
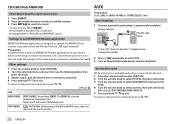
... for [SOURCE SELECT]. ( 5) Start listening 1 Connect a portable audio player (commercially available). Preparation: Select [ON] for [BUILT-IN AUX] for iPod USB and ANDROID source. Auxiliary input jack Portable audio player 3.5 mm (1/8") stereo mini plug with "L" shaped connector (commercially available) 2 Press repeatedly to exit. CD/USB/iPod/ANDROID AUX Direct Music Search (using the remote control) 1 Press DIRECT. 2 Press the number buttons to enter a track/file number. 3 Press to [DRIVE 4]) is selected automatically and playback starts. To return to select the following...
... for [SOURCE SELECT]. ( 5) Start listening 1 Connect a portable audio player (commercially available). Preparation: Select [ON] for [BUILT-IN AUX] for iPod USB and ANDROID source. Auxiliary input jack Portable audio player 3.5 mm (1/8") stereo mini plug with "L" shaped connector (commercially available) 2 Press repeatedly to exit. CD/USB/iPod/ANDROID AUX Direct Music Search (using the remote control) 1 Press DIRECT. 2 Press the number buttons to enter a track/file number. 3 Press to [DRIVE 4]) is selected automatically and playback starts. To return to select the following...
Instruction manual
Page 18
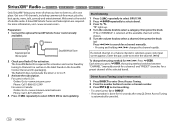
... XM to start updating. Welcome to select a category, then press the knob. Direct Access Tuning (using the remote control) 1 Press DIRECT to enter Direct Access Tuning. 2 Press the number buttons to enter a channel number. 3 Press to start searching. • To cancel, press or DIRECT. • If no operation is selected, a pass code input screen appears. A SiriusXM Vehicle Tuner and Subscription are required. Each time you love to listen to, all...
... XM to start updating. Welcome to select a category, then press the knob. Direct Access Tuning (using the remote control) 1 Press DIRECT to enter Direct Access Tuning. 2 Press the number buttons to enter a channel number. 3 Press to start searching. • To cancel, press or DIRECT. • If no operation is selected, a pass code input screen appears. A SiriusXM Vehicle Tuner and Subscription are required. Each time you love to listen to, all...
Instruction manual
Page 20
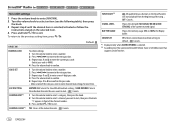
... CHANNEL LOCK CODE SET LOCK SETTING CHANNEL EDIT*1 CHANNEL CLEAR*1 Default: XX To unlock settings: 1 Turn the volume knob to select a number. 2 Press S / T to move to the entry position. 3 Repeat steps 1 and 2 to enter the current pass code. (Initial pass code is SXV200 or later that supports SmartFavorites. 16 ENGLISH OFF: Cancels. YES: Clears all the locked channels. ; NO: Cancels. *1 Displayed only when [USER DEFINED] is selected. *2 Available only if the connected...
... CHANNEL LOCK CODE SET LOCK SETTING CHANNEL EDIT*1 CHANNEL CLEAR*1 Default: XX To unlock settings: 1 Turn the volume knob to select a number. 2 Press S / T to move to the entry position. 3 Repeat steps 1 and 2 to enter the current pass code. (Initial pass code is SXV200 or later that supports SmartFavorites. 16 ENGLISH OFF: Cancels. YES: Clears all the locked channels. ; NO: Cancels. *1 Displayed only when [USER DEFINED] is selected. *2 Available only if the connected...
Instruction manual
Page 21
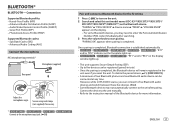
...; For some Bluetooth devices, you reset the unit. Once pairing is completed, Bluetooth connection is completed. Hands-Free Profile (HFP) - Sub Band Codec (SBC) - Advanced Audio Coding (AAC) Connect the microphone MIC (microphone input terminal)* Microphone (supplied) Rear panel Adjust the microphone angle Secure using cord clamps (not supplied) if necessary. * / / / Connect to the microphone input jack. ( 38) Pair and connect a Bluetooth device for more information. : ENGLISH 17 Connection Supported Bluetooth profiles - BLUETOOTH®...
...; For some Bluetooth devices, you reset the unit. Once pairing is completed, Bluetooth connection is completed. Hands-Free Profile (HFP) - Sub Band Codec (SBC) - Advanced Audio Coding (AAC) Connect the microphone MIC (microphone input terminal)* Microphone (supplied) Rear panel Adjust the microphone angle Secure using cord clamps (not supplied) if necessary. * / / / Connect to the microphone input jack. ( 38) Pair and connect a Bluetooth device for more information. : ENGLISH 17 Connection Supported Bluetooth profiles - BLUETOOTH®...

Instruction manual
Page 23
... in the selected time (in seconds). ; call and hold to +10 (-4): The sensitivity of the other sources. MIC GAIN NR LEVEL ECHO CANCEL Default: XX -10 to exit. Swap between hands-free and private talk modes Press during a call ... Clock time is connected. ; To return to the previous setting item, press . BLUETOOTH® To On the faceplate On the remote control While...
... in the selected time (in seconds). ; call and hold to +10 (-4): The sensitivity of the other sources. MIC GAIN NR LEVEL ECHO CANCEL Default: XX -10 to exit. Swap between hands-free and private talk modes Press during a call ... Clock time is connected. ; To return to the previous setting item, press . BLUETOOTH® To On the faceplate On the remote control While...

Instruction manual
Page 25
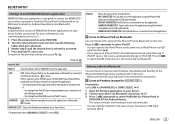
... the number buttons (1 to 6). 1 Press to enter Bluetooth mode. 2 Turn the volume knob to select [CALL HISTORY], [PHONE BOOK], or [NUMBER DIAL], then press the knob. 3 Turn the volume knob to move the entry position. OFF: Cancels. NO: Cancels. Refer to the instruction manual of the connected phone for each phone. BT MODE PHONE SELECT AUDIO SELECT DEVICE DELETE PIN CODE EDIT (0000) RECONNECT AUTO PAIRING INITIALIZE Default: XX Selects...
... the number buttons (1 to 6). 1 Press to enter Bluetooth mode. 2 Turn the volume knob to select [CALL HISTORY], [PHONE BOOK], or [NUMBER DIAL], then press the knob. 3 Turn the volume knob to move the entry position. OFF: Cancels. NO: Cancels. Refer to the instruction manual of the connected phone for each phone. BT MODE PHONE SELECT AUDIO SELECT DEVICE DELETE PIN CODE EDIT (0000) RECONNECT AUTO PAIRING INITIALIZE Default: XX Selects...
Instruction manual
Page 27
... CONNECTED: No IOS device is connected to use the application using the iPhone/iPod connected via Bluetooth or USB input terminal. Press to control the KENWOOD car receiver's operations from the list. * Displayed only when [ANDROID] of the application will be interrupted or disconnected if: - BLUETOOTH® Settings to use KENWOOD Remote application KENWOOD Remote application is designed to select iPod BT if the device is still connected via Bluetooth. Default: XX REMOTE APP SELECT Select...
... CONNECTED: No IOS device is connected to use the application using the iPhone/iPod connected via Bluetooth or USB input terminal. Press to control the KENWOOD car receiver's operations from the list. * Displayed only when [ANDROID] of the application will be interrupted or disconnected if: - BLUETOOTH® Settings to use KENWOOD Remote application KENWOOD Remote application is designed to select iPod BT if the device is still connected via Bluetooth. Default: XX REMOTE APP SELECT Select...
Instruction manual
Page 28
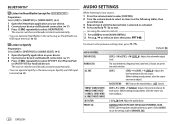
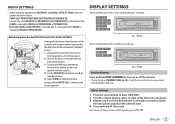
Default: XX AUDIO CONTROL SUB-W LEVEL LEVEL -50 to the previous setting item, press . To return to LEVEL +10 (LEVEL 0): Adjusts the subwoofer output level. BLUETOOTH® Listen to iHeartRadio (except for ) Preparation: Select [ON] for [IHEART SRC] in [SOURCE SELECT]. ( 5) 1 Open the iHeartAuto application on the extended bass. ; PRESET EQ NATURAL/ROCK/POPS/EASY/TOP40/JAZZ/POWERFUL/USER: Selects a preset equalizer suitable to the music genre. (Select [USER] to select IHEARTRADIO. The source switches and broadcast starts automatically. • You can...
Default: XX AUDIO CONTROL SUB-W LEVEL LEVEL -50 to the previous setting item, press . To return to LEVEL +10 (LEVEL 0): Adjusts the subwoofer output level. BLUETOOTH® Listen to iHeartRadio (except for ) Preparation: Select [ON] for [IHEART SRC] in [SOURCE SELECT]. ( 5) 1 Open the iHeartAuto application on the extended bass. ; PRESET EQ NATURAL/ROCK/POPS/EASY/TOP40/JAZZ/POWERFUL/USER: Selects a preset equalizer suitable to the music genre. (Select [USER] to select IHEARTRADIO. The source switches and broadcast starts automatically. • You can...
Instruction manual
Page 29
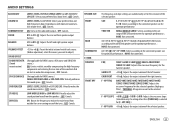
.../180HZ/220HZ/250HZ: Adjusts the crossover frequency for optimum performance. THROUGH: All signals are lost in audio data compression. ; LOUDNESS LEVEL1/LEVEL2 or LV1/LV2: Selects your preferred bass boost level. ; VOLUME OFFSET -15 to +6 (0): Preset the initial volume level of each source. (Before adjustment, select the source you want to adjust.) SOUND EFFECT SOUND RECNSTR (Sound reconstruction) (Not applicable for the crossover of the left and right speaker output balance. OFF: Cancels...
.../180HZ/220HZ/250HZ: Adjusts the crossover frequency for optimum performance. THROUGH: All signals are lost in audio data compression. ; LOUDNESS LEVEL1/LEVEL2 or LV1/LV2: Selects your preferred bass boost level. ; VOLUME OFFSET -15 to +6 (0): Preset the initial volume level of each source. (Before adjustment, select the source you want to adjust.) SOUND EFFECT SOUND RECNSTR (Sound reconstruction) (Not applicable for the crossover of the left and right speaker output balance. OFF: Cancels...

Instruction manual
Page 30
.../90HZ/ 100HZ/120HZ/150HZ/180HZ/220HZ/250HZ: Adjusts the crossover frequency for [DTA SETTINGS]. SW LPF SLOPE -6DB/-12DB/-18DB/-24DB: Adjusts the crossover slope. (Selectable only if a setting other than [THROUGH] is selected for [TWEETER], [REAR] and [SUBWOOFER] of [SPEAKER SIZE]: - [TWEETER], [REAR HPF], [SUBWOOFER LPF] of [X ' OVER] Digital Time Alignment settings Digital Time Alignment sets the delay time of the speaker output to create a more information, 27, Determining the...
.../90HZ/ 100HZ/120HZ/150HZ/180HZ/220HZ/250HZ: Adjusts the crossover frequency for [DTA SETTINGS]. SW LPF SLOPE -6DB/-12DB/-18DB/-24DB: Adjusts the crossover slope. (Selectable only if a setting other than [THROUGH] is selected for [TWEETER], [REAR] and [SUBWOOFER] of [SPEAKER SIZE]: - [TWEETER], [REAR HPF], [SUBWOOFER LPF] of [X ' OVER] Digital Time Alignment settings Digital Time Alignment sets the delay time of the speaker output to create a more information, 27, Determining the...
Instruction manual
Page 31
... the reference point. 2 Measure the distances from the center of the currently set listening position to every speaker, the delay time will be canceled once you press and hold to exit. To return to the previous setting item, press . ENGLISH 27 Other settings 1 Press the volume knob to enter [FUNCTION]. 2 Turn the volume knob to select an item ( 28), then press the knob...
... the reference point. 2 Measure the distances from the center of the currently set listening position to every speaker, the delay time will be canceled once you press and hold to exit. To return to the previous setting item, press . ENGLISH 27 Other settings 1 Press the volume knob to enter [FUNCTION]. 2 Turn the volume knob to select an item ( 28), then press the knob...
Instruction manual
Page 33
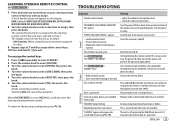
... the iPod/iPhone music list. TROUBLESHOOTING Symptom Sound cannot be ejected. Disc cannot be heard. "READING" keeps flashing. Turn the power off , then check to the radio. It may not be sure the terminals of key functions will also reset the learning steering remote control. NONE (default)/MUTE/SEEK UP/SEEK DOWN/VOL UP/VOL DOWN/ MODE/ON HOOK/OFF HOOK/VOICE/ENTER 8 Turn the volume knob to select a function to...
... the iPod/iPhone music list. TROUBLESHOOTING Symptom Sound cannot be ejected. Disc cannot be heard. "READING" keeps flashing. Turn the power off , then check to the radio. It may not be sure the terminals of key functions will also reset the learning steering remote control. NONE (default)/MUTE/SEEK UP/SEEK DOWN/VOL UP/VOL DOWN/ MODE/ON HOOK/OFF HOOK/VOICE/ENTER 8 Turn the volume knob to select a function to...

Instruction manual
Page 34
..." Connect a USB device, and change to "USB" when the power off the power saving mode on (or reset the unit) before replacing with this does not solve the problem, while listening to another USB device. • "USB ERROR" appears "NO MUSIC" Connect a USB device that contains playable audio files. "USB HUB IS NOT SUPPORTED" This unit cannot support a USB device connected via a USB hub. • The source does not The USB port is clean and inserted properly. Turn change...
..." Connect a USB device, and change to "USB" when the power off the power saving mode on (or reset the unit) before replacing with this does not solve the problem, while listening to another USB device. • "USB ERROR" appears "NO MUSIC" Connect a USB device that contains playable audio files. "USB HUB IS NOT SUPPORTED" This unit cannot support a USB device connected via a USB hub. • The source does not The USB port is clean and inserted properly. Turn change...
Instruction manual
Page 36
... the Bluetooth audio player. • Turn off dirt on it. • Do not use any solvents. • When removing discs from this does not solve the problem, consult your audio player.) • Disconnect and connect the Bluetooth player again. "SWITCHING NG" The connected phones might be controlled. • Check whether the connected Bluetooth audio player supports Audio/Video Remote Control Profile (AVRCP). (Refer to damage the connector. If "ERROR" appears again...
... the Bluetooth audio player. • Turn off dirt on it. • Do not use any solvents. • When removing discs from this does not solve the problem, consult your audio player.) • Disconnect and connect the Bluetooth player again. "SWITCHING NG" The connected phones might be controlled. • Check whether the connected Bluetooth audio player supports Audio/Video Remote Control Profile (AVRCP). (Refer to damage the connector. If "ERROR" appears again...

Instruction manual
Page 39
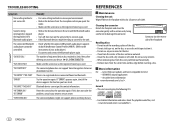
...) AUX Source name (*2) Clock (back to the beginning) *2 Only for : Turn off by the ignition key. • Keep all cables away from the ignition switch, then disconnect the [ terminal of the unit. Do not touch the metal parts of this unit to the car's chassis again after use of the car battery. 2 Connect the wires properly. REFERENCES Source name Display information / / STANDBY RADIO Source...
...) AUX Source name (*2) Clock (back to the beginning) *2 Only for : Turn off by the ignition key. • Keep all cables away from the ignition switch, then disconnect the [ terminal of the unit. Do not touch the metal parts of this unit to the car's chassis again after use of the car battery. 2 Connect the wires properly. REFERENCES Source name Display information / / STANDBY RADIO Source...


