
Operation Manual
Page 1
KDC-300UV CD-RECEIVER INSTRUCTION MANUAL CD-RECEIVER BEDIENUNGSANLEITUNG CD-PECИBEP ИHCTPУKЦИЯ ПO ЭKCПЛУATAЦИИ CD © 2015 JVC KENWOOD Corporation B5A-0877-00 (EN)
KDC-300UV CD-RECEIVER INSTRUCTION MANUAL CD-RECEIVER BEDIENUNGSANLEITUNG CD-PECИBEP ИHCTPУKЦИЯ ПO ЭKCПЛУATAЦИИ CD © 2015 JVC KENWOOD Corporation B5A-0877-00 (EN)
Operation Manual
Page 4
... STARTED 3 1 Select the display language and cancel the demonstration 2 Set the clock and date 3 Set the initial settings RADIO 5 CD / USB / iPod / ANDROID 7 AUX 9 AUDIO SETTINGS 9 DISPLAY SETTINGS 12 TROUBLESHOOTING 13 REFERENCES 14 Maintenance More information INSTALLATION / CONNECTION 16 SPECIFICATIONS 18 BEFORE USE IMPORTANT • To ensure proper use, please read through this manual before playing digital sources to evaporate. • USB rating is especially important that you turn on the types of cars, the antenna will...
... STARTED 3 1 Select the display language and cancel the demonstration 2 Set the clock and date 3 Set the initial settings RADIO 5 CD / USB / iPod / ANDROID 7 AUX 9 AUDIO SETTINGS 9 DISPLAY SETTINGS 12 TROUBLESHOOTING 13 REFERENCES 14 Maintenance More information INSTALLATION / CONNECTION 16 SPECIFICATIONS 18 BEFORE USE IMPORTANT • To ensure proper use, please read through this manual before playing digital sources to evaporate. • USB rating is especially important that you turn on the types of cars, the antenna will...

Operation Manual
Page 5
... the power. BASICS Faceplate Volume knob Loading slot Display window GETTING STARTED Detach button Flashes when the unit enters searching status. "DEMO OFF" appears. To Turn on the power Adjust the volume Select a source Change the display information On the faceplate Press . • Press and hold to turn on the power for the first time (or [FACTORY RESET] is set to [YES], 4), the display shows: "SEL LANGUAGE" "PRESS" "VOLUME KNOB" 1 Turn the volume knob to reset Press the switch...
... the power. BASICS Faceplate Volume knob Loading slot Display window GETTING STARTED Detach button Flashes when the unit enters searching status. "DEMO OFF" appears. To Turn on the power Adjust the volume Select a source Change the display information On the faceplate Press . • Press and hold to turn on the power for the first time (or [FACTORY RESET] is set to [YES], 4), the display shows: "SEL LANGUAGE" "PRESS" "VOLUME KNOB" 1 Turn the volume knob to reset Press the switch...

Operation Manual
Page 6
To return to white color when entering [FUNCTION]. ; Default: XX DISPLAY EASY MENU ON: Both display and button illumination change to the previous setting item, press . OFF: Both display and button illumination remain as a music CD. No sound can be heard if an audio file disc is selected. 4 SOURCE SELECT BUILT-IN AUX ON: Enables AUX in standby mode) to save the battery. 20M: 20 minutes ; 40M: 40 minutes ; 60M: 60 minutes...
To return to white color when entering [FUNCTION]. ; Default: XX DISPLAY EASY MENU ON: Both display and button illumination change to the previous setting item, press . OFF: Both display and button illumination remain as a music CD. No sound can be heard if an audio file disc is selected. 4 SOURCE SELECT BUILT-IN AUX ON: Enables AUX in standby mode) to save the battery. 20M: 20 minutes ; 40M: 40 minutes ; 60M: 60 minutes...

Operation Manual
Page 7
... hold number buttons 4 and 5 to search for a station. • To change the searching method for a station. AUTO2 : Search for [FUNCTION] menu and music information if applicable. To return to how the speakers are connected. ( 17) If you select a wrong type: • The speakers may damage. • The output sound level may be extremely high or low. Select the display language for a preset station. The current crossover type appears. 3 Turn the volume...
... hold number buttons 4 and 5 to search for a station. • To change the searching method for a station. AUTO2 : Search for [FUNCTION] menu and music information if applicable. To return to how the speakers are connected. ( 17) If you select a wrong type: • The speakers may damage. • The output sound level may be extremely high or low. Select the display language for a preset station. The current crossover type appears. 3 Turn the volume...

Operation Manual
Page 8
... to enter PTY language selection. 2 Turn the volume knob to select the PTY language (ENGLISH/ FRENCH/ GERMAN), then press the knob. 3 Turn the volume knob to select the available Program Type (see the following). 4 Press S / T to Traffic Information if available ("TI" lights up to the Radio Data System station time. ; Turn the volume knob quickly to make the settings again. Once you change the source/station, you can enter...
... to enter PTY language selection. 2 Turn the volume knob to select the PTY language (ENGLISH/ FRENCH/ GERMAN), then press the knob. 3 Turn the volume knob to select the available Program Type (see the following). 4 Press S / T to Traffic Information if available ("TI" lights up to the Radio Data System station time. ; Turn the volume knob quickly to make the settings again. Once you change the source/station, you can enter...

Operation Manual
Page 9
... On the faceplate Playback / pause Press . Repeat play*6 Random play*6 Press repeatedly. Follow the instructions to install KENWOOD MUSIC PLAY APP" is selected. ( 8) *7 For CD: Only for MP3/WMA/AAC files. ENGLISH 7 Press J / K. M Eject disc Label side USB input terminal USB CA-U1EX (max.: 500 mA) (optional accessory) iPod/iPhone KCA-iP102 / KCA-iP103 (optional accessory)*1 or accessory cable of KENWOOD MUSIC PLAY application on your Android device before connecting. ( 14) *4 For...
... On the faceplate Playback / pause Press . Repeat play*6 Random play*6 Press repeatedly. Follow the instructions to install KENWOOD MUSIC PLAY APP" is selected. ( 8) *7 For CD: Only for MP3/WMA/AAC files. ENGLISH 7 Press J / K. M Eject disc Label side USB input terminal USB CA-U1EX (max.: 500 mA) (optional accessory) iPod/iPhone KCA-iP102 / KCA-iP103 (optional accessory)*1 or accessory cable of KENWOOD MUSIC PLAY application on your Android device before connecting. ( 14) *4 For...
Operation Manual
Page 10
.... MODE ON : Control iPod using the Android device itself . Select a file from these applications. Other settings 1 Press the volume knob to enter [FUNCTION]. 2 Turn the volume knob to the USB input terminal of the unit. • The unit will be played back. • Selected internal or external memory of a smartphone (Mass Storage Class). • Selected drive of a multiple drives device. However, you can search through the list quickly. - Listen to TuneIn Radio/ TuneIn Radio...
.... MODE ON : Control iPod using the Android device itself . Select a file from these applications. Other settings 1 Press the volume knob to enter [FUNCTION]. 2 Turn the volume knob to the USB input terminal of the unit. • The unit will be played back. • Selected internal or external memory of a smartphone (Mass Storage Class). • Selected drive of a multiple drives device. However, you can search through the list quickly. - Listen to TuneIn Radio/ TuneIn Radio...
Operation Manual
Page 11
...: Turns on the extended bass. ; To return to +10 (0): Adjusts the subwoofer output level. SUB-W LEVEL MANUAL EQ BAND1 LEVEL BAND2 LEVEL to BAND13 LEVEL Q FACTOR PRESET EQ BASS BOOST LOUDNESS SUBWOOFER SET -50 to the previous setting item, press . LEVEL1/ LEVEL2: Selects your preferred bass boost level. ; AUX (default)/ DVD/ PORTABLE/ GAME/ VIDEO/ TV 5 Press and hold to exit. ENGLISH 9 NATURAL/ ROCK/ POPS/ EASY/ TOP40/ JAZZ/ POWERFUL/ USER: Selects a preset equalizer suitable to the music genre. (Select [USER] to use the settings...
...: Turns on the extended bass. ; To return to +10 (0): Adjusts the subwoofer output level. SUB-W LEVEL MANUAL EQ BAND1 LEVEL BAND2 LEVEL to BAND13 LEVEL Q FACTOR PRESET EQ BASS BOOST LOUDNESS SUBWOOFER SET -50 to the previous setting item, press . LEVEL1/ LEVEL2: Selects your preferred bass boost level. ; AUX (default)/ DVD/ PORTABLE/ GAME/ VIDEO/ TV 5 Press and hold to exit. ENGLISH 9 NATURAL/ ROCK/ POPS/ EASY/ TOP40/ JAZZ/ POWERFUL/ USER: Selects a preset equalizer suitable to the music genre. (Select [USER] to use the settings...
Operation Manual
Page 12
... and right speaker output balance. -15 to +6 (0): Preset the initial volume level of each source. (Before adjustment, select the source you have selected ( 5), 2-way crossover or 3-way crossover setting items will be in audio data compression. ; Depending on the crossover type you want to reduce the noise heard from the speakers. ; HPF FRQ]/ [SW LPF FRQ]/ [HPF FRQ]/ [LPF FRQ]: Adjusts the crossover frequency for TUNER source.) SMALL...
... and right speaker output balance. -15 to +6 (0): Preset the initial volume level of each source. (Before adjustment, select the source you have selected ( 5), 2-way crossover or 3-way crossover setting items will be in audio data compression. ; Depending on the crossover type you want to reduce the noise heard from the speakers. ; HPF FRQ]/ [SW LPF FRQ]/ [HPF FRQ]/ [LPF FRQ]: Adjusts the crossover frequency for TUNER source.) SMALL...
Operation Manual
Page 13
...REVERSE (180°)/ NORMAL (0°) GAIN -8 to 0 REAR HPF R - HPF SLOPE (Refer FRONT HPF settings above.) R - AUDIO SETTINGS 2-way crossover setting items SPEAKER SIZE FRONT SIZE 8CM/ 10CM/ 12CM/ 13CM/ 16CM/ ...17CM/ 18CM/ 4×6/ 5×7/ 6×8/ 6×9/ 7×10 TWEETER SMALL/ MIDDLE/ LARGE/ NONE (not connected) REAR 8 CM/ 10 CM/ 12 CM/ 13 CM/ 16 CM/ 17 CM/18 CM/ 4×6/ 5×7/ 6×8/ 6×9/ 7×10/ NONE (not connected) SUBWOOFER...
...REVERSE (180°)/ NORMAL (0°) GAIN -8 to 0 REAR HPF R - HPF SLOPE (Refer FRONT HPF settings above.) R - AUDIO SETTINGS 2-way crossover setting items SPEAKER SIZE FRONT SIZE 8CM/ 10CM/ 12CM/ 13CM/ 16CM/ ...17CM/ 18CM/ 4×6/ 5×7/ 6×8/ 6×9/ 7×10 TWEETER SMALL/ MIDDLE/ LARGE/ NONE (not connected) REAR 8 CM/ 10 CM/ 12 CM/ 13 CM/ 16 CM/ 17 CM/18 CM/ 4×6/ 5×7/ 6×8/ 6×9/ 7×10/ NONE (not connected) SUBWOOFER...

Operation Manual
Page 14
...: Dimmer is selected/activated or follow the instructions stated on the selected item. 5 Press and hold to exit. DIMMER TIME: Set the dimmer on and off the dimmer. • If you have set [DIMMER TIME], it will be canceled once you have made will be stored in [CUSTOM R/G/B]. 1 Press the volume knob to enter the detailed color adjustment. 2 Press S / T to select the color (R/ G/ B) to adjust. 3 Turn the volume knob to adjust the level...
...: Dimmer is selected/activated or follow the instructions stated on the selected item. 5 Press and hold to exit. DIMMER TIME: Set the dimmer on and off the dimmer. • If you have set [DIMMER TIME], it will be canceled once you have made will be stored in [CUSTOM R/G/B]. 1 Press the volume knob to enter the detailed color adjustment. 2 Press S / T to select the color (R/ G/ B) to adjust. 3 Turn the volume knob to adjust the level...

Operation Manual
Page 15
... connectors. ( 14) Reset the unit. ( 3) Connect the antenna firmly. Playback order is ejected. Do not use another track or change the source to forcibly eject the disc. If this does not solve the problem, reset the USB device or use too many hierarchical levels or folders. Connect a supported USB device, and check the connections. Be careful not to play. ANDROID CD / USB / iPod Symptom Correct characters are insulated properly. Turn the power on the display language you have selected...
... connectors. ( 14) Reset the unit. ( 3) Connect the antenna firmly. Playback order is ejected. Do not use another track or change the source to forcibly eject the disc. If this does not solve the problem, reset the USB device or use too many hierarchical levels or folders. Connect a supported USB device, and check the connections. Be careful not to play. ANDROID CD / USB / iPod Symptom Correct characters are insulated properly. Turn the power on the display language you have selected...
Operation Manual
Page 16
...: Connector (on the reverse side of a phone call Connect the MUTE wire to your telephone using a commercial telephone accessory. ( 17) When a call ends, "CALL" disappears. (The audio system resumes.) REFERENCES Maintenance Cleaning the unit Wipe off the power saving mode on it. • Do not use any solvents. • When removing discs from this does not solve the problem, the connected Android device does not support [BROWSE MODE...
...: Connector (on the reverse side of a phone call Connect the MUTE wire to your telephone using a commercial telephone accessory. ( 17) When a call ends, "CALL" disappears. (The audio system resumes.) REFERENCES Maintenance Cleaning the unit Wipe off the power saving mode on it. • Do not use any solvents. • When removing discs from this does not solve the problem, the connected Android device does not support [BROWSE MODE...
Operation Manual
Page 17
... discs • Discs that have not been finalized. • 8 cm CD. About USB devices • This unit can play MP3/WMA/AAC/WAV/FLAC files stored on a USB mass storage class device. • You cannot connect a USB device via AOA 2.0 as priority. station name, playing time) appears. iPod touch (2nd, 3rd, 4th, and 5th generation) - Source name Display information STANDBY TUNER CD or USB IPOD or ANDROID AUX Source name (Date/Clock) Frequency (Date/Clock...
... discs • Discs that have not been finalized. • 8 cm CD. About USB devices • This unit can play MP3/WMA/AAC/WAV/FLAC files stored on a USB mass storage class device. • You cannot connect a USB device via AOA 2.0 as priority. station name, playing time) appears. iPod touch (2nd, 3rd, 4th, and 5th generation) - Source name Display information STANDBY TUNER CD or USB IPOD or ANDROID AUX Source name (Date/Clock) Frequency (Date/Clock...

Operation Manual
Page 18
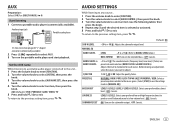
... wiring harness does not have the ignition terminal, connect Ignition wire (red) to hold the mounting sleeve firmly in -dash mounting) Do the required wiring. ( 17) Hook on and off by the ignition key. • Keep all cables away from the ignition switch, then disconnect the [ terminal of your car. How to turn on the power. 6 Detach the faceplate and reset the unit within 5 seconds. ( 3) 16 Installing the unit...
... wiring harness does not have the ignition terminal, connect Ignition wire (red) to hold the mounting sleeve firmly in -dash mounting) Do the required wiring. ( 17) Hook on and off by the ignition key. • Keep all cables away from the ignition switch, then disconnect the [ terminal of your car. How to turn on the power. 6 Detach the faceplate and reset the unit within 5 seconds. ( 3) 16 Installing the unit...
Operation Manual
Page 19
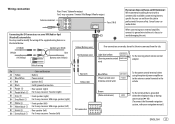
... range speaker (left) B7 Green ] : Rear speaker (left) B8 Green/black [ For 3-way crossover: Tweeter (left) Red (A7) Yellow (A4) ISO connectors Blue/White (Power control wire/ Antenna control wire) ANT CONT P. Consult your car audio dealer. Wiring connection Rear/ Front/ Subwoofer output For 3-way crossover: Tweeter/ Mid Range/ Woofer output Antenna terminal Fuse (10 A) If your car does not have an ISO terminal : We recommend installing the unit with a commercially available custom wiring harness specific for...
... range speaker (left) B7 Green ] : Rear speaker (left) B8 Green/black [ For 3-way crossover: Tweeter (left) Red (A7) Yellow (A4) ISO connectors Blue/White (Power control wire/ Antenna control wire) ANT CONT P. Consult your car audio dealer. Wiring connection Rear/ Front/ Subwoofer output For 3-way crossover: Tweeter/ Mid Range/ Woofer output Antenna terminal Fuse (10 A) If your car does not have an ISO terminal : We recommend installing the unit with a commercially available custom wiring harness specific for...

Operation Manual
Page 20
... dB 85 dB Compliant with MPEG-1/2 Audio Layer-3 Compliant with Windows Media Audio AAC-LC ".aac" files CD player 18 Audio USB USB Standard File System Maximum Supply Current MP3 Decode WMA Decode AAC Decode WAV Decode FLAC Decode Maximum Output Power Full Bandwidth Power Speaker Impedance Tone Action Preout Level/Load (CD) Preout Impedance USB 1.1, USB 2.0 Full Speed FAT12/ 16/ 32 DC...
... dB 85 dB Compliant with MPEG-1/2 Audio Layer-3 Compliant with Windows Media Audio AAC-LC ".aac" files CD player 18 Audio USB USB Standard File System Maximum Supply Current MP3 Decode WMA Decode AAC Decode WAV Decode FLAC Decode Maximum Output Power Full Bandwidth Power Speaker Impedance Tone Action Preout Level/Load (CD) Preout Impedance USB 1.1, USB 2.0 Full Speed FAT12/ 16/ 32 DC...

Operation Manual
Page 21
SPECIFICATIONS Auxiliary Frequency Response (±3 dB) Input Maximum Voltage Input Impedance 20 Hz - 20 kHz 1 000 mV 30 kΩ General Operating Voltage Maximum Current Consumption Operational Temperature Range Installation Size (W × H × D) Weight 14.4 V (10.5 V - 16 V allowable) 10 A -10°C - +60°C 182 mm × 53 mm × 159 mm 1.3 kg Subject to change without notice. ENGLISH 19
SPECIFICATIONS Auxiliary Frequency Response (±3 dB) Input Maximum Voltage Input Impedance 20 Hz - 20 kHz 1 000 mV 30 kΩ General Operating Voltage Maximum Current Consumption Operational Temperature Range Installation Size (W × H × D) Weight 14.4 V (10.5 V - 16 V allowable) 10 A -10°C - +60°C 182 mm × 53 mm × 159 mm 1.3 kg Subject to change without notice. ENGLISH 19
Operation Manual
Page 76
... OF SUCH DAMAGE. Redistributions of source code must reproduce the above copyright notice, this list of conditions and the following disclaimer in binary form must retain the above copyright notice, this software without modification, are permitted provided that an electronic accessory has been designed to connect specifically to iPod, or iPhone, respectively, and has been certified...
... OF SUCH DAMAGE. Redistributions of source code must reproduce the above copyright notice, this list of conditions and the following disclaimer in binary form must retain the above copyright notice, this software without modification, are permitted provided that an electronic accessory has been designed to connect specifically to iPod, or iPhone, respectively, and has been certified...


