
Instruction Manual
Page 2
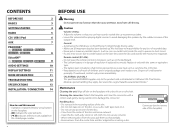
...until ready to evaporate. CONTENTS BEFORE USE 2 BASICS 3 GETTING STARTED 4 RADIO 5 CD / USB / iPod 6 AUX 7 PANDORA® (for KDC-X397 / KDC-355U / KDC-255U / KDC-155U / KMR-355U ) 8 SiriusXM™ (for the disc. • Clean from the center of the disc and move outward. • Clean...in California USA "Perchlorate Material-special handling may apply, See www.dtsc.ca.gov/hazardouswaste/perchlorate." Cleaning the connector: Detach the faceplate and clean the connector with a dry silicon or soft cloth. Caution Volume setting: • Adjust the volume so that ...
...until ready to evaporate. CONTENTS BEFORE USE 2 BASICS 3 GETTING STARTED 4 RADIO 5 CD / USB / iPod 6 AUX 7 PANDORA® (for KDC-X397 / KDC-355U / KDC-255U / KDC-155U / KMR-355U ) 8 SiriusXM™ (for the disc. • Clean from the center of the disc and move outward. • Clean...in California USA "Perchlorate Material-special handling may apply, See www.dtsc.ca.gov/hazardouswaste/perchlorate." Cleaning the connector: Detach the faceplate and clean the connector with a dry silicon or soft cloth. Caution Volume setting: • Adjust the volume so that ...
Instruction Manual
Page 3
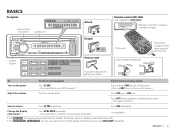
...indd 3 7/26/12 2:00:57 PM Detach button KDC-X397 KDC-355U KDC-255U KDC-155U KMR-355U KDC-MP255U KDC-MP155U How to reset Your preset adjustments will automatically turn off after 20 minutes when in standby mode (Auto Power Off). *2 For KDC-MP255U / KDC-MP155U : You can also select to turn off ...and hold to turn off the power. ( Pressing SRC does not turn on the power. ) Adjust the volume Turn the volume knob. BASICS Faceplate KDC-X397 Volume knob (turn/press) Loading slot Display window Attach Remote control (RC-406) (not supplied for the first time. Press ATT during playback...
...indd 3 7/26/12 2:00:57 PM Detach button KDC-X397 KDC-355U KDC-255U KDC-155U KMR-355U KDC-MP255U KDC-MP155U How to reset Your preset adjustments will automatically turn off after 20 minutes when in standby mode (Auto Power Off). *2 For KDC-MP255U / KDC-MP155U : You can also select to turn off ...and hold to turn off the power. ( Pressing SRC does not turn on the power. ) Adjust the volume Turn the volume knob. BASICS Faceplate KDC-X397 Volume knob (turn/press) Loading slot Display window Attach Remote control (RC-406) (not supplied for the first time. Press ATT during playback...
Instruction Manual
Page 14
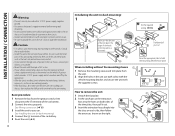
... the unit. 2 Align the holes in parallel. • Mount the unit with one that has the same rating. How to remove the unit 1 Detach the faceplate. 2 Fit the catch pin on the extraction keys into the holes on the right. When installing without the mounting sleeve 1 Remove the mounting sleeve and...
... the unit. 2 Align the holes in parallel. • Mount the unit with one that has the same rating. How to remove the unit 1 Detach the faceplate. 2 Fit the catch pin on the extraction keys into the holes on the right. When installing without the mounting sleeve 1 Remove the mounting sleeve and...
Instruction Manual
Page 15
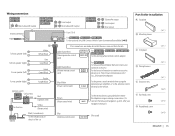
.../SW REAR/SW Wiring connection KDC-255U KDC-155U R L Rear/subwoofer output KDC-MP255U KDC-MP155U KMR-355U R L Front output Rear/subwoofer output KDC-X397 KDC-355U R Subwoofer output Front output L Rear output Antenna terminal Fuse (10 A) For KDC-X397 / KDC-355U / KMR-355U : ...that is grounded when either the telephone rings or during conversation. (To MUTE connect the Kenwood navigation system, refer your navigation manual.) Blue (Antenna control wire) (Not used) ANT CONT Part list for installation A Faceplate B Mounting sleeve ( ×1 ) C Trim plate ( ×1 ) D Wiring...
.../SW REAR/SW Wiring connection KDC-255U KDC-155U R L Rear/subwoofer output KDC-MP255U KDC-MP155U KMR-355U R L Front output Rear/subwoofer output KDC-X397 KDC-355U R Subwoofer output Front output L Rear output Antenna terminal Fuse (10 A) For KDC-X397 / KDC-355U / KMR-355U : ...that is grounded when either the telephone rings or during conversation. (To MUTE connect the Kenwood navigation system, refer your navigation manual.) Blue (Antenna control wire) (Not used) ANT CONT Part list for installation A Faceplate B Mounting sleeve ( ×1 ) C Trim plate ( ×1 ) D Wiring...

