
Instruction Manual
Page 1
...:30 PM Model KDC-X397/ KDC-355U/ KDC-255U/ KDC-155U/ KDC-MP255U/ KDC-MP155U/ KMR-355U Serial number US Residents Only Register Online Register your new CD-receiver. Familiarity with installation and operation procedures will help you call upon your Kenwood dealer for information or service on the warranty card, and in the spaces designated on the product. Refer to read through this instruction manual. For your...
...:30 PM Model KDC-X397/ KDC-355U/ KDC-255U/ KDC-155U/ KDC-MP255U/ KDC-MP155U/ KMR-355U Serial number US Residents Only Register Online Register your new CD-receiver. Familiarity with installation and operation procedures will help you call upon your Kenwood dealer for information or service on the warranty card, and in the spaces designated on the product. Refer to read through this instruction manual. For your...
Instruction Manual
Page 2
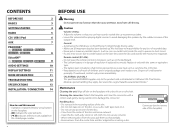
...; Avoid using buttons on the faceplate. • [XX] indicates the selected items. • (« XX) indicates references are available on the laser lens, eject the disc and wait for any accessories for KDC-X397 / KDC-355U / KMR-355U) 8 AUDIO SETTINGS 10 DISPLAY SETTINGS 11 MORE INFORMATION 11 TROUBLESHOOTING 12 SPECIFICATIONS 13 INSTALLATION / CONNECTION 14 How to damage the connector. Cleaning the connector: Detach the faceplate and clean the connector with...
...; Avoid using buttons on the faceplate. • [XX] indicates the selected items. • (« XX) indicates references are available on the laser lens, eject the disc and wait for any accessories for KDC-X397 / KDC-355U / KMR-355U) 8 AUDIO SETTINGS 10 DISPLAY SETTINGS 11 MORE INFORMATION 11 TROUBLESHOOTING 12 SPECIFICATIONS 13 INSTALLATION / CONNECTION 14 How to damage the connector. Cleaning the connector: Detach the faceplate and clean the connector with...
Instruction Manual
Page 3
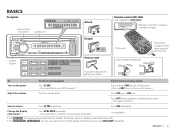
...; Press again to replace the battery To Do this (on the faceplate) Do this (on the remote control) Turn on the power. ) Adjust the volume Turn the volume knob. ENGLISH | 3 EN_KDC-X397[KWK0]f.indd 3 7/26/12 2:00:57 PM Detach button KDC-X397 KDC-355U KDC-255U KDC-155U KMR-355U KDC-MP255U KDC-MP155U How to bright sunlight.) Detach * Not used. Select a source Press L SRC repeatedly. Change the display information*2 Press SCRL DISP...
...; Press again to replace the battery To Do this (on the faceplate) Do this (on the remote control) Turn on the power. ) Adjust the volume Turn the volume knob. ENGLISH | 3 EN_KDC-X397[KWK0]f.indd 3 7/26/12 2:00:57 PM Detach button KDC-X397 KDC-355U KDC-255U KDC-155U KMR-355U KDC-MP255U KDC-MP155U How to bright sunlight.) Detach * Not used. Select a source Press L SRC repeatedly. Change the display information*2 Press SCRL DISP...
Instruction Manual
Page 4
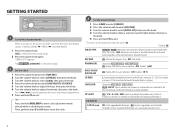
... PANDORA in source selection. ; GETTING STARTED 1 Cancel the demonstration When you turn on the power (or after you reset the unit), the display shows: "CANCEL DEMO" \ "PRESS" \ "VOLUME KNOB" 1 Press the volume knob. [YES] is selected for each preset button in each preset button regardless of the selected band or SiriusXM channel. Press 4 / ¢ to move between audio file disc and music CD. ; 2: Forces to enter clock adjustment mode directly while in clock display screen. OFF: Deactivates...
... PANDORA in source selection. ; GETTING STARTED 1 Cancel the demonstration When you turn on the power (or after you reset the unit), the display shows: "CANCEL DEMO" \ "PRESS" \ "VOLUME KNOB" 1 Press the volume knob. [YES] is selected for each preset button in each preset button regardless of the selected band or SiriusXM channel. Press 4 / ¢ to move between audio file disc and music CD. ; 2: Forces to enter clock adjustment mode directly while in clock display screen. OFF: Deactivates...
Instruction Manual
Page 5
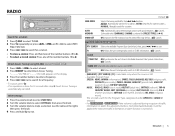
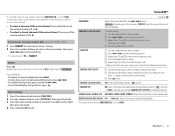
... [MUSIC] if selected. • For KDC-MP255U / KDC-MP155U : If the volume is adjusted during reception of the number buttons (1 to 6) Direct Access Tuning (using RC-406) (except for KMR-355U ) 1 Press *AM- / #FM+ to select a band. 2 Press DIRECT to enter Direct Access Tuning. OFF: Cancels. MANUAL: Manually search for a station. ; OFF: Cancels. AUTO2: Searches for 10 seconds after step 3, Direct Access Tuning is automatically canceled. CLOCK TIME SYNC ON: Synchronizes the unit's time...
... [MUSIC] if selected. • For KDC-MP255U / KDC-MP155U : If the volume is adjusted during reception of the number buttons (1 to 6) Direct Access Tuning (using RC-406) (except for KMR-355U ) 1 Press *AM- / #FM+ to select a band. 2 Press DIRECT to enter Direct Access Tuning. OFF: Cancels. MANUAL: Manually search for a station. ; OFF: Cancels. AUTO2: Searches for 10 seconds after step 3, Direct Access Tuning is automatically canceled. CLOCK TIME SYNC ON: Synchronizes the unit's time...
Instruction Manual
Page 6
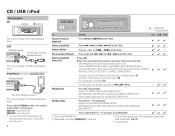
... iPod/iPhone (except for KDC-MP155U ) USB input terminal KCA-iP102 (optional accessory) The source changes to CD and playback starts. MODE ON: From the iPod*1. CD / USB / iPod Start playback CD Label side 0: Eject disc The source changes to iPod and playback starts. from a list 2 Turn the volume knob to make a selection, then press the knob. • MP3/WMA file: Select the desired folder, then a file. • iPod or KENWOOD Music Editor Light (KME Light)/ KENWOOD Music Control...
... iPod/iPhone (except for KDC-MP155U ) USB input terminal KCA-iP102 (optional accessory) The source changes to CD and playback starts. MODE ON: From the iPod*1. CD / USB / iPod Start playback CD Label side 0: Eject disc The source changes to iPod and playback starts. from a list 2 Turn the volume knob to make a selection, then press the knob. • MP3/WMA file: Select the desired folder, then a file. • iPod or KENWOOD Music Editor Light (KME Light)/ KENWOOD Music Control...
Instruction Manual
Page 7
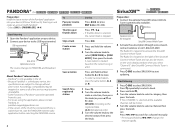
... MUTE wire to your telephone using RC-406) (except for KMR-355U ) 1 Press DIRECT. 2 Press the number buttons to enter a track/file number. 3 Press 4 / ¢ (+) to search for music. • To cancel, press . • Not available if Random Play is selected. • To search for [BUILT-IN AUX] / [BUILTIN AUX]. (« 4) Start listening 1 Connect a portable audio player (commercially available). Auxiliary input jack Portable audio player 3.5 mm (1/8") stereo mini plug with "L" shaped connector...
... MUTE wire to your telephone using RC-406) (except for KMR-355U ) 1 Press DIRECT. 2 Press the number buttons to enter a track/file number. 3 Press 4 / ¢ (+) to search for music. • To cancel, press . • Not available if Random Play is selected. • To search for [BUILT-IN AUX] / [BUILTIN AUX]. (« 4) Start listening 1 Connect a portable audio player (commercially available). Auxiliary input jack Portable audio player 3.5 mm (1/8") stereo mini plug with "L" shaped connector...
Instruction Manual
Page 8
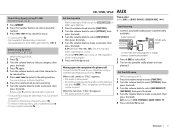
... button (3, 4 or 5). Save a station Press and hold . 4 Turn the volume knob to activate the SiriusXM Connect Vehicle Tuner. The Radio ID is located on the label of the SiriusXM Connect Vehicle Tuner and can also be shown on the unit's display window when you select "Channel 0" after SiriusXM Connect Vehicle Tuner is connected. 3 Press L SRC to select SIRIUS XM to PANDORA and broadcast starts. USB input terminal KCA-iP102 (optional accessory) The source changes...
... button (3, 4 or 5). Save a station Press and hold . 4 Turn the volume knob to activate the SiriusXM Connect Vehicle Tuner. The Radio ID is located on the label of the SiriusXM Connect Vehicle Tuner and can also be shown on the unit's display window when you select "Channel 0" after SiriusXM Connect Vehicle Tuner is connected. 3 Press L SRC to select SIRIUS XM to PANDORA and broadcast starts. USB input terminal KCA-iP102 (optional accessory) The source changes...
Instruction Manual
Page 9
... CHANNEL: Manually search for the 4 / ¢ buttons. CHANNEL LOCK/ CH LOCK To unlock settings: 1 Turn the volume knob to select a number. 2 Press 4 / ¢ to move to the entry position. 3 Repeat steps 1 and 2 to enter a new 4-digit pass code. 4 Press the volume knob to confirm. 5 Repeat steps 1 to 4 to reconfirm the pass code. • Make a note of the number buttons (1 to 6) Direct Access Tuning (using RC-406) (except for KDC...
... CHANNEL: Manually search for the 4 / ¢ buttons. CHANNEL LOCK/ CH LOCK To unlock settings: 1 Turn the volume knob to select a number. 2 Press 4 / ¢ to move to the entry position. 3 Repeat steps 1 and 2 to enter a new 4-digit pass code. 4 Press the volume knob to confirm. 5 Repeat steps 1 to 4 to reconfirm the pass code. • Make a note of the number buttons (1 to 6) Direct Access Tuning (using RC-406) (except for KDC...
Instruction Manual
Page 10
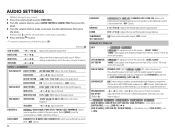
... Default: XX SUB-W LEVEL -15 to +8 (0): Adjusts the level. AUDIO SETTINGS While listening to any source... 1 Press the volume knob to enter [FUNCTION]. 2 Turn the volume knob to select [AUDIO CONTROL]/ [AUDIO CTRL], then press the knob. 3 Turn the volume knob to F15 (0): Adjusts the rear and front speaker output balance. BASS LEVEL MID LEVEL TRE LEVEL -8 to +8 (0): -8 to +8 (0): -8 to +8 (0): Adjusts the level to memorize for [LPF SUBWOOFER]/ [LPF SUB-W].) SUPREME SET ON: Creates realistic sound by interpolating the high-frequency components that...
... Default: XX SUB-W LEVEL -15 to +8 (0): Adjusts the level. AUDIO SETTINGS While listening to any source... 1 Press the volume knob to enter [FUNCTION]. 2 Turn the volume knob to select [AUDIO CONTROL]/ [AUDIO CTRL], then press the knob. 3 Turn the volume knob to F15 (0): Adjusts the rear and front speaker output balance. BASS LEVEL MID LEVEL TRE LEVEL -8 to +8 (0): -8 to +8 (0): -8 to +8 (0): Adjusts the level to memorize for [LPF SUBWOOFER]/ [LPF SUB-W].) SUPREME SET ON: Creates realistic sound by interpolating the high-frequency components that...
Instruction Manual
Page 11
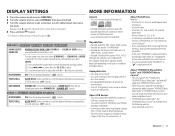
... iPod/iPhone Made for KDC-155U / KDC-MP155U / KMR-355U ) DISP DIMMER ON: Dims the display illumination. ; iPod classic - iPod with database information added using the "KENWOOD Music Editor Light" or "KENWOOD Music Control," you can search for KDC-X397 / KDC-355U / KDC-255U / KDC-MP255U ) COLOR SELECT/ VARIABLE SCAN/ VARI SCAN/ COLOR 01 - About "KENWOOD Music Editor Light" and "KENWOOD Music Control" • This unit supports the PC application "KENWOOD Music Editor Light" and Android™ application "KENWOOD Music Control." • When you use an audio file with video...
... iPod/iPhone Made for KDC-155U / KDC-MP155U / KMR-355U ) DISP DIMMER ON: Dims the display illumination. ; iPod classic - iPod with database information added using the "KENWOOD Music Editor Light" or "KENWOOD Music Control," you can search for KDC-X397 / KDC-355U / KDC-255U / KDC-MP255U ) COLOR SELECT/ VARIABLE SCAN/ VARI SCAN/ COLOR 01 - About "KENWOOD Music Editor Light" and "KENWOOD Music Control" • This unit supports the PC application "KENWOOD Music Editor Light" and Android™ application "KENWOOD Music Control." • When you use an audio file with video...
Instruction Manual
Page 12
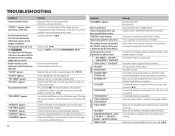
... Auto Power Off function (that contains playable audio files. "TOC ERROR" appears. "NO DEVICE" appears. Connect a USB device that turns the power off , then turn it on your device. Noise is not correct. • Reconnect the iPod. • Reset the iPod. Tracks do not play . Elapsed playing time is generated. Skip to another USB device. The selected channel is mounted outside the vehicle. Make sure the antenna is locked. The unit does not work . • Radio reception is selected for [DEMO MODE...
... Auto Power Off function (that contains playable audio files. "TOC ERROR" appears. "NO DEVICE" appears. Connect a USB device that turns the power off , then turn it on your device. Noise is not correct. • Reconnect the iPod. • Reset the iPod. Tracks do not play . Elapsed playing time is generated. Skip to another USB device. The selected channel is mounted outside the vehicle. Make sure the antenna is locked. The unit does not work . • Radio reception is selected for [DEMO MODE...
Instruction Manual
Page 13
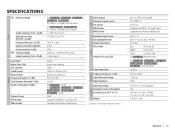
... V to change without notice. USB 1.1, USB 2.0 (Full speed) DC 5 V 1 A FAT16/ 32 Compliant with MPEG-1/2 Audio Layer-3 Compliant with Windows Media Audio CD player General Auxiliary Audio USB USB Standard Maximum Supply Current File System MP3 Decode WMA Decode Maximum Output Power Full Bandwidth Power Speaker Impedance Tone Action Preout Level / Load (CD) Preout Impedance Frequency Response (±3 dB) Input Maximum Voltage Input Impedance Operating Voltage Maximum Current Consumption Installation Size...
... V to change without notice. USB 1.1, USB 2.0 (Full speed) DC 5 V 1 A FAT16/ 32 Compliant with MPEG-1/2 Audio Layer-3 Compliant with Windows Media Audio CD player General Auxiliary Audio USB USB Standard Maximum Supply Current File System MP3 Decode WMA Decode Maximum Output Power Full Bandwidth Power Speaker Impedance Tone Action Preout Level / Load (CD) Preout Impedance Frequency Response (±3 dB) Input Maximum Voltage Input Impedance Operating Voltage Maximum Current Consumption Installation Size...
Instruction Manual
Page 14
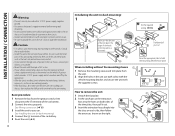
... parts of this unit during and shortly after installation. on the car are working properly. • If the fuse blows, first make sure the wires are not touching car's chassis, then replace the old fuse with the supplied screws. See Installing the unit (in-dash mounting). 4 Connect the · terminal of the car battery. 5 Reset the unit. (« 3) 14 Installating the unit (in the console of your vehicle. See Wiring connection. (« 15) 3 Install the unit...
... parts of this unit during and shortly after installation. on the car are working properly. • If the fuse blows, first make sure the wires are not touching car's chassis, then replace the old fuse with the supplied screws. See Installing the unit (in-dash mounting). 4 Connect the · terminal of the car battery. 5 Reset the unit. (« 3) 14 Installating the unit (in the console of your vehicle. See Wiring connection. (« 15) 3 Install the unit...
Instruction Manual
Page 15
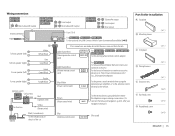
...To MUTE connect the Kenwood navigation system, refer your navigation manual.) Blue (Antenna control wire) (Not used) ANT CONT Part list for installation A Faceplate B Mounting sleeve ( ×1 ) C Trim plate ( ×1 ) D Wiring harness ( ×1 ) E Extraction key F Flat head screw G Round head screw ( ×1 ) ( ×2 ) ( ×4 ) ( ×4 ) ENGLISH | 15 EN_KDC-X397[KWK0]f.indd 15 8/7/12 2:48:16 PM SW FRONT REAR FRONT REAR/SW REAR/SW Wiring connection KDC-255U KDC-155U R L Rear/subwoofer output KDC-MP255U KDC-MP155U KMR-355U R L Front output Rear/subwoofer output...
...To MUTE connect the Kenwood navigation system, refer your navigation manual.) Blue (Antenna control wire) (Not used) ANT CONT Part list for installation A Faceplate B Mounting sleeve ( ×1 ) C Trim plate ( ×1 ) D Wiring harness ( ×1 ) E Extraction key F Flat head screw G Round head screw ( ×1 ) ( ×2 ) ( ×4 ) ( ×4 ) ENGLISH | 15 EN_KDC-X397[KWK0]f.indd 15 8/7/12 2:48:16 PM SW FRONT REAR FRONT REAR/SW REAR/SW Wiring connection KDC-255U KDC-155U R L Rear/subwoofer output KDC-MP255U KDC-MP155U KMR-355U R L Front output Rear/subwoofer output...
Instruction Manual
Page 16
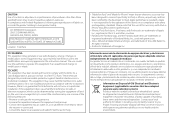
... desechados como residuos domésticos. Location : Top Plate FCC WARNING This equipment may affect wireless performance. • iPhone, iPod, iPod classic, iPod nano, and iPod touch are designed to provide reasonable protection against harmful interference in a residential installation. However, there is made. Old electrical and electronic equipment should be determined by turning the equipment off and on, the user is...
... desechados como residuos domésticos. Location : Top Plate FCC WARNING This equipment may affect wireless performance. • iPhone, iPod, iPod classic, iPod nano, and iPod touch are designed to provide reasonable protection against harmful interference in a residential installation. However, there is made. Old electrical and electronic equipment should be determined by turning the equipment off and on, the user is...
Instruction Manual
Page 17
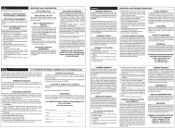
...Installation and/or removal charges. 6. the purchased of anew Kenwood brand product, you are n ecessary to follow instructions contained in the IJwne(S Manual. • Accidental or intentional damages. • Repairs or attempted repairs by an unauthorized agency. (All repairs must be pertormed at an authorized Kenwood Service... Modele do aparelho e numero de serie Model number & serial number Revendeur & cachet Nom e da loja e carimbo Deale r & stamp Date d'achtat Data da compra Purchase date Nom & adresse du client Nome e enderec;:o do not conform to the quali1y and specifications of...
...Installation and/or removal charges. 6. the purchased of anew Kenwood brand product, you are n ecessary to follow instructions contained in the IJwne(S Manual. • Accidental or intentional damages. • Repairs or attempted repairs by an unauthorized agency. (All repairs must be pertormed at an authorized Kenwood Service... Modele do aparelho e numero de serie Model number & serial number Revendeur & cachet Nom e da loja e carimbo Deale r & stamp Date d'achtat Data da compra Purchase date Nom & adresse du client Nome e enderec;:o do not conform to the quali1y and specifications of...
Instruction Manual
Page 18
... FOR CAR STEREO COMPONENTS HOW LONG IS THE WARRANTY Kenwood U.S.A. KENWOODSHALL NOTBELIABLE FOR: 1. If aproblem developsduringoraHe Irom an authorized Kenwood car stereo dealer or an automobile dealer, unless the product ispurchased through theU.S.A Military Exchange Service. 2. Take or ship it to follow instructions supplied withthe product. INSTALLATION OR REMOVAL CHARGES, DAMAGE TO OTHER PROPERTY CAUSED BY ANY DEFECTS IN KENWOOD CAR STEREO COMPONENTS...
... FOR CAR STEREO COMPONENTS HOW LONG IS THE WARRANTY Kenwood U.S.A. KENWOODSHALL NOTBELIABLE FOR: 1. If aproblem developsduringoraHe Irom an authorized Kenwood car stereo dealer or an automobile dealer, unless the product ispurchased through theU.S.A Military Exchange Service. 2. Take or ship it to follow instructions supplied withthe product. INSTALLATION OR REMOVAL CHARGES, DAMAGE TO OTHER PROPERTY CAUSED BY ANY DEFECTS IN KENWOOD CAR STEREO COMPONENTS...


