
Instruction Manual
Page 2
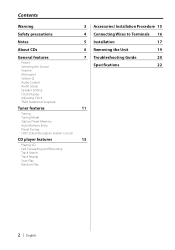
... Volume Attenuator System Q Audio Control Audio Setup Speaker Setting Clock Display Adjusting Clock Theft Deterrent Faceplate Tuner features Tuning Tuning Mode Station Preset Memory Auto Memory Entry Preset Tuning CRSC (Clean Reception System Circuit) CD player features Playing CD Fast Forwarding and Reversing Track Search Track Repeat Scan Play Random Play 3 Accessories/ Installation...
... Volume Attenuator System Q Audio Control Audio Setup Speaker Setting Clock Display Adjusting Clock Theft Deterrent Faceplate Tuner features Tuning Tuning Mode Station Preset Memory Auto Memory Entry Preset Tuning CRSC (Clean Reception System Circuit) CD player features Playing CD Fast Forwarding and Reversing Track Search Track Repeat Scan Play Random Play 3 Accessories/ Installation...
Instruction Manual
Page 4
...the car heater in cold weather, dew or condensation may not allow CDs to malfunction. • Do not use your Kenwood dealer. If the unit still does not operate normally after a while, consult your own screws. CDs in . Also avoid places with too much dust or the possibility ...Also avoid places with Canadian ICES-003. CD with its adapter into the unit, the adapter might separate from the CD and damage the unit. 4 | English NOTE This Class B digital apparatus complies with too much dust or the possibility of water splashing. (Faceplate case : KDC-1032/ 132CR only) • To ...
...the car heater in cold weather, dew or condensation may not allow CDs to malfunction. • Do not use your Kenwood dealer. If the unit still does not operate normally after a while, consult your own screws. CDs in . Also avoid places with too much dust or the possibility ...Also avoid places with Canadian ICES-003. CD with its adapter into the unit, the adapter might separate from the CD and damage the unit. 4 | English NOTE This Class B digital apparatus complies with too much dust or the possibility of water splashing. (Faceplate case : KDC-1032/ 132CR only) • To ...
Instruction Manual
Page 5
... this unit is stained, wipe it again with a hard cloth or using a volatile liquid such as a silicon cloth. English | 5 Wiping the faceplate with a clean soft dry cloth. • Applying spray cleaner directly to explain more clearly how the controls are used. The unit returns to operate ...properly, press the Reset button. Notes • If you experience problems during installation, consult your Kenwood dealer. • If the unit fails to factory settings when the Reset button is stained badly, wipe the stain off with a cloth ...
... this unit is stained, wipe it again with a hard cloth or using a volatile liquid such as a silicon cloth. English | 5 Wiping the faceplate with a clean soft dry cloth. • Applying spray cleaner directly to explain more clearly how the controls are used. The unit returns to operate ...properly, press the Reset button. Notes • If you experience problems during installation, consult your Kenwood dealer. • If the unit fails to factory settings when the Reset button is stained badly, wipe the stain off with a cloth ...
Instruction Manual
Page 10
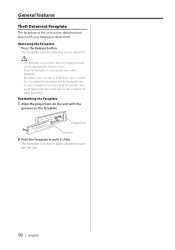
... and can be damaged by shocks or jolts. • Keep the faceplate in its faceplate case while detached. (Faceplate case : Accessory of the KDC-1032/ 132CR) • Do not expose the faceplate and the faceplate case to deter theft. General features Theft Deterrent Faceplate The faceplate of the unit can be detached and taken with the grooves on...
... and can be damaged by shocks or jolts. • Keep the faceplate in its faceplate case while detached. (Faceplate case : Accessory of the KDC-1032/ 132CR) • Do not expose the faceplate and the faceplate case to deter theft. General features Theft Deterrent Faceplate The faceplate of the unit can be detached and taken with the grooves on...
Instruction Manual
Page 15
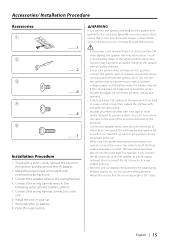
...) and the battery wire (yellow) to the car chassis (ground), you may have an ACC position, connect the ignition wires to a power source that the faceplate will be damaged or fail to work if you connect the ignition wire to which they correspond. on the ends of the wiring harness. 4. Install...
...) and the battery wire (yellow) to the car chassis (ground), you may have an ACC position, connect the ignition wires to a power source that the faceplate will be damaged or fail to work if you connect the ignition wire to which they correspond. on the ends of the wiring harness. 4. Install...

Instruction Manual
Page 18
If you want to fasten the faceplate to the mechanical parts inside the unit. 18 | English Accessory5 • Never insert the screw in the holes shown below. Installation Screwing the Faceplate on the Unit If you screw them in another hole, it will contact and may cause damage to the main unit so that it does not fall off, screw in the provided screws in any other screw hole than the one specified.
If you want to fasten the faceplate to the mechanical parts inside the unit. 18 | English Accessory5 • Never insert the screw in the holes shown below. Installation Screwing the Faceplate on the Unit If you screw them in another hole, it will contact and may cause damage to the main unit so that it does not fall off, screw in the provided screws in any other screw hole than the one specified.

