Instruction Manual
Page 2
...touched. When the unit has failed and direct current voltage is running, connect a line noise filter (optional) to each amplifier. If the "E-02" code does not disappear, contact your Kenwood dealer. • If the unit does not seem to be connected should be the same capacity as the unit's fuse...to be working right, consult your unit to peel off. When voltage gets out of the amplifier will cause smoke to be emitted as well as paint thinner and alcohol. Available Control Units: A KENWOOD's LX-Bus supporting Center Unit released in the power cord near the battery. When the ...
...touched. When the unit has failed and direct current voltage is running, connect a line noise filter (optional) to each amplifier. If the "E-02" code does not disappear, contact your Kenwood dealer. • If the unit does not seem to be connected should be the same capacity as the unit's fuse...to be working right, consult your unit to peel off. When voltage gets out of the amplifier will cause smoke to be emitted as well as paint thinner and alcohol. Available Control Units: A KENWOOD's LX-Bus supporting Center Unit released in the power cord near the battery. When the ...
Instruction Manual
Page 3
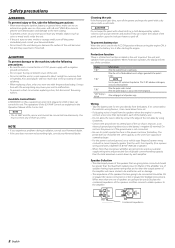
...Do not install in the vehicle, check that there is nothing hazardous on top of the unit. • The surface temperature of the amplifier will become hot during use. Blocking these openings will inhibit the cooling of the internal temperature and result in malfunction. • When making ...a hole under the carpet. Install the amplifier in the unit. 7.Attach the unit. 8.Install the terminal cover. 9.Connect the negative - If the unit comes off due to a shock and...
...Do not install in the vehicle, check that there is nothing hazardous on top of the unit. • The surface temperature of the amplifier will become hot during use. Blocking these openings will inhibit the cooling of the internal temperature and result in malfunction. • When making ...a hole under the carpet. Install the amplifier in the unit. 7.Attach the unit. 8.Install the terminal cover. 9.Connect the negative - If the unit comes off due to a shock and...
Instruction Manual
Page 4
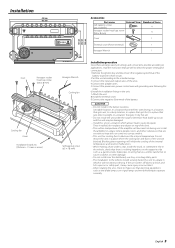
... A channel Speaker (Bridged) Battery Ground wire* B channel Speaker (Bridged) LX-Bus connection CENTER UNIT Power control wire �� �� Master amplifier Extension wire* To KENWOOD disc changer/ External optional accessory Control cable (option) ��� ��� ��� ��� �� S-video cable...
... A channel Speaker (Bridged) Battery Ground wire* B channel Speaker (Bridged) LX-Bus connection CENTER UNIT Power control wire �� �� Master amplifier Extension wire* To KENWOOD disc changer/ External optional accessory Control cable (option) ��� ��� ��� ��� �� S-video cable...
Instruction Manual
Page 5
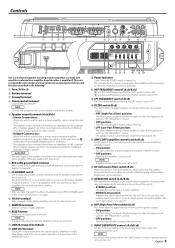
... the sound with the "HPF FREQUENCY" control. • OFF position: The entire bandwidth is automatically switched to monaural (L+R). & AMP CONT (amplifier control) switch (B.ch) Used to "ON". The speaker output is output without filtering. @1 INPUT SENSITIVITY control (A.ch/B.ch) Set this terminal...; sw� itch ��� is "ON", the frequencies which are below the audible range and therefore inaudible are used. NOTE Amplifier control is possible even while OFF. * ISF (infrasonic filter) switch (B.ch) When this switch is set to "LPF". ^ FILTER switch ...
... the sound with the "HPF FREQUENCY" control. • OFF position: The entire bandwidth is automatically switched to monaural (L+R). & AMP CONT (amplifier control) switch (B.ch) Used to "ON". The speaker output is output without filtering. @1 INPUT SENSITIVITY control (A.ch/B.ch) Set this terminal...; sw� itch ��� is "ON", the frequencies which are below the audible range and therefore inaudible are used. NOTE Amplifier control is possible even while OFF. * ISF (infrasonic filter) switch (B.ch) When this switch is set to "LPF". ^ FILTER switch ...
Instruction Manual
Page 6
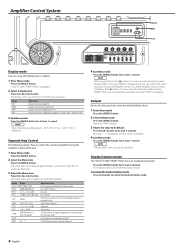
...are switched as follows: 1 Enter Menu mode Press the [MENU] button. Canceling the Demonstration mode Press any button to control the sound of amplifier B using the Amplifier Control of the cooling fan in 3 steps: "FAST", "SLOW" or "OFF". 3 Exit Menu mode Press the [MENU] button for the... refer to 'Default' The ID Number you have set values are displayed repeatedly. Press the [MENU] button for at least 1 second. To call the Amplifier Control's values, hold down the [2] button 3 or more seconds during ID number display ("AMP"). Display "VOLT" "CURR" "TEMP" "FAN" Information ...
...are switched as follows: 1 Enter Menu mode Press the [MENU] button. Canceling the Demonstration mode Press any button to control the sound of amplifier B using the Amplifier Control of the cooling fan in 3 steps: "FAST", "SLOW" or "OFF". 3 Exit Menu mode Press the [MENU] button for the... refer to 'Default' The ID Number you have set values are displayed repeatedly. Press the [MENU] button for at least 1 second. To call the Amplifier Control's values, hold down the [2] button 3 or more seconds during ID number display ("AMP"). Display "VOLT" "CURR" "TEMP" "FAN" Information ...
Instruction Manual
Page 7
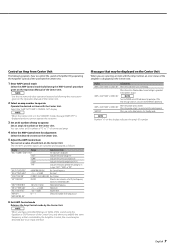
...Select an ID number of the amp you use . 6 Exit AMP Control mode Releases the Amp Control mode by the Amplifier Control, the sound may be distorted due to an input overflow. Control an Amp from Center Unit The following explains ...how to control the sound of Amplifier B by operating the Amplifier Control of the unit from the Center Unit. 1 Enter AMP Control mode Select the AMP Control mode by ... is displayed on the Operation Manual of the Center Unit. 2 Select an amp number to the KENWOOD's dealership.
...Select an ID number of the amp you use . 6 Exit AMP Control mode Releases the Amp Control mode by the Amplifier Control, the sound may be distorted due to an input overflow. Control an Amp from Center Unit The following explains ...how to control the sound of Amplifier B by operating the Amplifier Control of the unit from the Center Unit. 1 Enter AMP Control mode Select the AMP Control mode by ... is displayed on the Operation Manual of the Center Unit. 2 Select an amp number to the KENWOOD's dealership.
Instruction Manual
Page 9
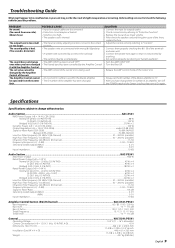
... change even when you have changed . of the terminals and wires well. • Connect the speaker wire again so that it On again. Audio Section...KAC-X541 RMS Power Output (+B = 14.4 V, CEA-2006) Normal (4 Ω/4ch) (1.0 % THD+N)...88 W Normal (2 Ω/4ch) (1.0 % THD+N)...124 W Bridged...to Noise Ratio...105 dB Sensitivity (rated output) (MAX.) ...0.2 V Sensitivity (rated output) (MIN.) ...5.0 V Input Impedance ...10 kΩ Amplifier Control Section (EQ) (B channel KAC-X541/PS541 Bass frequency ...60 / 80 / 100 / 200 Hz Bass level ...-15 - +15 dB Bass Q factor...1.00 / 1.25 / ...
... change even when you have changed . of the terminals and wires well. • Connect the speaker wire again so that it On again. Audio Section...KAC-X541 RMS Power Output (+B = 14.4 V, CEA-2006) Normal (4 Ω/4ch) (1.0 % THD+N)...88 W Normal (2 Ω/4ch) (1.0 % THD+N)...124 W Bridged...to Noise Ratio...105 dB Sensitivity (rated output) (MAX.) ...0.2 V Sensitivity (rated output) (MIN.) ...5.0 V Input Impedance ...10 kΩ Amplifier Control Section (EQ) (B channel KAC-X541/PS541 Bass frequency ...60 / 80 / 100 / 200 Hz Bass level ...-15 - +15 dB Bass Q factor...1.00 / 1.25 / ...


