Instruction manual
Page 1
... RECEIVER DDX8905S DDX6905S DDX6705S MONITOR WITH RECEIVER DMX7705S INSTRUCTION MANUAL • Updated information (the latest Instruction Manual, system updates, new functions, etc.) is available from your new receiver. Refer to read through this instruction manual. Familiarity with installation and operation procedures will help you call upon your KENWOOD dealer for information or service on the...
... RECEIVER DDX8905S DDX6905S DDX6705S MONITOR WITH RECEIVER DMX7705S INSTRUCTION MANUAL • Updated information (the latest Instruction Manual, system updates, new functions, etc.) is available from your new receiver. Refer to read through this instruction manual. Familiarity with installation and operation procedures will help you call upon your KENWOOD dealer for information or service on the...
Instruction manual
Page 2
Contents Before Use 4 Precautions 4 How to read this manual 5 Basic Operations 6 Functions of the Buttons on the Front Panel.... 6 Turning on the Unit 8 Initial Settings 8 Adjusting the volume 10 Monitor Angle Control 10 Touch ...
Contents Before Use 4 Precautions 4 How to read this manual 5 Basic Operations 6 Functions of the Buttons on the Front Panel.... 6 Turning on the Unit 8 Initial Settings 8 Adjusting the volume 10 Monitor Angle Control 10 Touch ...
Instruction manual
Page 5
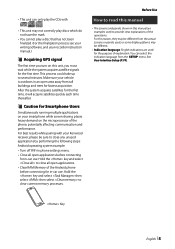
...Interface Setup (P.74). • This unit can select the indication language from the [SETUP] menu. Before Use How to read this manual are used for fastest acquisition. Key English 5 Hold the key and select to close all open applications. • Clear RAM Memory ...first time, it will acquire satellites quickly each time thereafter. ÑÑCaution for Smartphone Users Simultaneously running multiple applications on your Kenwood receiver, please be different. • Indication language: English indications are examples used , or some display patterns may be different ...
...Interface Setup (P.74). • This unit can select the indication language from the [SETUP] menu. Before Use How to read this manual are used for fastest acquisition. Key English 5 Hold the key and select to close all open applications. • Clear RAM Memory ...first time, it will acquire satellites quickly each time thereafter. ÑÑCaution for Smartphone Users Simultaneously running multiple applications on your Kenwood receiver, please be different. • Indication language: English indications are examples used , or some display patterns may be different ...
Instruction manual
Page 9
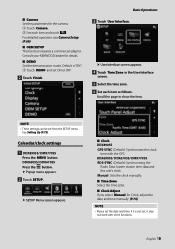
.... ■■[Clock Adjust] If you select [Manual] for Clock, adjust the date and time manually. (P.74) NOTE • Please set from the SETUP menu. See Setting Up (P.73). hhPopup menu appears. 2 Touch [SETUP]. Calendar/clock settings 1 DDX8905S/ DMX7705S Press the [MENU] button. English 9 ■&#...function requires a commercial adaptor. If it is "ON". 1 Touch [DEMO] and set , it may not work with the GPS. Consult your KENWOOD dealer for details. ■■ [DEMO] Set the demonstration mode. hhUser Interface screen appears. 4 Touch [Time Zone] in the User Interface ...
.... ■■[Clock Adjust] If you select [Manual] for Clock, adjust the date and time manually. (P.74) NOTE • Please set from the SETUP menu. See Setting Up (P.73). hhPopup menu appears. 2 Touch [SETUP]. Calendar/clock settings 1 DDX8905S/ DMX7705S Press the [MENU] button. English 9 ■&#...function requires a commercial adaptor. If it is "ON". 1 Touch [DEMO] and set , it may not work with the GPS. Consult your KENWOOD dealer for details. ■■ [DEMO] Set the demonstration mode. hhUser Interface screen appears. 4 Touch [Time Zone] in the User Interface ...
Instruction manual
Page 18
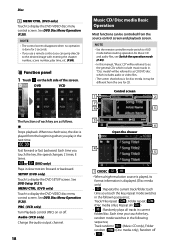
...) on or off ( ) It may be controlled from the one for Music CD and audio files, see Switch the operation mode (P.85). • In this manual, "Music CD" will be referred to AUD mode before starting operation for CD. Track/ File repeat ( ), Folder repeat ( ) (Disc media only), Repeat all ( ) • [ ] : Randomly...
...) on or off ( ) It may be controlled from the one for Music CD and audio files, see Switch the operation mode (P.85). • In this manual, "Music CD" will be referred to AUD mode before starting operation for CD. Track/ File repeat ( ), Folder repeat ( ) (Disc media only), Repeat all ( ) • [ ] : Randomly...

Instruction manual
Page 30
The word "USB device" appearing in this manual indicates a flash memory device. ●●About file system The file system should be the one of the following. • FAT16 • FAT32 • exFAT &#... before starting operation, see Switch the operation mode (P.85). DDX6905S/ DDX6705S Press the [ ] button. 3 Touch . 4 Touch [USB]. (P.12) ÑÑDisconnect the USB device 1 DDX8905S/ DMX7705S Press the [HOME] button. The files can be controlled from any erased data. Control screen 1 2 7 4 5 3 6 Open the drawer 4 5 30 USB USB Connecting a USB device 1 Connect...
The word "USB device" appearing in this manual indicates a flash memory device. ●●About file system The file system should be the one of the following. • FAT16 • FAT32 • exFAT &#... before starting operation, see Switch the operation mode (P.85). DDX6905S/ DDX6705S Press the [ ] button. 3 Touch . 4 Touch [USB]. (P.12) ÑÑDisconnect the USB device 1 DDX8905S/ DMX7705S Press the [HOME] button. The files can be controlled from any erased data. Control screen 1 2 7 4 5 3 6 Open the drawer 4 5 30 USB USB Connecting a USB device 1 Connect...

Instruction manual
Page 36
Radio Radio (DDX6905S/DDX6705S/DMX7705S) Radio Basic Operation Most functions can be controlled from the... the operation mode (P.85). To enter Radio source, touch [Radio] icon in memory one after another. • [MANUAL]: Switches to switch between Content A and Content B. Content A: PS name, Radio Text, Title & Artist Content B: ..., Radio Text plus Preset#: Preset number 2 Seek mode Switches the seek mode in the following sequence; [AUTO1], [AUTO2], [MANUAL]. • [AUTO1]: Tunes in a station with good reception automatically. • [AUTO2]: Tunes in stations in the source selection...
Radio Radio (DDX6905S/DDX6705S/DMX7705S) Radio Basic Operation Most functions can be controlled from the... the operation mode (P.85). To enter Radio source, touch [Radio] icon in memory one after another. • [MANUAL]: Switches to switch between Content A and Content B. Content A: PS name, Radio Text, Title & Artist Content B: ..., Radio Text plus Preset#: Preset number 2 Seek mode Switches the seek mode in the following sequence; [AUTO1], [AUTO2], [MANUAL]. • [AUTO1]: Tunes in a station with good reception automatically. • [AUTO2]: Tunes in stations in the source selection...

Instruction manual
Page 37
For details, see Search by setting program type. English 37 hhAuto memory starts. ÑÑManual memory You can store stations with good reception in which you wish to store in memory. 2 Touch [FM#] (#:1-15) or [AM#] (#:1-5) in memory automatically. 1 Touch ...
For details, see Search by setting program type. English 37 hhAuto memory starts. ÑÑManual memory You can store stations with good reception in which you wish to store in memory. 2 Touch [FM#] (#:1-15) or [AM#] (#:1-5) in memory automatically. 1 Touch ...

Instruction manual
Page 39
... : Display the Channel List screen. Touch again to switch between Content A, Content B and Content C. The method of the screen to the next frequency manually. 4 Operation keys • [E] [F] : Tunes in memory. • Touch on the left side of frequency switching can be different from the source... Message, Radio Text Content C: PTY Genre, Album Name 3 Seek mode Switches the seek mode in the following sequence; [AUTO1], [AUTO2], [MANUAL]. • [AUTO1]: Tunes in a station with gray when it lights with orange when the audio is digital and lights with good reception automatically...
... : Display the Channel List screen. Touch again to switch between Content A, Content B and Content C. The method of the screen to the next frequency manually. 4 Operation keys • [E] [F] : Tunes in memory. • Touch on the left side of frequency switching can be different from the source... Message, Radio Text Content C: PTY Genre, Album Name 3 Seek mode Switches the seek mode in the following sequence; [AUTO1], [AUTO2], [MANUAL]. • [AUTO1]: Tunes in a station with gray when it lights with orange when the audio is digital and lights with good reception automatically...

Instruction manual
Page 41
Touch [RCV]. hhAuto memory starts. ÑÑManual memory You can store stations with good reception in which you wish to store in memory. 2 Touch [FM#] (#:1-15) or [AM#] (#:1-5) in memory automatically. 1 Touch ...
Touch [RCV]. hhAuto memory starts. ÑÑManual memory You can store stations with good reception in which you wish to store in memory. 2 Touch [FM#] (#:1-15) or [AM#] (#:1-5) in memory automatically. 1 Touch ...
Instruction manual
Page 69
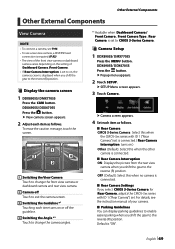
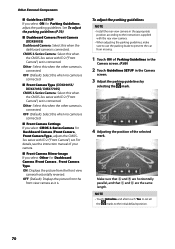
...Camera], adjusts the CMOS-3xx series with ID 1 ("Rear Camera") set to [CMOS 3-Series Camera]. ÑÑCamera Setup 1 DDX8905S/ DMX7705S Press the [MENU] button. Default is displayed when you shift the gear to the reverse (R) position. hhView camera screen appears. 2 Adjust each...reverse (R) position. ÑÑDisplay the camera screen 1 DDX8905S/ DMX7705S Press the [CAM] button. English 69 Other External Components Other External Components View Camera NOTE • To connect a camera, see the instruction manual of [Dashboard Camera /Front Camera]. • If [Rear Camera ...
...Camera], adjusts the CMOS-3xx series with ID 1 ("Rear Camera") set to [CMOS 3-Series Camera]. ÑÑCamera Setup 1 DDX8905S/ DMX7705S Press the [MENU] button. Default is displayed when you shift the gear to the reverse (R) position. hhView camera screen appears. 2 Adjust each...reverse (R) position. ÑÑDisplay the camera screen 1 DDX8905S/ DMX7705S Press the [CAM] button. English 69 Other External Components Other External Components View Camera NOTE • To connect a camera, see the instruction manual of [Dashboard Camera /Front Camera]. • If [Rear Camera ...
Instruction manual
Page 70
.... [Other]: Select this when the other camera is connected. [OFF ](Default): Select this when no camera is connected. ■■[Front Camera Type] (DDX6905S/ DDX6705S/ DMX7705S) [CMOS 3-Series Camera]: Select this when the CMOS-3xx series with ID 2 ("Front Camera") set is connected. [Other]: Select this when the other camera is...
.... [Other]: Select this when the other camera is connected. [OFF ](Default): Select this when no camera is connected. ■■[Front Camera Type] (DDX6905S/ DDX6705S/ DMX7705S) [CMOS 3-Series Camera]: Select this when the CMOS-3xx series with ID 2 ("Front Camera") set is connected. [Other]: Select this when the other camera is...

Instruction manual
Page 71
... display the dashboard camera control buttons. Other External Components External audio/video players- hhView camera screen appears. NOTE • To connect a camera, see the instruction manual of the Dashboard Camera DRV-N520 (optional accessory).
... display the dashboard camera control buttons. Other External Components External audio/video players- hhView camera screen appears. NOTE • To connect a camera, see the instruction manual of the Dashboard Camera DRV-N520 (optional accessory).

Instruction manual
Page 74
...ÑÑTouch panel adjustment (DDX6905S/ DDX6705S/ DMX7705S) 1 Touch [Touch Panel Adjust] on or off. DDX6905S/ DDX6705S/ DMX7705S [RDS-SYNC ](Default): Synchronizing the Radio Data System station time data and this unit's clock. [Manual]: Sets the clock manually ■■[Time Zone] Select the time zone.... ■■[Clock Adjust] If you can setup user interface parameters. 1 DDX8905S/ DMX7705S Press the [MENU] button. Setting Up User Interface ...
...ÑÑTouch panel adjustment (DDX6905S/ DDX6705S/ DMX7705S) 1 Touch [Touch Panel Adjust] on or off. DDX6905S/ DDX6705S/ DMX7705S [RDS-SYNC ](Default): Synchronizing the Radio Data System station time data and this unit's clock. [Manual]: Sets the clock manually ■■[Time Zone] Select the time zone.... ■■[Clock Adjust] If you can setup user interface parameters. 1 DDX8905S/ DMX7705S Press the [MENU] button. Setting Up User Interface ...

Instruction manual
Page 75
Special Setup You can setup Special parameters. 1 DDX8905S/ DMX7705S Press the [MENU] button. hhPopup menu appears. 2 Touch [SETUP]. Default is "ON". ■■[SETUP Memory] Locks or unlocks the Audio SETUP Memory/ Recall/Clear. &#... • To cancel the touch panel adjustment, touch [Cancel]. • To reset to update the software, see the relevant update procedure manual which comes with the software. Display Setup 1 DDX8905S/ DMX7705S Press the [MENU] button. hhSETUP screen appears. 2 Follow the instruction on the screen and long touch the center of this unit...
Special Setup You can setup Special parameters. 1 DDX8905S/ DMX7705S Press the [MENU] button. hhPopup menu appears. 2 Touch [SETUP]. Default is "ON". ■■[SETUP Memory] Locks or unlocks the Audio SETUP Memory/ Recall/Clear. &#... • To cancel the touch panel adjustment, touch [Cancel]. • To reset to update the software, see the relevant update procedure manual which comes with the software. Display Setup 1 DDX8905S/ DMX7705S Press the [MENU] button. hhSETUP screen appears. 2 Follow the instruction on the screen and long touch the center of this unit...

Instruction manual
Page 100
... remove it from multiple angles, you may be restricted depending on the location where the DVD is displayed on the screen. Up to the disc manual.
... remove it from multiple angles, you may be restricted depending on the location where the DVD is displayed on the screen. Up to the disc manual.

Instruction manual
Page 106
... source and binary forms, with the limits for help. # CAUTION Use of controls or adjustments or performance of the FCC Rules. JVC KENWOOD Corporation 2967-3, ISHIKAWA-MACHI, HACHIOJI-SHI, TOKYO, JAPAN THIS PRODUCT COMPLIES WITH DHHS RULES 21 CFR SUBCHAPTER J IN EFFECT AT DATE OF...following disclaimer in the documentation and/or other than those specified herein may cause harmful interference to which can be used in the instruction manual. IN NO EVENT SHALL THE FOUNDATION OR CONTRIBUTORS BE LIABLE FOR ANY DIRECT, INDIRECT, INCIDENTAL, SPECIAL, EXEMPLARY, OR CONSEQUENTIAL DAMAGES (...
... source and binary forms, with the limits for help. # CAUTION Use of controls or adjustments or performance of the FCC Rules. JVC KENWOOD Corporation 2967-3, ISHIKAWA-MACHI, HACHIOJI-SHI, TOKYO, JAPAN THIS PRODUCT COMPLIES WITH DHHS RULES 21 CFR SUBCHAPTER J IN EFFECT AT DATE OF...following disclaimer in the documentation and/or other than those specified herein may cause harmful interference to which can be used in the instruction manual. IN NO EVENT SHALL THE FOUNDATION OR CONTRIBUTORS BE LIABLE FOR ANY DIRECT, INDIRECT, INCIDENTAL, SPECIAL, EXEMPLARY, OR CONSEQUENTIAL DAMAGES (...


