

Quick Start Guide
Page 1
... instruction manual. Model DMX4707S / DMX47S / DMX5020S Serial number US Residence Only Register Online Register your records Record the serial number, found on the back of the unit, in the space provided below. Familiarity with installation and operation procedures will help you call upon your new receiver. For your KENWOOD product at www.kenwood.com...
... instruction manual. Model DMX4707S / DMX47S / DMX5020S Serial number US Residence Only Register Online Register your records Record the serial number, found on the back of the unit, in the space provided below. Familiarity with installation and operation procedures will help you call upon your new receiver. For your KENWOOD product at www.kenwood.com...

Quick Start Guide
Page 2
... Public License (hereinafter called "User") has used a product implementation of Licensed Software. Article 2 (Right of Use) 1. User shall use Licensed Software as per the instruction manual or instructions given in the help file and may not be distributed, licensed or sublicensed for in Paragraph 1, Article 3). This agreement establishes the conditions under...
... Public License (hereinafter called "User") has used a product implementation of Licensed Software. Article 2 (Right of Use) 1. User shall use Licensed Software as per the instruction manual or instructions given in the help file and may not be distributed, licensed or sublicensed for in Paragraph 1, Article 3). This agreement establishes the conditions under...

Quick Start Guide
Page 4
...patterns may be different. • Indication language: English indications are examples used for reference. See Instruction Manual. 4 For this unit. For detailed operations and information, refer to the INSTRUCTION MANUAL on the Unit 6 Getting Started 7 Adjusting the volume 8 Touch screen operations 8 HOME screen descriptions...Before Use About the Quick start guide 4 How to read this manual • The screens and panels shown in this manual are used to download the latest edition of the Instruction manual for the purpose of explanation. Before Use Contents Before Use 4 ...
...patterns may be different. • Indication language: English indications are examples used for reference. See Instruction Manual. 4 For this unit. For detailed operations and information, refer to the INSTRUCTION MANUAL on the Unit 6 Getting Started 7 Adjusting the volume 8 Touch screen operations 8 HOME screen descriptions...Before Use About the Quick start guide 4 How to read this manual • The screens and panels shown in this manual are used to download the latest edition of the Instruction manual for the purpose of explanation. Before Use Contents Before Use 4 ...
Quick Start Guide
Page 5
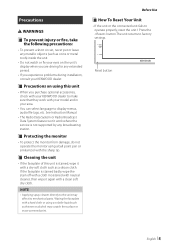
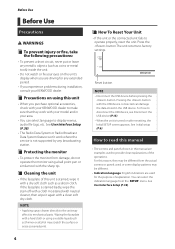
...faceplate with a clean soft dry cloth. Reset button English 5 See Instruction Manual. • The Radio Data System or Radio Broadcast Data System feature ...unit • If the faceplate of this unit • When you purchase optional accessories, check with your KENWOOD dealer to make sure that they work where the service is not supported by any extended period. •...; If you experience problems during installation, consult your KENWOOD dealer. ÑÑPrecautions on using this unit is stained badly, wipe the stain off with a...
...faceplate with a clean soft dry cloth. Reset button English 5 See Instruction Manual. • The Radio Data System or Radio Broadcast Data System feature ...unit • If the faceplate of this unit • When you purchase optional accessories, check with your KENWOOD dealer to make sure that they work where the service is not supported by any extended period. •...; If you experience problems during installation, consult your KENWOOD dealer. ÑÑPrecautions on using this unit is stained badly, wipe the stain off with a...
Quick Start Guide
Page 7
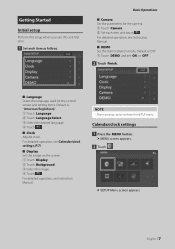
... [OFF]. 2 Touch [Finish]. ■■ [Language] Select the language used for the camera. 1 Touch [Camera]. 2 Set each item as follows. For detailed operation, see Instruction Manual. For detailed operation, see Calendar/clock settings (P.7). ■■ [Display] Set the image on the screen. 1 Touch [Display. 2 Touch [Background]. 3 Select the image. 4 Touch [ ]..... Getting Started Initial setup Perform this setup when you use this unit first time. 1 Set each item and touch [ ]. For detailed operation, see Instruction Manual. ■■ [DEMO] Set the demonstration mode.
... [OFF]. 2 Touch [Finish]. ■■ [Language] Select the language used for the camera. 1 Touch [Camera]. 2 Set each item as follows. For detailed operation, see Instruction Manual. For detailed operation, see Calendar/clock settings (P.7). ■■ [Display] Set the image on the screen. 1 Touch [Display. 2 Touch [Background]. 3 Select the image. 4 Touch [ ]..... Getting Started Initial setup Perform this setup when you use this unit first time. 1 Set each item and touch [ ]. For detailed operation, see Instruction Manual. ■■ [DEMO] Set the demonstration mode.

Quick Start Guide
Page 8
..., you need to touch, touch and hold, flick or swipe to select an item, display setting menu screen or to change the page. See Instruction Manual. You can scroll the list screen by flicking the screen up or down . ●● Swipe Slide your finger quickly to the left or right...
..., you need to touch, touch and hold, flick or swipe to select an item, display setting menu screen or to change the page. See Instruction Manual. You can scroll the list screen by flicking the screen up or down . ●● Swipe Slide your finger quickly to the left or right...

Quick Start Guide
Page 13
For details on this manual indicates a flash memory device. 3 1 [ ]/[ ] • [ ] : Repeats the current track/folder. The word "USB device" appearing in the following sequence; File random ([ ]), Random off ([ ]) 2 Track information ... USB device with the USB cable. (P.26) USB USB Basic Operation Most functions can use a mass-storage-class USB device on search operation, see Instruction Manual. • [E] [F] : Searches the previous/next track/ file.
For details on this manual indicates a flash memory device. 3 1 [ ]/[ ] • [ ] : Repeats the current track/folder. The word "USB device" appearing in the following sequence; File random ([ ]), Random off ([ ]) 2 Track information ... USB device with the USB cable. (P.26) USB USB Basic Operation Most functions can use a mass-storage-class USB device on search operation, see Instruction Manual. • [E] [F] : Searches the previous/next track/ file.

Quick Start Guide
Page 14
... 1 Information display Displays the information of the current station: Frequency Touching [ ] allows you to display the Preset list. For details, see Instruction Manual. • [AME]: Presets stations automatically. White: TP is being received. 14 The method of frequency switching can be changed (see 2 in ... mode on . • [TI] : Indicates the reception state of the screen to switch between Content A and Content B. -- For details, see Instruction Manual. • [MONO] (FM only): Select the Monaural reception. 6 [FM] [AM] Switches the band. 7 Indicator Items • [ST] :...
... 1 Information display Displays the information of the current station: Frequency Touching [ ] allows you to display the Preset list. For details, see Instruction Manual. • [AME]: Presets stations automatically. White: TP is being received. 14 The method of frequency switching can be changed (see 2 in ... mode on . • [TI] : Indicates the reception state of the screen to switch between Content A and Content B. -- For details, see Instruction Manual. • [MONO] (FM only): Select the Monaural reception. 6 [FM] [AM] Switches the band. 7 Indicator Items • [ST] :...

Quick Start Guide
Page 15
hhAuto memory starts. ÑÑManual memory You can store the current receiving station in memory. 1 Select a station you wish to store in memory. 2 Touch [FM#] (#: 1-24) or [AM#] (#: 1-12) in ... 15 To listen to , all in one of the two methods below: --For users in U.S.A. hhA confirmation screen appears. 3 Touch [Yes]. SiriuRsaXdMio® SiriusXM® (DMX4707S/ DMX47S) SiriusXM® Basic Operation Only SiriusXM® brings you love to listen to the SiriusXM source, touch the [SiriusXM] icon on the source selection...
hhAuto memory starts. ÑÑManual memory You can store the current receiving station in memory. 1 Select a station you wish to store in memory. 2 Touch [FM#] (#: 1-24) or [AM#] (#: 1-12) in ... 15 To listen to , all in one of the two methods below: --For users in U.S.A. hhA confirmation screen appears. 3 Touch [Yes]. SiriuRsaXdMio® SiriusXM® (DMX4707S/ DMX47S) SiriusXM® Basic Operation Only SiriusXM® brings you love to listen to the SiriusXM source, touch the [SiriusXM] icon on the source selection...

Quick Start Guide
Page 16
...SETUP screen. For details on or off the replay mode. Touch [ ] to close the panel. -- [Direct Channel]: Touch and enter the desired number. See Instruction Manual. • [CHS] [CHR] : Selects a channel. • [ ] : Touch to mute or not to mute. 5 Preset list • Touch [ ...] of the screen to display the function panel. For details, see Instruction Manual. • [DH] : Plays or pauses. Content A: Artist Name, Song Title --Content B: Content Info, Category Name NOTE • While getting contents, "Waiting" ...
...SETUP screen. For details on or off the replay mode. Touch [ ] to close the panel. -- [Direct Channel]: Touch and enter the desired number. See Instruction Manual. • [CHS] [CHR] : Selects a channel. • [ ] : Touch to mute or not to mute. 5 Preset list • Touch [ ...] of the screen to display the function panel. For details, see Instruction Manual. • [DH] : Plays or pauses. Content A: Artist Name, Song Title --Content B: Content Info, Category Name NOTE • While getting contents, "Waiting" ...
Instruction Manual
Page 1
... or service on the warranty card, and in the space provided below. Refer to read through this instruction manual. Model DMX4707S / DMX47S / DMX5020S Serial number US Residence Only Register Online Register your KENWOOD product at www.kenwood.com/usa/ © 2020 JVCKENWOOD Corporation B5H-0358-50 EN (K/R) For your records Record the serial number...
... or service on the warranty card, and in the space provided below. Refer to read through this instruction manual. Model DMX4707S / DMX47S / DMX5020S Serial number US Residence Only Register Online Register your KENWOOD product at www.kenwood.com/usa/ © 2020 JVCKENWOOD Corporation B5H-0358-50 EN (K/R) For your records Record the serial number...

Instruction Manual
Page 2
Contents Before Use 4 Precautions 4 How to read this manual 4 Basic Operations 5 Functions of the Buttons on the Front Panel.... 5 Turning on the Unit 5 Getting Started 6 Adjusting the volume 7 Touch screen operations 7 HOME screen descriptions 8 ...
Contents Before Use 4 Precautions 4 How to read this manual 4 Basic Operations 5 Functions of the Buttons on the Front Panel.... 5 Turning on the Unit 5 Getting Started 6 Adjusting the volume 7 Touch screen operations 7 HOME screen descriptions 8 ...
Instruction Manual
Page 4
... inside the unit. • Do not watch or fix your eyes on the unit's display when you experience problems during installation, consult your KENWOOD dealer. ÑÑPrecautions on after resetting, the Initial SETUP screen appears. See User Interface Setup (P.38). • The Radio Data System...• To protect the monitor from the [SETUP] menu. See User Interface Setup (P.38). 4 How to read this manual • The screens and panels shown in your KENWOOD dealer to display menus, audio file tags, etc. Reset button NOTE • Disconnect the USB device before pressing the button...
... inside the unit. • Do not watch or fix your eyes on the unit's display when you experience problems during installation, consult your KENWOOD dealer. ÑÑPrecautions on after resetting, the Initial SETUP screen appears. See User Interface Setup (P.38). • The Radio Data System...• To protect the monitor from the [SETUP] menu. See User Interface Setup (P.38). 4 How to read this manual • The screens and panels shown in your KENWOOD dealer to display menus, audio file tags, etc. Reset button NOTE • Disconnect the USB device before pressing the button...

Instruction Manual
Page 15
... control screen and playback screen. File random ([ ]), Random off ([ ]) 2 Track information Displays the information of the USB device. The word "USB device" appearing in this manual indicates a flash memory device. ●●About file system The file system should be erased depending on this unit. Each time you touch the key...
... control screen and playback screen. File random ([ ]), Random off ([ ]) 2 Track information Displays the information of the USB device. The word "USB device" appearing in this manual indicates a flash memory device. ●●About file system The file system should be erased depending on this unit. Each time you touch the key...

Instruction Manual
Page 18
...; [AUTO1]: Tunes in a station with good reception automatically. • [AUTO2]: Tunes in stations in memory one after another. • [MANUAL]: Switches to the next frequency manually. 3 Operation keys • [E] [F] : Tunes in the source selection screen. (P.9) Control screen 1 4 2 5 6 3 Open the drawer 5 4 7 1 Information display Displays the information of the current station: Frequency Touching [ ] ...
...; [AUTO1]: Tunes in a station with good reception automatically. • [AUTO2]: Tunes in stations in memory one after another. • [MANUAL]: Switches to the next frequency manually. 3 Operation keys • [E] [F] : Tunes in the source selection screen. (P.9) Control screen 1 4 2 5 6 3 Open the drawer 5 4 7 1 Information display Displays the information of the current station: Frequency Touching [ ] ...

Instruction Manual
Page 19
... which you want to FM. 1 Touch [ ] on the left side of the screen. You can search a station of the screen. hhAuto memory starts. ÑÑManual memory You can store the current receiving station in memory. 1 Select a station you wish to store in memory. 2 Touch [FM#] (#: 1-24) or [AM#] (#: 1-12) in...
... which you want to FM. 1 Touch [ ] on the left side of the screen. You can search a station of the screen. hhAuto memory starts. ÑÑManual memory You can store the current receiving station in memory. 1 Select a station you wish to store in memory. 2 Touch [FM#] (#: 1-24) or [AM#] (#: 1-12) in...

Instruction Manual
Page 38
.... 38 hhUser Interface screen appears. 4 Set each item as necessary. 5 Touch [ ]. "[12-Hour]" (Default)/ "[24-Hour]" ■■[Clock Adjust] Adjust the date and time manually. (P.6) ÑÑLearning function of the settable function on or off. hhSETUP screen appears. 3 Touch [User Interface]. See Learning function of steering remote (P.38). ■...
.... 38 hhUser Interface screen appears. 4 Set each item as necessary. 5 Touch [ ]. "[12-Hour]" (Default)/ "[24-Hour]" ■■[Clock Adjust] Adjust the date and time manually. (P.6) ÑÑLearning function of the settable function on or off. hhSETUP screen appears. 3 Touch [User Interface]. See Learning function of steering remote (P.38). ■...

Instruction Manual
Page 60
... those who are entitled to modify and redistribute the software components are offered to the customers for their use Licensed Software as per the instruction manual or instructions given in this product are encouraged to use software components distributed under this product. 2. The rise of use granted under the GPL/LGPL...
... those who are entitled to modify and redistribute the software components are offered to the customers for their use Licensed Software as per the instruction manual or instructions given in this product are encouraged to use software components distributed under this product. 2. The rise of use granted under the GPL/LGPL...


