
User Manual
Page 2
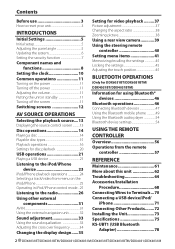
...11 Turning on the power 11 Turning off the power 11 Adjusting the volume 11 Putting the unit in standby 11 Turning off the screen 11 Switching screens 12 AV SOURCE OPERATIONS Selecting the playback source....13 Displaying the source control screen ..........13 Disc operations 14 Playing a disc 14 Playable disc types 15 Playback operations 16 Settings for disc playback 20 USB operations 21 Playing a USB device 21 Listening to the iPod/iPhone device 23 iPod/iPhone playback operations 24 Selecting a track/video from menu on the iPod/iPhone 25 Operating in iPod/iPhone control mode...
...11 Turning on the power 11 Turning off the power 11 Adjusting the volume 11 Putting the unit in standby 11 Turning off the screen 11 Switching screens 12 AV SOURCE OPERATIONS Selecting the playback source....13 Displaying the source control screen ..........13 Disc operations 14 Playing a disc 14 Playable disc types 15 Playback operations 16 Settings for disc playback 20 USB operations 21 Playing a USB device 21 Listening to the iPod/iPhone device 23 iPod/iPhone playback operations 24 Selecting a track/video from menu on the iPod/iPhone 25 Operating in iPod/iPhone control mode...
User Manual
Page 3
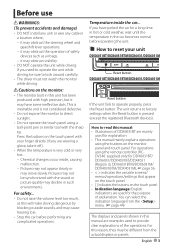
... to reset your finger directly (if you need to operate the unit while driving, be sure to look around carefully. • The driver must not watch the monitor while driving. You can select the indication language from the actual displays or panels. Pictures may cause hearing loss. • Stop the car before operating the unit. For operations using the remote controller (RCDV340: supplied only for DDX6031BT/ DDX6031/DDX4031BT/DDX4031...
... to reset your finger directly (if you need to operate the unit while driving, be sure to look around carefully. • The driver must not watch the monitor while driving. You can select the indication language from the actual displays or panels. Pictures may cause hearing loss. • Stop the car before operating the unit. For operations using the remote controller (RCDV340: supplied only for DDX6031BT/ DDX6031/DDX4031BT/DDX4031...
User Manual
Page 5
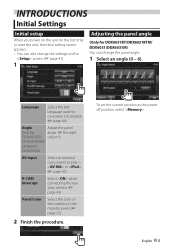
... the first time or reset the unit, the initial setting screen appears. • You can change the settings on the screen. (☞ page 41) 1 Adjusting the panel angle (Only for angle. (☞ the right DDX6031BT/ column) DDX6031BTM/ DDX6031/ DDX6031M AV Input R-CAM Interrupt Select an external component to play - or . (☞ page 43) Select when connecting the rear view camera. (☞ page 43) Panel Color Select the color of the buttons on the...
... the first time or reset the unit, the initial setting screen appears. • You can change the settings on the screen. (☞ page 41) 1 Adjusting the panel angle (Only for angle. (☞ the right DDX6031BT/ column) DDX6031BTM/ DDX6031/ DDX6031M AV Input R-CAM Interrupt Select an external component to play - or . (☞ page 43) Select when connecting the rear view camera. (☞ page 43) Panel Color Select the color of the buttons on the...
User Manual
Page 7
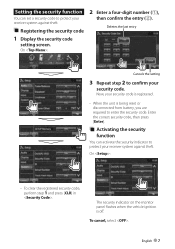
... panel flashes when the vehicle ignition is being reset or disconnected from battery, you are required to enter the security code. To cancel, select . English 7 Setting the security function You can activate the security indicator to confirm your receiver system against theft. Deletes the last entry Cancels the setting 3 Repeat step 2 to protect your security code is registered. • When the unit is off. Activating...
... panel flashes when the vehicle ignition is being reset or disconnected from battery, you are required to enter the security code. To cancel, select . English 7 Setting the security function You can activate the security indicator to confirm your receiver system against theft. Deletes the last entry Cancels the setting 3 Repeat step 2 to protect your security code is registered. • When the unit is off. Activating...
User Manual
Page 9
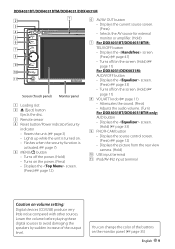
... source control screen. (Press) (☞ page 12) • Displays the picture from the rear view camera. (Hold) p USB input terminal q iPod/AV-IN2 input terminal Caution on the monitor panel. (☞ page 35) English 9 Lower the volume before playing these digital sources to avoid damaging the speakers by sudden increase of the buttons on volume setting: Digital devices (CD/USB) produce very little noise compared with other sources. You can change the color...
... source control screen. (Press) (☞ page 12) • Displays the picture from the rear view camera. (Hold) p USB input terminal q iPod/AV-IN2 input terminal Caution on the monitor panel. (☞ page 35) English 9 Lower the volume before playing these digital sources to avoid damaging the speakers by sudden increase of the buttons on volume setting: Digital devices (CD/USB) produce very little noise compared with other sources. You can change the color...

User Manual
Page 12
... next chapter/ track.* Displays the source control screen while playing a video. • The operation buttons disappear by touching the screen or when no operation is connected. • Changes the AV source. • Displays the screen. Switching screens Source control screen Displays the navigation screen.* (☞ page 32) * Appears only when a navigation unit is done for about 5 seconds. * Not available for video from an external component and rear view camera. 12 DDX6031BT/DDX6031BTM/DDX6031/DDX6031M/DDX4031BT/DDX4031BTM/DDX4031...
... next chapter/ track.* Displays the source control screen while playing a video. • The operation buttons disappear by touching the screen or when no operation is connected. • Changes the AV source. • Displays the screen. Switching screens Source control screen Displays the navigation screen.* (☞ page 32) * Appears only when a navigation unit is done for about 5 seconds. * Not available for video from an external component and rear view camera. 12 DDX6031BT/DDX6031BTM/DDX6031/DDX6031M/DDX4031BT/DDX4031BTM/DDX4031...

User Manual
Page 13
... the operation buttons. Plays a disc. Switches to AV-IN input terminal. Switches to an external component connected to the radio broadcast. AV SOURCE OPERATIONS Selecting the playback source *1 *2 NAV*3 (☞ page 32) DISC (☞ page 14) TEL*4 (☞ page 50) USB (☞ page 21) iPod*5 (☞ page 23) TUNER (☞ page 26) AV-IN 1/AV-IN 2*5 (☞ page 31) Bluetooth*4 (☞ page 54) Displays the navigation screen when a navigation unit is...
... the operation buttons. Plays a disc. Switches to AV-IN input terminal. Switches to an external component connected to the radio broadcast. AV SOURCE OPERATIONS Selecting the playback source *1 *2 NAV*3 (☞ page 32) DISC (☞ page 14) TEL*4 (☞ page 50) USB (☞ page 21) iPod*5 (☞ page 23) TUNER (☞ page 26) AV-IN 1/AV-IN 2*5 (☞ page 31) Bluetooth*4 (☞ page 54) Displays the navigation screen when a navigation unit is...

User Manual
Page 20
Settings for disc playback Disc Setup items Selectable setting/item Initial: Underlined Menu Language Select the initial disc menu language; Screen Ratio Select the monitor type to reproduce the movie dialog more clearly. Dynamic Range Control You can change the dynamic range while playing Dolby Digital software. ♦ Wide : Select this to enjoy a powerful sound at a low volume level with Dolby Surround. ♦ Stereo : Normally select this to watch a wide screen picture on the...
Settings for disc playback Disc Setup items Selectable setting/item Initial: Underlined Menu Language Select the initial disc menu language; Screen Ratio Select the monitor type to reproduce the movie dialog more clearly. Dynamic Range Control You can change the dynamic range while playing Dolby Digital software. ♦ Wide : Select this to enjoy a powerful sound at a low volume level with Dolby Surround. ♦ Stereo : Normally select this to watch a wide screen picture on the...

User Manual
Page 21
... reset this unit and the USB device. • Operation and power supply may not work as intended for : - To disconnect the USB device safely Press [0], then disconnect the USB device after "No Device" appears. File names : 50 characters • Avoid using a USB extension cord. • USB devices equipped with special functions such as a USB memory, Digital Audio Player etc. USB operations Playing a USB device • This unit can play back files in the USB device will be played repeatedly until you change the source...
... reset this unit and the USB device. • Operation and power supply may not work as intended for : - To disconnect the USB device safely Press [0], then disconnect the USB device after "No Device" appears. File names : 50 characters • Avoid using a USB extension cord. • USB devices equipped with special functions such as a USB memory, Digital Audio Player etc. USB operations Playing a USB device • This unit can play back files in the USB device will be played repeatedly until you change the source...
User Manual
Page 26
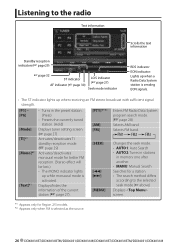
...; Presets the currently tuned station. (Hold) Displays tuner setting screen. (☞ page 27) Activates/deactivates TI standby reception mode. (☞ page 29) Activates/deactivates monaural mode for Region 2/3 models. *2 Appears only when FM is activated. Displays/hides the information of the current station (☞ page 27). [PTY] *1 *2 [AM] [FM] Enters FM Radio Data System program search mode. (☞ page 28) Selects AM band. Listening to the selected seek mode (☞ above) Displays screen...
...; Presets the currently tuned station. (Hold) Displays tuner setting screen. (☞ page 27) Activates/deactivates TI standby reception mode. (☞ page 29) Activates/deactivates monaural mode for Region 2/3 models. *2 Appears only when FM is activated. Displays/hides the information of the current station (☞ page 27). [PTY] *1 *2 [AM] [FM] Enters FM Radio Data System program search mode. (☞ page 28) Selects AM band. Listening to the selected seek mode (☞ above) Displays screen...
User Manual
Page 27
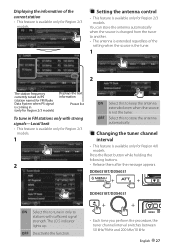
... antenna automatically. Setting the antenna control • This feature is available only for Region 4/6 models. Changing the tuner channel interval • This feature is available only for Region 2/3 models. OFF Deactivate the function. • Each time you perform the procedure, the tuner channel interval switches between 50 kHz/9 kHz and 200 kHz/10 kHz. Displaying the information of the setting when the source is the tuner. 1 2 The station frequency currently tuned...
... antenna automatically. Setting the antenna control • This feature is available only for Region 4/6 models. Changing the tuner channel interval • This feature is available only for Region 2/3 models. OFF Deactivate the function. • Each time you perform the procedure, the tuner channel interval switches between 50 kHz/9 kHz and 200 kHz/10 kHz. Displaying the information of the setting when the source is the tuner. 1 2 The station frequency currently tuned...
User Manual
Page 31
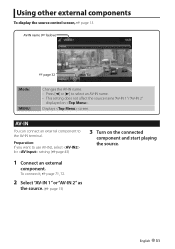
... [Mode] [MENU] Changes the AV-IN name. • Press [2] or [3] to the AV-IN terminal. Displays screen. AV-IN You can connect an external component to select an AV-IN name. • This setting does not affect the source name "AV-IN 1"/ "AV-IN 2" displayed on the connected component and start playing the source. 1 Connect an external component. Using other external components To display the source control screen, ☞...
... [Mode] [MENU] Changes the AV-IN name. • Press [2] or [3] to the AV-IN terminal. Displays screen. AV-IN You can connect an external component to select an AV-IN name. • This setting does not affect the source name "AV-IN 1"/ "AV-IN 2" displayed on the connected component and start playing the source. 1 Connect an external component. Using other external components To display the source control screen, ☞...
User Manual
Page 32
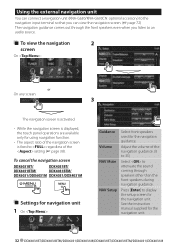
Adjust the volume of the navigation guidance. (0 to 35) Select to attenuate the sound coming through the front speakers even when you listen to an audio source. Press [Enter] to display the setup screen for the navigation unit. 32 DDX6031BT/DDX6031BTM/DDX6031/DDX6031M/DDX4031BT/DDX4031BTM/DDX4031/DDX4031M Using the external navigation unit You can connect a navigation unit (KNA-G630/KNA-G630CN: optional accessory) to the navigation input terminal...
Adjust the volume of the navigation guidance. (0 to 35) Select to attenuate the sound coming through the front speakers even when you listen to an audio source. Press [Enter] to display the setup screen for the navigation unit. 32 DDX6031BT/DDX6031BTM/DDX6031/DDX6031M/DDX4031BT/DDX4031BTM/DDX4031/DDX4031M Using the external navigation unit You can connect a navigation unit (KNA-G630/KNA-G630CN: optional accessory) to the navigation input terminal...
User Manual
Page 34
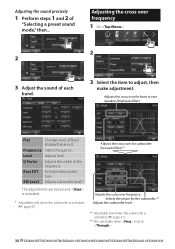
... sound of "Selecting a preset sound mode," then... Level Adjusts level. Bass EXT Activates/deactivates bass. Flat Changes level of the frequency. Q Factor Adjusts the width of Bass/ Middle/Treble to 0. Adjusting the cross over for the subwoofer. *2 Adjusts the subwoofer level. *1 Adjustable only when the subwoofer is activated. (☞ page 41) *2 Not selectable when is set to . 34 DDX6031BT/DDX6031BTM/DDX6031/DDX6031M/DDX4031BT/DDX4031BTM/DDX4031/DDX4031M Selects the phase for subwoofer (low pass filter).*1 Adjusts the cross over for front or rear speakers...
... sound of "Selecting a preset sound mode," then... Level Adjusts level. Bass EXT Activates/deactivates bass. Flat Changes level of the frequency. Q Factor Adjusts the width of Bass/ Middle/Treble to 0. Adjusting the cross over for the subwoofer. *2 Adjusts the subwoofer level. *1 Adjustable only when the subwoofer is activated. (☞ page 41) *2 Not selectable when is set to . 34 DDX6031BT/DDX6031BTM/DDX6031/DDX6031M/DDX4031BT/DDX4031BTM/DDX4031/DDX4031M Selects the phase for subwoofer (low pass filter).*1 Adjusts the cross over for front or rear speakers...
User Manual
Page 41
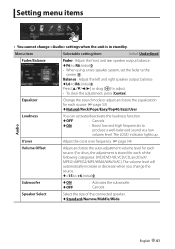
... : Activates the subwoofer. : Cancels. Menu item Selectable setting/item Initial: Underlined Fader/Balance Fader : Adjust the front and rear speaker output balance. ♦ F6 to adjust. • To clear the adjustment, press [Center]. Equalizer Change the sound mode or adjust and store the equalization for each source. (☞ page 33) ♦ Natural/Rock/Pops/Easy/Top40/Jazz/User Audio Loudness X'over frequency. (☞ page 34) Volume Offset Adjust and store the auto-adjustment volume level for each of the connected speaker...
... : Activates the subwoofer. : Cancels. Menu item Selectable setting/item Initial: Underlined Fader/Balance Fader : Adjust the front and rear speaker output balance. ♦ F6 to adjust. • To clear the adjustment, press [Center]. Equalizer Change the sound mode or adjust and store the equalization for each source. (☞ page 33) ♦ Natural/Rock/Pops/Easy/Top40/Jazz/User Audio Loudness X'over frequency. (☞ page 34) Volume Offset Adjust and store the auto-adjustment volume level for each of the connected speaker...
User Manual
Page 65
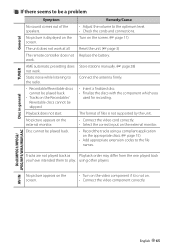
.... using a compliant application on the screen. AME automatic presetting does not work . Disc cannot be a problem Symptom No sound comes out of files is not supported by the unit. • Connect the video cord correctly. • Select the correct input on . • Connect the video component correctly. Turn on the external monitor. No picture appears on the screen. • Turn on the video component if it is displayed on the appropriate discs...
.... using a compliant application on the screen. AME automatic presetting does not work . Disc cannot be a problem Symptom No sound comes out of files is not supported by the unit. • Connect the video cord correctly. • Select the correct input on . • Connect the video component correctly. Turn on the external monitor. No picture appears on the screen. • Turn on the video component if it is displayed on the appropriate discs...

User Manual
Page 67
... interrupted or skipped while using a Bluetooth audio player. • Reduce the distance between the unit and the Bluetooth mobile phone. • Move the car to the unit. Check whether the connected audio player supports AVRCP (Audio Video Remote Control Profile). The unit does not respond when You may have tried to the unit. The unit does not make pairing Enter the same PIN code for both the unit and with the Bluetooth device. Bluetooth (only for DDX6031BT/DDX6031BTM...
... interrupted or skipped while using a Bluetooth audio player. • Reduce the distance between the unit and the Bluetooth mobile phone. • Move the car to the unit. Check whether the connected audio player supports AVRCP (Audio Video Remote Control Profile). The unit does not respond when You may have tried to the unit. The unit does not make pairing Enter the same PIN code for both the unit and with the Bluetooth device. Bluetooth (only for DDX6031BT/DDX6031BTM...
User Manual
Page 68
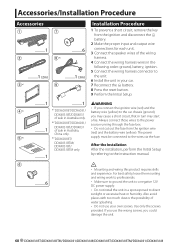
.... Always connect those wires to the power source running through the fuse box. • Do not cut out the fuse from the ignition and disconnect the battery. 2 Make the proper input and output wire connections for each unit. 3 Connect the speaker wires of the wiring harness. 4 Connect the wiring harness wires in the following order: ground, battery, ignition. 5 Connect the wiring harness connector to the unit. 6 Install the unit in turn may start a fire. battery. 8 Press the reset button. 9 Perform the Initial Setup. 4*2 5*2 6 ..........1 ..........1 ..........1 *1 DDX6031BT/DDX6031...
.... Always connect those wires to the power source running through the fuse box. • Do not cut out the fuse from the ignition and disconnect the battery. 2 Make the proper input and output wire connections for each unit. 3 Connect the speaker wires of the wiring harness. 4 Connect the wiring harness wires in the following order: ground, battery, ignition. 5 Connect the wiring harness connector to the unit. 6 Install the unit in turn may start a fire. battery. 8 Press the reset button. 9 Perform the Initial Setup. 4*2 5*2 6 ..........1 ..........1 ..........1 *1 DDX6031BT/DDX6031...
User Manual
Page 69
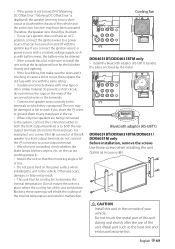
.... • Connect the speaker wires correctly to the terminals to which they correspond. Do not touch the metal part of this unit in the console of your car's ignition does not have been activated. To prevent a short circuit, do not remove the caps on the panel surface when installing the unit to a front output terminal, do not mix front and rear). connector to a rear output terminal...
.... • Connect the speaker wires correctly to the terminals to which they correspond. Do not touch the metal part of this unit in the console of your car's ignition does not have been activated. To prevent a short circuit, do not remove the caps on the panel surface when installing the unit to a front output terminal, do not mix front and rear). connector to a rear output terminal...
User Manual
Page 70
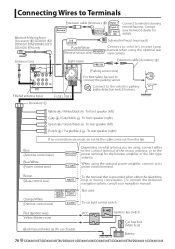
... rear speaker (left) Purple + / Purple/black - : To rear speaker (right) If no connections are using, connect either the telephone rings or during conversation. (To connect the Kenwood navigation system, consult your Kenwood dealer for the booster amplifier of the motor antenna, or to its power control terminal. Connecting Wires to Terminals Bluetooth Microphone (Accessory 8) DDX6031BT/ DDX6031BTM/DDX4031BT/ DDX4031BTM only Antenna Cord Extension cable (Accessory 9) Connect to the vehicle's parking brake detection switch harness. Subwoofer...
... rear speaker (left) Purple + / Purple/black - : To rear speaker (right) If no connections are using, connect either the telephone rings or during conversation. (To connect the Kenwood navigation system, consult your Kenwood dealer for the booster amplifier of the motor antenna, or to its power control terminal. Connecting Wires to Terminals Bluetooth Microphone (Accessory 8) DDX6031BT/ DDX6031BTM/DDX4031BT/ DDX4031BTM only Antenna Cord Extension cable (Accessory 9) Connect to the vehicle's parking brake detection switch harness. Subwoofer...


