

Quick Start Guide
Page 2
... media/USB Basic Operation....13 iPod/iPhone Basic Operation 14 Bluetooth Setup 15 Using the Hands-Free Unit 16 Before Installation 18 Installing the unit 20 About this Unit 28 About the Quick start guide This Quick Start Guide describes basic functions of this reason, they may be different from the actual panels. For functions not described in the Instruction Manual. 2 Be sure to download the latest edition of the Instruction manual for modification of specifications and...
... media/USB Basic Operation....13 iPod/iPhone Basic Operation 14 Bluetooth Setup 15 Using the Hands-Free Unit 16 Before Installation 18 Installing the unit 20 About this Unit 28 About the Quick start guide This Quick Start Guide describes basic functions of this reason, they may be different from the actual panels. For functions not described in the Instruction Manual. 2 Be sure to download the latest edition of the Instruction manual for modification of specifications and...

Quick Start Guide
Page 3
... be used. • This unit can select a language to play. In such a situation, remove the disc and wait for any metallic objects (such as a silicon cloth. NOTE • Applying spray cleaner directly to evaporate. See User Interface Setup (P.66) in the Instruction Manual. • The Radio Data System or Radio Broadcast Data System feature won't work in areas where the service is not supported...
... be used. • This unit can select a language to play. In such a situation, remove the disc and wait for any metallic objects (such as a silicon cloth. NOTE • Applying spray cleaner directly to evaporate. See User Interface Setup (P.66) in the Instruction Manual. • The Radio Data System or Radio Broadcast Data System feature won't work in areas where the service is not supported...

Quick Start Guide
Page 4
... Instruction Manual. Default is "ON". 1 Touch [DEMO] and select ON or OFF. 2 Touch [Finish]. ■■ [Language] Select the language used for the control screen and setting items. Default is hard to see Calendar/clock settings (P.5). ■■ [Display] Set the button illumination color. Consult your KENWOOD dealer for the camera. 1 Touch [Camera]. 2 Set each item and touch [ ]. Initial Settings Initial setup Perform this setup when you use this unit first time. 1 Set...
... Instruction Manual. Default is "ON". 1 Touch [DEMO] and select ON or OFF. 2 Touch [Finish]. ■■ [Language] Select the language used for the control screen and setting items. Default is hard to see Calendar/clock settings (P.5). ■■ [Display] Set the button illumination color. Consult your KENWOOD dealer for the camera. 1 Touch [Camera]. 2 Set each item and touch [ ]. Initial Settings Initial setup Perform this setup when you use this unit first time. 1 Set...

Quick Start Guide
Page 7
... installation, it is turned on . • Adjusts the volume. DDX6906S/ DDX6706S DDX5706S ●●To turn the unit on the model. 1 Press the [ ]/[HOME] button. For this guide are examples used to insert a disc media. (DDX6906S/ DDX6706S/ DDX5706S only) • Receives the remote control signal. DMX706S/ DMX7706S hhThe unit is your first time to the "Camera Setup" setting and the shift lever position in the Instruction Manual. • Pressing for 1 second. Number Name 1 [ ]/HOME 2 S, R (Volume) 3 [ ]/CAM 4 [ ]/MENU...
... installation, it is turned on . • Adjusts the volume. DDX6906S/ DDX6706S DDX5706S ●●To turn the unit on the model. 1 Press the [ ]/[HOME] button. For this guide are examples used to insert a disc media. (DDX6906S/ DDX6706S/ DDX5706S only) • Receives the remote control signal. DMX706S/ DMX7706S hhThe unit is your first time to the "Camera Setup" setting and the shift lever position in the Instruction Manual. • Pressing for 1 second. Number Name 1 [ ]/HOME 2 S, R (Volume) 3 [ ]/CAM 4 [ ]/MENU...

Quick Start Guide
Page 8
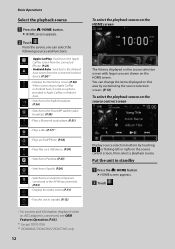
... input terminal. • Displays the Audio screen. • Puts the unit in standby. hhHOME screen appears. 2 Touch [ ]. 3 Touch [STANDBY]. 8 hhHOME screen appears. 2 Touch [ ]. Put the unit in Apple CarPlay or Android Auto. • Switches to the Radio broadcast. • Switches to the SiriusXM® satellite radio broadcast. • Plays a Bluetooth audio player • Plays a disc. (DDX6906S/ DDX6706S/ DDX5706S) • Plays an iPod/iPhone. • Plays files on a USB device. • Switches...
... input terminal. • Displays the Audio screen. • Puts the unit in standby. hhHOME screen appears. 2 Touch [ ]. 3 Touch [STANDBY]. 8 hhHOME screen appears. 2 Touch [ ]. Put the unit in Apple CarPlay or Android Auto. • Switches to the Radio broadcast. • Switches to the SiriusXM® satellite radio broadcast. • Plays a Bluetooth audio player • Plays a disc. (DDX6906S/ DDX6706S/ DDX5706S) • Plays an iPod/iPhone. • Plays files on a USB device. • Switches...

Quick Start Guide
Page 10
... to display the popup menu screen. 2 Press the [ ]/[HOME] button. 3 Touch [ ]. 4 Touch [USB]. ÑÑDisconnect the USB device 1 Press the [ ]/[HOME] button. 2 Touch a source other than [USB]. 3 Detach the USB device. Connecting a USB device 1 Connect the USB device with the cable: 1 Detach the iPod/iPhone. Connect iPod/iPhone Wired connection 1 Connect the iPod/iPhone using the KCA- Playing a disc (DDX6906S/ DDX6706S/ DDX5706S) ÑÑInsert a disc 1 Insert the disc into the slot. Bluetooth connection Pair the iPhone through Bluetooth. (P.15...
... to display the popup menu screen. 2 Press the [ ]/[HOME] button. 3 Touch [ ]. 4 Touch [USB]. ÑÑDisconnect the USB device 1 Press the [ ]/[HOME] button. 2 Touch a source other than [USB]. 3 Detach the USB device. Connecting a USB device 1 Connect the USB device with the cable: 1 Detach the iPod/iPhone. Connect iPod/iPhone Wired connection 1 Connect the iPod/iPhone using the KCA- Playing a disc (DDX6906S/ DDX6706S/ DDX5706S) ÑÑInsert a disc 1 Insert the disc into the slot. Bluetooth connection Pair the iPhone through Bluetooth. (P.15...

Quick Start Guide
Page 16
... CarPlay or Android Auto Hands-Free function can display the phone book and call lists onto the touch panel screen when the cell-phone is connected, the Bluetooth Hands-Free function and two Bluetooth devices connections cannot be used . Using the Hands-Free Unit You can disable the hands-free function. 16 hhHands Free screen appears. NOTE • If your cell-phone supports PBAP, you want to use. ] to this unit. Bluetooth Setup screen appears. ●...
... CarPlay or Android Auto Hands-Free function can display the phone book and call lists onto the touch panel screen when the cell-phone is connected, the Bluetooth Hands-Free function and two Bluetooth devices connections cannot be used . Using the Hands-Free Unit You can disable the hands-free function. 16 hhHands Free screen appears. NOTE • If your cell-phone supports PBAP, you want to use. ] to this unit. Bluetooth Setup screen appears. ●...

Quick Start Guide
Page 22
... optional rear view camera. 22 Blue (Antenna control wire) ANT CONT Depending on what antenna you are made, do not let the cable come out from the tab. Ignition key switch Red (Ignition wire) Yellow (Battery wire) Car fuse box Black (Ground wire) ¤ (To car chassis) Battery Green Green/Black To rear left speaker To front right speaker Connect to the vehicle's parking brake detection switch Accessory 1 harness. CONT When using , connect either to the control terminal of...
... optional rear view camera. 22 Blue (Antenna control wire) ANT CONT Depending on what antenna you are made, do not let the cable come out from the tab. Ignition key switch Red (Ignition wire) Yellow (Battery wire) Car fuse box Black (Ground wire) ¤ (To car chassis) Battery Green Green/Black To rear left speaker To front right speaker Connect to the vehicle's parking brake detection switch Accessory 1 harness. CONT When using , connect either to the control terminal of...

Quick Start Guide
Page 23
... connections are using the optional rear view camera. CONT ANT. CONT When using the optional power amplifier, connect to the vehicle's parking brake detection switch harness. MUTE English 23 Ignition key switch Red (Ignition wire) Yellow (Battery wire) Car fuse box Black (Ground wire) ¤ (To car chassis) Battery Green Green/Black To rear left speaker To front right speaker Connect to its power control terminal. (Max. 200mA, 12V) Depending on what antenna you need an exclusive remote adapter (not supplied...
... connections are using the optional rear view camera. CONT ANT. CONT When using the optional power amplifier, connect to the vehicle's parking brake detection switch harness. MUTE English 23 Ignition key switch Red (Ignition wire) Yellow (Battery wire) Car fuse box Black (Ground wire) ¤ (To car chassis) Battery Green Green/Black To rear left speaker To front right speaker Connect to its power control terminal. (Max. 200mA, 12V) Depending on what antenna you need an exclusive remote adapter (not supplied...

Operation Manual
Page 3
... 62 View Camera 62 External audio/video players (AV-IN 63 OEM Features Operation 63 Setup 65 Monitor Screen Setup 65 System Setup 65 User Interface Setup 66 Special Setup 67 Display Setup 68 AV Setup 70 Controlling Audio 71 3-way speaker system setup 71 Speaker / X'over setup 72 Controlling General Audio 73 Equalizer Control 74 Volume Offset 75 Zone Control 75 Sound Effect 76 Listening Position / DTA 77 Audio Setup memory 78 Remote control 79 Battery Installation 79 Functions of the Remote control Buttons........79 Connection/Installation 82...
... 62 View Camera 62 External audio/video players (AV-IN 63 OEM Features Operation 63 Setup 65 Monitor Screen Setup 65 System Setup 65 User Interface Setup 66 Special Setup 67 Display Setup 68 AV Setup 70 Controlling Audio 71 3-way speaker system setup 71 Speaker / X'over setup 72 Controlling General Audio 73 Equalizer Control 74 Volume Offset 75 Zone Control 75 Sound Effect 76 Listening Position / DTA 77 Audio Setup memory 78 Remote control 79 Battery Installation 79 Functions of the Remote control Buttons........79 Connection/Installation 82...

Operation Manual
Page 4
... display menus, audio file tags, etc. on the disc, or use a disc with tape stuck on it. • Do not use disc type accessories. • Clean the disc from this unit • When you turn on handling discs • Do not touch the recording surface of the unit due to condensation. NOTE • Applying spray cleaner directly to play. Before Use...
... display menus, audio file tags, etc. on the disc, or use a disc with tape stuck on it. • Do not use disc type accessories. • Clean the disc from this unit • When you turn on handling discs • Do not touch the recording surface of the unit due to condensation. NOTE • Applying spray cleaner directly to play. Before Use...
Operation Manual
Page 12
...) *1 • Displays the Hands Free screen. (P.56) When connecting as Apple CarPlay or Android Auto, it works as a phone provided in Apple CarPlay or Android Auto. • Switches to the Radio broadcast. (P.36) • Switches to the SiriusXM® satellite radio broadcast. (P.39) • Plays a Bluetooth audio player. (P.51) • Plays a disc. (P.17) *2 • Plays an iPod/iPhone. (P.33) • Plays files on a USB device. (P.30) • Switches to...
...) *1 • Displays the Hands Free screen. (P.56) When connecting as Apple CarPlay or Android Auto, it works as a phone provided in Apple CarPlay or Android Auto. • Switches to the Radio broadcast. (P.36) • Switches to the SiriusXM® satellite radio broadcast. (P.39) • Plays a Bluetooth audio player. (P.51) • Plays a disc. (P.17) *2 • Plays an iPod/iPhone. (P.33) • Plays files on a USB device. (P.30) • Switches to...

Operation Manual
Page 18
...; [VER2]: The VCD version is 2. 6 Searching area Touch to search for the next/previous content. 7 Key display area Touch to display the control screen. 8 [MENU CTRL] (DVD only) Touch to change audio output channels. 3 Play mode indicator/ Playing time • D, B, I ]: Stops playback. Orange: Disc player failure. NOTE • The control screen disappears when no operation is inside the unit. Each time you touch the key, repeat modes are as follows: D (play it...
...; [VER2]: The VCD version is 2. 6 Searching area Touch to search for the next/previous content. 7 Key display area Touch to display the control screen. 8 [MENU CTRL] (DVD only) Touch to change audio output channels. 3 Play mode indicator/ Playing time • D, B, I ]: Stops playback. Orange: Disc player failure. NOTE • The control screen disappears when no operation is inside the unit. Each time you touch the key, repeat modes are as follows: D (play it...

Operation Manual
Page 22
...;[Menu Language] / [Subtitle Language] / [Audio Language] See Language setup (P.22). ■■[Dynamic Range Control] Sets the dynamic range. [Wide]: The dynamic range is wide. [Normal]: The dynamic range is normal. [Dialog] (Default): Makes the total sound volume larger than the volumes in other modes. Touch [Close] to set the entered language and return to DVD Language Codes (P.97). Touch [SETUP]. ■■[Screen Ratio] Sets the screen display mode. [16:9 ](Default): Displays wide pictures...
...;[Menu Language] / [Subtitle Language] / [Audio Language] See Language setup (P.22). ■■[Dynamic Range Control] Sets the dynamic range. [Wide]: The dynamic range is wide. [Normal]: The dynamic range is normal. [Dialog] (Default): Makes the total sound volume larger than the volumes in other modes. Touch [Close] to set the entered language and return to DVD Language Codes (P.97). Touch [SETUP]. ■■[Screen Ratio] Sets the screen display mode. [16:9 ](Default): Displays wide pictures...

Operation Manual
Page 25
... for 1 second. To enter the Android Auto mode, touch the [Android Auto] icon on the screen differ among the connected Android devices. English 25 If the Bluetooth Hands-Free phone is being used, disconnection will switch the current source to another source with Android Auto is connected to the USB terminal, the device is disconnected. DDX6906S/ DDX6706S DDX5706S DMX706S/ DMX7706S 1 1 Application/information buttons Starts the application or displays information.
... for 1 second. To enter the Android Auto mode, touch the [Android Auto] icon on the screen differ among the connected Android devices. English 25 If the Bluetooth Hands-Free phone is being used, disconnection will switch the current source to another source with Android Auto is connected to the USB terminal, the device is disconnected. DDX6906S/ DDX6706S DDX5706S DMX706S/ DMX7706S 1 1 Application/information buttons Starts the application or displays information.

Operation Manual
Page 33
...iPod/iPhone Preparation ÑÑConnectable iPod/iPhone The following models can be connected. 1 Connect the iPod/iPhone using the KCA- iPod/iPhone ÑÑConnect iPod/iPhone Wired connection Preparation • Connect an iPod/iPhone with the KCA-iP103 (optional accessory). • Only one iPod/iPhone can supply power to this unit. iP103. (P.90) 2 Press the [ ]/[HOME] button. 3 Touch [ ]. 4 Touch [iPod]. (P.12) ●●To disconnect the iPod/iPhone connected with the iPod connection cable KCA-iP103 (optional accessory), you restart playback after connecting...
...iPod/iPhone Preparation ÑÑConnectable iPod/iPhone The following models can be connected. 1 Connect the iPod/iPhone using the KCA- iPod/iPhone ÑÑConnect iPod/iPhone Wired connection Preparation • Connect an iPod/iPhone with the KCA-iP103 (optional accessory). • Only one iPod/iPhone can supply power to this unit. iP103. (P.90) 2 Press the [ ]/[HOME] button. 3 Touch [ ]. 4 Touch [iPod]. (P.12) ●●To disconnect the iPod/iPhone connected with the iPod connection cable KCA-iP103 (optional accessory), you restart playback after connecting...
Operation Manual
Page 46
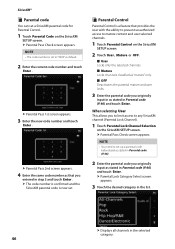
...;■ [OFF] Deactivates the parental mature and user locks. 3 Enter the parental code you to limit access to mature content and user selected channels. 1 Touch [Parental Control] on the SiriusXM SETUP screen. hhDisplays all channels in the list. hhParental Pass Check screen appears. hhParental Pass 1st screen appears. 3 Enter the new code number and touch [Enter]. NOTE • You need to "0000" as stated in Parental...
...;■ [OFF] Deactivates the parental mature and user locks. 3 Enter the parental code you to limit access to mature content and user selected channels. 1 Touch [Parental Control] on the SiriusXM SETUP screen. hhDisplays all channels in the list. hhParental Pass Check screen appears. hhParental Pass 1st screen appears. 3 Enter the new code number and touch [Enter]. NOTE • You need to "0000" as stated in Parental...

Operation Manual
Page 72
... Speaker network is activated automatically (for timing adjustment of speakers. 1 Touch [X`over ]* Display the speaker crossover setup screen. Controlling Audio Speaker / X'over ]. 4 Select a car type. None, Small, Medium, Large 72 2 Touch the speaker to get the best sound effects. hhPopup menu appears. 2 Touch [Audio]. Connecting 3-way speakers with the 2-way mode selected can break the speakers. • Select "None" if you have no speakers. ÑÑCrossover network setup You can set the crossover frequency of sound output...
... Speaker network is activated automatically (for timing adjustment of speakers. 1 Touch [X`over ]* Display the speaker crossover setup screen. Controlling Audio Speaker / X'over ]. 4 Select a car type. None, Small, Medium, Large 72 2 Touch the speaker to get the best sound effects. hhPopup menu appears. 2 Touch [Audio]. Connecting 3-way speakers with the 2-way mode selected can break the speakers. • Select "None" if you have no speakers. ÑÑCrossover network setup You can set the crossover frequency of sound output...

Operation Manual
Page 86
... detection switch Accessory 1 harness. Blue/White (Power control wire) P. Orange/White (Dimmer control wire) To car light control switch ILLUMI Purple/White (Reverse sensor wire) (2 m) REVERSE Connect to vehicle's reverse lamp harness when using the optional rear view camera. 86 Blue (Antenna control wire) ANT CONT Depending on what antenna you are made, do not let the cable come out from the tab. Ignition key switch Red (Ignition wire) Yellow (Battery wire) Car fuse box Black (Ground wire) ¤ (To car chassis) Battery Green Green/Black...
... detection switch Accessory 1 harness. Blue/White (Power control wire) P. Orange/White (Dimmer control wire) To car light control switch ILLUMI Purple/White (Reverse sensor wire) (2 m) REVERSE Connect to vehicle's reverse lamp harness when using the optional rear view camera. 86 Blue (Antenna control wire) ANT CONT Depending on what antenna you are made, do not let the cable come out from the tab. Ignition key switch Red (Ignition wire) Yellow (Battery wire) Car fuse box Black (Ground wire) ¤ (To car chassis) Battery Green Green/Black...

Operation Manual
Page 92
... not connected. †† Connect the wire correctly. The preout jack is enabled. †† Turn off the PBC function. The disc is an error in contact with the car chassis. †† Wire or insulate the speaker cord as the message on the screen. The sound skips when an audio file is disabled. †† Set the dual zone function to operate the unit correctly...
... not connected. †† Connect the wire correctly. The preout jack is enabled. †† Turn off the PBC function. The disc is an error in contact with the car chassis. †† Wire or insulate the speaker cord as the message on the screen. The sound skips when an audio file is disabled. †† Set the dual zone function to operate the unit correctly...


