
Instruction Manual
Page 22
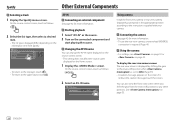
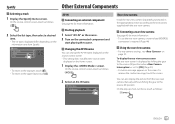
... follows: 2 Select an AV-IN name. On the source control screen, touch as the source. 2 Turn on the information sent from the reverse (R) position to any other positions. You can change the AV-IN name displayed on the source control screen. • This setting does not...Selecting a track 1 Display the Spotify menu screen. Connecting the camera See page 42 for more information. • To use the rear view camera, a reverse lead (REVERSE) connection is set to the reverse (R) position when is required. (Page 41) Using the camera • For settings, see on page 32 or on the...
... follows: 2 Select an AV-IN name. On the source control screen, touch as the source. 2 Turn on the information sent from the reverse (R) position to any other positions. You can change the AV-IN name displayed on the source control screen. • This setting does not...Selecting a track 1 Display the Spotify menu screen. Connecting the camera See page 42 for more information. • To use the rear view camera, a reverse lead (REVERSE) connection is set to the reverse (R) position when is required. (Page 41) Using the camera • For settings, see on page 32 or on the...
Instruction Manual
Page 34
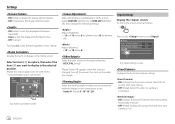
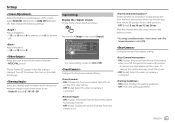
Touching [ Settings • ON (Initial): Activates the display demonstration. • OFF: Deactivates the display demonstration. • ON (Initial): Scrolls the displayed information repeatedly. • Once: Scrolls the displayed information once. • OFF: Cancels.
Touching [ Settings • ON (Initial): Activates the display demonstration. • OFF: Deactivates the display demonstration. • ON (Initial): Scrolls the displayed information repeatedly. • Once: Scrolls the displayed information once. • OFF: Cancels.
Instruction Manual
Page 35
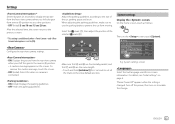
...display the picture from the front view camera when you shift the gear to [ON]. Adjust the parking guidelines according to the size of the selected mark (2). System settings screen Select the text language used for 2 seconds to set to the reverse (R) position. - To remove the ...caution message, touch the screen. • OFF (Initial): Select this when no camera is changed. On the Home screen, touch as follows: Select the mark (1), then adjust...
...display the picture from the front view camera when you shift the gear to [ON]. Adjust the parking guidelines according to the size of the selected mark (2). System settings screen Select the text language used for 2 seconds to set to the reverse (R) position. - To remove the ...caution message, touch the screen. • OFF (Initial): Select this when no camera is changed. On the Home screen, touch as follows: Select the mark (1), then adjust...
Instruction Manual
Page 43
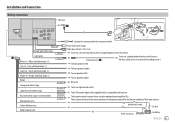
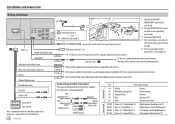
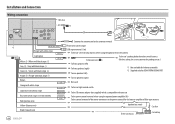
... compatible with your car Blue with white stripe (12 V 350 mA) ANT.CONT To the power control terminal when using the optional rear view camera Light green ¥ PRK SW White ] / White with black stripe [ Extension wire ( ø ) To front speakers (left) To ... To front speakers (right) Green ] / Green with black stripe [ To rear speakers (left) Purple ] / Purple with white stripe REVERSE USB cable (5 V 1.5 A) (1 m) To the car's reverse lamp harness when using the optional power amplifier (Or) Red (Ignition wire) P.CONT To the control terminal of film-type antenna Yellow (...
... compatible with your car Blue with white stripe (12 V 350 mA) ANT.CONT To the power control terminal when using the optional rear view camera Light green ¥ PRK SW White ] / White with black stripe [ Extension wire ( ø ) To front speakers (left) To ... To front speakers (right) Green ] / Green with black stripe [ To rear speakers (left) Purple ] / Purple with white stripe REVERSE USB cable (5 V 1.5 A) (1 m) To the car's reverse lamp harness when using the optional power amplifier (Or) Red (Ignition wire) P.CONT To the control terminal of film-type antenna Yellow (...
Instruction Manual 1
Page 27
...the information sent from the rear view camera manually without shifting the gear to the upper layer, touch [ ]. Connecting a rear view camera See page 45 for more information. • To use the rear view camera, a reverse lead (REVERSE) connection is set to the instructions... supplied with the rear view camera. Rear view camera Install the rear view camera (separately purchased) in the appropriate position ...
...the information sent from the rear view camera manually without shifting the gear to the upper layer, touch [ ]. Connecting a rear view camera See page 45 for more information. • To use the rear view camera, a reverse lead (REVERSE) connection is set to the instructions... supplied with the rear view camera. Rear view camera Install the rear view camera (separately purchased) in the appropriate position ...

Instruction Manual 1
Page 39
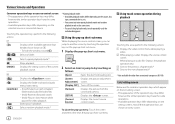
...and D are the same length. • Touch and hold [Initialize ] for DDX4019BT Configure the rear view camera settings. • ON: Displays the picture from the rear view camera when you shift the gear to prevent the car from moving. To remove the ...caution message, touch the screen. • OFF (Initial): Select this when no camera is changed. When adjusting the parking guidelines, make the image on . Settings Adjust the brightness and blackness of the... the monitor to make sure to use the parking brake to the reverse (R) position. - ENGLISH 35
...and D are the same length. • Touch and hold [Initialize ] for DDX4019BT Configure the rear view camera settings. • ON: Displays the picture from the rear view camera when you shift the gear to prevent the car from moving. To remove the ...caution message, touch the screen. • OFF (Initial): Select this when no camera is changed. When adjusting the parking guidelines, make the image on . Settings Adjust the brightness and blackness of the... the monitor to make sure to use the parking brake to the reverse (R) position. - ENGLISH 35
Instruction Manual 1
Page 48
Connecting the ISO connectors You may need to the aerial input terminal USB input terminal (1 m) To the car's reverse lamp harness when using the optional power amplifier (Or) To the aerial control terminal in the vehicle To the terminal that is 12 V ... sensor.) To the remote adapter (not supplied) which is compatible with your car To the power control terminal when using the optional rear view camera *1 Only for DDX4019BT/ DDX4019BTR: Connect the aerial cord. *2 Only for DDX4019DAB: Connect the DAB aerial (separately purchased). *3 Only for blue with white stripe (output A) Brown ...
Connecting the ISO connectors You may need to the aerial input terminal USB input terminal (1 m) To the car's reverse lamp harness when using the optional power amplifier (Or) To the aerial control terminal in the vehicle To the terminal that is 12 V ... sensor.) To the remote adapter (not supplied) which is compatible with your car To the power control terminal when using the optional rear view camera *1 Only for DDX4019BT/ DDX4019BTR: Connect the aerial cord. *2 Only for DDX4019DAB: Connect the DAB aerial (separately purchased). *3 Only for blue with white stripe (output A) Brown ...
Instruction Manual 1
Page 57
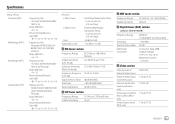
...(dB): -8/-7/-6/-5/-4/-3/-2/-1/0 Frequency (Hz): 30/40/50/60/70/80/90/100/ 120/150/180/220/250/ Through Slope (dB/Oct.): −6/−12 Phase: Normal/Reverse Gain (dB): -8/-7/-6/-5/-4/-3/-2/-1/0 Position 2 Way X'over: 3 Way X'over: Gain: Subwoofer Level Front/Rear/Subwoofer Delay 0 cm to 610 cm (2.0 cm Step) Tweeter/Mid ...Color System of External Video Input External Video Input Level (mini jack) External Audio Max Input Level (mini jack) Video Input Level for Rear Camera (RCA jack) Video Output Level (RCA jack) NTSC/PAL 1 Vp-p/75 Ω 2 V/25 kΩ 1 Vp-p/75 Ω 1 Vp-p/75 Ω...
...(dB): -8/-7/-6/-5/-4/-3/-2/-1/0 Frequency (Hz): 30/40/50/60/70/80/90/100/ 120/150/180/220/250/ Through Slope (dB/Oct.): −6/−12 Phase: Normal/Reverse Gain (dB): -8/-7/-6/-5/-4/-3/-2/-1/0 Position 2 Way X'over: 3 Way X'over: Gain: Subwoofer Level Front/Rear/Subwoofer Delay 0 cm to 610 cm (2.0 cm Step) Tweeter/Mid ...Color System of External Video Input External Video Input Level (mini jack) External Audio Max Input Level (mini jack) Video Input Level for Rear Camera (RCA jack) Video Output Level (RCA jack) NTSC/PAL 1 Vp-p/75 Ω 2 V/25 kΩ 1 Vp-p/75 Ω 1 Vp-p/75 Ω...
Instruction Manual 2
Page 10
... (Touch) Selects an item (chapter/ folder/track/audio file/video file). • (Hold) Reverses/forwards search. • (Hold) Plays in slow-motion while paused for video from the connected camera. [SETUP] Displays the screen. [Current Source] Displays the current source control screen. Displays the ...Eject] Ejects the disc from loading slot. [Screen Displays the picture adjustment Adjustment] screen. [Display OFF] Turns off the screen. [Camera] Displays the picture from an external component (AV-IN). To close the pop-up menu: Touch the screen anywhere other available operation ...
... (Touch) Selects an item (chapter/ folder/track/audio file/video file). • (Hold) Reverses/forwards search. • (Hold) Plays in slow-motion while paused for video from the connected camera. [SETUP] Displays the screen. [Current Source] Displays the current source control screen. Displays the ...Eject] Ejects the disc from loading slot. [Screen Displays the picture adjustment Adjustment] screen. [Display OFF] Turns off the screen. [Camera] Displays the picture from an external component (AV-IN). To close the pop-up menu: Touch the screen anywhere other available operation ...

Instruction Manual 2
Page 23
... an external navigation unit (Not applicable for more information. • To use the rear view camera, a reverse lead (REVERSE) connection is displayed To switch the screen between front view camera and rear view camera Touch the area shown below. To adjust the picture Touch the area shown below. To display ...Page 43) • The navigation guidance comes out of the front speakers even when you shift the gear from the reverse (R) position to [OFF], the picture from the front view camera is displayed. (Page 33) • When is shown. Video menu control is set to [ON], the picture ...
... an external navigation unit (Not applicable for more information. • To use the rear view camera, a reverse lead (REVERSE) connection is displayed To switch the screen between front view camera and rear view camera Touch the area shown below. To adjust the picture Touch the area shown below. To display ...Page 43) • The navigation guidance comes out of the front speakers even when you shift the gear from the reverse (R) position to [OFF], the picture from the front view camera is displayed. (Page 33) • When is shown. Video menu control is set to [ON], the picture ...
Instruction Manual 2
Page 35
.... • OFF (Initial): Select this when no camera is connected. • ON: Displays the picture from the front view camera horizontally reversed. • OFF (Initial): Displays the picture from the rear view camera when you shift the gear from reverse (R) position to any other positions. • OFF ...; OFF (Initial): Select this to [ON]. Select [DIM ON] (dimmer on the screen easier to the reverse (R) position. - Setup Audio Front Camera Display Rear Camera Input Navigation System Enter Enter Enter E.g. A caution message appears on to +10 (Initial: 0) Select the color system ...
.... • OFF (Initial): Select this when no camera is connected. • ON: Displays the picture from the front view camera horizontally reversed. • OFF (Initial): Displays the picture from the rear view camera when you shift the gear from reverse (R) position to any other positions. • OFF ...; OFF (Initial): Select this to [ON]. Select [DIM ON] (dimmer on the screen easier to the reverse (R) position. - Setup Audio Front Camera Display Rear Camera Input Navigation System Enter Enter Enter E.g. A caution message appears on to +10 (Initial: 0) Select the color system ...
Instruction Manual 2
Page 46
... wire) Yellow (Battery wire) Black (Ground wire) 44 ENGLISH Connect the antenna cord to the antenna terminal Front view camera input USB input terminal (1 m) REVERSE To the car's reverse lamp harness when using the optional power amplifier (Or) To the control terminal of the motor antenna or to connect the...Brown Orange with white stripe Light blue with yellow stripe Blue with your car To the power control terminal when using the optional rear view camera To the car's parking brake detection switch harness PRK SW Extension wire ( ø ) (For best safety, be sure to the power...
... wire) Yellow (Battery wire) Black (Ground wire) 44 ENGLISH Connect the antenna cord to the antenna terminal Front view camera input USB input terminal (1 m) REVERSE To the car's reverse lamp harness when using the optional power amplifier (Or) To the control terminal of the motor antenna or to connect the...Brown Orange with white stripe Light blue with yellow stripe Blue with your car To the power control terminal when using the optional rear view camera To the car's parking brake detection switch harness PRK SW Extension wire ( ø ) (For best safety, be sure to the power...


