
Instruction Manual
Page 1
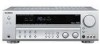
... obtain a proper understanding of the remote control and how to switch the operation modes may result in to receive e-mail updates and other KENWOOD DVD players. Using the remote control without completely understanding its design and how to switch its operation modes (...modes enable the remote control unit to standard remote controls, the remote control supplied with this receiver has several operation modes. AUDIO VIDEO SURROUND RECEIVER VR-9050 INSTRUCTION MANUAL KENWOOD CORPORATION About the supplied remote control Compared to control other offers when you register at www....
... obtain a proper understanding of the remote control and how to switch the operation modes may result in to receive e-mail updates and other KENWOOD DVD players. Using the remote control without completely understanding its design and how to switch its operation modes (...modes enable the remote control unit to standard remote controls, the remote control supplied with this receiver has several operation modes. AUDIO VIDEO SURROUND RECEIVER VR-9050 INSTRUCTION MANUAL KENWOOD CORPORATION About the supplied remote control Compared to control other offers when you register at www....
Instruction Manual
Page 2
... component. 2 EN Increase the separation between the equipment and receiver. - - For the U.S.A. NOTE: This equipment has been tested and found to comply with the instructions. As an ENERGY STAR® Partner, Kenwood Corporation has determined that interference will guide you how to operate... other components using the remote control supplied with this receiver works with a soft, dry cloth. Changes or modifications to Part ...
... component. 2 EN Increase the separation between the equipment and receiver. - - For the U.S.A. NOTE: This equipment has been tested and found to comply with the instructions. As an ENERGY STAR® Partner, Kenwood Corporation has determined that interference will guide you how to operate... other components using the remote control supplied with this receiver works with a soft, dry cloth. Changes or modifications to Part ...
Instruction Manual
Page 3
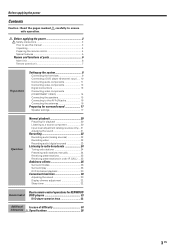
...25 Receiving preset stations in order (P.CALL) ... 25 Ambience effects 26 Surround modes 26 Surround play 28 DVD 6-channel playback 30 Convenient functions 30 Adjusting the sound 30 Display dimmer adjustment 32 Sleep timer 32 Remote Control Basic remote control operations for KENWOOD ...11 Connecting video components 12 Digital connections 13 Connecting video components (COMPONENT VIDEO 14 Connecting the speakers 15 Connecting to the AV AUX jacks 16 Connecting the antennas 16 Preparing for surround sound 17 Speaker settings 17 Operations Normal playback 20 Preparing for ...
...25 Receiving preset stations in order (P.CALL) ... 25 Ambience effects 26 Surround modes 26 Surround play 28 DVD 6-channel playback 30 Convenient functions 30 Adjusting the sound 30 Display dimmer adjustment 32 Sleep timer 32 Remote Control Basic remote control operations for KENWOOD ...11 Connecting video components 12 Digital connections 13 Connecting video components (COMPONENT VIDEO 14 Connecting the speakers 15 Connecting to the AV AUX jacks 16 Connecting the antennas 16 Preparing for surround sound 17 Speaker settings 17 Operations Normal playback 20 Preparing for ...
Instruction Manual
Page 4
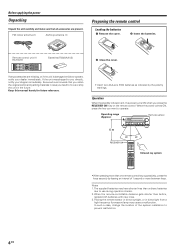
...remote control Loading the batteries 1 Remove the cover. 2 Insert the batteries. Kenwood recommends that all accessories are missing, or if the unit is lit, the power turns ON when you press the RECEIVER ON key on the remote control. The supplied batteries may cause a malfunction... When the power comes ON, press the key you directly, notify your dealer immediately. Operating range (Approx.) Remote sensor 6 m RECEIVER ON Infrared ray system • When pressing more between keys. When the remote-controllable distance gets shorter than one remote control key successively...
...remote control Loading the batteries 1 Remove the cover. 2 Insert the batteries. Kenwood recommends that all accessories are missing, or if the unit is lit, the power turns ON when you press the RECEIVER ON key on the remote control. The supplied batteries may cause a malfunction... When the power comes ON, press the key you directly, notify your dealer immediately. Operating range (Approx.) Remote sensor 6 m RECEIVER ON Infrared ray system • When pressing more between keys. When the remote-controllable distance gets shorter than one remote control key successively...
Instruction Manual
Page 5
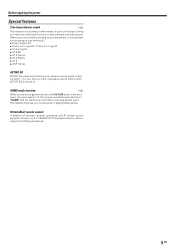
...the power Special features True home theater sound § This receiver incorporates a wide variety of surround modes to bring you connect a game machine to the AV AUX jacks on the front panel, the input selector of the receiver switches automatically to "GAME" and the optimum sound field for... is turned on. IR (InfraRed) remote control In addition to the basic receiver operations, this IR remote control supplied can enjoy a more dynamic sound quality in playing video games. You can also control KENWOOD DVD players directly without using the DVD Special features. 5 EN This feature...
...the power Special features True home theater sound § This receiver incorporates a wide variety of surround modes to bring you connect a game machine to the AV AUX jacks on the front panel, the input selector of the receiver switches automatically to "GAME" and the optimum sound field for... is turned on. IR (InfraRed) remote control In addition to the basic receiver operations, this IR remote control supplied can enjoy a more dynamic sound quality in playing video games. You can also control KENWOOD DVD players directly without using the DVD Special features. 5 EN This feature...

Instruction Manual
Page 6
...¡ Use for selection adjustments during sound, set up according to back up the memory. ACTIVE EQ mode indicator ™ Lights when the receiver is only 1 channel. This is in the Dolby Digital mode. Names and functions of parts Main unit Speaker MUTE CLIP Input mode indicators indicator ... CD/DVD PHONO TUNER VIDEO 1 VIDEO 2 VIDEO 3 MD/TAPE SOUND TONE SETUP BAND AUTO/MONO MEMORY VOLUME CONTROL MULTI CONTROL LISTEN MODE DOWN UP MUTE AV AUX/GAME S VIDEO VIDEO L-AUDIO-R 1 (POWER ON/STANDBY) key & Use to turn the A/B speakers on or off. 3 ACTIVE EQ key &#...
...¡ Use for selection adjustments during sound, set up according to back up the memory. ACTIVE EQ mode indicator ™ Lights when the receiver is only 1 channel. This is in the Dolby Digital mode. Names and functions of parts Main unit Speaker MUTE CLIP Input mode indicators indicator ... CD/DVD PHONO TUNER VIDEO 1 VIDEO 2 VIDEO 3 MD/TAPE SOUND TONE SETUP BAND AUTO/MONO MEMORY VOLUME CONTROL MULTI CONTROL LISTEN MODE DOWN UP MUTE AV AUX/GAME S VIDEO VIDEO L-AUDIO-R 1 (POWER ON/STANDBY) key & Use to turn the A/B speakers on or off. 3 ACTIVE EQ key &#...
Instruction Manual
Page 7
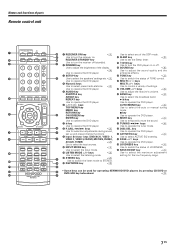
...functions. 9 Input Selector keys (DVD/6CH, VIDEO 1, VIDEO 2, VIDEO 3, CD/DVD, MD/TAPE, PHONO, AV AUX, TUNER) ) Use to select the input sources. 0 INPUT MODE key 8 Use to select the Input ...DVD key Use to operate the DVD player. 8 P.CALL 4/¢ keys ∞ Use for operating KENWOOD DVD players by pressing CD/DVD or DVD/6CH key beforehand. ‹ 7 EN Names and functions ... #/@ keys MULTI %/fi keys Use to control a variety of parts Remote control unit RECEIVER ON STANDBY DVD SLEEP DIMMER SETUP TONE SOUND MULTI MULTI AUDIO SUBTITLE ANGLE REPEAT TOP MENU ...
...functions. 9 Input Selector keys (DVD/6CH, VIDEO 1, VIDEO 2, VIDEO 3, CD/DVD, MD/TAPE, PHONO, AV AUX, TUNER) ) Use to select the input sources. 0 INPUT MODE key 8 Use to select the Input ...DVD key Use to operate the DVD player. 8 P.CALL 4/¢ keys ∞ Use for operating KENWOOD DVD players by pressing CD/DVD or DVD/6CH key beforehand. ‹ 7 EN Names and functions ... #/@ keys MULTI %/fi keys Use to control a variety of parts Remote control unit RECEIVER ON STANDBY DVD SLEEP DIMMER SETUP TONE SOUND MULTI MULTI AUDIO SUBTITLE ANGLE REPEAT TOP MENU ...
Instruction Manual
Page 8
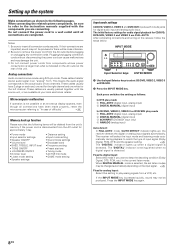
... is extinguished when no digital signal is not possible or an erroneous display appears, even though all connections have 2 plugs on the receiver, follow the steps below. When DIGITAL MANUAL mode is detected. Press the INPUT MODE key again. 8 EN When connecting the related...6CH INPUT (DVD/6CH input only) 4 ANALOG (analog input) Auto detect: In FULL AUTO mode ("AUTO DETECT" indicator lights up), the receiver detects the digital or analog input signals automatically. If their connections are made properly, reset the microcomputer referring to match the type of difficulty". &#...
... is extinguished when no digital signal is not possible or an erroneous display appears, even though all connections have 2 plugs on the receiver, follow the steps below. When DIGITAL MANUAL mode is detected. Press the INPUT MODE key again. 8 EN When connecting the related...6CH INPUT (DVD/6CH input only) 4 ANALOG (analog input) Auto detect: In FULL AUTO mode ("AUTO DETECT" indicator lights up), the receiver detects the digital or analog input signals automatically. If their connections are made properly, reset the microcomputer referring to match the type of difficulty". &#...
Instruction Manual
Page 9
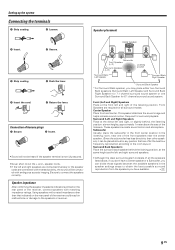
... the cord. 4 Return the lever. Speaker impedance After confirming the speaker impedance indications printed on the rear panel of the receiver could result in the speaker settings steps to obtain the best possible surround reproduction from the speakers you have a Center speaker or... motion and atmosphere. Center Speaker Place front and center. Connection of the listening position. Be sure to the speakers or receiver. Using speakers with matching impedance ratings. Front Speakers are connected with ambiguous acoustic imaging. Setting up the system Connecting the terminals...
... the cord. 4 Return the lever. Speaker impedance After confirming the speaker impedance indications printed on the rear panel of the receiver could result in the speaker settings steps to obtain the best possible surround reproduction from the speakers you have a Center speaker or... motion and atmosphere. Center Speaker Place front and center. Connection of the listening position. Be sure to the speakers or receiver. Using speakers with matching impedance ratings. Front Speakers are connected with ambiguous acoustic imaging. Setting up the system Connecting the terminals...
Instruction Manual
Page 10
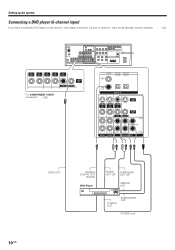
Setting up the system Connecting a DVD player (6-channel input) If you have connected a DVD player to the receiver with digital connection, be sure to read the "Input mode settings" section carefully. 8 OUT VIDEO IN VIDEO IN VIDEO IN VIDEO IN VIDEO VIDEO OUT ...
Setting up the system Connecting a DVD player (6-channel input) If you have connected a DVD player to the receiver with digital connection, be sure to read the "Input mode settings" section carefully. 8 OUT VIDEO IN VIDEO IN VIDEO IN VIDEO IN VIDEO VIDEO OUT ...

Instruction Manual
Page 11
It is not for noise reduction of the unit. • Leave a space around the unit (from the receiver unit. Top panel : 50 cm Side panel : 10 cm Back panel : 10 cm 11 EN Setting up the system Connecting audio components • The earth ...
It is not for noise reduction of the unit. • Leave a space around the unit (from the receiver unit. Top panel : 50 cm Side panel : 10 cm Back panel : 10 cm 11 EN Setting up the system Connecting audio components • The earth ...
Instruction Manual
Page 12
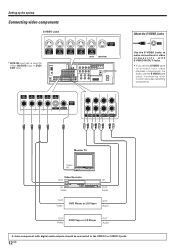
Monitor TV Video IN Video Recorder OUT IN Video IN OUT Audio OUT Video DVD Player or LD Player OUT Audio OUT Video DVD Player or LD Player OUT Audio A video component with S VIDEO IN/OUT Jacks. • If you use the S VIDEO jacks to connect your video playback components, be connected to use the S VIDEO jacks when connecting your monitor and video recording components. OUT VIDEO IN VIDEO IN VIDEO IN VIDEO IN VIDEO VIDEO OUT DVD MONITOR REC OUT PLAY IN PLAY IN PLAY IN VIDEO 1 VIDEO 2 VIDEO 3 About the S VIDEO Jacks S VIDEO OUT Use the S VIDEO Jacks to make connections to ...
Monitor TV Video IN Video Recorder OUT IN Video IN OUT Audio OUT Video DVD Player or LD Player OUT Audio OUT Video DVD Player or LD Player OUT Audio A video component with S VIDEO IN/OUT Jacks. • If you use the S VIDEO jacks to connect your video playback components, be connected to use the S VIDEO jacks when connecting your monitor and video recording components. OUT VIDEO IN VIDEO IN VIDEO IN VIDEO IN VIDEO VIDEO OUT DVD MONITOR REC OUT PLAY IN PLAY IN PLAY IN VIDEO 1 VIDEO 2 VIDEO 3 About the S VIDEO Jacks S VIDEO OUT Use the S VIDEO Jacks to make connections to ...

Instruction Manual
Page 13
...DIGITAL IN jacks of outputting DTS, Dolby Digital, or standard PCM (CD) format digital signals. If you have connected any digital components to the receiver, be sure to read the "Input mode settings" section carefully. 8 COAXIAL VIDEO 2 OPTICAL OPTICAL CD/DVD VIDEO 3 DVD/ 6CH DIGITAL IN... and digital audio signals to the VIDEO 2 or VIDEO 3 jacks. (See "Connecting video components".) 13 EN Connect components capable of the receiver. Setting up the system Digital connections The digital in jacks can accept DTS, Dolby Digital, or PCM signals. Next, connect the DIGITAL OUT...
...DIGITAL IN jacks of outputting DTS, Dolby Digital, or standard PCM (CD) format digital signals. If you have connected any digital components to the receiver, be sure to read the "Input mode settings" section carefully. 8 COAXIAL VIDEO 2 OPTICAL OPTICAL CD/DVD VIDEO 3 DVD/ 6CH DIGITAL IN... and digital audio signals to the VIDEO 2 or VIDEO 3 jacks. (See "Connecting video components".) 13 EN Connect components capable of the receiver. Setting up the system Digital connections The digital in jacks can accept DTS, Dolby Digital, or PCM signals. Next, connect the DIGITAL OUT...
Instruction Manual
Page 14
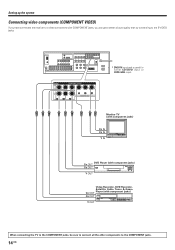
... component jacks) CR OUT CB OUT Y OUT Video Recorder, DVD Recorder, Satellite Cable Tuner & Game CR OUT Player (with COMPONENT jacks, you have connected the receiver to a video component with component jacks) CB OUT Y OUT When connecting the TV to the COMPONENT jacks, be sure to connect all the other components...
... component jacks) CR OUT CB OUT Y OUT Video Recorder, DVD Recorder, Satellite Cable Tuner & Game CR OUT Player (with COMPONENT jacks, you have connected the receiver to a video component with component jacks) CB OUT Y OUT When connecting the TV to the COMPONENT jacks, be sure to connect all the other components...

Instruction Manual
Page 15
Refer to "5 Adjust the speaker volume level." * • When you wish to connect the second pair of Front speakers or to connect the speakers in a different room to SURROUND BACK L terminals and se- Setting up the system Connecting the speakers Surround Back Speaker/s When connecting a single Surround Back Speaker, connect it to this unit, use the SPEAKERS FRONT B terminals for connection. 15 EN L BLUE - + SURROUND BACK R TAN L BROWN + - - + Powered Subwoofer RED + WHITE - R FRONT A L GREEN CENTER SUB WOOFER PRE OUT FRONT B R L +--+ Center Speaker ...
Refer to "5 Adjust the speaker volume level." * • When you wish to connect the second pair of Front speakers or to connect the speakers in a different room to SURROUND BACK L terminals and se- Setting up the system Connecting the speakers Surround Back Speaker/s When connecting a single Surround Back Speaker, connect it to this unit, use the SPEAKERS FRONT B terminals for connection. 15 EN L BLUE - + SURROUND BACK R TAN L BROWN + - - + Powered Subwoofer RED + WHITE - R FRONT A L GREEN CENTER SUB WOOFER PRE OUT FRONT B R L +--+ Center Speaker ...
Instruction Manual
Page 16
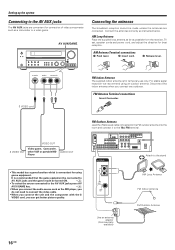
...or portable MD Player AUDIO OUT • This model has a game function which is recommended that the game equipment be connected to the AV AUX jacks press AV AUX/GAME key. ) • When you connect the audio source such as a camcorder or a video game. Connect the antennas ...correctly as possible from the receiver, TV set, speaker cords and power cord, and adjust the direction for using an outdoor antenna. AV AUX/GAME Connecting the antennas The broadcast reception cannot be turned ON. ) • To select...
...or portable MD Player AUDIO OUT • This model has a game function which is recommended that the game equipment be connected to the AV AUX jacks press AV AUX/GAME key. ) • When you connect the audio source such as a camcorder or a video game. Connect the antennas ...correctly as possible from the receiver, TV set, speaker cords and power cord, and adjust the direction for using an outdoor antenna. AV AUX/GAME Connecting the antennas The broadcast reception cannot be turned ON. ) • To select...
Instruction Manual
Page 17
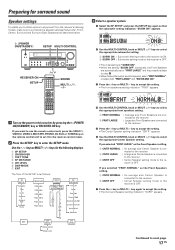
... SETUP and press the SETUP key again so that the subwoofer setting indication "SUBW ON" appears. If you to obtain optimum enjoyment from the receiver's listening modes, make sure to complete the speaker settings (Subwoofer, Front, Center, Surround and Surround Back Speakers) as the Front Speakers setting,... to use the remote control unit, press the VIDEO 1, VIDEO 2, VIDEO 3, MD/TAPE, PHONO, AV AUX or TUNER key on the power to this receiver by pressing the (POWER ON/STANDBY) key or RECEIVER ON key. Preparing for the following displays. 1 SP SETUP 2 CROSSOVER 3 TEST TONE 4 SP DISTANCE...
... SETUP and press the SETUP key again so that the subwoofer setting indication "SUBW ON" appears. If you to obtain optimum enjoyment from the receiver's listening modes, make sure to complete the speaker settings (Subwoofer, Front, Center, Surround and Surround Back Speakers) as the Front Speakers setting,... to use the remote control unit, press the VIDEO 1, VIDEO 2, VIDEO 3, MD/TAPE, PHONO, AV AUX or TUNER key on the power to this receiver by pressing the (POWER ON/STANDBY) key or RECEIVER ON key. Preparing for the following displays. 1 SP SETUP 2 CROSSOVER 3 TEST TONE 4 SP DISTANCE...
Instruction Manual
Page 18
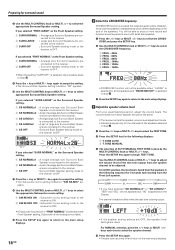
... 4 FREQ. : 100Hz 5 FREQ. : 120Hz 6 FREQ. : 150Hz SP MUTE L R A B CLIP STEREO • CROSSOVER function will be the same. • The receiver enters the speaker volume level adjustment mode. • Indicators appear only for the channels of the speakers selected in the following displays: 1 T.TONE AUTO 2 T.TONE...dynamic sound experience even with small size speakers. 1 Press the ∧/∨ keys or MULTI @/# keys to adjust the receiver's audio output characteristics with the speakers' characteristics which differs depending on the Display. If you selected "SURR LARGE" as the...
... 4 FREQ. : 100Hz 5 FREQ. : 120Hz 6 FREQ. : 150Hz SP MUTE L R A B CLIP STEREO • CROSSOVER function will be the same. • The receiver enters the speaker volume level adjustment mode. • Indicators appear only for the channels of the speakers selected in the following displays: 1 T.TONE AUTO 2 T.TONE...dynamic sound experience even with small size speakers. 1 Press the ∧/∨ keys or MULTI @/# keys to adjust the receiver's audio output characteristics with the speakers' characteristics which differs depending on the Display. If you selected "SURR LARGE" as the...
Instruction Manual
Page 19
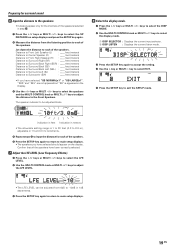
Distance to Front Left Speaker (L) : ____ feet (meters) Distance to Center Speaker (C) : ____ feet (meters) Distance to Front Right Speaker (R) : ____ feet (meters) Distance to Surround Right (SR) : ____ feet (meters) Distance to Surround Back Right (SBR) : ____ feet (meters) Distance to Surround Back (SB) : ____ feet (meters) Distance to Surround Back Left (SBL) : ____ feet (meters) Distance to Surround Left (SL) : ____ feet (meters) Distance to Subwoofer (SW) : ____ feet (meters) • If you have been correctly selected. 7 Adjust the LFE LEVEL (Low Frequency Effects...
Distance to Front Left Speaker (L) : ____ feet (meters) Distance to Center Speaker (C) : ____ feet (meters) Distance to Front Right Speaker (R) : ____ feet (meters) Distance to Surround Right (SR) : ____ feet (meters) Distance to Surround Back Right (SBR) : ____ feet (meters) Distance to Surround Back (SB) : ____ feet (meters) Distance to Surround Back Left (SBL) : ____ feet (meters) Distance to Surround Left (SL) : ____ feet (meters) Distance to Subwoofer (SW) : ____ feet (meters) • If you have been correctly selected. 7 Adjust the LFE LEVEL (Low Frequency Effects...
Instruction Manual
Page 20
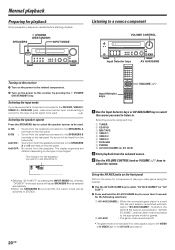
...source will cause SPEAKERS A to . SPEAKERS (POWER ON/STANDBY) INPUT MODE Listening to a source component VOLUME CONTROL Input Selector keys AV AUX/GAME Turning on the receiver 1 Turn on the power to the related components. 2 Turn on the front panel Perform the setup for convenience of audio signal ... A and B terminals on the rear panel. Selecting a source using the receiver. 1 Use the AV AUX/GAME key to select "AV AUX [GAME]" (or "AV AUX"). 2 Press and hold the AV AUX/GAME key for more than 2 seconds for games. 2 AV AUX : The game mode is switched off. • The game mode ...
...source will cause SPEAKERS A to . SPEAKERS (POWER ON/STANDBY) INPUT MODE Listening to a source component VOLUME CONTROL Input Selector keys AV AUX/GAME Turning on the receiver 1 Turn on the power to the related components. 2 Turn on the front panel Perform the setup for convenience of audio signal ... A and B terminals on the rear panel. Selecting a source using the receiver. 1 Use the AV AUX/GAME key to select "AV AUX [GAME]" (or "AV AUX"). 2 Press and hold the AV AUX/GAME key for more than 2 seconds for games. 2 AV AUX : The game mode is switched off. • The game mode ...