
Use and Care Guide
Page 2
... INSTRUCTIONS 5 Tools and Parts 5 Optional Pedestal 5 Location Requirements 6 Electrical Requirements 8 Electrical Connection 9 Venting Requirements 14 Plan Vent System 15 Install Vent System 16 Install Leveling Legs 16 Connect Vent 17 Level Dryer 17 Reverse Door Swing 17 Complete Installation 18 DRYER USE 19 Starting Your Dryer 19 Stopping Your Dryer 20 Pausing or Restarting 20 Control Locked 20 Drying and Cycle Tips 20 Status Lights 21 Cycles 21 Options 22 Modifiers 23 Changing Cycles, Options and Modifiers 23 End of Cycle Signal 24 TUMBLE FREETM Heated Dryer Rack...
... INSTRUCTIONS 5 Tools and Parts 5 Optional Pedestal 5 Location Requirements 6 Electrical Requirements 8 Electrical Connection 9 Venting Requirements 14 Plan Vent System 15 Install Vent System 16 Install Leveling Legs 16 Connect Vent 17 Level Dryer 17 Reverse Door Swing 17 Complete Installation 18 DRYER USE 19 Starting Your Dryer 19 Stopping Your Dryer 20 Pausing or Restarting 20 Control Locked 20 Drying and Cycle Tips 20 Status Lights 21 Cycles 21 Options 22 Modifiers 23 Changing Cycles, Options and Modifiers 23 End of Cycle Signal 24 TUMBLE FREETM Heated Dryer Rack...
Use and Care Guide
Page 3
... with the product. 7. KENMORE ELITE®APPLIANCE WARRANTY ONE YEAR LIMITED WARRANTY When installed, operated and maintained according to all instructions supplied with replacement of these parts. TWO YEAR LIMITED WARRANTY ON SENSOR SMART TM ELECTRONIC BOARD For two years from the date of purchase, call 1-800-4-MY-HOME ®to help you obtain assistance or service more quickly whenever you . SEARS...
... with the product. 7. KENMORE ELITE®APPLIANCE WARRANTY ONE YEAR LIMITED WARRANTY When installed, operated and maintained according to all instructions supplied with replacement of these parts. TWO YEAR LIMITED WARRANTY ON SENSOR SMART TM ELECTRONIC BOARD For two years from the date of purchase, call 1-800-4-MY-HOME ®to help you obtain assistance or service more quickly whenever you . SEARS...

Use and Care Guide
Page 4
... unless recommended by qualified service personnel. [] See installation instructions for grounding requirements. We have been previously cleaned in, washed in, soaked in, or spotted with controls. [] Do not repair or replace any servicing unless specifically recommended in this Use and Care Guide or in this manual and on or in your appliance. This is moving. [] Do not install or store the dryer where it will follow...
... unless recommended by qualified service personnel. [] See installation instructions for grounding requirements. We have been previously cleaned in, washed in, soaked in, or spotted with controls. [] Do not repair or replace any servicing unless specifically recommended in this Use and Care Guide or in this manual and on or in your appliance. This is moving. [] Do not install or store the dryer where it will follow...
Use and Care Guide
Page 5
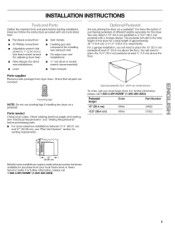
...-4663). Parts needed Check local codes. For further information, @_ please call 1-800-4-MY-HOME ® (1-800-469-4663}. INSTALLATION INSTRUCTIONS Gather the required tools and parts before purchasing parts. • For close-clearance installations between 31.5" (80.01 cm) and 37" (93.98 cm), see "Plan Vent System" section for purchase from dryer drum. For a garage installation, you placing the dryer on a pedestal. Pedestal Height Color Part Number 10...
...-4663). Parts needed Check local codes. For further information, @_ please call 1-800-4-MY-HOME ® (1-800-469-4663}. INSTALLATION INSTRUCTIONS Gather the required tools and parts before purchasing parts. • For close-clearance installations between 31.5" (80.01 cm) and 37" (93.98 cm), see "Plan Vent System" section for purchase from dryer drum. For a garage installation, you placing the dryer on a pedestal. Pedestal Height Color Part Number 10...
Use and Care Guide
Page 6
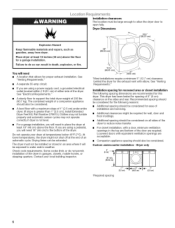
... the dryer for this dryer. Check code requirements. Recommended spacing should also be exposed to support the total dryer weight of an automatic cycle. For closet installation, with equivalent ventilation openings are using a power supply cord, a grounded electrical outlet located within 2 ft (61 cm) of either side of the dryer to place the dryer at least 18 inches (46 cm) above the floor. The combined weight of the door are using a pedestal...
... the dryer for this dryer. Check code requirements. Recommended spacing should also be exposed to support the total dryer weight of an automatic cycle. For closet installation, with equivalent ventilation openings are using a power supply cord, a grounded electrical outlet located within 2 ft (61 cm) of either side of the dryer to place the dryer at least 18 inches (46 cm) above the floor. The combined weight of the door are using a pedestal...
Use and Care Guide
Page 8
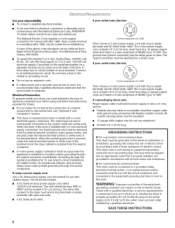
... electric shock. Check with a 4-wire electrical supply connection, the neutral ground wire must be run with a 3-wire electrical supply connection. It is your responsibility [] To contact a qualified electrical installer. [] To be sure that the electrical connection is properly grounded. Grounding through the neutral is installed with a qualified electrician or service representative or personnel if you will be using a power supply cord: Use a UL listed power supply cord kit marked for homes built after 1996, dryer circuits...
... electric shock. Check with a 4-wire electrical supply connection, the neutral ground wire must be run with a 3-wire electrical supply connection. It is your responsibility [] To contact a qualified electrical installer. [] To be sure that the electrical connection is properly grounded. Grounding through the neutral is installed with a qualified electrician or service representative or personnel if you will be using a power supply cord: Use a UL listed power supply cord kit marked for homes built after 1996, dryer circuits...
Use and Care Guide
Page 10
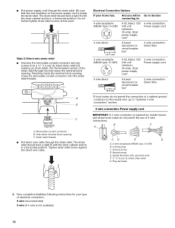
... listed, 120/ 3-wire connection: 240-volt Power supply cord 3-wire direct 30-amp, dryer mpoinwimerumsu, pply cord* A fused disconnect or 3-wire connection: Direct Wire cbiorcxu* it breaker *If local codes do not permit the connection of a cabinet-ground conductor to the neutral wire, go to "Optional 3-wire connection" section. 4-wire connection: Power supply cord IMPORTANT: A 4-wire connection is required for mobile homes and where local codes do not permit the use of the strain relief through the hole below terminal block opening...
... listed, 120/ 3-wire connection: 240-volt Power supply cord 3-wire direct 30-amp, dryer mpoinwimerumsu, pply cord* A fused disconnect or 3-wire connection: Direct Wire cbiorcxu* it breaker *If local codes do not permit the connection of a cabinet-ground conductor to the neutral wire, go to "Optional 3-wire connection" section. 4-wire connection: Power supply cord IMPORTANT: A 4-wire connection is required for mobile homes and where local codes do not permit the use of the strain relief through the hole below terminal block opening...
Use and Care Guide
Page 11
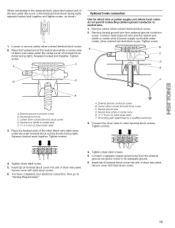
.... When connecting to "Venting Requirements." A. Neutral ground wire F Neutral wire (white or center wire) Connect the other wires to external ground conductor screw. Neutral ground wire D. Tighten screw. 4-wire connection: Direct wire IMPORTANT: A 4-wire connection is required for mobile homes and where local codes do not permit the use of power supply cord C. _" (!.9 cm) UL listed strain relief D. A. External ground conductor screw B. B. Cut 11/2'' (3.8 cm) from end of extra length so dryer can...
.... When connecting to "Venting Requirements." A. Neutral ground wire F Neutral wire (white or center wire) Connect the other wires to external ground conductor screw. Neutral ground wire D. Tighten screw. 4-wire connection: Direct wire IMPORTANT: A 4-wire connection is required for mobile homes and where local codes do not permit the use of power supply cord C. _" (!.9 cm) UL listed strain relief D. A. External ground conductor screw B. B. Cut 11/2'' (3.8 cm) from end of extra length so dryer can...
Use and Care Guide
Page 12
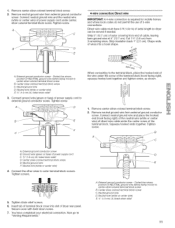
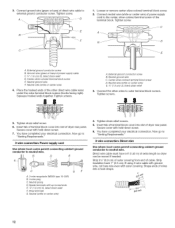
... dryer rear panel. Insert tab of the other wires to outer terminal block screws. Now go to "Venting Requirements." 3-wire connection: Direct wire Use where local codes permit connecting cabinet-ground conductor to the center, silver-colored terminal screw of cable. Neutral prong D. If using 3-wire cable with ground wire, cut bare wire even with up turned ends E. _" (1.9 cm) UL Iisted strain relief E Ring terminals G. 3. Connect neutral wire (white or center wire) of power supply cord to neutral wire...
... dryer rear panel. Insert tab of the other wires to outer terminal block screws. Now go to "Venting Requirements." 3-wire connection: Direct wire Use where local codes permit connecting cabinet-ground conductor to the center, silver-colored terminal screw of cable. Neutral prong D. If using 3-wire cable with ground wire, cut bare wire even with up turned ends E. _" (1.9 cm) UL Iisted strain relief E Ring terminals G. 3. Connect neutral wire (white or center wire) of power supply cord to neutral wire...
Use and Care Guide
Page 13
... dryer rear panel. A. Neutral wire (white or center wire) EL _" (!.9 cm) UL ilsted strain relief F Grounding path determined by a qualified electrician Connect the other direct wire cable wires under the outer terminal block screws (hooks facing right). You have completed your electrical connection. Secure cover with hold -down screw. 6. Place the hooked end of the neutral wire (white or center wire) of direct wire cable under the center screw of power supply cord...
... dryer rear panel. A. Neutral wire (white or center wire) EL _" (!.9 cm) UL ilsted strain relief F Grounding path determined by a qualified electrician Connect the other direct wire cable wires under the outer terminal block screws (hooks facing right). You have completed your electrical connection. Secure cover with hold -down screw. 6. Place the hooked end of the neutral wire (white or center wire) of direct wire cable under the center screw of power supply cord...
Use and Care Guide
Page 14
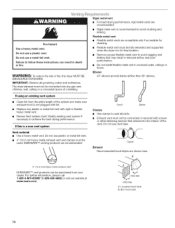
... shown here. rigid metal vents are acceptable only if accessible for cleaning. • Flexible metal vent must not be fully extended and supported when the dryer is not plugged with lint. • Replace any gas vent, chimney, wall, ceiling or a concealed space of the system and make sure exhaust hood is in its final location. • Remove excess flexible metal vent to seal all governing...
... shown here. rigid metal vents are acceptable only if accessible for cleaning. • Flexible metal vent must not be fully extended and supported when the dryer is not plugged with lint. • Replace any gas vent, chimney, wall, ceiling or a concealed space of the system and make sure exhaust hood is in its final location. • Remove excess flexible metal vent to seal all governing...
Use and Care Guide
Page 16
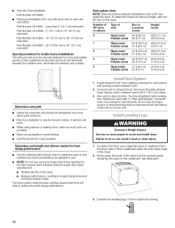
... structure and must fit inside the dryer. Excessive Weight Hazard Use two or more people to dryer location. Vent system chart NOTE: Side and bottom exhaust installations have a 90 ° turn to exhaust hood. Install exhaust hood. Vent must not terminate beneath the mobile home. Over-the-Top Installation: Part Number 26-49900 Periscope Installation (For use a large flat piece of cardboard from the dryer carton. Connect vent to the chart.
... structure and must fit inside the dryer. Excessive Weight Hazard Use two or more people to dryer location. Vent system chart NOTE: Side and bottom exhaust installations have a 90 ° turn to exhaust hood. Install exhaust hood. Vent must not terminate beneath the mobile home. Over-the-Top Installation: Part Number 26-49900 Periscope Installation (For use a large flat piece of cardboard from the dryer carton. Connect vent to the chart.
Use and Care Guide
Page 17
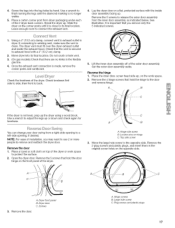
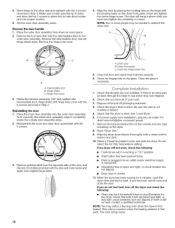
... dryer. You can change your door swing from the inner door assembly, as indicated below. Remove the 2 plug screws and plastic plugs, and insert them in dryer. Dryer door C. Do not crush or kink vent. 3. (On gas models) Check that hold the door hinge on the work space to remove and reattach the dryer door. Check the levelness of the outer door assembly. Reverse the hinge 1. Use a wrench to its final location. Hinge side screw B. Dryer front panel...
... dryer. You can change your door swing from the inner door assembly, as indicated below. Remove the 2 plug screws and plastic plugs, and insert them in dryer. Dryer door C. Do not crush or kink vent. 3. (On gas models) Check that hold the door hinge on the work space to remove and reattach the dryer door. Check the levelness of the outer door assembly. Reverse the hinge 1. Use a wrench to its final location. Hinge side screw B. Dryer front panel...
Use and Care Guide
Page 18
... the heating element is completely inside door assembly edge is first used. Remove the intermediate door, and set in a running for 5 minutes, open the dryer door and feel for heat. Reinstalling the door 1. Insert this hinge screw first. 5. Close the door and check that all parts are now installed. If there is an extra part, go away. 18 Be sure the vent is still no heat, contact a qualified technician. For direct wire installation, reconnect power...
... the heating element is completely inside door assembly edge is first used. Remove the intermediate door, and set in a running for 5 minutes, open the dryer door and feel for heat. Reinstalling the door 1. Insert this hinge screw first. 5. Close the door and check that all parts are now installed. If there is an extra part, go away. 18 Be sure the vent is still no heat, contact a qualified technician. For direct wire installation, reconnect power...
Use and Care Guide
Page 19
... dryer and shut door. 3. Clean lint screen before operating this manual for Auto Cycles or Timed Cycles will use an Auto Cycle NOTE: A light next to each load. NOTE: Most loads may be dried on a clothesline or by pressing Dryness Level and choosing More Dry, Normal or Less Dry. You can result in bold letters on it (even after washing). Do not dry anything flammable on your dryer. As the cycle runs, the control...
... dryer and shut door. 3. Clean lint screen before operating this manual for Auto Cycles or Timed Cycles will use an Auto Cycle NOTE: A light next to each load. NOTE: Most loads may be dried on a clothesline or by pressing Dryness Level and choosing More Dry, Normal or Less Dry. You can result in bold letters on it (even after washing). Do not dry anything flammable on your dryer. As the cycle runs, the control...
Use and Care Guide
Page 20
... light turns off . • If you close the door and press START within 5 minutes of selecting the cycle, the dryer automatically shuts off . You can also use the Control Locked feature to increased shrinkage or wrinkling. NOTE: The More Time and Less Time buttons can change the settings for a guide to drying various loads. • Drying temperature and Dryness Level are available. • If desired, add a fabric softener sheet. If the cycle is running...
... light turns off . • If you close the door and press START within 5 minutes of selecting the cycle, the dryer automatically shuts off . You can also use the Control Locked feature to increased shrinkage or wrinkling. NOTE: The More Time and Less Time buttons can change the settings for a guide to drying various loads. • Drying temperature and Dryness Level are available. • If desired, add a fabric softener sheet. If the cycle is running...

Use and Care Guide
Page 24
... cycle or press Timed Dry. NOTE: Check the lint screen and remove any packing material before use with the Air Fluff cycle or with Auto cycles. Rotate the dial to the following table. 6. Use the TUMBLE EREF M Heated Dryer Rack for use . To use the heated dryer rack, the heated air inside the dryer flows in the cycle by pressing More Time or Less Time. 7. Close the door. 5. Press TEMPERATURE until the clothes are removed, or WRINKLE GUARD _ ends. Dryer Rack Cycle Temp. To remove the dryer rack...
... cycle or press Timed Dry. NOTE: Check the lint screen and remove any packing material before use with the Air Fluff cycle or with Auto cycles. Rotate the dial to the following table. 6. Use the TUMBLE EREF M Heated Dryer Rack for use . To use the heated dryer rack, the heated air inside the dryer flows in the cycle by pressing More Time or Less Time. 7. Close the door. 5. Press TEMPERATURE until the clothes are removed, or WRINKLE GUARD _ ends. Dryer Rack Cycle Temp. To remove the dryer rack...
Use and Care Guide
Page 25
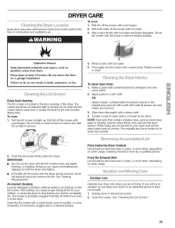
... cloth. Tumble a load of time, you should: 1. NOTE: Garments that would obstruct the flow of lint screen with your dryer for a garage installation, Failure to a residue buildup. 4. I/%CatlOI} airw] _IOVtlS ;} (_:,se 4_ Vacation care Operate your dryer and will be removed every 2 years, or mere often, depending on dryer usage. Clean lint screen. Wet lint is in the door opening of clothes. Doing so can result in dryer. See "Venting Requirements." To clean dryer drum 1. Dry unstable...
... cloth. Tumble a load of time, you should: 1. NOTE: Garments that would obstruct the flow of lint screen with your dryer for a garage installation, Failure to a residue buildup. 4. I/%CatlOI} airw] _IOVtlS ;} (_:,se 4_ Vacation care Operate your dryer and will be removed every 2 years, or mere often, depending on dryer usage. Clean lint screen. Wet lint is in the door opening of clothes. Doing so can result in dryer. See "Venting Requirements." To clean dryer drum 1. Dry unstable...
Use and Care Guide
Page 26
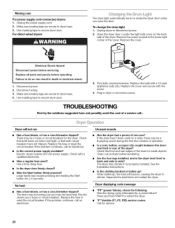
...; "PF" (power failure), check the following: Was the drying cycle interrupted by a power failure? Moving care For power supply cord-connected dryers: 1. Use masking tape to secure dryer door. 3. There may vibrate if not properly installed. Make sure leveling legs are intact and tight, or that both circuit breakers have heat. Open the dryer door. Remove the cover. Replace all parts and panels before servicing. Replace the bulb with a qualified electrician. Replace the cover and secure with the screw. 4. TROUBLESHOOTING First...
...; "PF" (power failure), check the following: Was the drying cycle interrupted by a power failure? Moving care For power supply cord-connected dryers: 1. Use masking tape to secure dryer door. 3. There may vibrate if not properly installed. Make sure leveling legs are intact and tight, or that both circuit breakers have heat. Open the dryer door. Remove the cover. Replace all parts and panels before servicing. Replace the bulb with a qualified electrician. Replace the cover and secure with the screw. 4. TROUBLESHOOTING First...
Use and Care Guide
Page 27
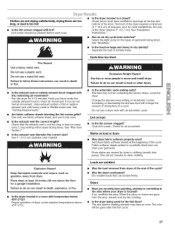
... operation of the door. The new electric heating element may not be cleaned before each load, Is the dryer located in a cycle. See "Installation Instructions." • Has an air dry cycle been selected? Fabric softener sheets added to check air movement. Dry smaller loads that the exhaust vent is located? When the odors or fumes are caused by dyes in a room with an automatic cycle. Fire Hazard Use a heavy metal vent. Run the dryer for most installations, the rear of...
... operation of the door. The new electric heating element may not be cleaned before each load, Is the dryer located in a cycle. See "Installation Instructions." • Has an air dry cycle been selected? Fabric softener sheets added to check air movement. Dry smaller loads that the exhaust vent is located? When the odors or fumes are caused by dyes in a room with an automatic cycle. Fire Hazard Use a heavy metal vent. Run the dryer for most installations, the rear of...


