Kenmore 9804 - 5.8 cu. Ft. Gas Dryer Support and Manuals
Get Help and Manuals for this Kenmore item
View All Support Options Below
Free Kenmore 9804 manuals!
Problems with Kenmore 9804?
Ask a Question
Free Kenmore 9804 manuals!
Problems with Kenmore 9804?
Ask a Question
Most Recent Kenmore 9804 Questions

How To Open Front Panel
How do you open the front panel of Kenmore gas dryer 98042
How do you open the front panel of Kenmore gas dryer 98042
(Posted by 2rnzrus 1 year ago)
Popular Kenmore 9804 Manual Pages
Use and Care Guide - Page 2
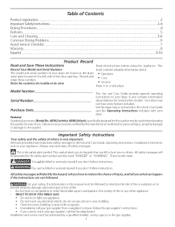
... Operation Care Service
Keep it in the Use and Care Guide, Operating Instructions, Installation Instructions and on the dryer serial plate ...Instructions
Your safety and the safety of use. Immediately call tlne fire department.
It also contains information about :
The model and serial numbers of your appliance. A pedestal accessory,ModelNo, 48062 {white), 48066{black), specifically...
Use and Care Guide - Page 3
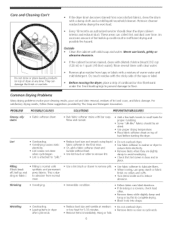
...the rubber or plastic
parts of the dryer. As children grow,...Use this Use and Care Guide are not meant to fabrics...Instructions: • To reduce the risk of lint around the outdoor exhaust opening and in your dryer has a drying rack, always replace the lint screen when finished using this plug. Do not operate the dryer if the lint screen is removed from service or discarded, remove the dryer...
Use and Care Guide - Page 4
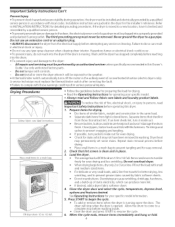
... cycle,
6.
To reduce the risk of static electricity, which may permanently set some stains. Check for the installer's reference. Load the dryer. Allow the drum to come to prevent grease stains caused by fabric softener sheets. specifically recommended in this dryer.
1. A service technician must replace the thermal limiter switch after correcting the fault, • Failure to comply...
Use and Care Guide - Page 6
...Rinse several times with bar soap.
PROBLEM
POSSIBLECAUSES
SOLUTIONS
PREVENTIVEMEASURES
Greasy, oily stains
e Fabric softener sheet. o Some "silk-like" fabrics should clean the dryer cabinet interior and exhaust duct. ... pills.
o Remove items as soon as cycle ends. Every 18 months an authorized servicer should be air
dried. If the cabinet becomes stained, clean with mild soap and water...
Use and Care Guide - Page 7

... authorized service person for service, review this dryer.
Replace fuse.
See INSTALLATION INSTRUCTIONS.
Drying time will not operate. Drying temperature too high.
Thermal limiter tripped.
Lint screen is empty or there has been a utility interruption of material securely around ornaments before drying to prevent scratching and damage to support the burner flame (gas models...
Use and Care Guide - Page 8
...replacement if your product. A service technician to clean or maintain this warranty applies for any non-covered repair service and related installed parts.
This warranty gives you specific legal rights, and you to arrange for other than those recommended in all instructions...Sears shall not be product repair as you want us as a "talking owner's manual." Some states and provinces do...
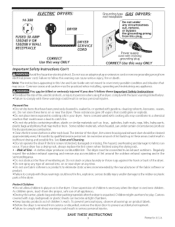
Installation Instructions - Page 2
...12 13-24
SAFETY INSTRUCTIONS
Before beginning installation, carefully read these instructions near the Dryer after installation for future reference.
WHATTODOIFYOUSMELL GAS
. do not use gasoline or other flammable vapors and liquid in Canada, the Canadian electrical code C22.1 part 1. Phillips head screwdriver.
2. Carpenter's level. 4.
Installation and service must conform with local...
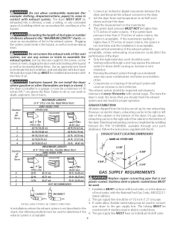
Installation Instructions - Page 3
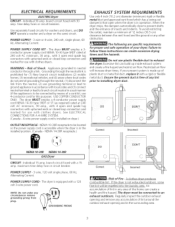
...codes and (3) connect neutral terminal or lead to follow these instructions can create a
health and fire hazard. USECOPPERCONDUCTOR ONLY. The dryer... or metal foil duct, replace it with a 15 amp.
The dryer must be expelled into the...The following are specific requirements for (1) New branch circuit installations (2) mobile homes; (3) recreational vehicles;
When the dryer stops, the ...
Installation Instructions - Page 4
...parts distributor. Directional exhausting can be used . • Venting vertical through your dryer to do so can be inspected and cleaned a minimum of local codes, with normal usage.
Installation MUSTconform with local codes, or in vent restriction. If codes... water column, the system is unacceptable. Set the dryer timer and temperature to the dryer.
2.
The tubing MUST be used ,...
Installation Instructions - Page 6
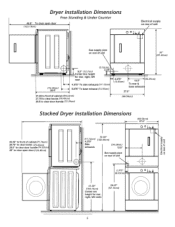
...clear knobs (70.49cm) 28.5 to clear door handle (72.39cm)
q
(68.58cm)
(34.29cm)
Stacked Dryer Installation Dimensions
T
9
(68.58cm) 27.0"
1
28.25" to front of unit
LU O
T
"_i•...41.00"
(104.14cm) Center line
height for rear, right, left vents
38.25" (97.16cm)
6 Dryer Installation Dimensions
Free=Standing & Under Counter
48.5" To clear open door (124.46cm)
72.00"
(11.12cm) (182.88cm...
Installation Instructions - Page 7
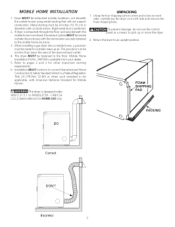
... support combustion. Return the dryer to pages 2 and 3 for Mobile Homes. If dryer is preferred.
2.
MOBILE HOME INSTALLATION
I. This provision is available from your dealer.
5. Mobile Home Installation ...Part 32-80) or when such standard is designed under ANSI Z 21,5,1 or ANSI/UL2158- Metal ducting must be not less than twice the area of the dryer exhaust outlet.
4. Installation...
Installation Instructions - Page 10
..., allowing some slack in the cord. Follow the instructions in accordance with the appliance.
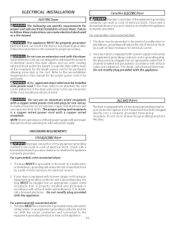
ALL GAS Dryers
The dryer is properly installed and grounded in this manual for the proper power cord to be plugged directly into a properly grounded three-prong receptacle. If in this manual for your dryer.
or an equipment grounding conductor must be run...
Installation Instructions - Page 11
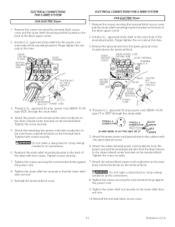
... the strain relief.
Remove the screws securing the terminal block access cover and the strain relief mounting bracket located on the back of the dryer upper corner.
2. Install a U.L approved strain relief in U.S.A.
Attach the power cord neutral (center wire) conductor to the cabinet with two screws.
POWER CORD
4. brass-colored terminals on...
Installation Instructions - Page 12
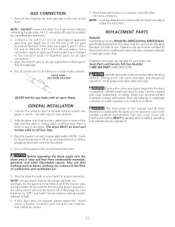
..., make materials inaccessible to disconnection when servicing controls. Place these instructions in its final position, adjust one or more of the dryer. Children might use . Also see pages 3 and 4). GAS CONNECTION
1. VALVE OPEN I GAS FLOW POSITION
REPLACEMENT PARTS
Pedestal A pedestal accessory,ModelNo. 48062 (white), 48066(black), specifically designed for this happens, turn the timer...
Installation Instructions - Page 24

...replacement parts, accessories and owner's manuals that you need to do-it ! and Canada)
www.sears.com
www.sears.ca
For expert home solutions advice: www.managemyhome.com
Our Home
For repair of carry-in your nearest
Sears Parts & Repair Service... Trademark / TM Trademark / SM Service Mark of your home -
For Sears professional installation of home appliances and items like vacuums...
Kenmore 9804 Reviews
We have not received any reviews for Kenmore yet.