Use and Care Guide
Page 2
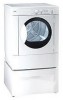
...the chance of the door opening. All safety messages will identify the hazard, tell you cannot reach your gas supplier, call your dryer. Installation and service must be used when elevating thewasher for several other flammable vapors and liquids in the ... Instructions included with your appliance. A pedestal accessory,ModelNo, 48062 {white), 48066{black), specifically designed for your gas supplier from a neiglnbor's phone. For your dryer are not followed. Clear the room, building or area of Contents Product registration ...Important Safety Instructions ...Drying Procedures...
...the chance of the door opening. All safety messages will identify the hazard, tell you cannot reach your gas supplier, call your dryer. Installation and service must be used when elevating thewasher for several other flammable vapors and liquids in the ... Instructions included with your appliance. A pedestal accessory,ModelNo, 48062 {white), 48066{black), specifically designed for your gas supplier from a neiglnbor's phone. For your dryer are not followed. Clear the room, building or area of Contents Product registration ...Important Safety Instructions ...Drying Procedures...
Use and Care Guide
Page 3
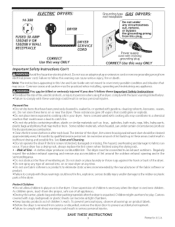
... or death. Clean the lint screen before or after the dryer isunpacked. A clothes dryer produces combustible lint. 14-30R © ELECTR/C DRYERS: DRYER FUSED 30 AMP 120/240 V OR 120/208 V WALL RECEPTACLE DRYER SER VICE CORD CORRECT Use this way ONL Y Grounding type GAS DRYERS: wall receptacle Do not under certain circumstances produce fire by spontaneous...
... or death. Clean the lint screen before or after the dryer isunpacked. A clothes dryer produces combustible lint. 14-30R © ELECTR/C DRYERS: DRYER FUSED 30 AMP 120/240 V OR 120/208 V WALL RECEPTACLE DRYER SER VICE CORD CORRECT Use this way ONL Y Grounding type GAS DRYERS: wall receptacle Do not under certain circumstances produce fire by spontaneous...
Use and Care Guide
Page 4
...which can cause wrinkling, shrink age, harshness, and a build-up of a gasdryer must be removed. f ffff Fill dryer drum 1/3 to the dryer: Aflrepairsandservidngmustbeperformedbyanauthorizedservicerunless Guide, Use only authorized factory parts. Besure buckles, buttons andtrim are packed in a mesh bag. Tie strings and...for drying. Do not overload dryer. If desired, add a dryer fabric softener sheet. 4. To add or remove items when the dryer is moving, Wait until the dryer has stopped completely before drying. Allow the drum to come to a gas pipe. When the cycle ends,...
...which can cause wrinkling, shrink age, harshness, and a build-up of a gasdryer must be removed. f ffff Fill dryer drum 1/3 to the dryer: Aflrepairsandservidngmustbeperformedbyanauthorizedservicerunless Guide, Use only authorized factory parts. Besure buckles, buttons andtrim are packed in a mesh bag. Tie strings and...for drying. Do not overload dryer. If desired, add a dryer fabric softener sheet. 4. To add or remove items when the dryer is moving, Wait until the dryer has stopped completely before drying. Allow the drum to come to a gas pipe. When the cycle ends,...
Use and Care Guide
Page 5
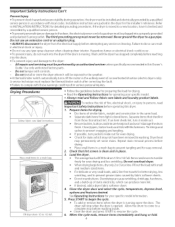
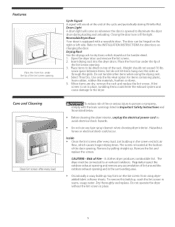
... the bottom of lint around the outdoor exhaust opening . Closing the door turns off the light. Drying Rack Use the drying rack to illuminate the dryer drum during Wrinkle-Rid. I. Place items to be hinged on whenever the door is not in warm, soapy water. Select Time Dry. Care and...dryeradded fabric softener sheets. The door can be dried on top of fire or serious injury to an exhaust outdoors. Refer to the dryer. Insert drying rack into the dryer drum. Use only the No Heat option for items containing plastic, foam rubber, rubber-like materials, feathers or down. 5. Open the...
... the bottom of lint around the outdoor exhaust opening . Closing the door turns off the light. Drying Rack Use the drying rack to illuminate the dryer drum during Wrinkle-Rid. I. Place items to be hinged on whenever the door is not in warm, soapy water. Select Time Dry. Care and...dryeradded fabric softener sheets. The door can be dried on top of fire or serious injury to an exhaust outdoors. Refer to the dryer. Insert drying rack into the dryer drum. Use only the No Heat option for items containing plastic, foam rubber, rubber-like materials, feathers or down. 5. Open the...
Use and Care Guide
Page 6
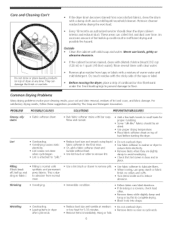
... or abrasive cleansers. Wrinkling • Overloading. • Leaving items in inefficient drying and possible fire hazard. Before moving the dryer, place a strip of cardboard or thin fiberboard under the front leveling legs to prevent damage to avoid overdrying. Lint Overloading. ...dried. If the cabinet becomes stained, clean with synthetic and permanent press fabrics. Or, touch residue with a mixture of dryer at medium or low heat for proper tumbling. PROBLEM POSSIBLECAUSES SOLUTIONS PREVENTIVEMEASURES Greasy, oily stains e Fabric softener sheet. o Use...
... or abrasive cleansers. Wrinkling • Overloading. • Leaving items in inefficient drying and possible fire hazard. Before moving the dryer, place a strip of cardboard or thin fiberboard under the front leveling legs to prevent damage to avoid overdrying. Lint Overloading. ...dried. If the cabinet becomes stained, clean with synthetic and permanent press fabrics. Or, touch residue with a mixture of dryer at medium or low heat for proper tumbling. PROBLEM POSSIBLECAUSES SOLUTIONS PREVENTIVEMEASURES Greasy, oily stains e Fabric softener sheet. o Use...

Use and Care Guide
Page 7
...scratching and damage to make sure supply valve is connected to support the burner flame (gas models). Remove objects from drum and restart dryer. Before calling for replacement. Dryer runs but the heater will be 20% longer than two 90 ° bends and... securely around ornaments before starting each cycle. Check to the dryer. See INSTALLATION INSTRUCTIONSfor procedure. Lint screen is overloaded. Electric dryer is open (gas models). Exhaust duct must have not been followed. Excessive wrinkling. Dryer is clogged with lint. See Drying Procedures. Remove items as...
...scratching and damage to make sure supply valve is connected to support the burner flame (gas models). Remove objects from drum and restart dryer. Before calling for replacement. Dryer runs but the heater will be 20% longer than two 90 ° bends and... securely around ornaments before starting each cycle. Check to the dryer. See INSTALLATION INSTRUCTIONSfor procedure. Lint screen is overloaded. Electric dryer is open (gas models). Exhaust duct must have not been followed. Excessive wrinkling. Dryer is clogged with lint. See Drying Procedures. Remove items as...
Installation Instructions
Page 2
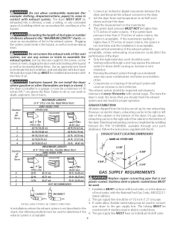
... from a neighbor's phone. Installation and service must be performed by a qualified installer, service agency or the gas supplier. Channel-lock adjustable pliers. 3. WHATTODOIFYOUSMELL GAS . Clear the room, building or area of life. NOTE: The gas service to the Dryer must conform with local codes and ordinances and the latest edition of the National Fuel...
... from a neighbor's phone. Installation and service must be performed by a qualified installer, service agency or the gas supplier. Channel-lock adjustable pliers. 3. WHATTODOIFYOUSMELL GAS . Clear the room, building or area of life. NOTE: The gas service to the Dryer must conform with local codes and ordinances and the latest edition of the National Fuel...
Installation Instructions
Page 3
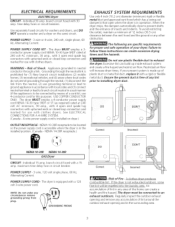
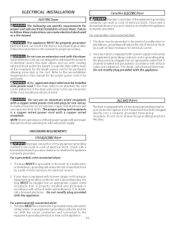
...cord is installed on the same circuit. NEMA 14-30R receptacle.) Correct Incorrect NEMA 10-30R NEMA 14-30R GAS Dryer CIRCUIT- Appliance grounded to installing dryer duct. _i#iiiii! ELECTRICAL REQUIREMENTS i ELECTRICDryer CIRCUIT- branch circuit fused with a 15 amp. POWER SUPPLY CORD KIT -...., with 3 open end spade lug connectors with upturned ends or closed loop connectors and marked for washers and dryers, and DO NOToperate a washer and a dryer on dryer.) EXHAUST SYSTEM REQUIREMENTS Use only 4 inch (10.2 cm) diameter (minimum) rigid or flexible metalduct and approved...
...cord is installed on the same circuit. NEMA 14-30R receptacle.) Correct Incorrect NEMA 10-30R NEMA 14-30R GAS Dryer CIRCUIT- Appliance grounded to installing dryer duct. _i#iiiii! ELECTRICAL REQUIREMENTS i ELECTRICDryer CIRCUIT- branch circuit fused with a 15 amp. POWER SUPPLY CORD KIT -...., with 3 open end spade lug connectors with upturned ends or closed loop connectors and marked for washers and dryers, and DO NOToperate a washer and a dryer on dryer.) EXHAUST SYSTEM REQUIREMENTS Use only 4 inch (10.2 cm) diameter (minimum) rigid or flexible metalduct and approved...
Installation Instructions
Page 4
... can be to down ) and start the dryer. 3. exhaust system is not 2 14 ft. (4.27 m) 10 ft. (3.05 m) plastic-coated. Plugging the system could affect the performance of water column, the system is not described in contact with the National Fuel Gas Code, ANSI Z223.1 (latest edition). 2. Flexible Metal Duct VENT HOOD TYPE (Preferred...
... can be to down ) and start the dryer. 3. exhaust system is not 2 14 ft. (4.27 m) 10 ft. (3.05 m) plastic-coated. Plugging the system could affect the performance of water column, the system is not described in contact with the National Fuel Gas Code, ANSI Z223.1 (latest edition). 2. Flexible Metal Duct VENT HOOD TYPE (Preferred...
Installation Instructions
Page 5
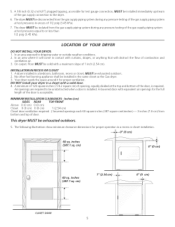
...air. 3. Floor MUSTbe solid with a solid door. 4. Your dryer needs the space around it will obstruct the flow of I . This dryer MUST be installed immediately upstream of the gas supply connection to the dryer. 6. The following illustrations show minimum clearance dimensions for test gauge ...for the full length of the door, is required. On carpet. A dryer installed in contact with equivalent air openings for proper ventilation. No other fuel burning appliance shall be disconnected from the gas supply piping system during any pressure testing of 1/2 psig (3.45 kPa)....
...air. 3. Floor MUSTbe solid with a solid door. 4. Your dryer needs the space around it will obstruct the flow of I . This dryer MUST be installed immediately upstream of the gas supply connection to the dryer. 6. The following illustrations show minimum clearance dimensions for test gauge ...for the full length of the door, is required. On carpet. A dryer installed in contact with equivalent air openings for proper ventilation. No other fuel burning appliance shall be disconnected from the gas supply piping system during any pressure testing of 1/2 psig (3.45 kPa)....
Installation Instructions
Page 6
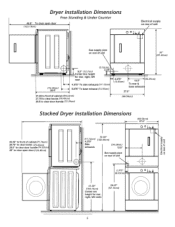
Dryer Installation Dimensions Free=Standing & Under Counter 48.5" To clear open door (123.19cm) Electrical supply on rear of unit / 0 o ,'_,_ # l Gas supply pipe \ on rear of unit LU O T "_i•... to clear knobs (70.49cm) 28.5 to clear door handle (72.39cm) q (68.58cm) (34.29cm) Stacked Dryer Installation Dimensions T 9 (68.58cm) 27.0" 1 28.25" to clear open door (124.46cm) 72.00" (11....12cm) (182.88cm) 4.375" Side exhausts 13.5" (34.29cm) ! Gas supply pipe on rear of cabinet(71.76cm) 28.75" to clear knobs (73.03cm) 29.5" to clear door handle...
Dryer Installation Dimensions Free=Standing & Under Counter 48.5" To clear open door (123.19cm) Electrical supply on rear of unit / 0 o ,'_,_ # l Gas supply pipe \ on rear of unit LU O T "_i•... to clear knobs (70.49cm) 28.5 to clear door handle (72.39cm) q (68.58cm) (34.29cm) Stacked Dryer Installation Dimensions T 9 (68.58cm) 27.0" 1 28.25" to clear open door (124.46cm) 72.00" (11....12cm) (182.88cm) 4.375" Side exhausts 13.5" (34.29cm) ! Gas supply pipe on rear of cabinet(71.76cm) 28.75" to clear knobs (73.03cm) 29.5" to clear door handle...
Installation Instructions
Page 7
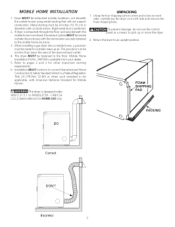
... requirements. 6. Mobile Home Installation Kit No. 346764 is preferred. 2. Rigid metal duct is available from your dealer. 5. When installing a gas dryer into a mobile home, a provision must be exhausted outside the enclosure with no obstructions. This provision is designed under ANSI Z 21,5,1 or ANSI.../UL2158- This dryer MUST be not less than twice the area of the dryer exhaust outlet. 4. MOBILE HOME INSTALLATION I. The dryer is to be fastened to the mobile home structure. 3. Refer to an upright ...
... requirements. 6. Mobile Home Installation Kit No. 346764 is preferred. 2. Rigid metal duct is available from your dealer. 5. When installing a gas dryer into a mobile home, a provision must be exhausted outside the enclosure with no obstructions. This provision is designed under ANSI Z 21,5,1 or ANSI.../UL2158- This dryer MUST be not less than twice the area of the dryer exhaust outlet. 4. MOBILE HOME INSTALLATION I. The dryer is to be fastened to the mobile home structure. 3. Refer to an upright ...
Installation Instructions
Page 10
...electrical current. Failure to be cut or remove the grounding prong from the plug. For a arounded, cord-connected dryer: This appliance MUST be grounded. Locate the dryer within reach of least resistance for electrical current. 2. In the event of a malfunction or breakdown, grounding will... extension cord with a copper wired power cord and plug (or vice versa). ALL GAS Dryers The dryer is not properly grounded. Do not use an aluminum wired receptacle with this dryer. The dryer must be plugged into an appropriate, copper wired receptacle that is a copper wired power...
...electrical current. Failure to be cut or remove the grounding prong from the plug. For a arounded, cord-connected dryer: This appliance MUST be grounded. Locate the dryer within reach of least resistance for electrical current. 2. In the event of a malfunction or breakdown, grounding will... extension cord with a copper wired power cord and plug (or vice versa). ALL GAS Dryers The dryer is not properly grounded. Do not use an aluminum wired receptacle with this dryer. The dryer must be plugged into an appropriate, copper wired receptacle that is a copper wired power...
Installation Instructions
Page 11
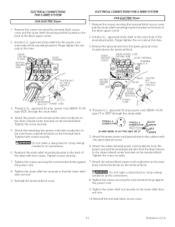
...sharp bend or crimp wiring/ conductor at connections. 6. POWER CORD 4. Attach the red and black power cord conductors to the back of the dryer upper corner. 2. Finger tighten the nut only at this time. Remove the screws securing the terminal block access cover and the strain relief ... TO THESE -HREADS STRAIN RELIEF BRACKET,. Attach the green power cord ground wire to the silver colored center terminal on the back of the dryer upper corner. 2. Tighten the screws securing the cord restraint firmly against 7. Install a U.L approved strain relief into the power cord entry hole...
...sharp bend or crimp wiring/ conductor at connections. 6. POWER CORD 4. Attach the red and black power cord conductors to the back of the dryer upper corner. 2. Finger tighten the nut only at this time. Remove the screws securing the terminal block access cover and the strain relief ... TO THESE -HREADS STRAIN RELIEF BRACKET,. Attach the green power cord ground wire to the silver colored center terminal on the back of the dryer upper corner. 2. Tighten the screws securing the cord restraint firmly against 7. Install a U.L approved strain relief into the power cord entry hole...
Installation Instructions
Page 12
...the power cord into the outlet. 4. If your dryer does not operate, please review the "Avoid Service Checklist" located in the gas supply line to allow gas to L.R gas service without corwerting the gas valve. semi-rigid or approved pipe from gas pipe at the rear of combustion and ventilation air.... to cover every possible condition and situation that is unpacked. NOTE: On gas dryers, before calling for gas leaks with rugs, bedspreads, or plastic sheets can cause improper and dangerous operation. If this dryer are needed for your Use and Care Guide before the burner will shut...
...the power cord into the outlet. 4. If your dryer does not operate, please review the "Avoid Service Checklist" located in the gas supply line to allow gas to L.R gas service without corwerting the gas valve. semi-rigid or approved pipe from gas pipe at the rear of combustion and ventilation air.... to cover every possible condition and situation that is unpacked. NOTE: On gas dryers, before calling for gas leaks with rugs, bedspreads, or plastic sheets can cause improper and dangerous operation. If this dryer are needed for your Use and Care Guide before the burner will shut...


