
Kenmore 8787 Support Question
Kenmore 8787 Support Question
Find answers below for this question about Kenmore 8787 - Elite HE3 7.0 cu. Ft. Electric Dryer.Need a Kenmore 8787 manual? We have 1 online manual for this item!
Question posted by monte20536 on June 22nd, 2022
Dryer Vent Positioning
Where is the vent positioned on the back of an 8787 HE3 7.0Cu Ft Electric Dryer?
Current Answers
Answer #1: Posted by SonuKumar on June 22nd, 2022 9:46 PM
SonuKumar

Member since:
May 9th, 2021 Points: 16,604,590

Member since:
May 9th, 2021 Points: 16,604,590
https://www.manualslib.com/manual/408442/Kenmore-8787-Elite-He3-7-0-Cu-Ft-Electric-Dryer.html?page=16
Please respond to my effort to provide you with the best possible solution by using the "Acceptable Solution" and/or the "Helpful" buttons when the answer has proven to be helpful.
Regards,
Sonu
Your search handyman for all e-support needs!!
Related Kenmore 8787 Manual Pages
Use and Care Guide - Page 2
...5 Tools and Parts 5 Optional Pedestal 5 Location Requirements 6 Electrical Requirements 8 Electrical Connection 9 Venting Requirements 14 Plan Vent System 15 Install Vent System 16 Install Leveling Legs 16 Connect Vent 17 Level Dryer 17 Reverse Door Swing 17 Complete Installation 18
DRYER USE 19 Starting Your Dryer 19 Stopping Your Dryer 20 Pausing or Restarting 20 Control Locked...
Use and Care Guide - Page 3
KENMORE ELITE®APPLIANCE WARRANTY
ONE YEAR LIMITED WARRANTY
When installed, operated and maintained according to all instructions supplied ... from accident, abuse, misuse or use for only 90 days from state to state. Expendable items that can find this dryer is used for other than those recommended in the United States and Canada. Some states and provinces do not allow the ...
Use and Care Guide - Page 4

...electric shock, or injury to persons when using the dryer.
[] Do not place items exposed to cooking oils in your appliance. Close supervision of children is necessary when the dryer is used near children.
[] Before the dryer... is removed from the accumulation of lint, dust, and dirt.
[] The interior of the dryer and exhaust vent should be...
Use and Care Guide - Page 5
...
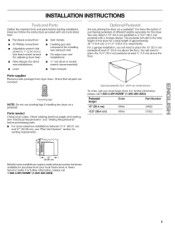
15.5" (39.4 cm)
White
57822
I_- 37" --_1
(93.98 crn)
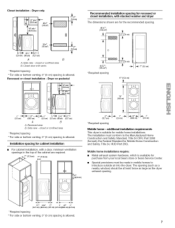
Mobile home installations require metal exhaust system hardware available for purchase from dryer drum.
Check existing electrical supply and venting. Optional pedestal (15.5" [39.4 cm] model shown)
To order, call your local Sears store or Sears Service Center. INSTALLATION INSTRUCTIONS
Gather the...
Use and Care Guide - Page 6
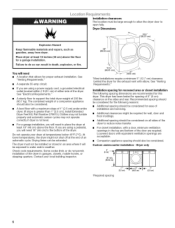
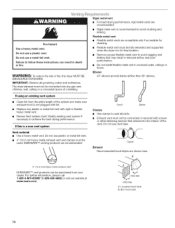
... for proper exhaust installation. Louvered doors with elbow. Dryer Dimensions
501/2'' 1128.27 crn)
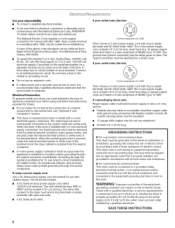
ExplosionHazard
Keep flammable materials and vapors, such as gasoline, away from dryer. See
"Venting Requirements."
• A separate30-amp circuit.
• If you are using a power supply cord, a grounded electrical outlet located within 2 ft (61 cm) of either side of 0" (0 cm) clearance...
Use and Care Guide - Page 7
Dryer only
IH
4,,,m0x.,.-
Closet installation - A L41 (35.6cm)
(3481ic0rmt?2*)
r-,l
| i 6,,rain.*
(7.6cm)
f
24in,2.
(15c5r2n)
h"d
Use and Care Guide - Page 8
... the connection of least resistance for homes built after 1996, dryer circuits involved in ring terminals or spade terminals with a 4-wire electrical supply connection, the neutral ground wire must have a fuse in the neutral or grounding circuit.
[] Do not use aluminum).
[] At least 5 ft (1.52 m) long.
The 3-wire power supply cord, at least...
Use and Care Guide - Page 10
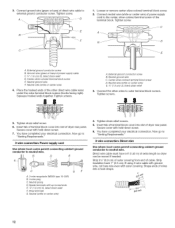
...should have a tight fit with the dryer cabinet and be in a horizontal position. F
CD
E
G
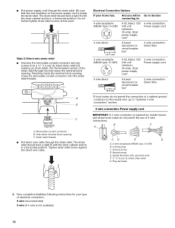
A. 4-wire receptacle (NEMA type 14-30R) B. 4-prong plug C. Ring terminals
4. Removable conduit connector B. Ground prong D. Spade terminals with upturned ends F. _" (1.9 cm) UL listed strain relief G. Put the threaded section of electrical connection: 4-wire (recommended) 3-wire (if 4-wire...
Use and Care Guide - Page 11
...wires to
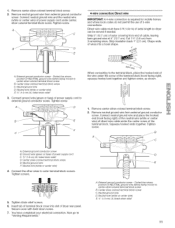
"Venting Requirements." Dotted line shows position of NEUTRAL ground wire before being moved to external ground conductor screw.
Shape ends of dryer rear panel....neutral ground wire from 3 remaining wires. A.
Tighten strain relief screws. 6. B. You have 5 ft (1.52 m) of power supply cord to center silver-colored terminal block screw. External ground conductor ...
Use and Care Guide - Page 12
...terminal block cover into a hook shape.
12 You have 5 ft (1.52 m) of dryer rear panel. Now go to "Venting Requirements."
3-wire connection: Power supply cord
Use where local ...so dryer can be moved if needed. Tighten screw.
1. Place the hooked ends of dryer rear panel. External ground conductor screw B. Tighten screws.
!! !! A.
You have completed your electrical ...
Use and Care Guide - Page 13
...relief
Place the hooked ends of dryer rear panel. Insert tab of terminal block cover into slot of the other wires to "Venting Requirements."
4= Tighten strain relief ...qualified electrician
Connect the other direct wire cable wires under the screw of dryer rear panel. You have completed your electrical connection. Tighten screws.
!! !!
----=
4. When connecting to neutral wire...
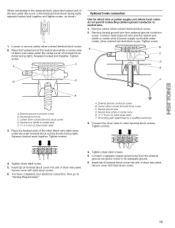
Use and Care Guide - Page 14
... sure exhaust hood is a new vent system
Vent material • Use a heavy metal vent. If using an existing vent system
• Clean lint from your dealer. If this dryer MUST BE
EXHAUSTED OUTDOORS.
Do not use a plastic vent. Do not use plastic or metal foil vent. • 4" (10.2 cm) heavy metal exhaust vent and clamps must not be...
Use and Care Guide - Page 15
... exhaust installations This dryer can be in death, fire, electrical shock, or serious injury. Exhaust outlet
elbows
A
B
C
A. i l,
i
A
B
A.
Left or right side exhaust installation C. Over-the-top installation (also available with a magnetic latch. For further information, please call 1-800-4-MY-HOME ® (1-800-469-4663}.
15 improper venting can result in...
Use and Care Guide - Page 16
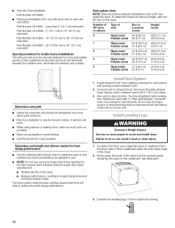
... dryer carton.
Number of 90 ° turns or elbows
Type of vent
Box or Louvered hoods
Angled hoods
0
Rigid metal
64 ft (20 m)
58 ft (17.7 m)
Flexible metal 36 ft (11 m)
28 ft (8.5 m)
1
Rigid metal
54 ft (16.5 m) 48 ft (14.6 m)
Flexible metal 31 ft (9.4 m) 23 ft (7 m)
2
Rigid metal
44 ft (13.4 m) 38 ft (11.6 m)
Flexible metal 27 ft (8.2 m) 19 ft (5.8 m)
3
Rigid metal
35 ft...
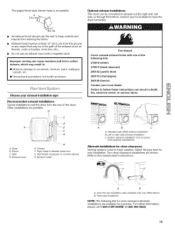
Use and Care Guide - Page 17
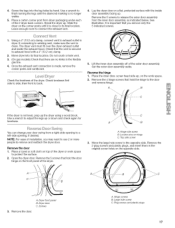
... the front panel of installation, you remove only the 5 indicated screws.
1. Lay the dryer door on the work space
to the door
and remove hinge. The dryer vent must fit over the dryer exhaust outlet and inside door assembly facing up , on a flat, protected surface with a 4" (10.2 cm) clamp.
2. Check that there are no...
Use and Care Guide - Page 18
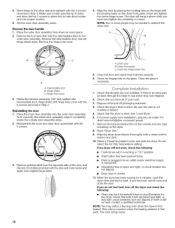
... electrical supply
is connected.
• Household fuse is intact and tight, or circuit breaker has not tripped.
• Dryer...Check for the dryer. Read "Dryer Use."
9.
The odor will not start the dryer.
Dryer front panel C. Be sure the vent is still no... 2. When the dryer has been running or "On" position. • Start button has been pushed firmly. • Dryer is plugged into...
Use and Care Guide - Page 19
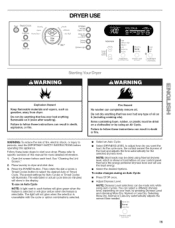
...Explosion Hazard
Keep flammable materials and vapors, such as gasoline, away from dryer. WARNING: To reduce the risk of oil on it (even after ... anything that has ever had any type of fire, electric shock, or injury to persons, read the IMPORTANT SAFETY...Please refer to start your load, by using Auto Cycles. Place laundry in the display.
Items containing foam, rubber, or plastic must...
Use and Care Guide - Page 20
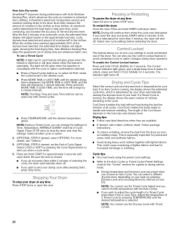
... and hold CYCLE SIGNAL for 3 seconds. Cool Down tumbles the load without heat during dryer operation. Drying tips • Follow care label directions when they tumble.
A thermistor (... desired drying time is selected. "Imed Cycle Adiust
........
• Press TEMPERATURE until dryer starts. Follow package instructions.
• To reduce wrinkling, remove the load from where...
Use and Care Guide - Page 25
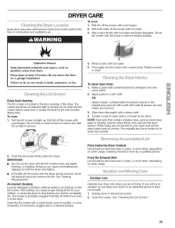
... clean 1. Pull the lint screen straight up on dryer usage. Wet lint is in the door opening of the dryer. As needed cleaning Laundry detergent and fabric softener residue can build up . ... hood and remove the lint. IMPORTANT: • De net run the dryer with a damp cloth.
4. To clean dryer drum 1.
From the Exhaust Vent
Lint should :
1. See "Cleaning the Lint Screen."
25 Roll lint ...
Use and Care Guide - Page 27
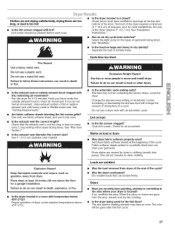
... or varnishing in back or other clothing. Proper operation of the dryer requires 5" (12.7 cm). The new electric heating element may not be cleaned before each load,
Is the dryer located in clothing (usually blue jeans). See "Plan Vent System ."
• Is the exhaust vent diameter the correct size? Clean lint screen. If so, ventilate...
Similar Questions

How To Open Front Panel
How do you open the front panel of Kenmore gas dryer 98042
How do you open the front panel of Kenmore gas dryer 98042
(Posted by 2rnzrus 1 year ago)

Diasble Buzzer On Kenmore 8041
How do I go about diabling the buzzer on the Kenmore 8041 5.8 CU FT electric dryer?
How do I go about diabling the buzzer on the Kenmore 8041 5.8 CU FT electric dryer?
(Posted by dhuard22 9 years ago)

How To Convert Kenmore He2 Dryer To Side Vent
(Posted by greChur 10 years ago)

New Dryer Has No Heat. Runs Cold Then I Can Smell Gas Coming Out Of Vent
(Posted by piepergeorge 12 years ago)
