Kenmore 8751 Support Question
Kenmore 8751 Support Question
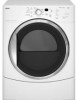
Find answers below for this question about Kenmore 8751 - 6.7 cu. Ft. HE2 Electric Dryer.Need a Kenmore 8751 manual? We have 1 online manual for this item!
Question posted by greChur on October 4th, 2013
How To Convert Kenmore He2 Dryer To Side Vent
The person who posted this question about this Kenmore product did not include a detailed explanation. Please use the "Request More Information" button to the right if more details would help you to answer this question.
Current Answers
Related Kenmore 8751 Manual Pages
Use and Care Guide - Page 2

...Electrical Requirements 8 Electrical Connection 9 Venting Requirements 14 Plan Vent System 15 Install Vent System 16 Install Leveling Legs 16 Connect Vent 16 Level Dryer 16 Reverse Door Swing 17 Complete Installation 18
DRYER USE 19 Starting Your Dryer 19 Stopping or Restarting Your Dryer...count on making a smart purchase. Your new Kenmore ®product is all products, it takes ...
Use and Care Guide - Page 3
... date of purchase. LIMITATION OF REMEDIES
Customer's sole and exclusive remedy under this appliance fails due to a defect in correct product installation, operation or maintenance.
3.
KENMORE APPLIANCE AND OPTIONAL PEDESTAL WARRANTY
ONE YEAR LIMITED WARRANTY
When installed, operated and maintained according to all instructions supplied with the product.
7.
If this appliance...
Use and Care Guide - Page 4
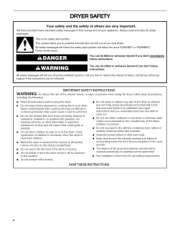
...is necessary when the dryer is used near children.
[] Before the dryer is removed from the accumulation of lint, dust, and dirt.
[] The interior of the dryer and exhaust vent should be killed or...spotted with controls.
[] Do not repair or replace any part of fire, electric shock, or injury to persons when using the dryer.
[] Do not place items exposed to dry articles containing foam rubber or...
Use and Care Guide - Page 5

... installations)
• Level
• Vent clamps
• Caulking gun and compound (for purchase from dryer. See "Location Requirements."
To do so can purchase a pedestal separately for proper exhaust installation. This pedestal will need • A location that all parts are using a power supply cord, a grounded electrical outlet located within 2 ft (61 cm) of either side...
Use and Care Guide - Page 6

...-il_j _U 36" rnin
O
1"'
2.Scrn
I
(81.4cm) (
*28.65" (72.77 cm)
* Most installations require a minimum 5" (12.7 cm) clearance behind the dryer for ease of the
dryer to open fully. See "Venting Requirements." Recommended spacing should be considered for the following spacing dimensions are recommended for spacing of the door are acceptable. •...
Use and Care Guide - Page 7

...system hardware, which is available for mobile home installations.
Mobile home - The opening (such as the dryer exhaust opening.
0
24 in. 2 * {155 crn2)
* Required spacing
i_
3"* (7.6 crn...crn) (2.5 crn) (2.5 cm)(68.6 crn) (2.5 crn)
* Required spacing **For side or bottom venting, 0" (0 cm) spacing is allowed. Recommended installation spacing for recessed or closet installation, with a door...
Use and Care Guide - Page 8

...UL listed strain relief. GROUNDING INSTRUCTIONS
[] For a grounded, cord-connected dryer: This dryer must be run with a 4-wire electrical supply connection, the neutral ground wire must be used , it is ...) and be at least 4 ft (1.22 m) long, must be using a power supply cord:
Use a UL listed power supply cord kit marked for electric current. This dryer uses a cord having an equipment...
Use and Care Guide - Page 10
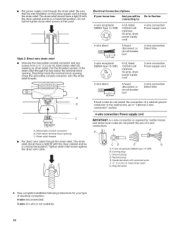
... Ground prong D. Spade terminals with the dryer cabinet and be in a horizontal position....Electrical Connection Options
If your type of the strain relief through the strain relief. Removable conduit connector B. Neutral prong E. Put power supply cord through the strain relief. Be sure that the wire insulation on strain relief). The strain relief should have a tight fit with the dryer...
Use and Care Guide - Page 11
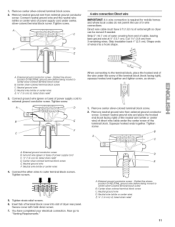
...strain relief D. Direct wire cable must have completed your electrical connection.
Remove neutral ground wire from end of terminal ...ft (1.52 m) of 3-wire connections.
Neutral ground wire E Neutral wire (white or center wire) 4, Connect the other wires to
"Venting...local codes do not permit the use of extra length so dryer can be moved if needed.
1, Remove center silver-colored...
Use and Care Guide - Page 12
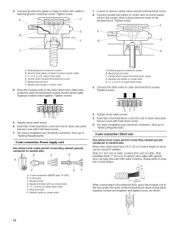
... with hold -down screw.
7. You have completed your electrical connection. Strip insulation back 1" (2.5 cm). A. Center ...cm) UL Iisted strain relief E Ring terminals G. Now go to
"Venting Requirements."
3-wire connection: Direct wire
Use where local codes permit connecting... 3-wire plug C. Direct wire cable must have 5 ft (1.52 m) of dryer rear panel. Ground wire (green or bare) of the...
Use and Care Guide - Page 13
... codes do not permit connecting cabinet-ground conductor to
"Venting Requirements."
//ii/ F
A. Remove center silver-colored ... relief screw. 5. Insert tab of terminal block cover into slot of dryer rear panel. Neutral wire (white or center wire) EL _" (!.9 cm... screw D. Neutral ground wire D. You have completed your electrical connection. Squeeze hooked end together. Secure cover with hold ...
Use and Care Guide - Page 14

... line, etc.). • Do not use an exhaust hood with a magnetic latch. Rigid metal vent
• For best drying performance, recommended. improper venting can be fully extended and supported when the dryer is acceptable.
4" (!0.2 cm) heavymetal exhaust vent
DURASAFE TM vent products can cause moisture and lint to collect indoors, which may result in reduced...
Use and Care Guide - Page 15
... in death, fire, electrical shock, or serious injury. A
B
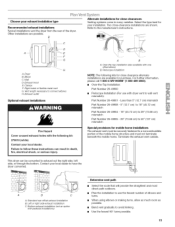
A. This dryer can result in many varieties. Bottom exhaust installation (not an option
with pedestal installations)
Determine vent path
• Select the route that will provide the straightest and most direct path outdoors.
• Plan the installation to use with dryer vent to wall vent mismatch):
Part Number...
Use and Care Guide - Page 16

... metal 25 ft (7.6 m) 17 ft (5.2 m)
4
Rigid metal
27 ft (8.2 m) 21 ft (6.4 m)
Flexible metal 23 ft (7 m)
15 ft (4.6 m)
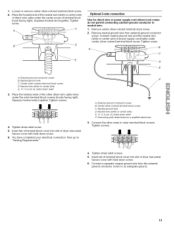
Excessive Weight Hazard Use two or more people to exhaust outlet in "Plan Vent System." Use caulking compound to back. Screw the legs into the leg holes by hand. Using a 4" (10.2 cm) clamp, connect vent to move and install dryer. Do not...
Use and Care Guide - Page 17
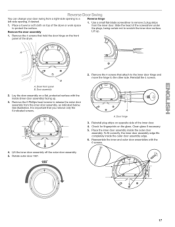
...To fit correctly, the inner door assembly edge fits completely inside the outer door
assembly. A. Dryer front panel B. Lay the door assembly on the front panel of the screwdriver under the plugs...hinge and move the hinge to a left-side opening, if desired.
1. Slide the head of the dryer. Rotate outer door 180 °.
180 °
17
See illustration, It is important that you ...
Use and Care Guide - Page 18
... the door. Be sure the vent is still no heat, contact a qualified technician. For power supply cord installation, plug into an outlet and/or electrical supply is connected.
• Household fuse is intact and tight, or circuit breaker has not tripped.
• Dryer door is closed.
11. Read "Dryer Use."
9.
Plug strip (cannot be...
Use and Care Guide - Page 19
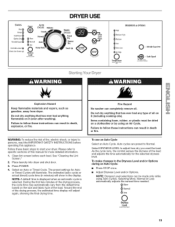
...few minutes of the drying process, the cycle time may automatically vary from dryer.
Auto cycles are preset to start your dryer.
Follow these basic steps to Normal. The estimated (auto cycle) or ... cycle runs, the control senses the dryness of fire, electric shock, or injury to specific sections of the load.
Place laundry into dryer and shut door. 3. Fire Hazard
No washer can result...
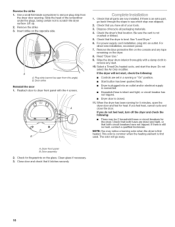
Use and Care Guide - Page 25

...fingers. 2. To clean
1. See "Venting Requirements."
4. OR
Apply a liquid, nonflammable household cleaner to remove lint from dryer, Place dryer at least 18 inches (46 cm...dryer to stop before your dryer's lint screen to a residue buildup. The control panel has an indicator light to remind you to both sides of lint screen with a damp cloth. 4.
Rinse screen with powdered laundry...
Use and Care Guide - Page 26
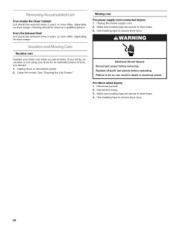
... more often, depending on dryer usage. Use masking tape to secure dryer door.
26 Disconnect wiring. 3. Make sure leveling legs are at home. Disconnect power. 2.
Cleaning should be done by a qualified person. Replace all parts and panels before servicing. Electrical Shock Hazard Disconnect power before operating. From the Exhaust Vent Lint should be removed...
Use and Care Guide - Page 27

... edges of non-use? See "Installation Instructions." Fire Hazard Use a heavy metal vent. See "Venting Requirements." Are fabric softener sheets blocking the grille? Is the exhaust vent the correct length?
Separate the load items and restart the dryer. See "Plan Vent System." Electric dryers require 240 volt power supply. is not too long or has too many...
Similar Questions

How To Open Front Panel
How do you open the front panel of Kenmore gas dryer 98042
How do you open the front panel of Kenmore gas dryer 98042
(Posted by 2rnzrus 1 year ago)

Dryer Vent Positioning
Where is the vent positioned on the back of an 8787 HE3 7.0Cu Ft Electric Dryer?
Where is the vent positioned on the back of an 8787 HE3 7.0Cu Ft Electric Dryer?
(Posted by monte20536 1 year ago)
Diagnostic Testing Mode On He2 Dryer
How do u enter the diagnostic testing mode on a Kenmore HE2 electric dryer?
How do u enter the diagnostic testing mode on a Kenmore HE2 electric dryer?
(Posted by dawnmrepose 9 years ago)

Need A Part
Hello, i have an old Kenmore dryer Model # is 87515110 and serial number is M 52206158 and the drye...
Hello, i have an old Kenmore dryer Model # is 87515110 and serial number is M 52206158 and the drye...
(Posted by sangmeet 10 years ago)

Kenmore He2 Dyer
Just got this dryer and have done one load successfully. Now it will not start, all the light are li...
Just got this dryer and have done one load successfully. Now it will not start, all the light are li...
(Posted by lkay 10 years ago)