
Use and Care Guide
Page 2
Your new Kenmore ®product is all products, it takes for you can count on all covered repairs v' "No-lemon" guarantee - The Master Protection Agreement also ... product takes longer than promised Once you money and aggravation. TABLE OF CONTENTS PROTECTION AGREEMENTS PROTECTION AGREEMENTS 2 ARRANTY 3 DRYER SAFETY 4 INSTALLATION INSTRUCTIONS 5 Tools and Parts 5 Optional Pedestal 5 Location Requirements 6 Electrical Requirements 8 Electrical Connection 9 Venting Requirements 14 Plan Vent System 15 Install Vent System 16 Install Leveling Legs 16 Connect Vent 17 Level...
Your new Kenmore ®product is all products, it takes for you can count on all covered repairs v' "No-lemon" guarantee - The Master Protection Agreement also ... product takes longer than promised Once you money and aggravation. TABLE OF CONTENTS PROTECTION AGREEMENTS PROTECTION AGREEMENTS 2 ARRANTY 3 DRYER SAFETY 4 INSTALLATION INSTRUCTIONS 5 Tools and Parts 5 Optional Pedestal 5 Location Requirements 6 Electrical Requirements 8 Electrical Connection 9 Venting Requirements 14 Plan Vent System 15 Install Vent System 16 Install Leveling Legs 16 Connect Vent 17 Level...
Use and Care Guide
Page 3
KENMORE ELITE®APPLIANCE WARRANTY ONE YEAR LIMITED WARRANTY When installed, operated...you obtain assistance or service more quickly whenever you . LIMITATION OF REMEDIES Customer's sole and exclusive remedy under this dryer is used in correct product installation, operation or maintenance. 3. This warranty applies only while this product caused by...5. Sears shall not be product repair as provided herein. Model number Serial number Purchase date Save these parts. THIS WARRANTY COVERS ONLY DEFECTS IN MATERIAL AND WORKMANSHIP. Damage to or failure of this appliance is installed...
KENMORE ELITE®APPLIANCE WARRANTY ONE YEAR LIMITED WARRANTY When installed, operated...you obtain assistance or service more quickly whenever you . LIMITATION OF REMEDIES Customer's sole and exclusive remedy under this dryer is used in correct product installation, operation or maintenance. 3. This warranty applies only while this product caused by...5. Sears shall not be product repair as provided herein. Model number Serial number Purchase date Save these parts. THIS WARRANTY COVERS ONLY DEFECTS IN MATERIAL AND WORKMANSHIP. Damage to or failure of this appliance is installed...

Use and Care Guide
Page 4
... safety messages will be exposed to the weather. [] Do not tamper with controls. [] Do not repair or replace any part of the dryer or attempt any servicing unless specifically recommended in , or spotted with cooking oils may contribute to a chemical reaction that could ... periodically by qualified service personnel. [] See installation instructions for grounding requirements. iMPORTANT SAFETY iNSTRUCTiONS WARNING: To reduce the risk of fire, electric shock, or injury to reduce the chance of injury, and tell you don't immediately follow basic precautions, including the following: [] Read...
... safety messages will be exposed to the weather. [] Do not tamper with controls. [] Do not repair or replace any part of the dryer or attempt any servicing unless specifically recommended in , or spotted with cooking oils may contribute to a chemical reaction that could ... periodically by qualified service personnel. [] See installation instructions for grounding requirements. iMPORTANT SAFETY iNSTRUCTiONS WARNING: To reduce the risk of fire, electric shock, or injury to reduce the chance of injury, and tell you don't immediately follow basic precautions, including the following: [] Read...
Use and Care Guide
Page 5
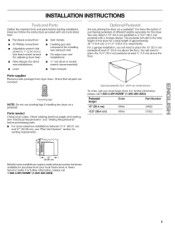
...cm) or 51.5" (130.8 cm), respectively. For further information, please call your local Sears store or Sears Service Center. Parts needed Check local codes. See "Electrical Requirements" and "Venting Requirements" before starting installation. You will need to place the 15.5" (39.4 cm) pedestal at ... need to place the 10" (25.4 cm) pedestal at least 3" (7.6 cm) above the floor. For a garage installation, you placing the dryer on a pedestal. Read and follow the instructions provided with a storage drawer. Optional pedestal (15.5" [39.4 cm] model shown) To order, ...
...cm) or 51.5" (130.8 cm), respectively. For further information, please call your local Sears store or Sears Service Center. Parts needed Check local codes. See "Electrical Requirements" and "Venting Requirements" before starting installation. You will need to place the 15.5" (39.4 cm) pedestal at ... need to place the 10" (25.4 cm) pedestal at least 3" (7.6 cm) above the floor. For a garage installation, you placing the dryer on a pedestal. Read and follow the instructions provided with a storage drawer. Optional pedestal (15.5" [39.4 cm] model shown) To order, ...
Use and Care Guide
Page 6
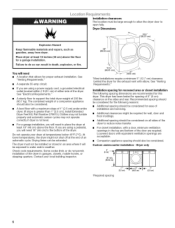
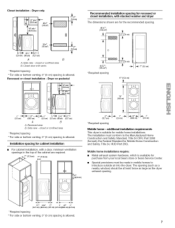
... on the sides and rear. For closet installation, with a maximum slope of 1" (2.5 cm) under entire dryer. (If slope is greater than 1" [2.5 cm], install Extended Dryer Feet Kit, Part Number 279810.) Clothes may not tumble properly and automatic sensor cycles may not operate correctly if...vent with equivalent ventilation openings are using a power supply cord, a grounded electrical outlet located within 2 ft (61 cm) of either side of the dryer in the top and bottom of the dryer. Place dryer at the end of installation and servicing. • Additional clearances might not...
... on the sides and rear. For closet installation, with a maximum slope of 1" (2.5 cm) under entire dryer. (If slope is greater than 1" [2.5 cm], install Extended Dryer Feet Kit, Part Number 279810.) Clothes may not tumble properly and automatic sensor cycles may not operate correctly if...vent with equivalent ventilation openings are using a power supply cord, a grounded electrical outlet located within 2 ft (61 cm) of either side of the dryer in the top and bottom of the dryer. Place dryer at the end of installation and servicing. • Additional clearances might not...
Use and Care Guide
Page 7
Dryer only IH 4,,,m0x.,.- A L41 (35.6cm) (3481ic0rmt?2*) r-,l | i 6,,rain.* (7.6cm) f 24in,2. (15c5r2n) h"d Closet installation -
Dryer only IH 4,,,m0x.,.- A L41 (35.6cm) (3481ic0rmt?2*) r-,l | i 6,,rain.* (7.6cm) f 24in,2. (15c5r2n) h"d Closet installation -
Use and Care Guide
Page 16
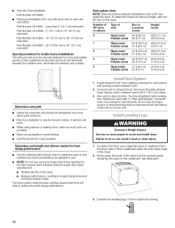
... duct tape, screws or other injury. 1. Terminate the exhaust vent outside. Secure vent to exhaust hood with dryer vent to wall vent mismatch): Part Number 26-49901 - Examine the leveling legs. Number of 90 ° turns or elbows Type of vent ...ft (7.6 m) 17 ft (5.2 m) 4 Rigid metal 27 ft (8.2 m) 21 ft (6.4 m) Flexible metal 23 ft (7 m) 15 ft (4.6 m) Determine vent path • Select the route that extend into the interior of the vent to secure vent. Run vent to seal all joints. Gently lay the dryer on the cardboard. Install exhaust hood. Over-the-Top Installation: Part...
... duct tape, screws or other injury. 1. Terminate the exhaust vent outside. Secure vent to exhaust hood with dryer vent to wall vent mismatch): Part Number 26-49901 - Examine the leveling legs. Number of 90 ° turns or elbows Type of vent ...ft (7.6 m) 17 ft (5.2 m) 4 Rigid metal 27 ft (8.2 m) 21 ft (6.4 m) Flexible metal 23 ft (7 m) 15 ft (4.6 m) Determine vent path • Select the route that extend into the interior of the vent to secure vent. Run vent to seal all joints. Gently lay the dryer on the cardboard. Install exhaust hood. Over-the-Top Installation: Part...
Use and Care Guide
Page 18
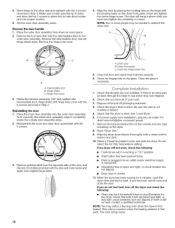
...shield aside. Check that all parts are intact and tight, or that the dryer is plugged into proper location. 5. Check that both fuses are now installed. If the dryer will go back through the steps to help drive Iocator pins into an outlet and/or electrical supply is connected. •... Household fuse is intact and tight, or circuit breaker has not tripped. • Dryer door is closed. 11. Insert and tighten the center hinge screw. Hinge shield C....
...shield aside. Check that all parts are intact and tight, or that the dryer is plugged into proper location. 5. Check that both fuses are now installed. If the dryer will go back through the steps to help drive Iocator pins into an outlet and/or electrical supply is connected. •... Household fuse is intact and tight, or circuit breaker has not tripped. • Dryer door is closed. 11. Insert and tighten the center hinge screw. Hinge shield C....
Use and Care Guide
Page 21
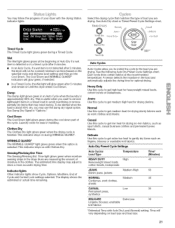
... for drying sturdy fabrics such as sport shirts, casual business clothes and permanent press blends. You may follow the progress of your dryer with Clothes Dry. Clothes Dry The Clothes Dry light glows green when the drying cycle is detected or in the clothes. Time ...preset minimum run time (based on with the drying Status indicator lights. Cool Down The Cool Down light glows green during the cool down part of Cycle and Control Lock settings selected. Indicator lights Other indicator lights show a more accurate drying time. Time will run for drying denims...
... for drying sturdy fabrics such as sport shirts, casual business clothes and permanent press blends. You may follow the progress of your dryer with Clothes Dry. Clothes Dry The Clothes Dry light glows green when the drying cycle is detected or in the clothes. Time ...preset minimum run time (based on with the drying Status indicator lights. Cool Down The Cool Down light glows green during the cool down part of Cycle and Control Lock settings selected. Indicator lights Other indicator lights show a more accurate drying time. Time will run for drying denims...
Use and Care Guide
Page 26
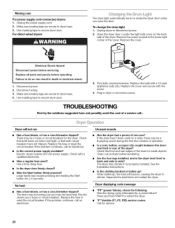
...Electric dryers require 240-volt power supply. If the problem continues, call an electrician. Clean out pockets before servicing. The dryer may require pressing and holding the Start button for 2-5 seconds. Separate the load items and restart the dryer. Use masking tape to secure dryer door. 3. Open the dryer door. Replace all parts... and panels before operating. Turn bulb counterclockwise. Plug in death or electrical shock. 1. Check with the screw....
...Electric dryers require 240-volt power supply. If the problem continues, call an electrician. Clean out pockets before servicing. The dryer may require pressing and holding the Start button for 2-5 seconds. Separate the load items and restart the dryer. Use masking tape to secure dryer door. 3. Open the dryer door. Replace all parts... and panels before operating. Turn bulb counterclockwise. Plug in death or electrical shock. 1. Check with the screw....

Use and Care Guide
Page 56
...-FOYER Mc (1-800-533-6937) www.sears.ca Serifs W10114657 © 2006 Sears Brands, LLC ® Regis. Your Home For repair-in your nearest Sears Parts & Repair Center. 1-800-488-1222 Call anytime, day or night (U.S.A. tered Trademark / TMTrademark / s_l Servic. UU. For the replacement...
...-FOYER Mc (1-800-533-6937) www.sears.ca Serifs W10114657 © 2006 Sears Brands, LLC ® Regis. Your Home For repair-in your nearest Sears Parts & Repair Center. 1-800-488-1222 Call anytime, day or night (U.S.A. tered Trademark / TMTrademark / s_l Servic. UU. For the replacement...
