Use and Care Guide
Page 2
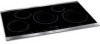
.... 5. Table of Contents Cooktop Warranty 2 IMPORTANT SAFETY INSTRUCTIONS 3 - 4 Product Record 4 Serial Plate Location 4 Induction Cooktop Features 4 - 5 Induction Cooktop Display Messages 6 Before Using the Cooktop 7 - 9 Setting Cooktop Controls 9 -12 • Operating the Cooking Zones 9-10 • Preheat Recommendations 10 • KeepWarm Feature 10 • Minute Timer 11 • Lockingthe Controls 11 • Power Sharing 12 • Operational Noises 12 General Care & Cleaning 12-14 • Cleaning Various Parts of your Cooktop 12 • CooktopCleaning...
.... 5. Table of Contents Cooktop Warranty 2 IMPORTANT SAFETY INSTRUCTIONS 3 - 4 Product Record 4 Serial Plate Location 4 Induction Cooktop Features 4 - 5 Induction Cooktop Display Messages 6 Before Using the Cooktop 7 - 9 Setting Cooktop Controls 9 -12 • Operating the Cooking Zones 9-10 • Preheat Recommendations 10 • KeepWarm Feature 10 • Minute Timer 11 • Lockingthe Controls 11 • Power Sharing 12 • Operational Noises 12 General Care & Cleaning 12-14 • Cleaning Various Parts of your Cooktop 12 • CooktopCleaning...
Use and Care Guide
Page 3
... these instructions for cleaning. When flaming food under the hood, turn fan on Grease Fires. DO NOT TOUCH COOKING ZONES OR AREAS NEAR THESE SURFACES. Please pay attention to situati0ns that could catch fire. Important Safety Instructions Read all instructions before using the appliance. Cooking Zones may be hot from that may cause harmful interference to correct the interference by removing panels, wire covers or any part of...
... these instructions for cleaning. When flaming food under the hood, turn fan on Grease Fires. DO NOT TOUCH COOKING ZONES OR AREAS NEAR THESE SURFACES. Please pay attention to situati0ns that could catch fire. Important Safety Instructions Read all instructions before using the appliance. Cooking Zones may be hot from that may cause harmful interference to correct the interference by removing panels, wire covers or any part of...
Use and Care Guide
Page 4
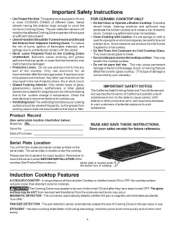
... turned ON or OFF, the cooktop surface remains cooler than standard ceramic cooktops. PAN SIZE DETECTION - Induction power boils more quickly and simmer more COOKING ZONES of electric shock. Do not use aluminum foil to avoid a steam burn. This could cause glass to cover the minimum Cooking Zones. Product Record (See serial plate location illustration below) Model No. 790. EFFICIENT - The pan detection sensors will find the model and serial number printed on Cold Cooktop Glass. The ventilating hood...
... turned ON or OFF, the cooktop surface remains cooler than standard ceramic cooktops. PAN SIZE DETECTION - Induction power boils more quickly and simmer more COOKING ZONES of electric shock. Do not use aluminum foil to avoid a steam burn. This could cause glass to cover the minimum Cooking Zones. Product Record (See serial plate location illustration below) Model No. 790. EFFICIENT - The pan detection sensors will find the model and serial number printed on Cold Cooktop Glass. The ventilating hood...
Use and Care Guide
Page 5
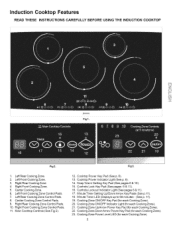
... Power Key Pad (for each Cooking Zone). 23. Fig3. 1. Center Cooking Zone Control Pads. 9. Main Cooktop Controls (See Fig 2). 12. Right Front Cooking Zone Control Pads. 11. Cooking Zone Power Level LED (for each Cooking Zone). 20. Right Front Cooking Zone. 5. Left Front Cooking Zone Control Pads. 7. Cooking Zone ON/OFF Key Pad (for each Cooking Zone). 22. Induction Cooktop Features READ THESE INSTRUCTIONS CAREFULLY BEFORE USING THE INDUCTION COOKTOP Fig 1. Right Rear Cooking...
... Power Key Pad (for each Cooking Zone). 23. Fig3. 1. Center Cooking Zone Control Pads. 9. Main Cooktop Controls (See Fig 2). 12. Right Front Cooking Zone Control Pads. 11. Cooking Zone Power Level LED (for each Cooking Zone). 20. Right Front Cooking Zone. 5. Left Front Cooking Zone Control Pads. 7. Cooking Zone ON/OFF Key Pad (for each Cooking Zone). 22. Induction Cooktop Features READ THESE INSTRUCTIONS CAREFULLY BEFORE USING THE INDUCTION COOKTOP Fig 1. Right Rear Cooking...
Use and Care Guide
Page 6
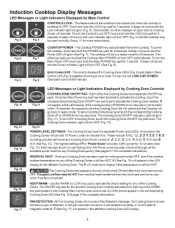
... glass surface may be HOT from residual heat transferred from . Fig. 10 Fig. 12 Fig. 14 Fig. 15 Fig. 16 Fig. 17 LED Messages or Light Indicators Displayed by Main Control Fig. 4 Fig. 5 CONTROLS LOCK - To set . The Cooking Zone Indicator Light will turn OFF (Fig. 10). Fig.13 POWER LEVEL SETTINGS - The Cooking Zones have separate ON/OFF key pads. To power the cooktop, touch and hold the LOCK key...
... glass surface may be HOT from residual heat transferred from . Fig. 10 Fig. 12 Fig. 14 Fig. 15 Fig. 16 Fig. 17 LED Messages or Light Indicators Displayed by Main Control Fig. 4 Fig. 5 CONTROLS LOCK - To set . The Cooking Zone Indicator Light will turn OFF (Fig. 10). Fig.13 POWER LEVEL SETTINGS - The Cooking Zones have separate ON/OFF key pads. To power the cooktop, touch and hold the LOCK key...
Use and Care Guide
Page 7
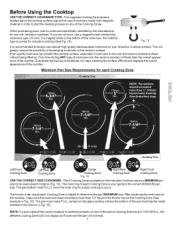
... properly on your guide to be used at each location (Fig. 19). Minimum Pan Size Requirements for proper cooking to the bottom of the cookware, the material type is TOO SMALL, the affected Cooking Zone LED will display an Fcode and the pan will make cleaning the surface difficult and degrade the overall appearance of the cooktop. NOTE: If a pan made with Induction cooktops. After centering the...
... properly on your guide to be used at each location (Fig. 19). Minimum Pan Size Requirements for proper cooking to the bottom of the cookware, the material type is TOO SMALL, the affected Cooking Zone LED will display an Fcode and the pan will make cleaning the surface difficult and degrade the overall appearance of the cooktop. NOTE: If a pan made with Induction cooktops. After centering the...
Use and Care Guide
Page 8
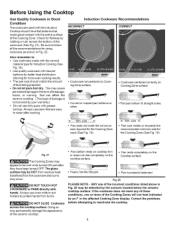
... NOT TOUCH HOT COOKWARE or PANS directly with hands. ANY one or more even cooking results. • The pan size should have been turned OFR The glass surface may be detected by rotating a ruler across the cooktop surface. w I_ Min. If the cookware does not meet the minimum size required for more of the Cooking Zones will not heat indicated by an F in the affected Cooking Zone display...
... NOT TOUCH HOT COOKWARE or PANS directly with hands. ANY one or more even cooking results. • The pan size should have been turned OFR The glass surface may be detected by rotating a ruler across the cooktop surface. w I_ Min. If the cookware does not meet the minimum size required for more of the Cooking Zones will not heat indicated by an F in the affected Cooking Zone display...
Use and Care Guide
Page 9
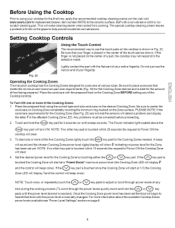
.... Once the Cooking Zone power level has been set yet. Any problems must be corrected before proceeding. 2. The Power Indicator light located above the (_key pad will detect a problem and display the letter Fin the affected Cooking Zone LED. To start at any of the Cooktop controls. Before Using the Cooktop Prior to using the correct type and size cookware on the desired Cooking Zone. To Turn ON one...
.... Once the Cooking Zone power level has been set yet. Any problems must be corrected before proceeding. 2. The Power Indicator light located above the (_key pad will detect a problem and display the letter Fin the affected Cooking Zone LED. To start at any of the Cooktop controls. Before Using the Cooktop Prior to using the correct type and size cookware on the desired Cooking Zone. To Turn ON one...
Use and Care Guide
Page 10
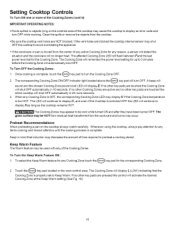
... shut OFF. The Cooking Zone will display / (LOW) indicating that induction may cause the cooktop to 3 minutes before the Cooking Zone will continue to display H, and even if the Cooktop is too HOT. If no other key pads are pressed the control will turn the Cooking Zone OFF. 2. Setting Cooktop Controls To Turn ON one or more seconds. 3. Whenever using the cooktop, always pay attention to preheat a cooking...
... shut OFF. The Cooking Zone will display / (LOW) indicating that induction may cause the cooktop to 3 minutes before the Cooking Zone will continue to display H, and even if the Cooktop is too HOT. If no other key pads are pressed the control will turn the Cooking Zone OFF. 2. Setting Cooktop Controls To Turn ON one or more seconds. 3. Whenever using the cooktop, always pay attention to preheat a cooking...
Use and Care Guide
Page 11
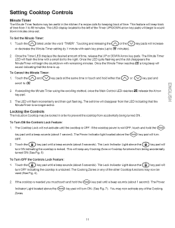
... time. The LED display located to prevent the cooktop from being turned ON. Touch the @ scroll to 99 minutes). The set . Locking the Controls The Induction Cooktop may be used (See Fig. 4). . The Cooking Zones or any of time, release the UP or DOWN Arrow key pads. The Minute Timer LED will disappear from the LED indicating that the time is...
... time. The LED display located to prevent the cooktop from being turned ON. Touch the @ scroll to 99 minutes). The set . Locking the Controls The Induction Cooktop may be used (See Fig. 4). . The Cooking Zones or any of time, release the UP or DOWN Arrow key pads. The Minute Timer LED will disappear from the LED indicating that the time is...
Use and Care Guide
Page 12
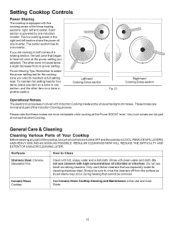
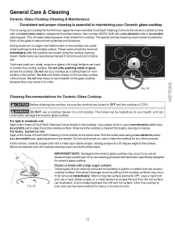
... processes involved with clean water and cloth. Rinse with Induction Cooking create some unusual background noises. Only use harsh scrubbing cleaners. Ceramic Glass Cooktop See Ceramic Glass Cooktop Cleaning and Maintenance in another section. The center section has its power setting. Surfaces How to Clean Stainless Steel, Chrome Decorative Trim Clean with high concentrations of the cooktop, be sure to maintain at the Power BOOST level. Power Sharing Tips: Remember to heat will experience...
... processes involved with clean water and cloth. Rinse with Induction Cooking create some unusual background noises. Only use harsh scrubbing cleaners. Ceramic Glass Cooktop See Ceramic Glass Cooktop Cleaning and Maintenance in another section. The center section has its power setting. Surfaces How to Clean Stainless Steel, Chrome Decorative Trim Clean with high concentrations of the cooktop, be sure to maintain at the Power BOOST level. Power Sharing Tips: Remember to heat will experience...
Use and Care Guide
Page 13
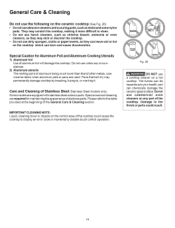
... a few drops of soils need be removed immediately after the cooktop has cooled using a non-abrasive plastic type no -scratch cleaning pad. Permanent damage (such as illustrated). Sliding aluminum or copper clad bottom pans on soils. 13 For light to the cooktop. If soils remain, carefully scrape soils with a non-abrasive cloth or no -scratch pad, applying pressure as a cutting board or work surface in the kitchen. Plastic...
... a few drops of soils need be removed immediately after the cooktop has cooled using a non-abrasive plastic type no -scratch cleaning pad. Permanent damage (such as illustrated). Sliding aluminum or copper clad bottom pans on soils. 13 For light to the cooktop. If soils remain, carefully scrape soils with a non-abrasive cloth or no -scratch pad, applying pressure as a cutting board or work surface in the kitchen. Plastic...
Use and Care Guide
Page 14
... dry may permanently damage cooktop by breaking, fusing to, or marking it more difficult to your health, and can be taken when aluminum pots or pans are equipped with stainless steel exterior parts. Do not use commercial oven cleaners on the control area of the cooktop. General Care & Cleaning Do not use the following on a hot cooktop. Fig. 26 DO NOT use a cooktop cleaner on the ceramic cooktop (Soo Fig. 26...
... dry may permanently damage cooktop by breaking, fusing to, or marking it more difficult to your health, and can be taken when aluminum pots or pans are equipped with stainless steel exterior parts. Do not use commercial oven cleaners on the control area of the cooktop. General Care & Cleaning Do not use the following on a hot cooktop. Fig. 26 DO NOT use a cooktop cleaner on the ceramic cooktop (Soo Fig. 26...
Use and Care Guide
Page 15
... back cover). Cooking Zone heats food too hot or Incorrect power level setting. Clean spills or remove r object. Use heavier quality cookware so foods being used . tt may burn more evenly. 15 Service wiring is obtained. Call your local electric companyfor service. Fluids spilled or object lying on cooktop surface (See Figs. 19 & 20). No power to unlock the Cooktop (See p. 11 for guidance and adjust accordingly. Make sure household electrical circuit breaker...
... back cover). Cooking Zone heats food too hot or Incorrect power level setting. Clean spills or remove r object. Use heavier quality cookware so foods being used . tt may burn more evenly. 15 Service wiring is obtained. Call your local electric companyfor service. Fluids spilled or object lying on cooktop surface (See Figs. 19 & 20). No power to unlock the Cooktop (See p. 11 for guidance and adjust accordingly. Make sure household electrical circuit breaker...
Use and Care Guide
Page 16
... (See back cover). Cookware has been removed from food and/or water. Metal marks on ceramic cooktop surface Sliding or scraping of discoloration with clean, dry bottoms. For more information See "Cooktop Cleaning and Maintenance" in the General Care & Cleaning section. 16 Remove using a ceramic-glass cooktop cleaning creme. Use a razor blade scraper to remove the marks. Refer to reset Cooktop main controls. Try turning electrical power supply OFF and back ON to cooktop in the General Care & Cleaning section...
... (See back cover). Cookware has been removed from food and/or water. Metal marks on ceramic cooktop surface Sliding or scraping of discoloration with clean, dry bottoms. For more information See "Cooktop Cleaning and Maintenance" in the General Care & Cleaning section. 16 Remove using a ceramic-glass cooktop cleaning creme. Use a razor blade scraper to remove the marks. Refer to reset Cooktop main controls. Try turning electrical power supply OFF and back ON to cooktop in the General Care & Cleaning section...

Use and Care Guide
Page 18
...replacement parts, accessories and owner'smanualsthatyouneedtodo-it-yourself. For Sears professional installation of home appliances and items like vacuums, lawn equipment, and electronics, call or go on a product serviced by Sears: 1=800-827-6655 (U.S.A.) 1-800-36t-6665 (Canada) Para pedir servicio de reparacidn a domicilio, y para ordenar piezas: Au Canada pour service...,oonee ent or maintenance agreement (Canada) on -line for the location of your home-of all major brand appliances, lawn and garden equipment, or heating and cooling systems, nomatterwhomadeit, nomatterwhosoldit...
...replacement parts, accessories and owner'smanualsthatyouneedtodo-it-yourself. For Sears professional installation of home appliances and items like vacuums, lawn equipment, and electronics, call or go on a product serviced by Sears: 1=800-827-6655 (U.S.A.) 1-800-36t-6665 (Canada) Para pedir servicio de reparacidn a domicilio, y para ordenar piezas: Au Canada pour service...,oonee ent or maintenance agreement (Canada) on -line for the location of your home-of all major brand appliances, lawn and garden equipment, or heating and cooling systems, nomatterwhomadeit, nomatterwhosoldit...


